BYD Atto 3: Mounting an original BYD dashcam DIY
I have driven my BYD Atto 3 from its purchase in November 2022 with a Garmin mini dashcam mounted in it, on the windshield just above right next to the interior mirror. That works fine, except you have a cable running that you have to get rid of and you have to use your phone app to view the footage.
According to the BYD dealer, it is not possible to retrofit the original BYD dashcam.
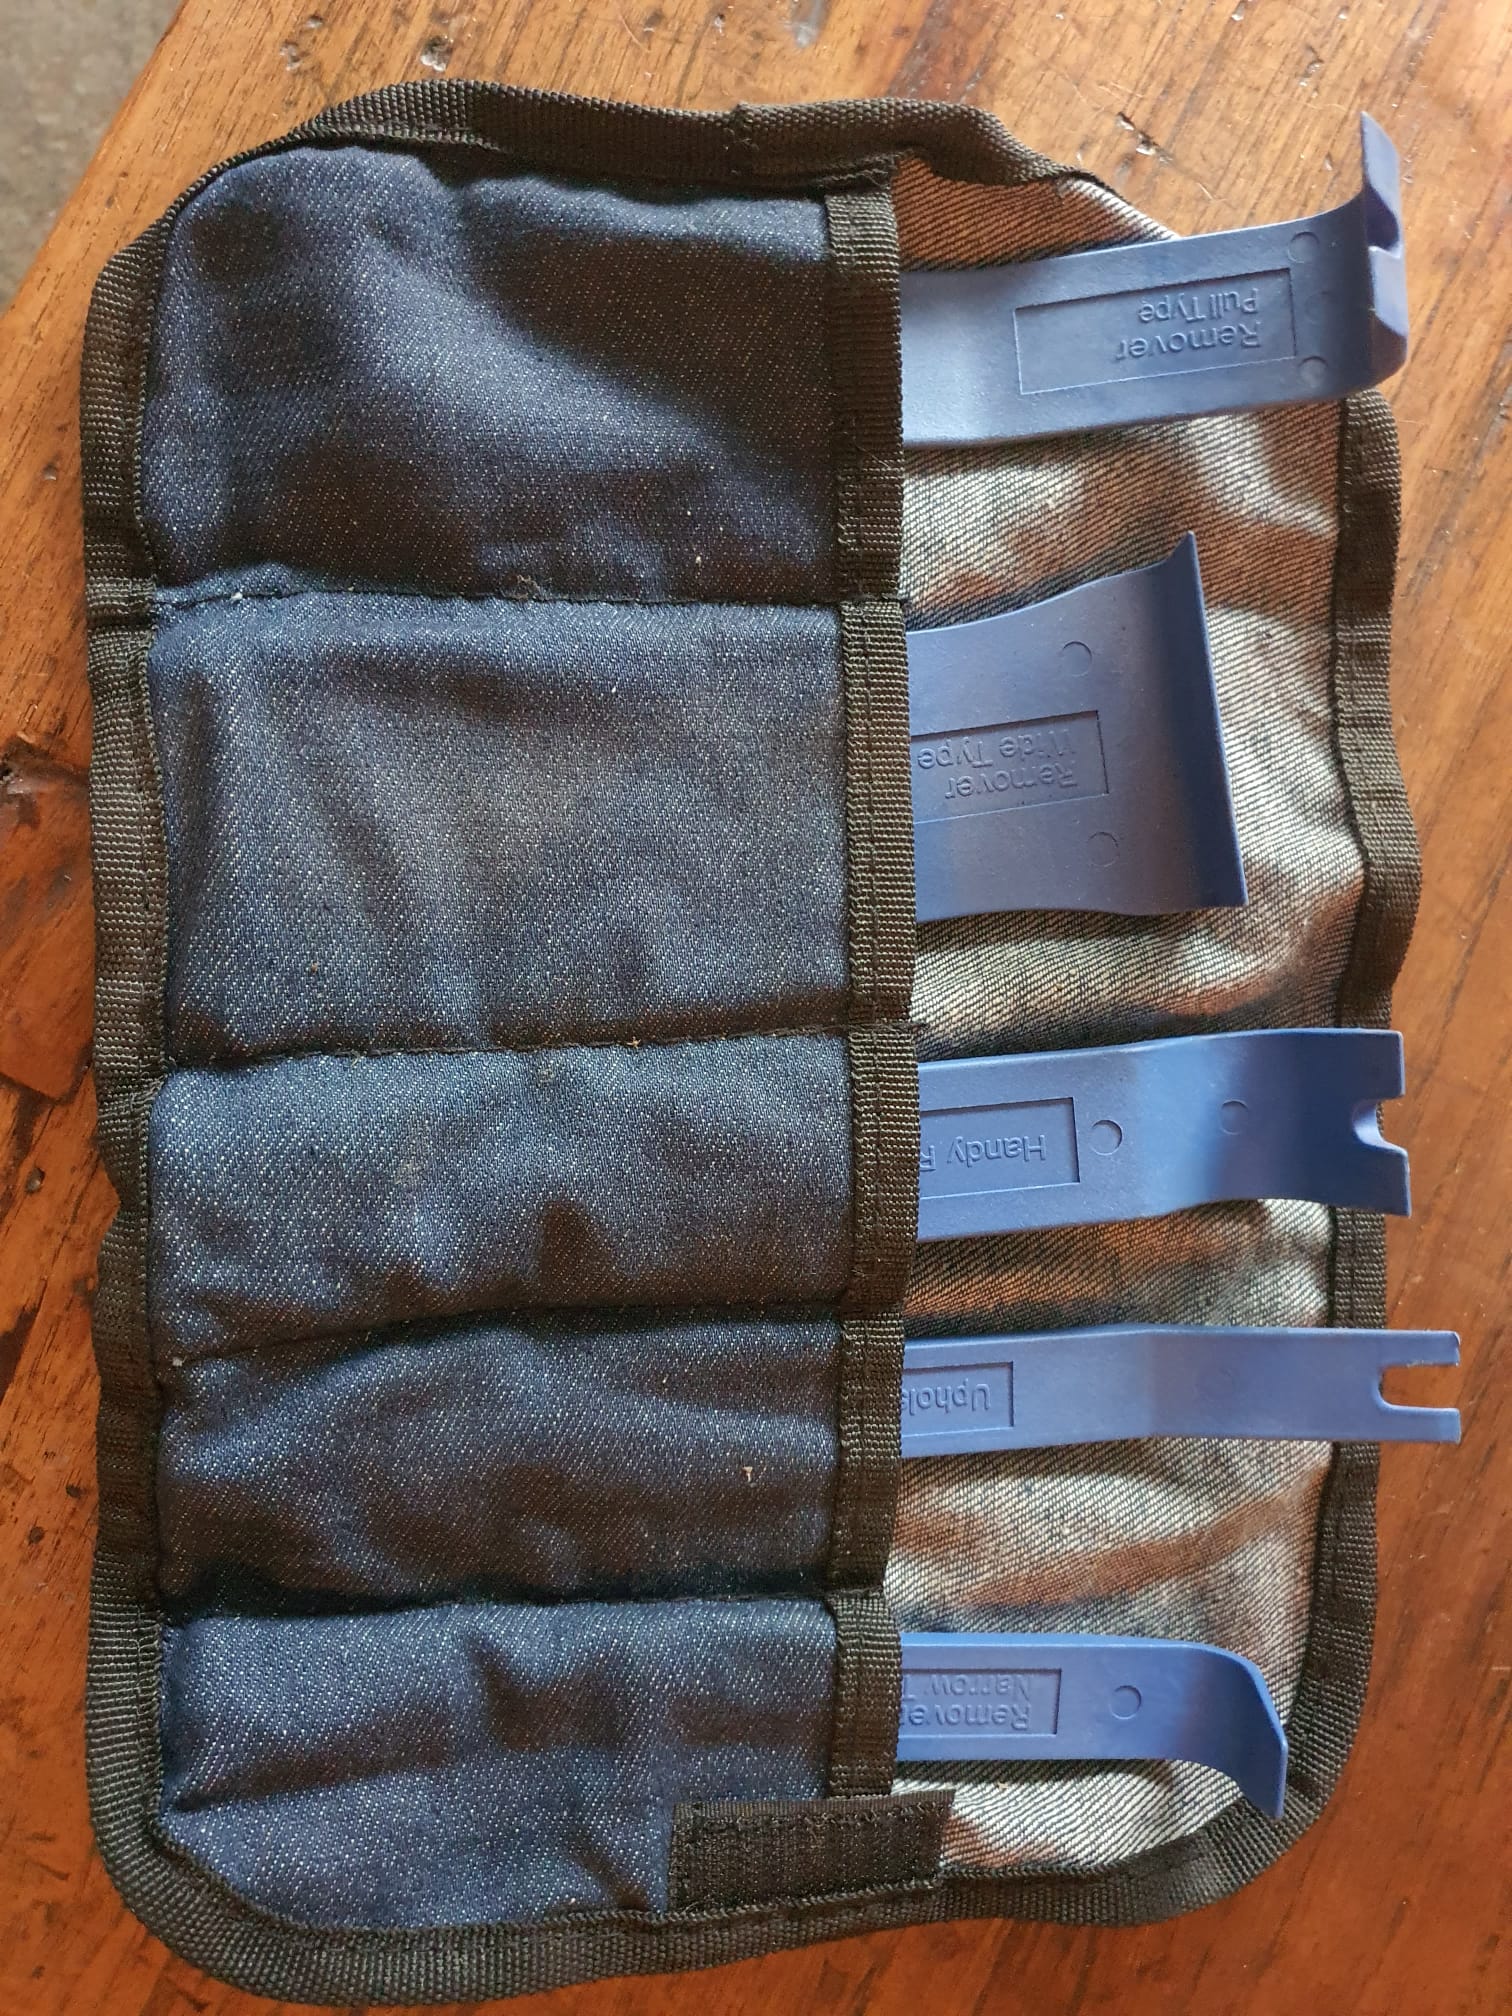
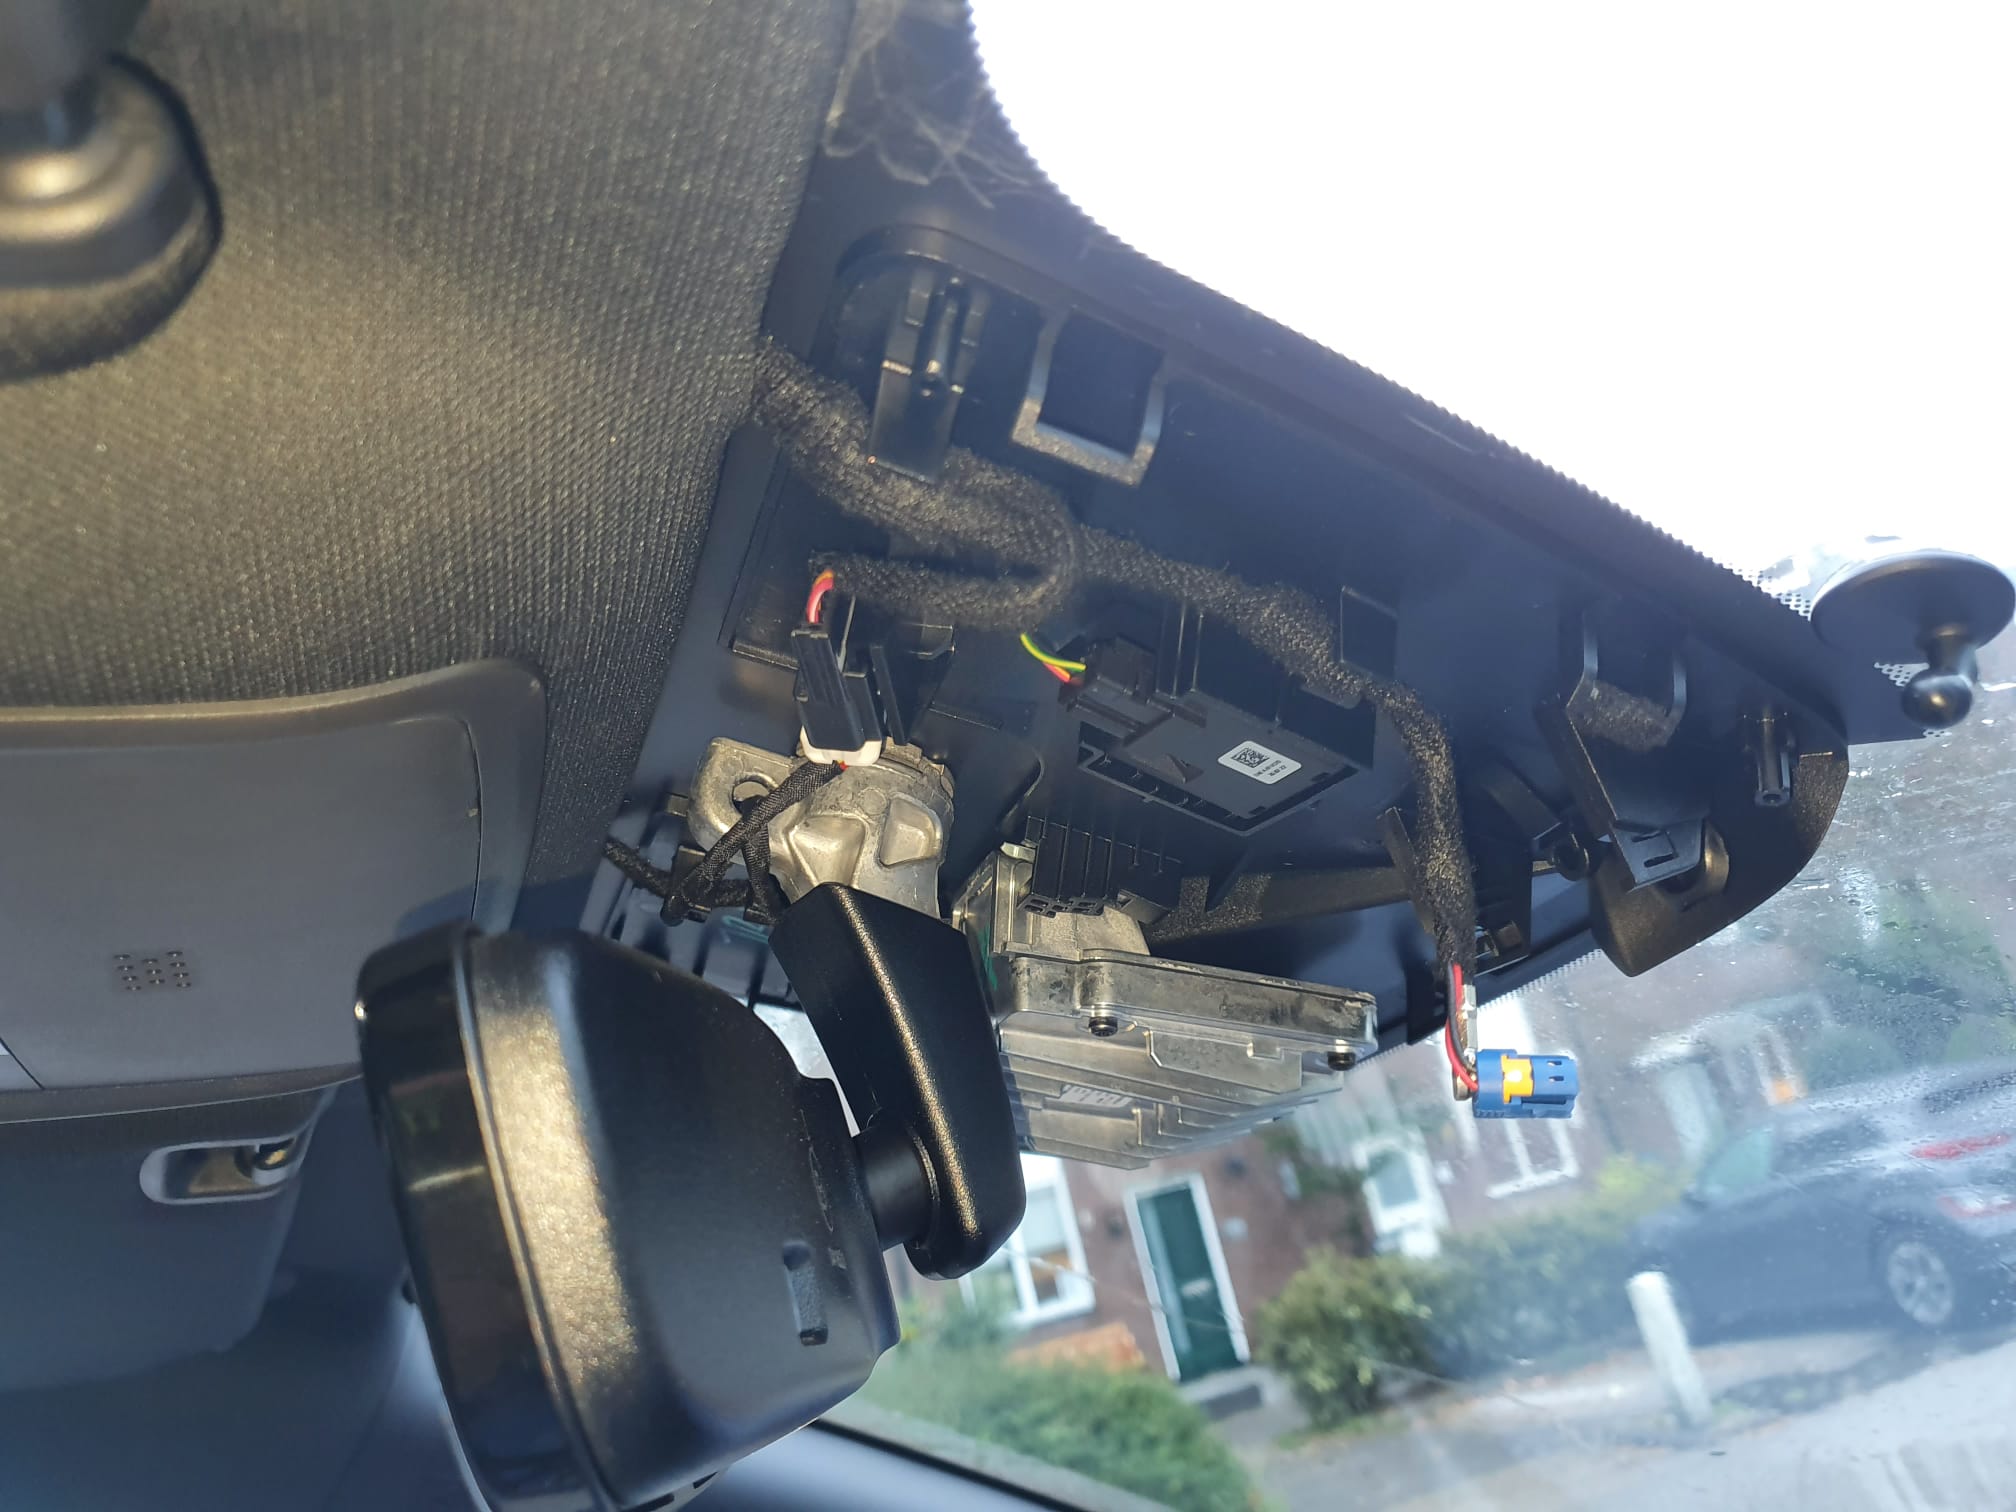
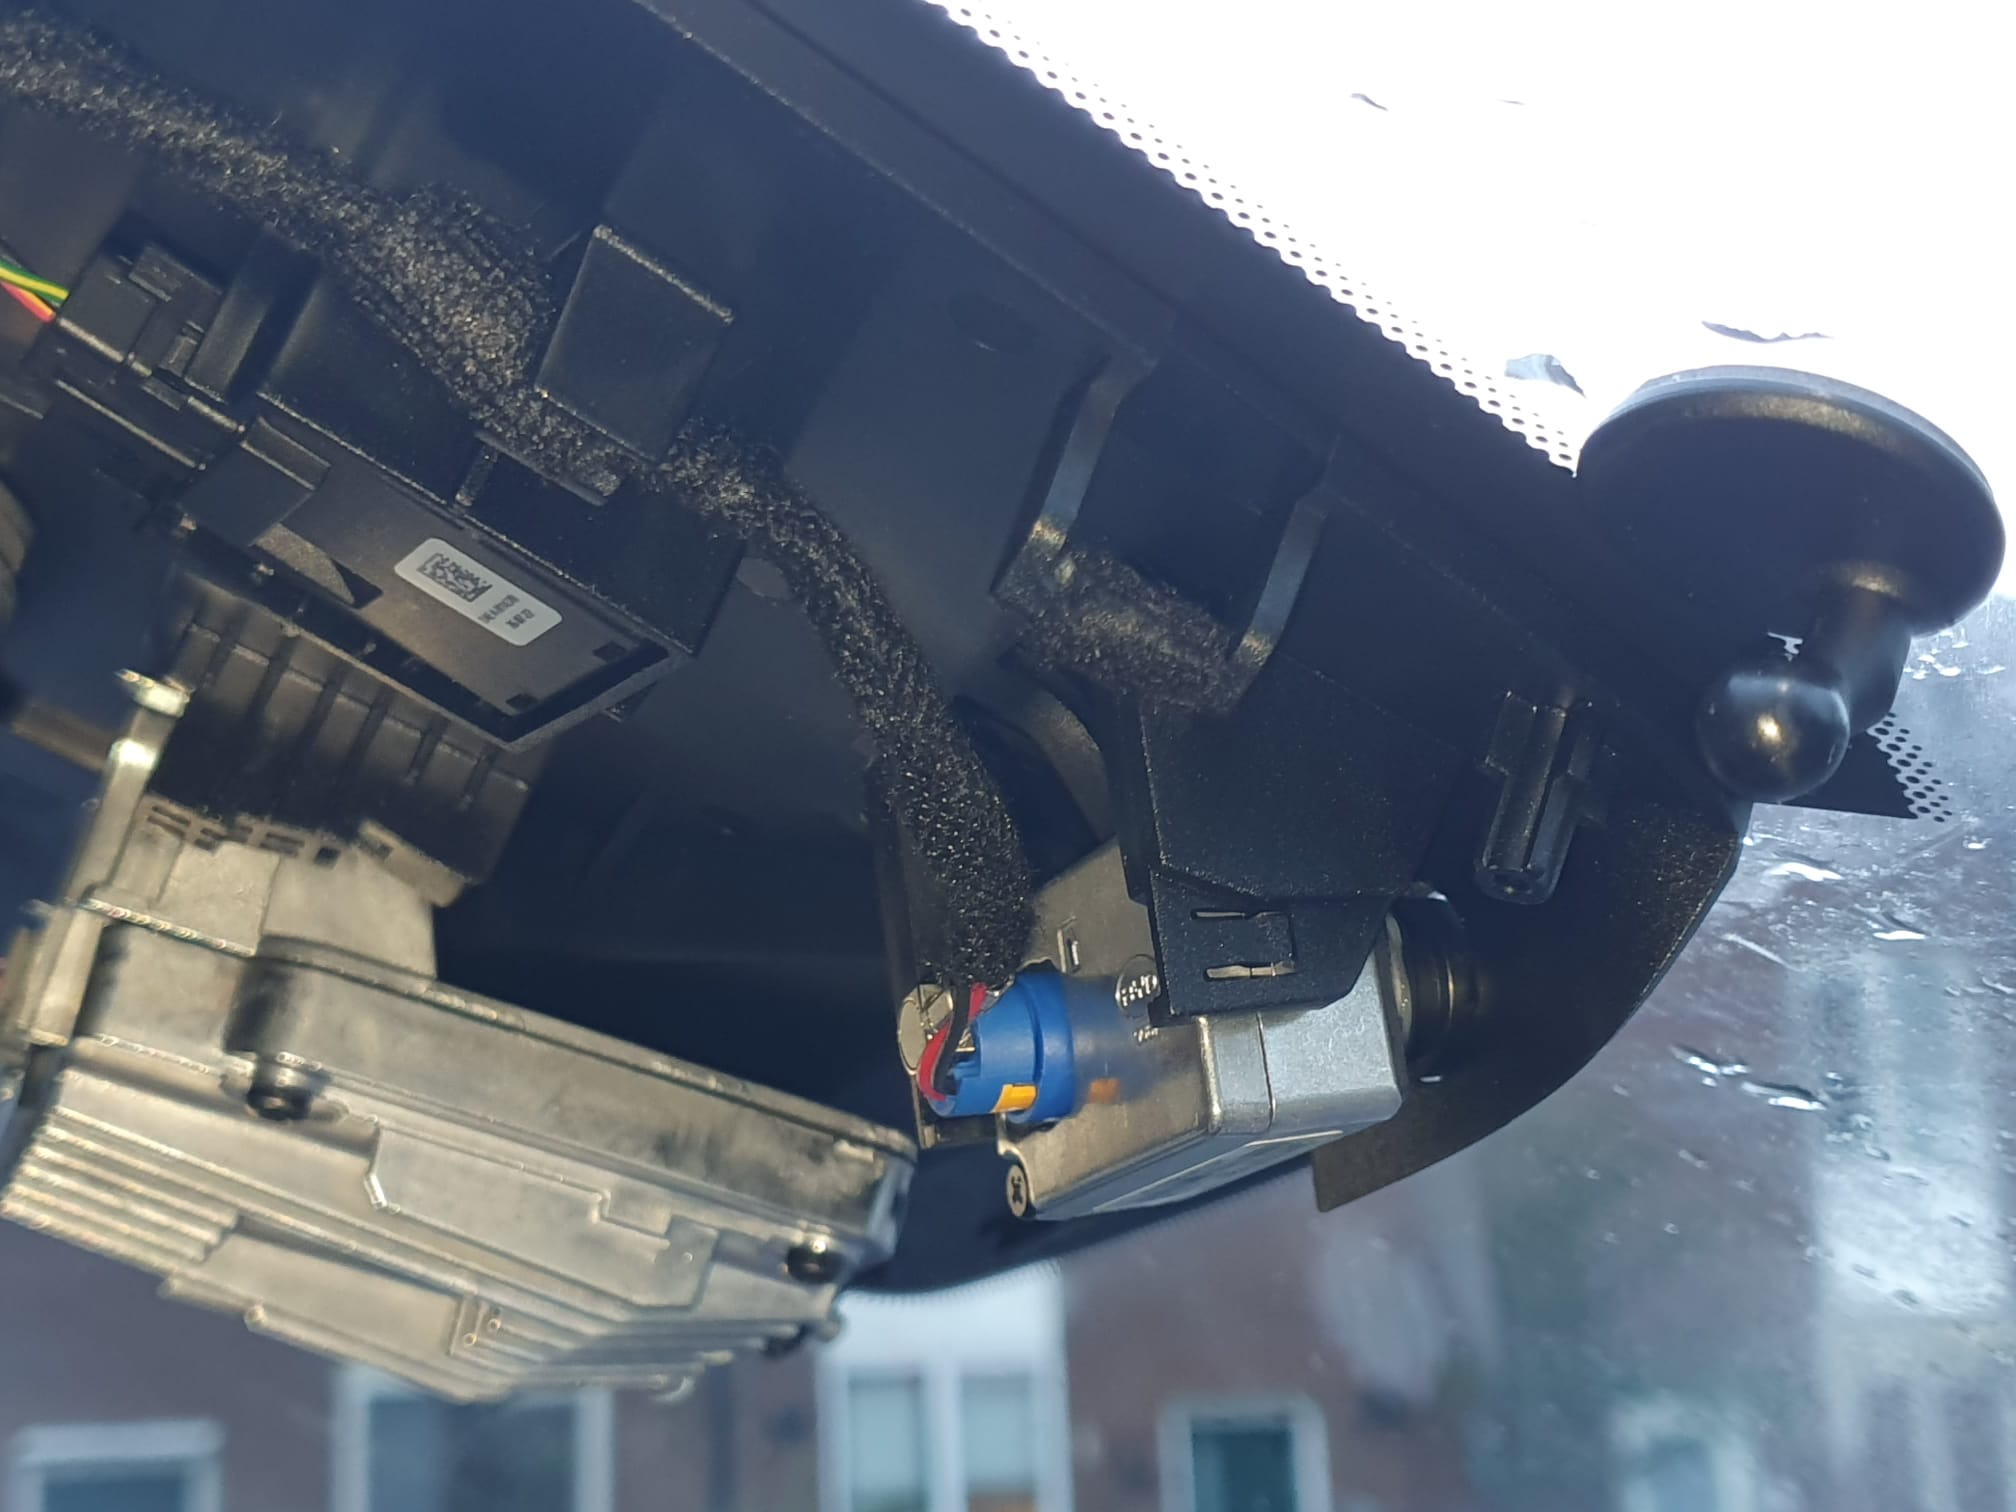
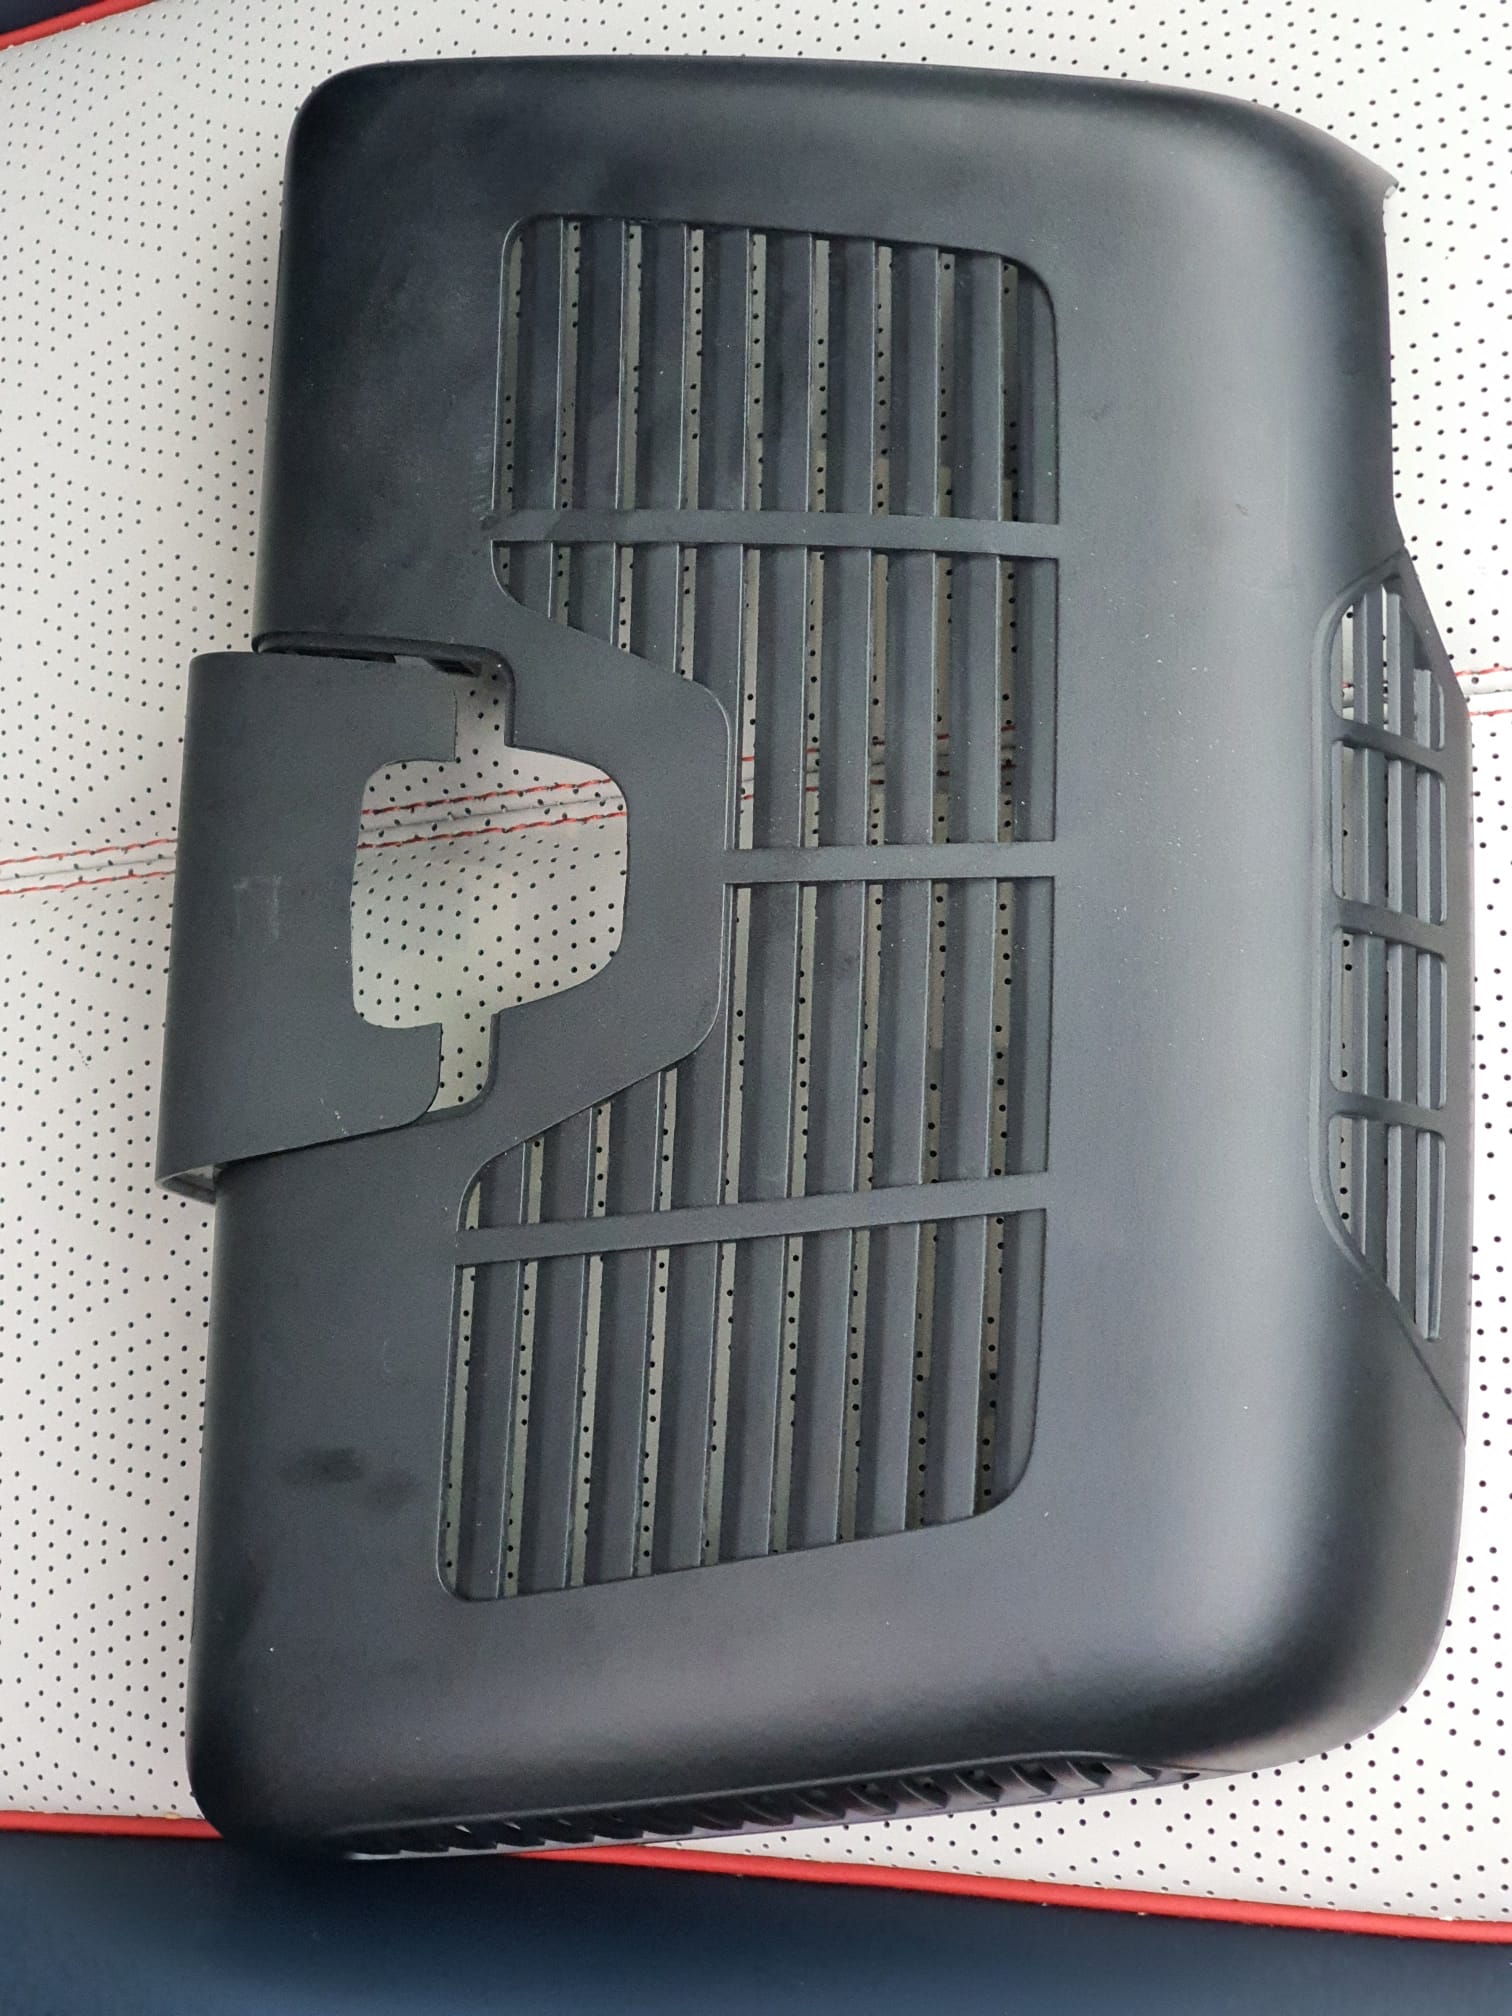
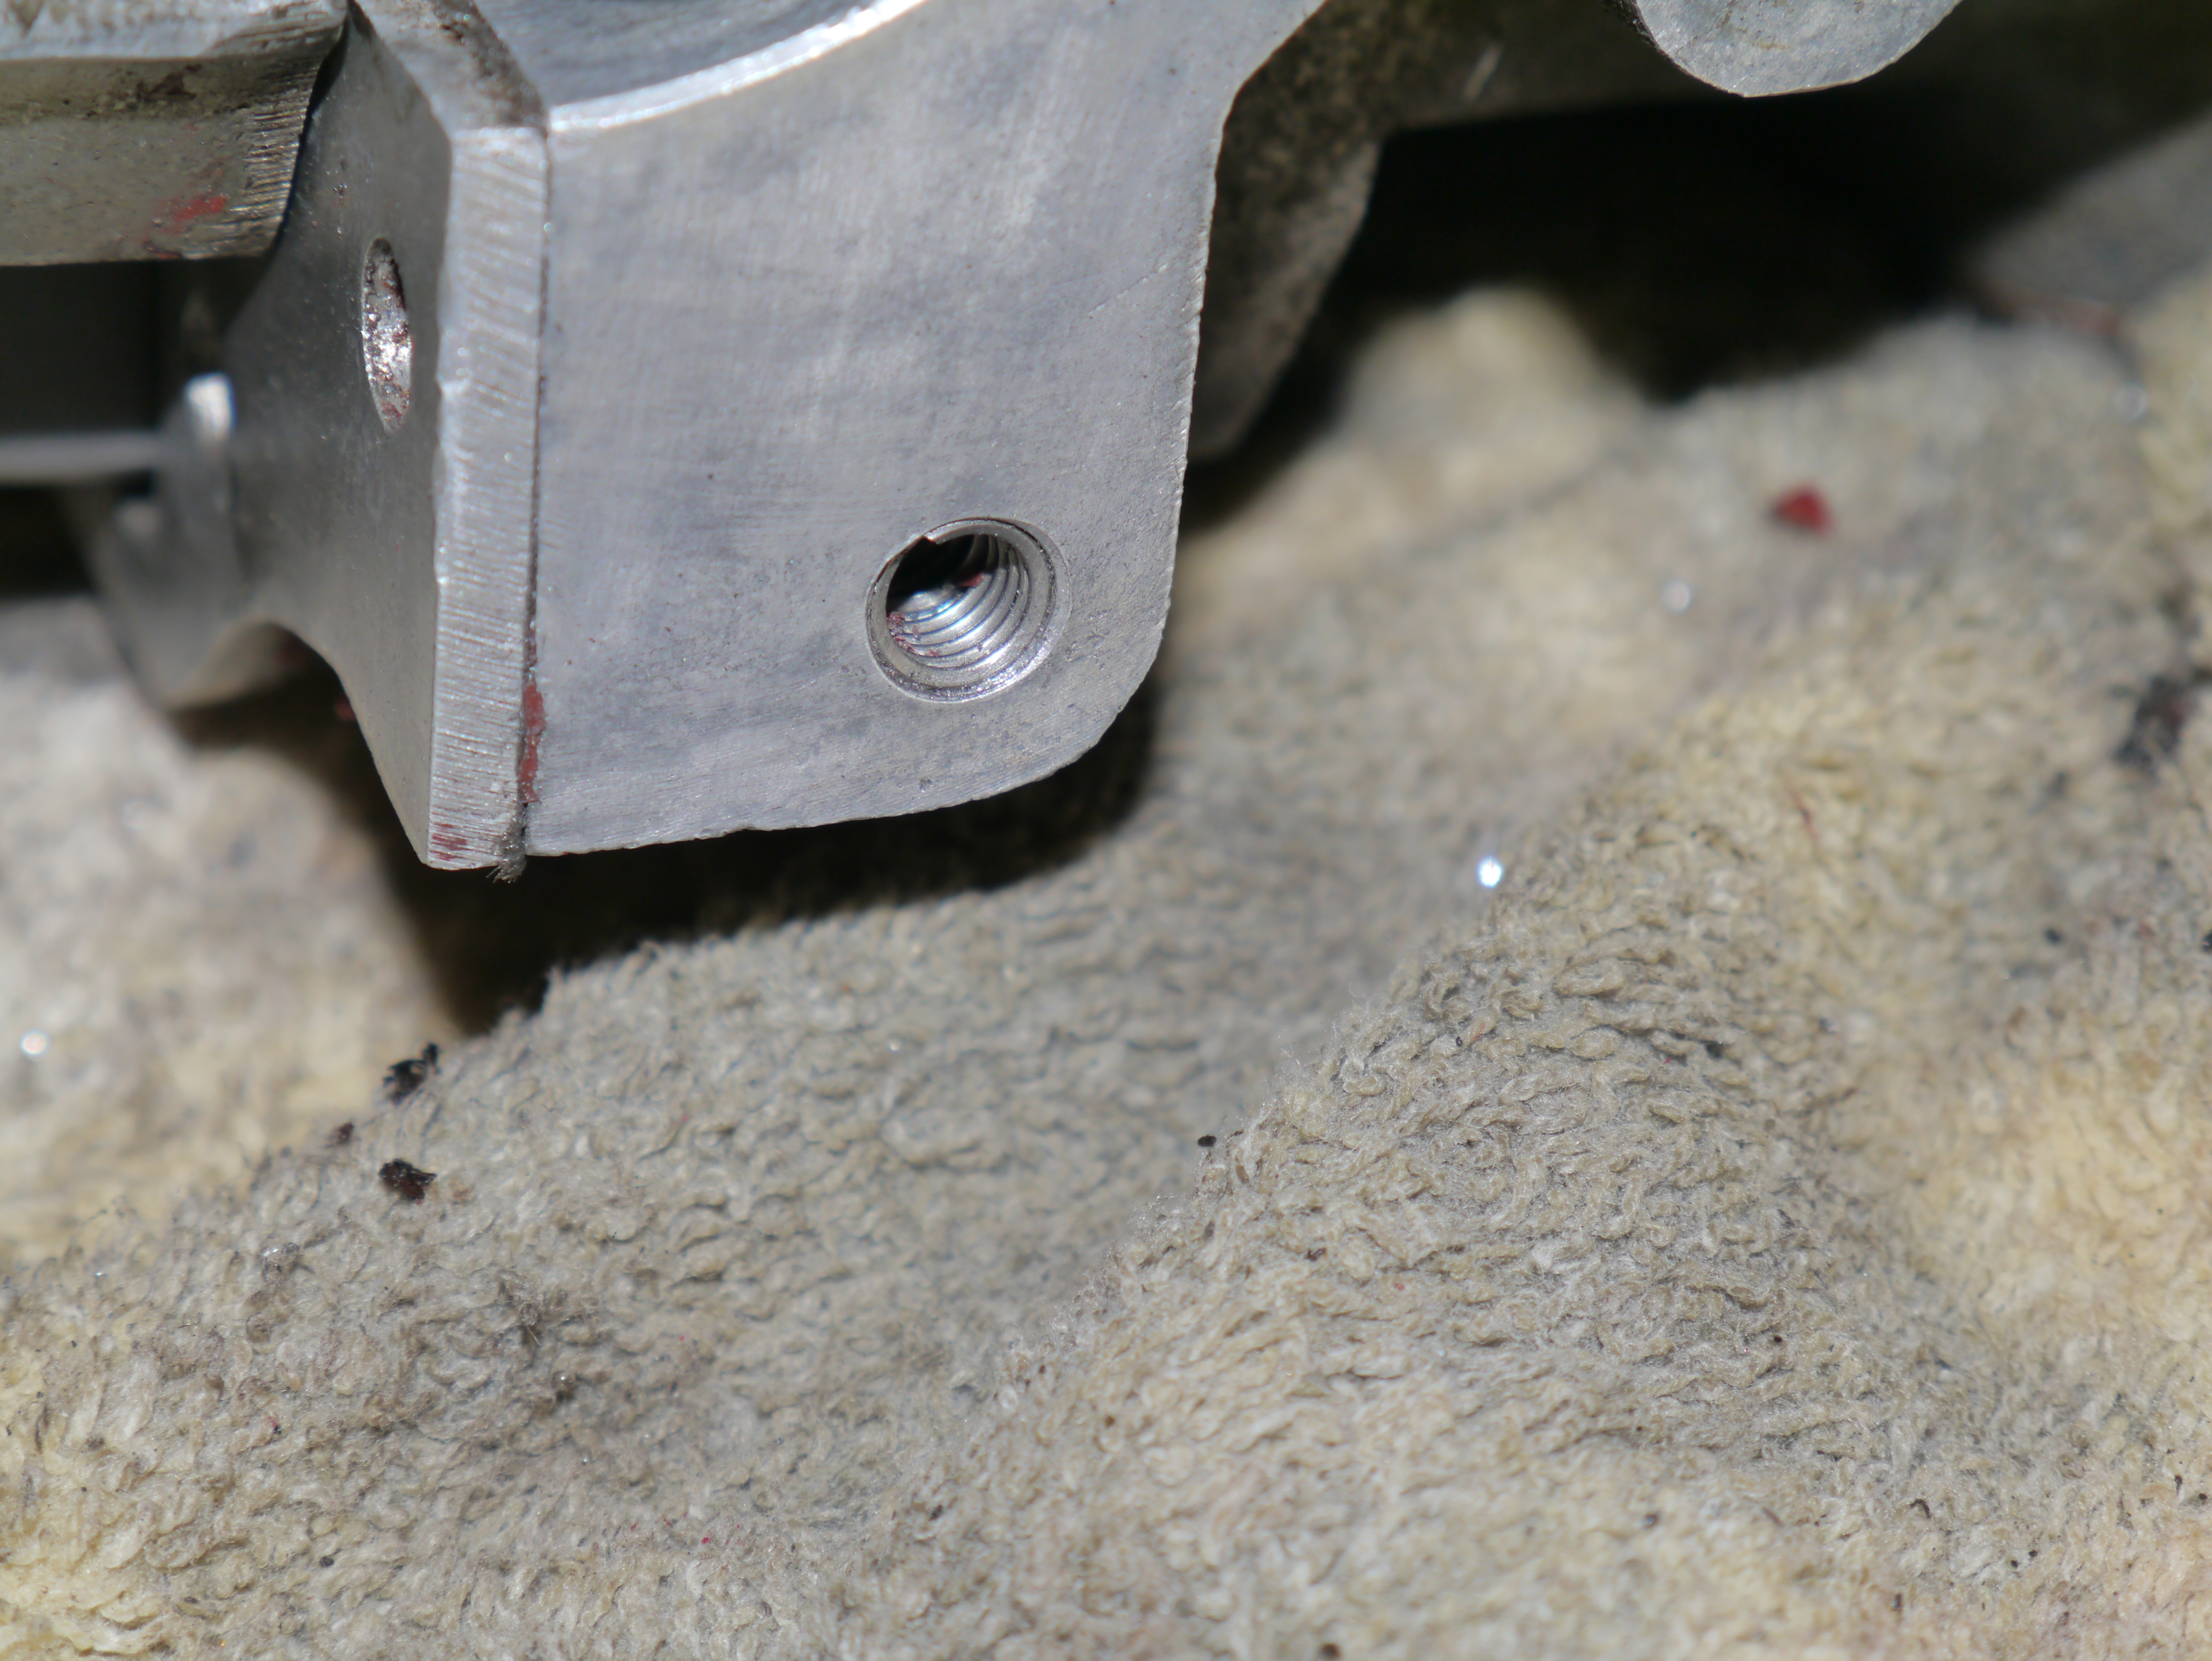
I removed the protective cover where the dashcam should go in, using appropriate tools for this purpose so as not to damage the plastic snap brackets.
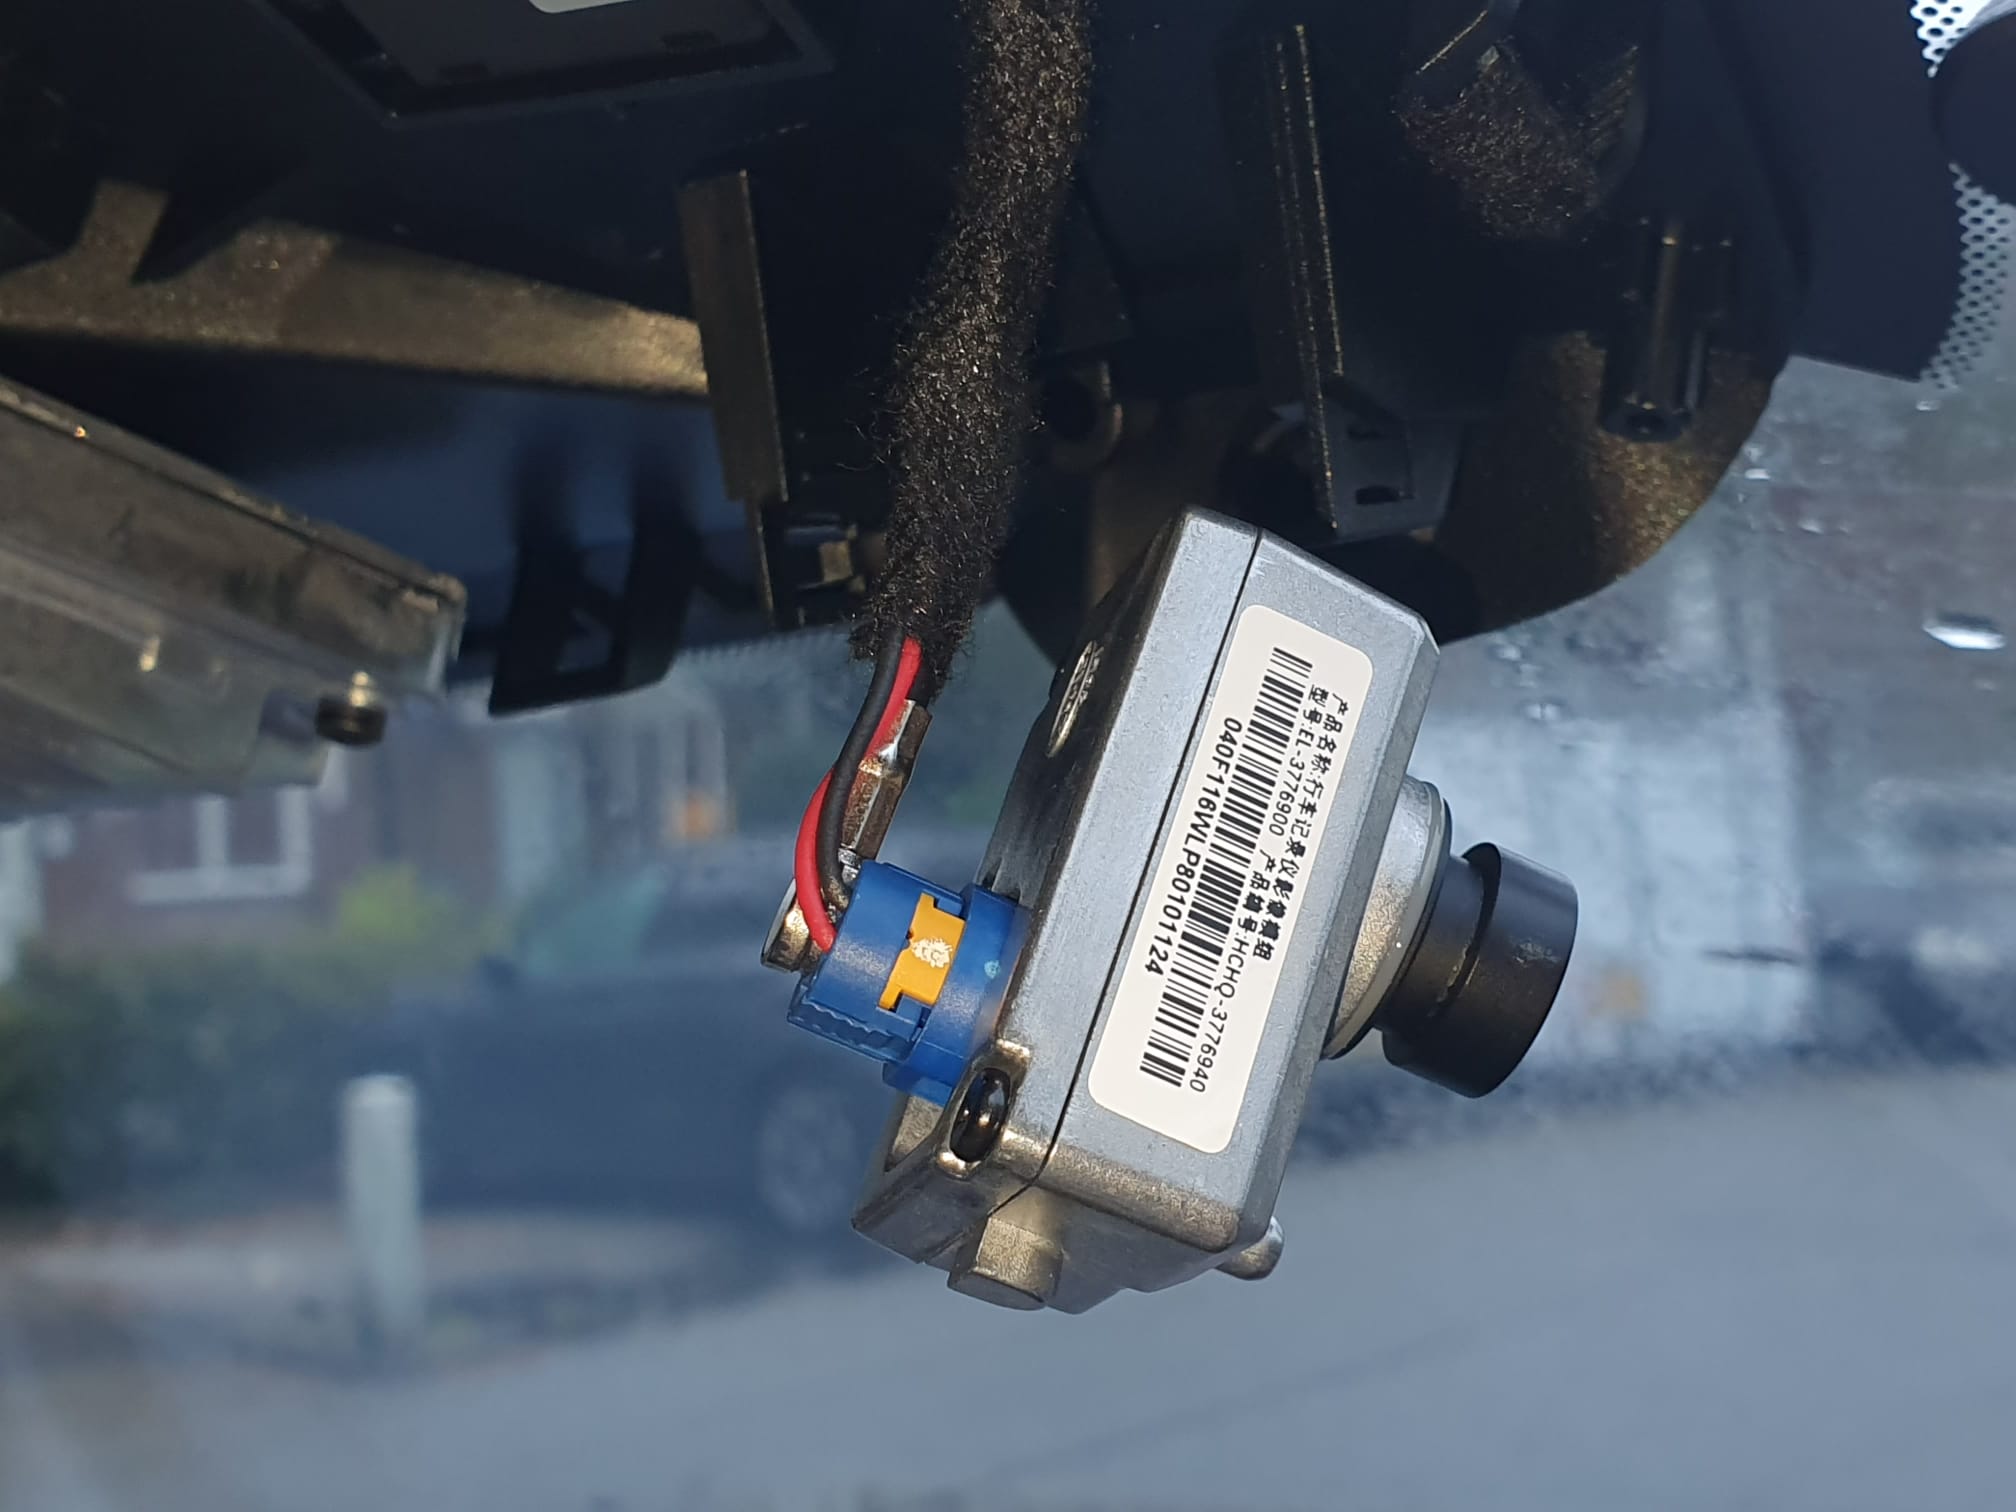
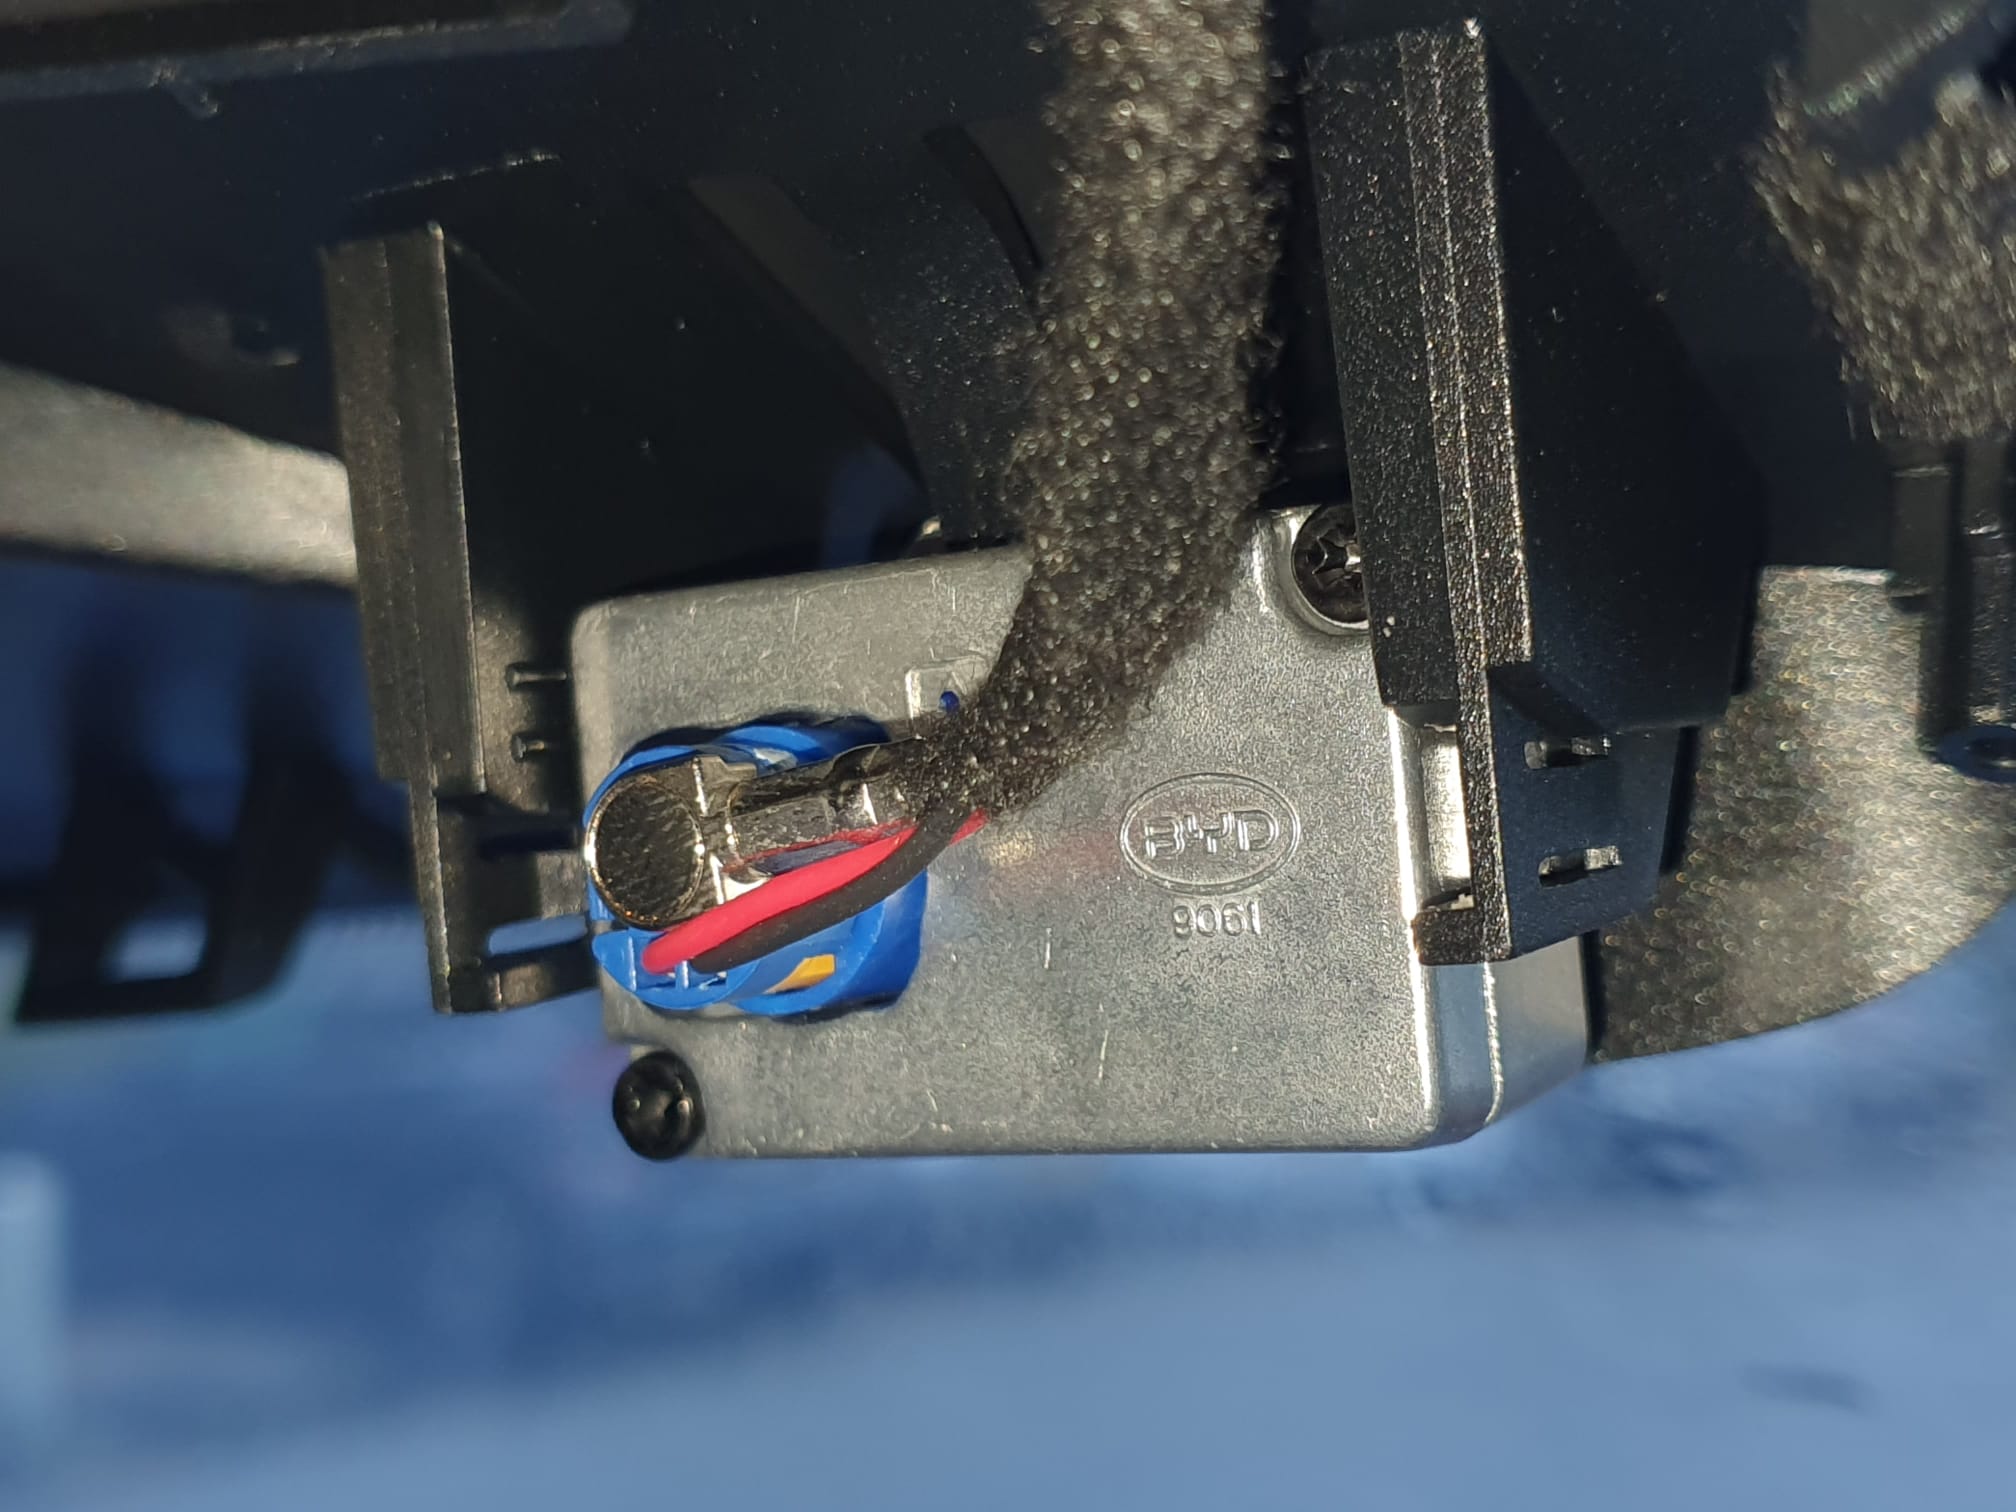
It then turned out that the cable for the dashcam is just neatly mounted there. On the right side of the picture below, you can just see the mounting foot of the Garmin mini dashcam. The blue loose connector with yellow area is the connector for the original BYD dashcam. Obviously, this is for a left-steered version but for a right-steered version the situation is just mirrored.
On Aliexpress I just came across the original BYD dashcam as a separate replacement unit, for about 83 Euro. So ordered it 2 weeks back and mounted it this morning.
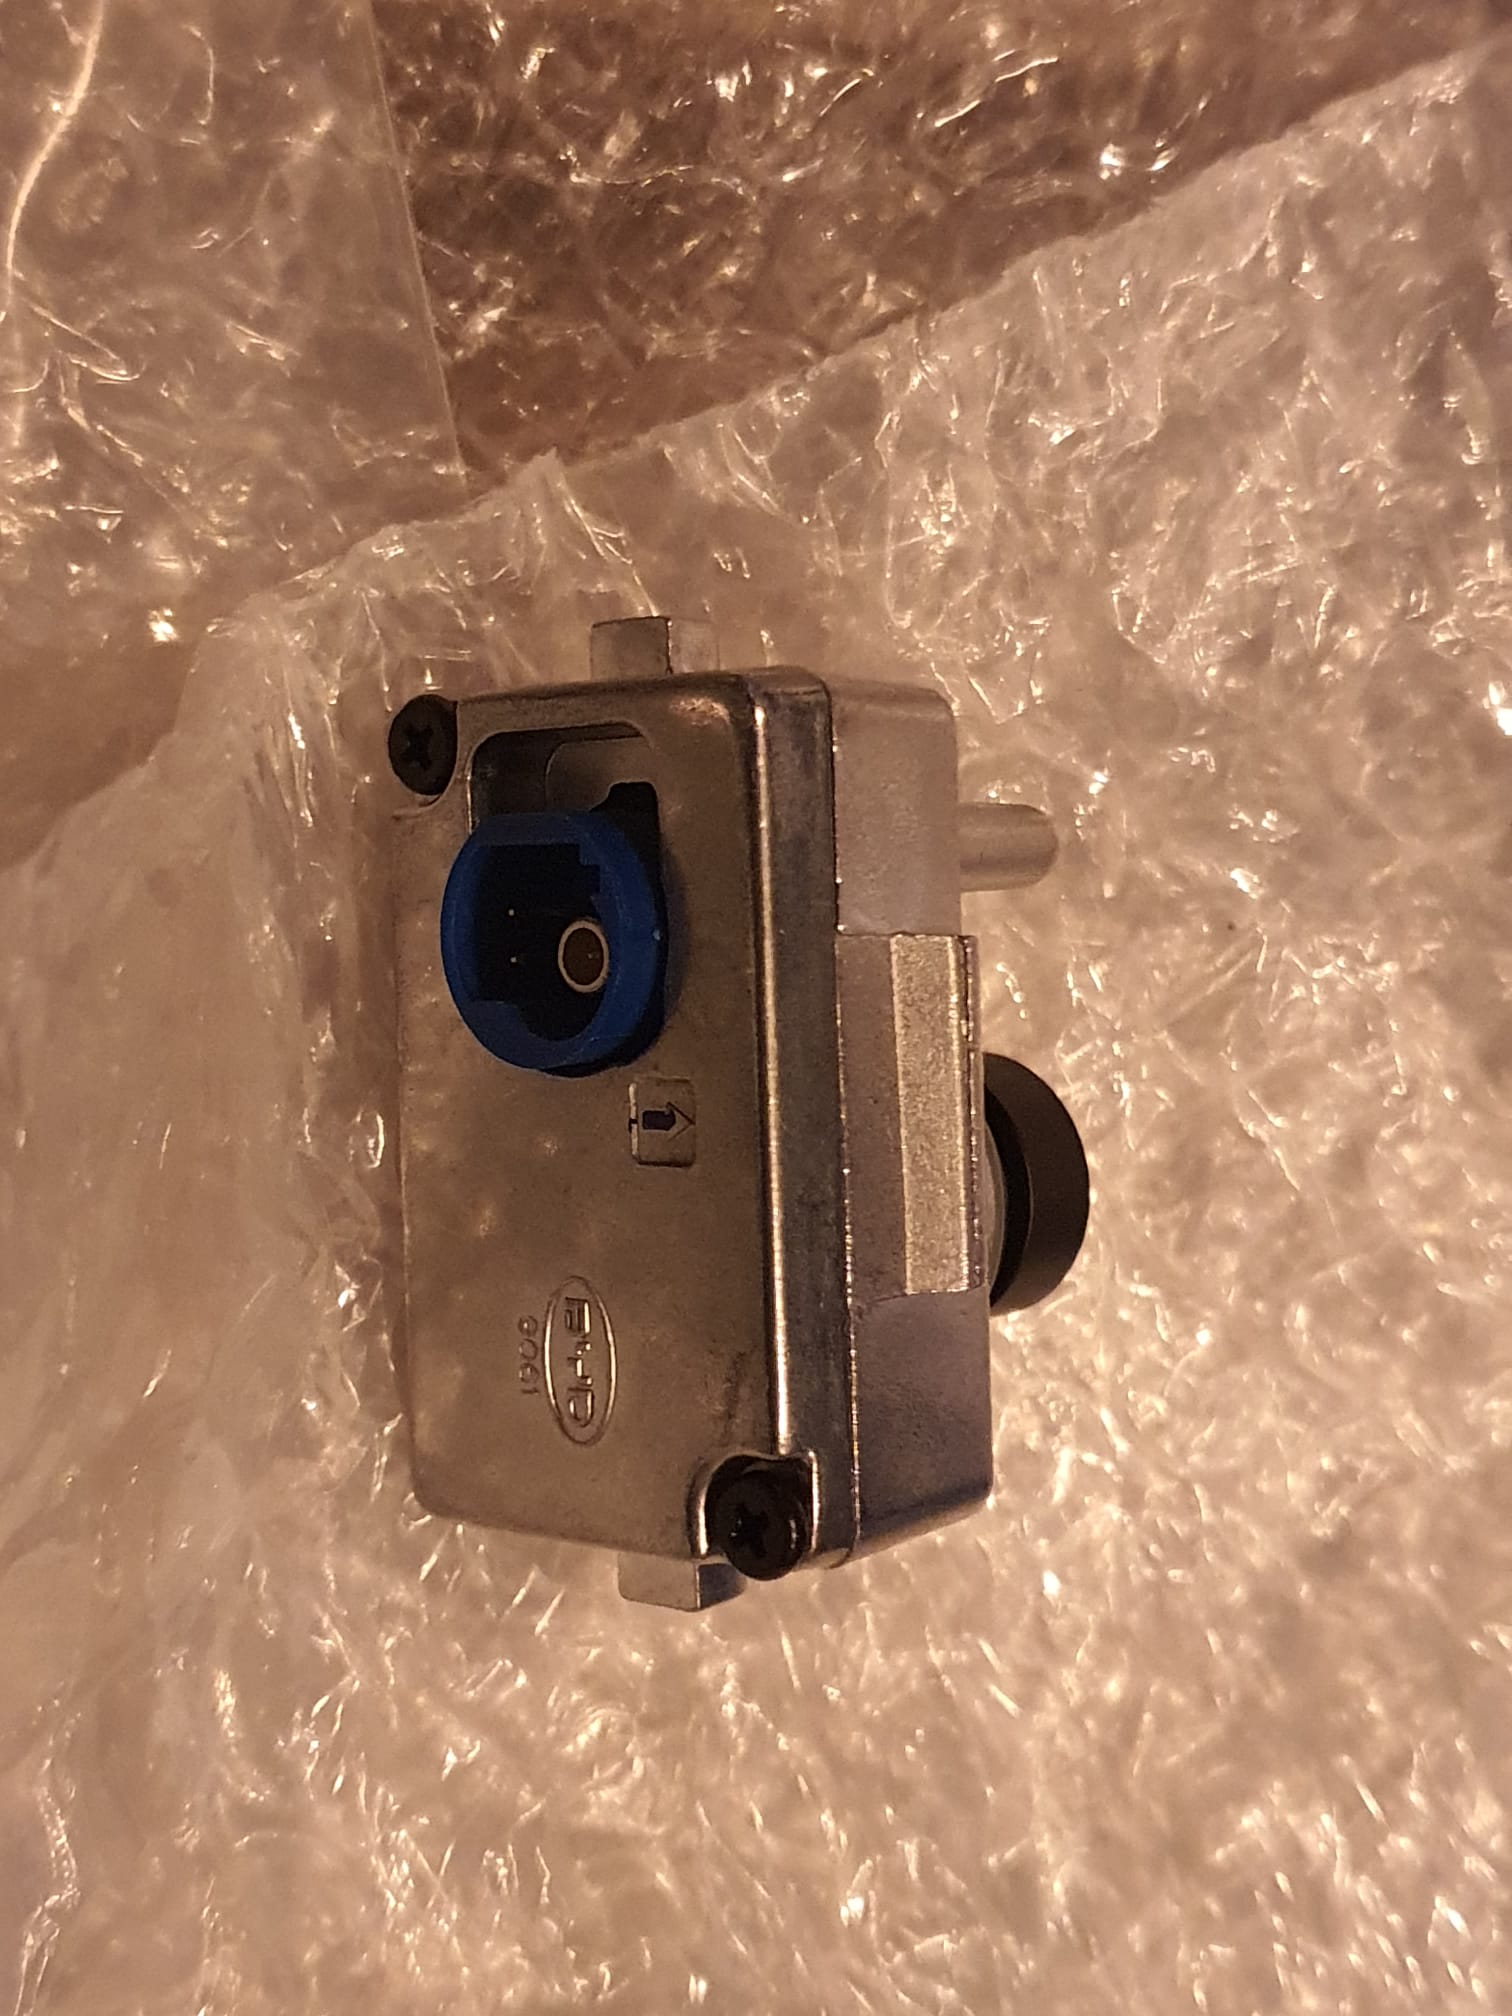
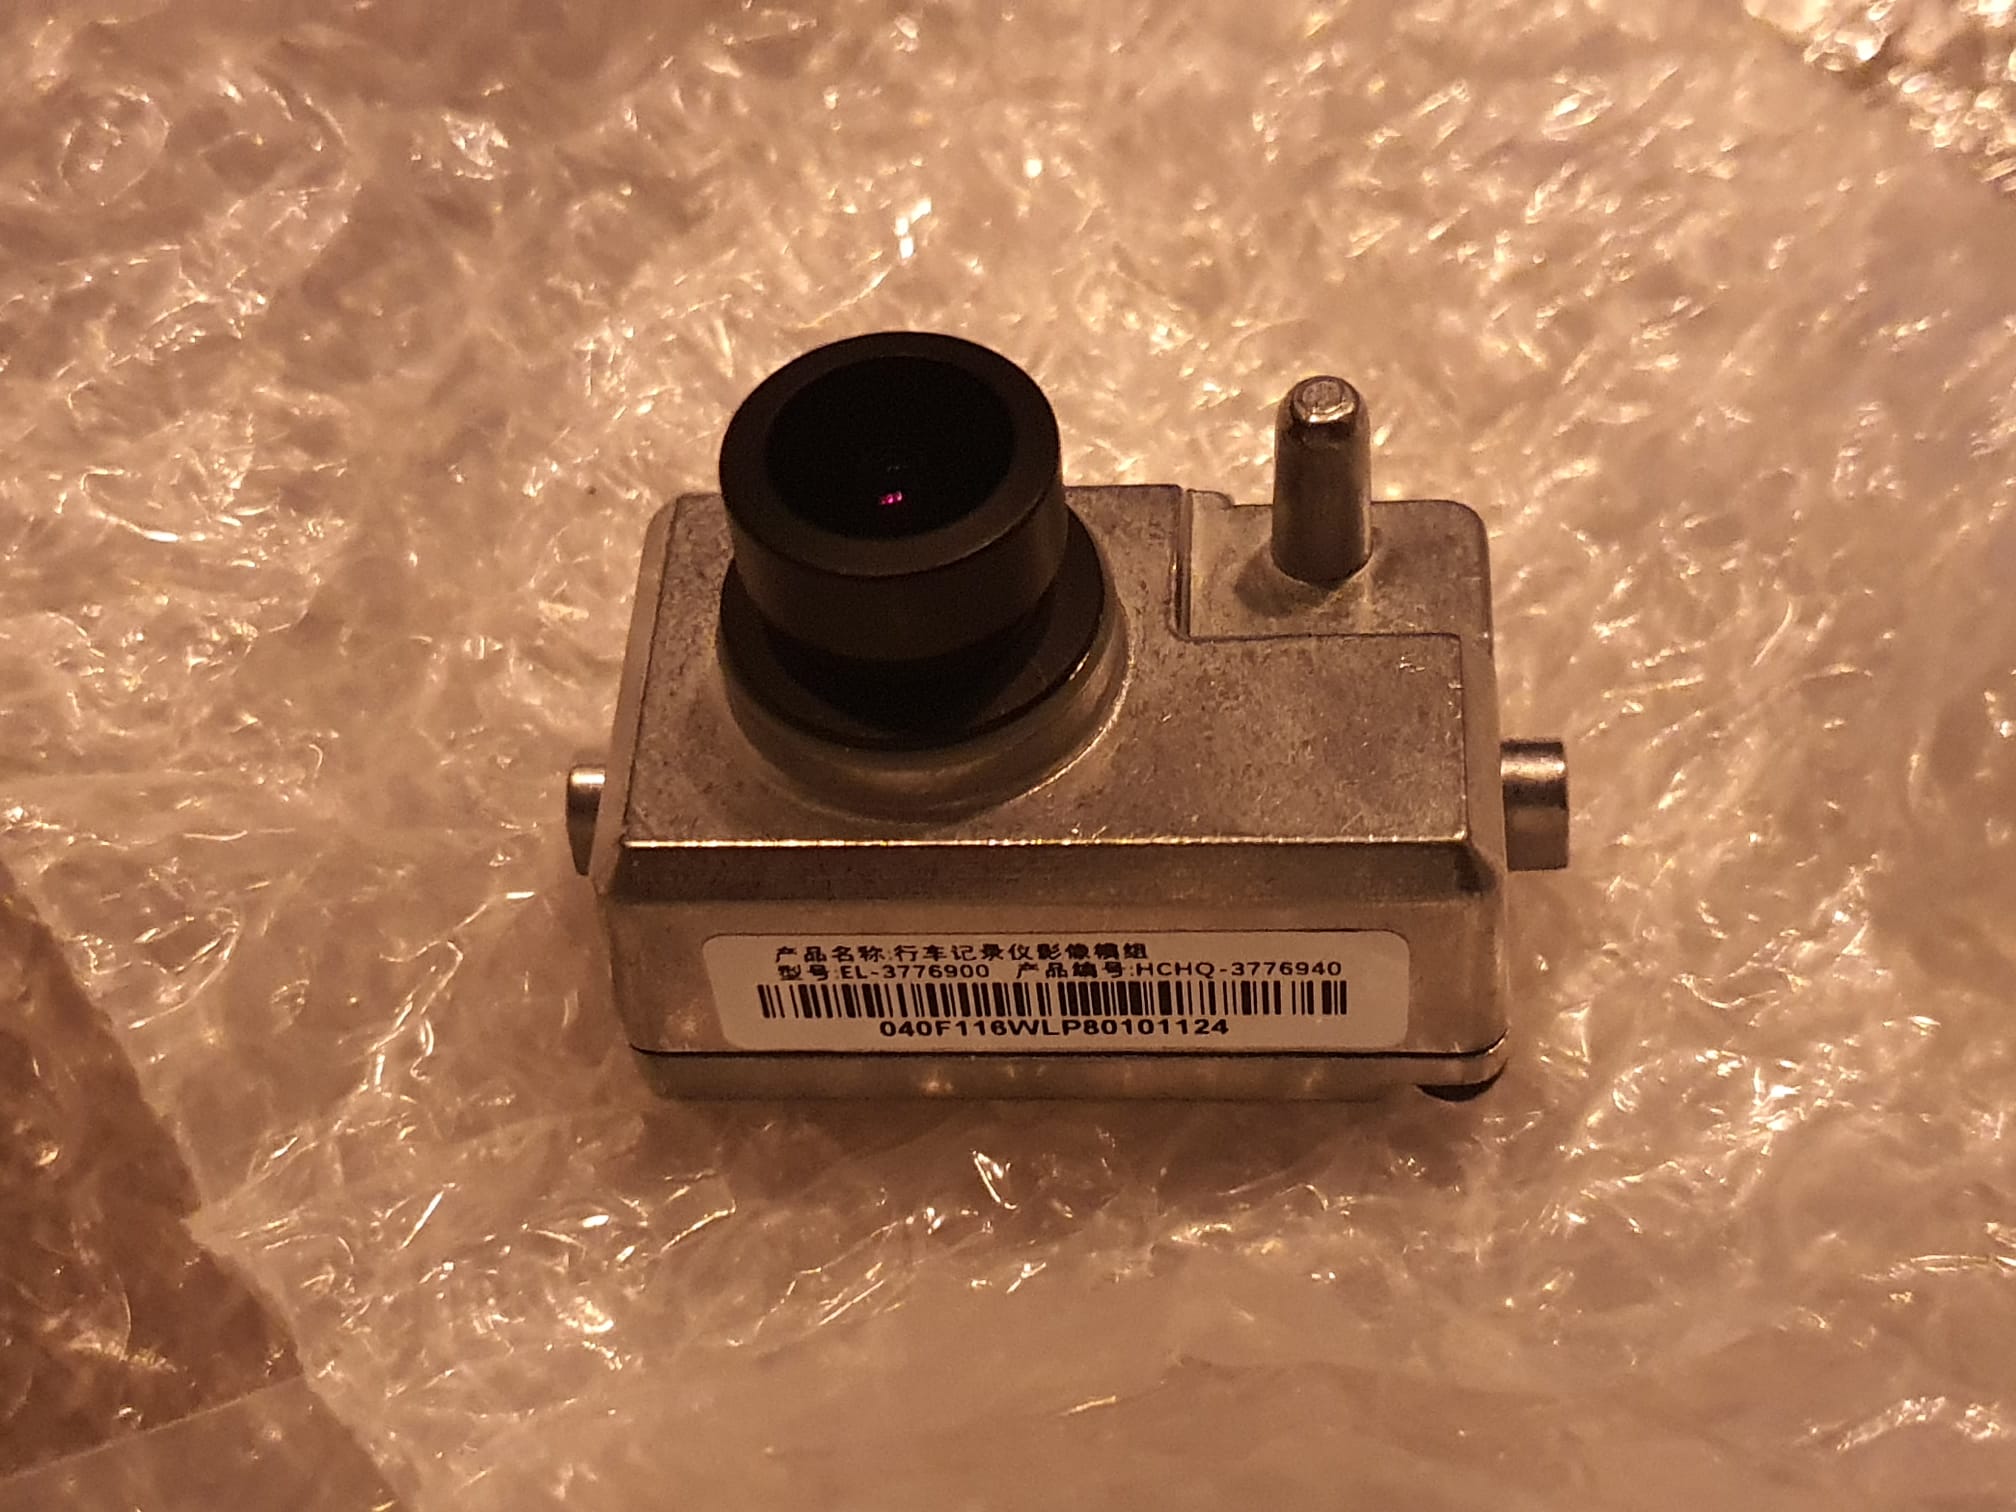
Mounting is very simple: First remove the rubber where the lens of the dashcam should come through .
Then click the cable into the camera, it is automatically secured. Look very carefully how to insert this plug! It is a combined plug with 2 contacts for the power supply and a coax video connector attached to each other so it only fits one way!
And click the camera in the right place in the holder.
And…guess what? It just works. I also simultaneously had the update of the car to V 1.4 underway, and after booting up, the car detected that a dashcam was present. And the app was activated right away, so the camera now functions integrated into the car!
I then mounted the protective cover and neatly removed the Garmin dashcam mounting sticker and cleaned the windshield. When reinstalling the protective cover, I placed the large part first. Then turned the mirror down under and inserted the small part into the large part. That took some very careful work…
.
The software is self-explanatory: you do need to insert a MicroSD card under the dash. I have a 128Gb MicroSD card in there and I formatted it to FAT32 via the car software’s camera app.
What you find after using the camera is a number of directories on the microSDcard. your files are in the DCIM folder, arranged by video and photo.
The app allows you to change a number of settings including the recording time per recorded clip. I always set that to the longest possible time, here it is 5 minutes. just like the Garmin.
You can watch live and then also take pictures. I have programmed a quick button on the steering wheel to allow the dashcam to take recordings when I feel it is important. Of course, the app always makes recordings anyway, which are kept for a short time because of the size of the storage on the MicroSDCard. when the card is full, the oldest recordings go off. But when you initiate a recording yourself then this recording is always saved on the MicroSDCard.
Programming the camera power button for protected (non-erasable) recordings) goes like this: You use the screen rotation button on the steering wheel for this purpose. Press this button for 5 seconds until the large LCD screen gives you the choice of what you want to connect to this button. So I chose video recording for this.
If you want to copy recordings, the easiest way is to copy them to a USB drive via the file manager app of the BYD software. just copy from MicroSDCard/DCIM/…. to USB/… paste like on your phone.
That’s it! Have fun with your dashcam in the BYD Atto 3.
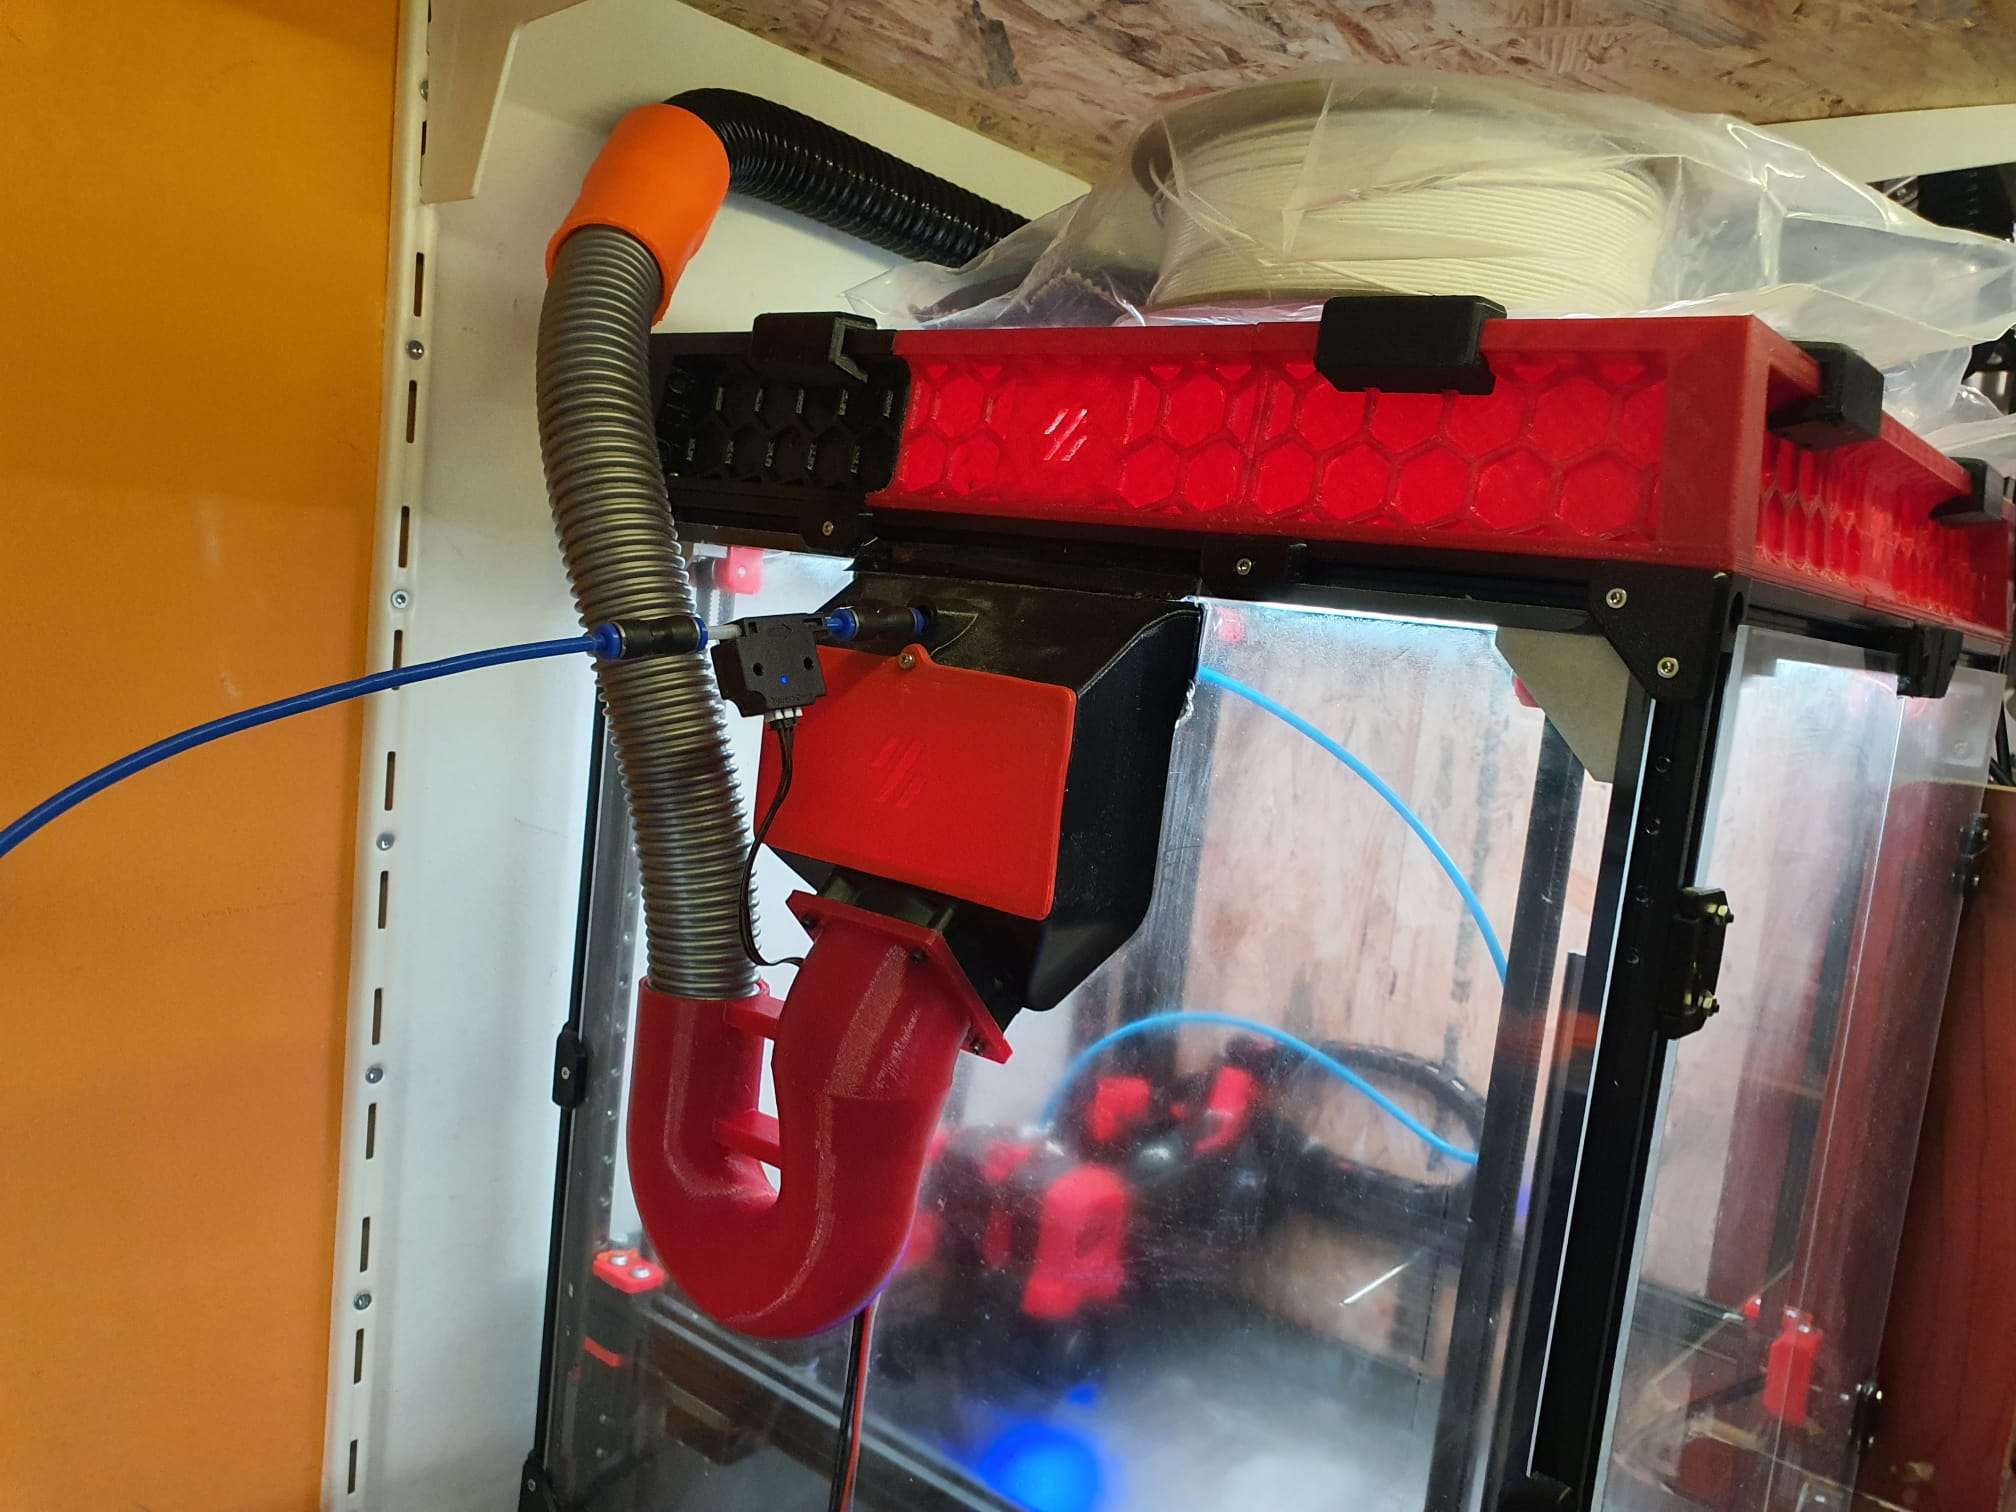
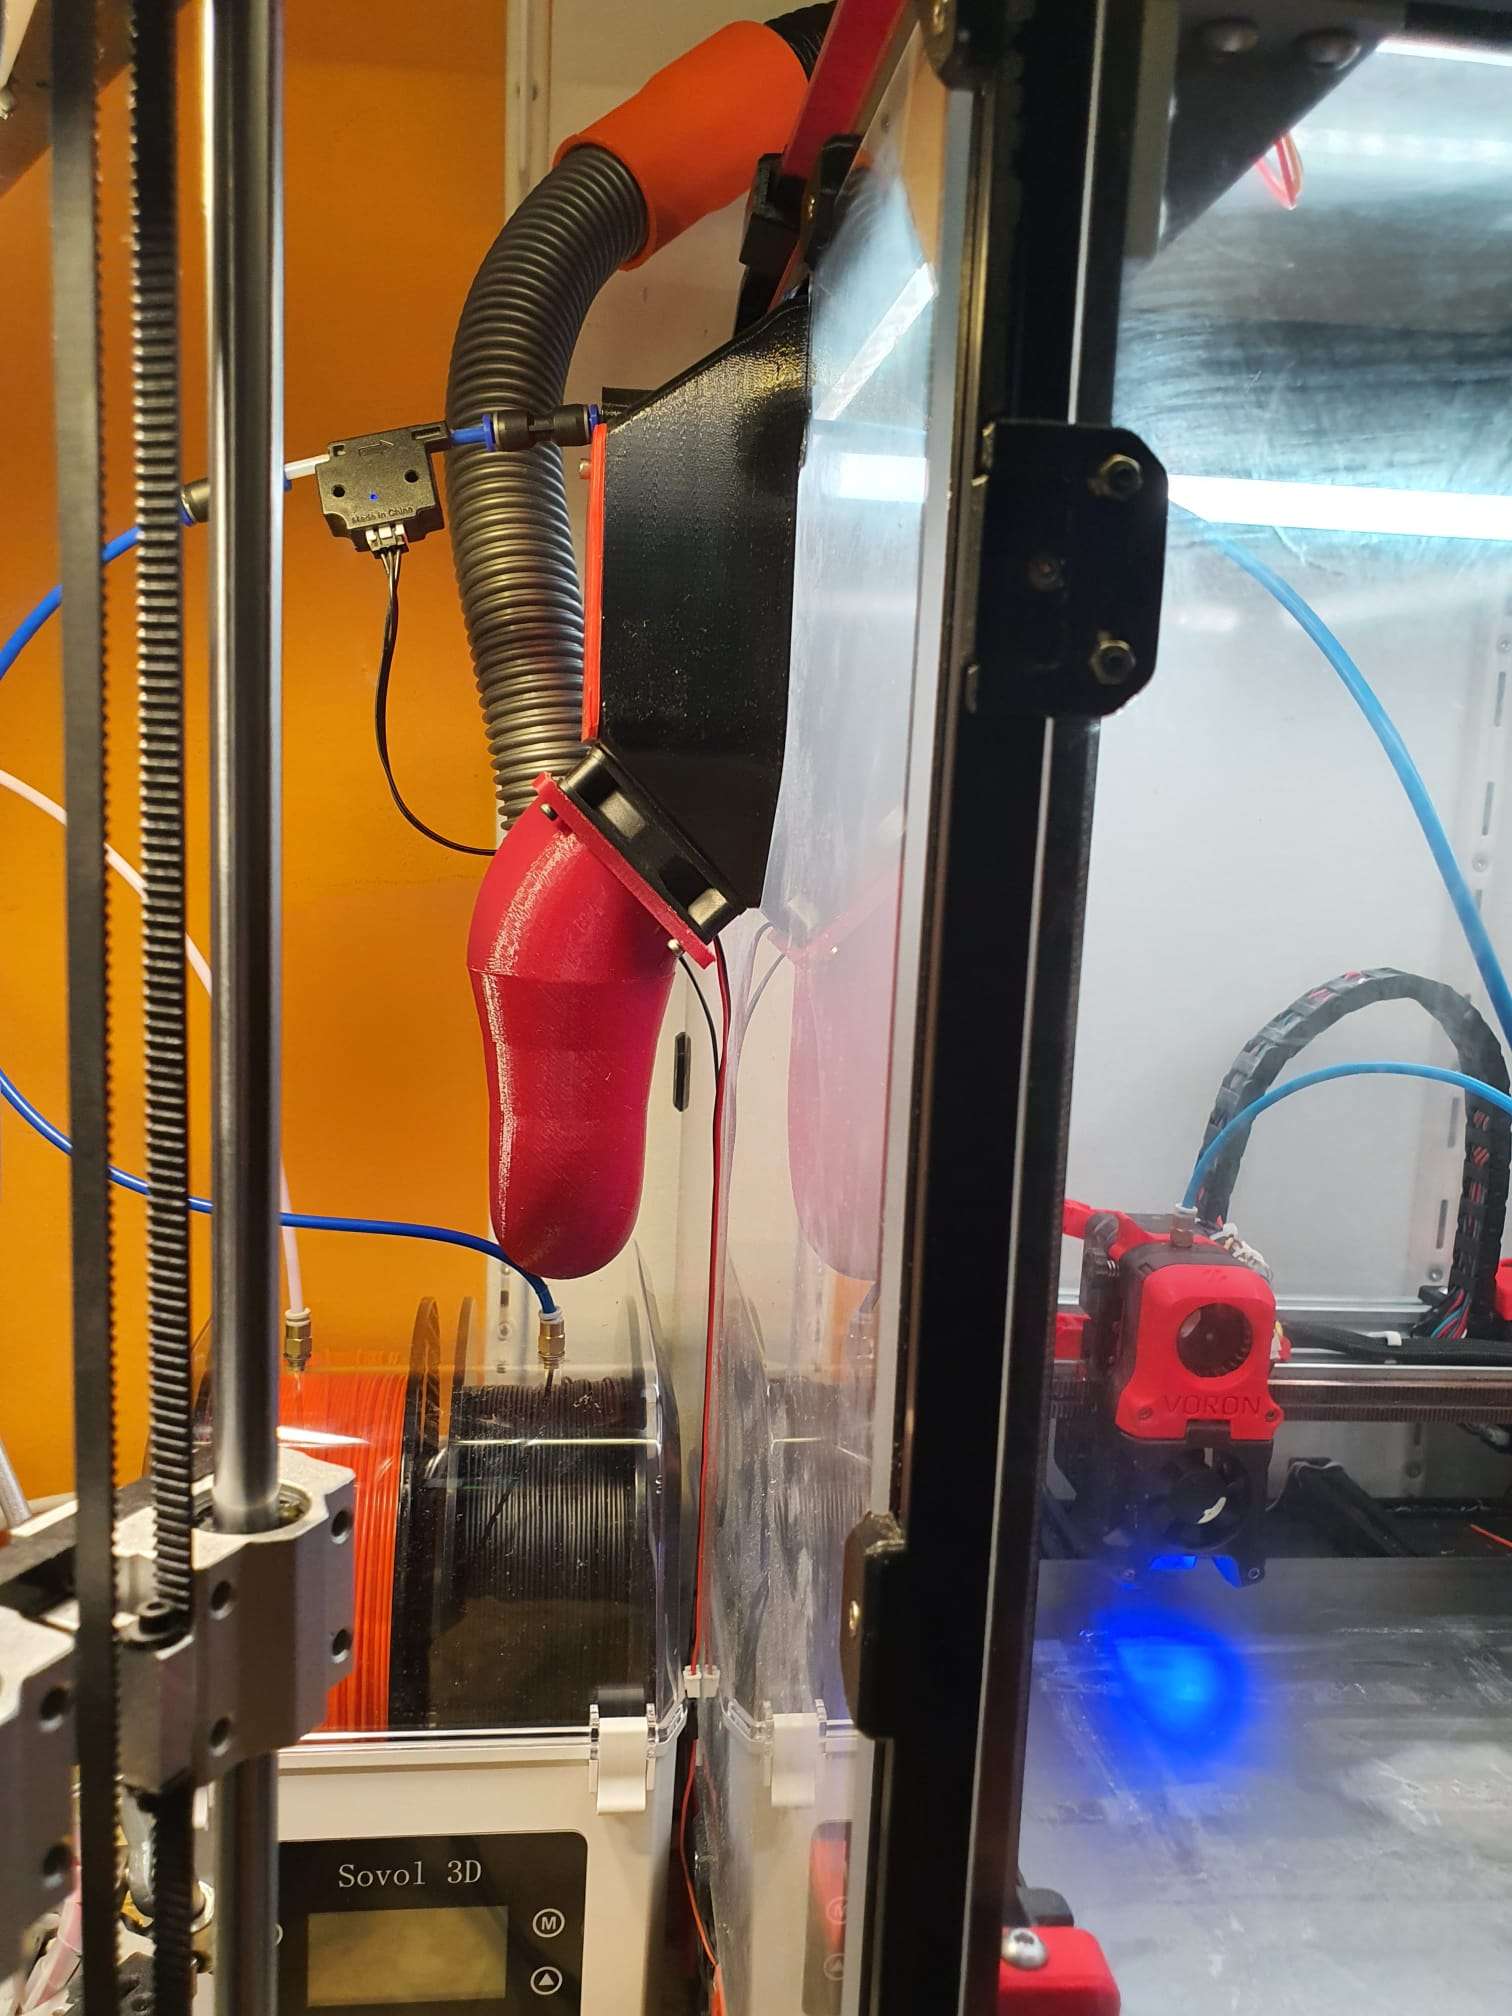
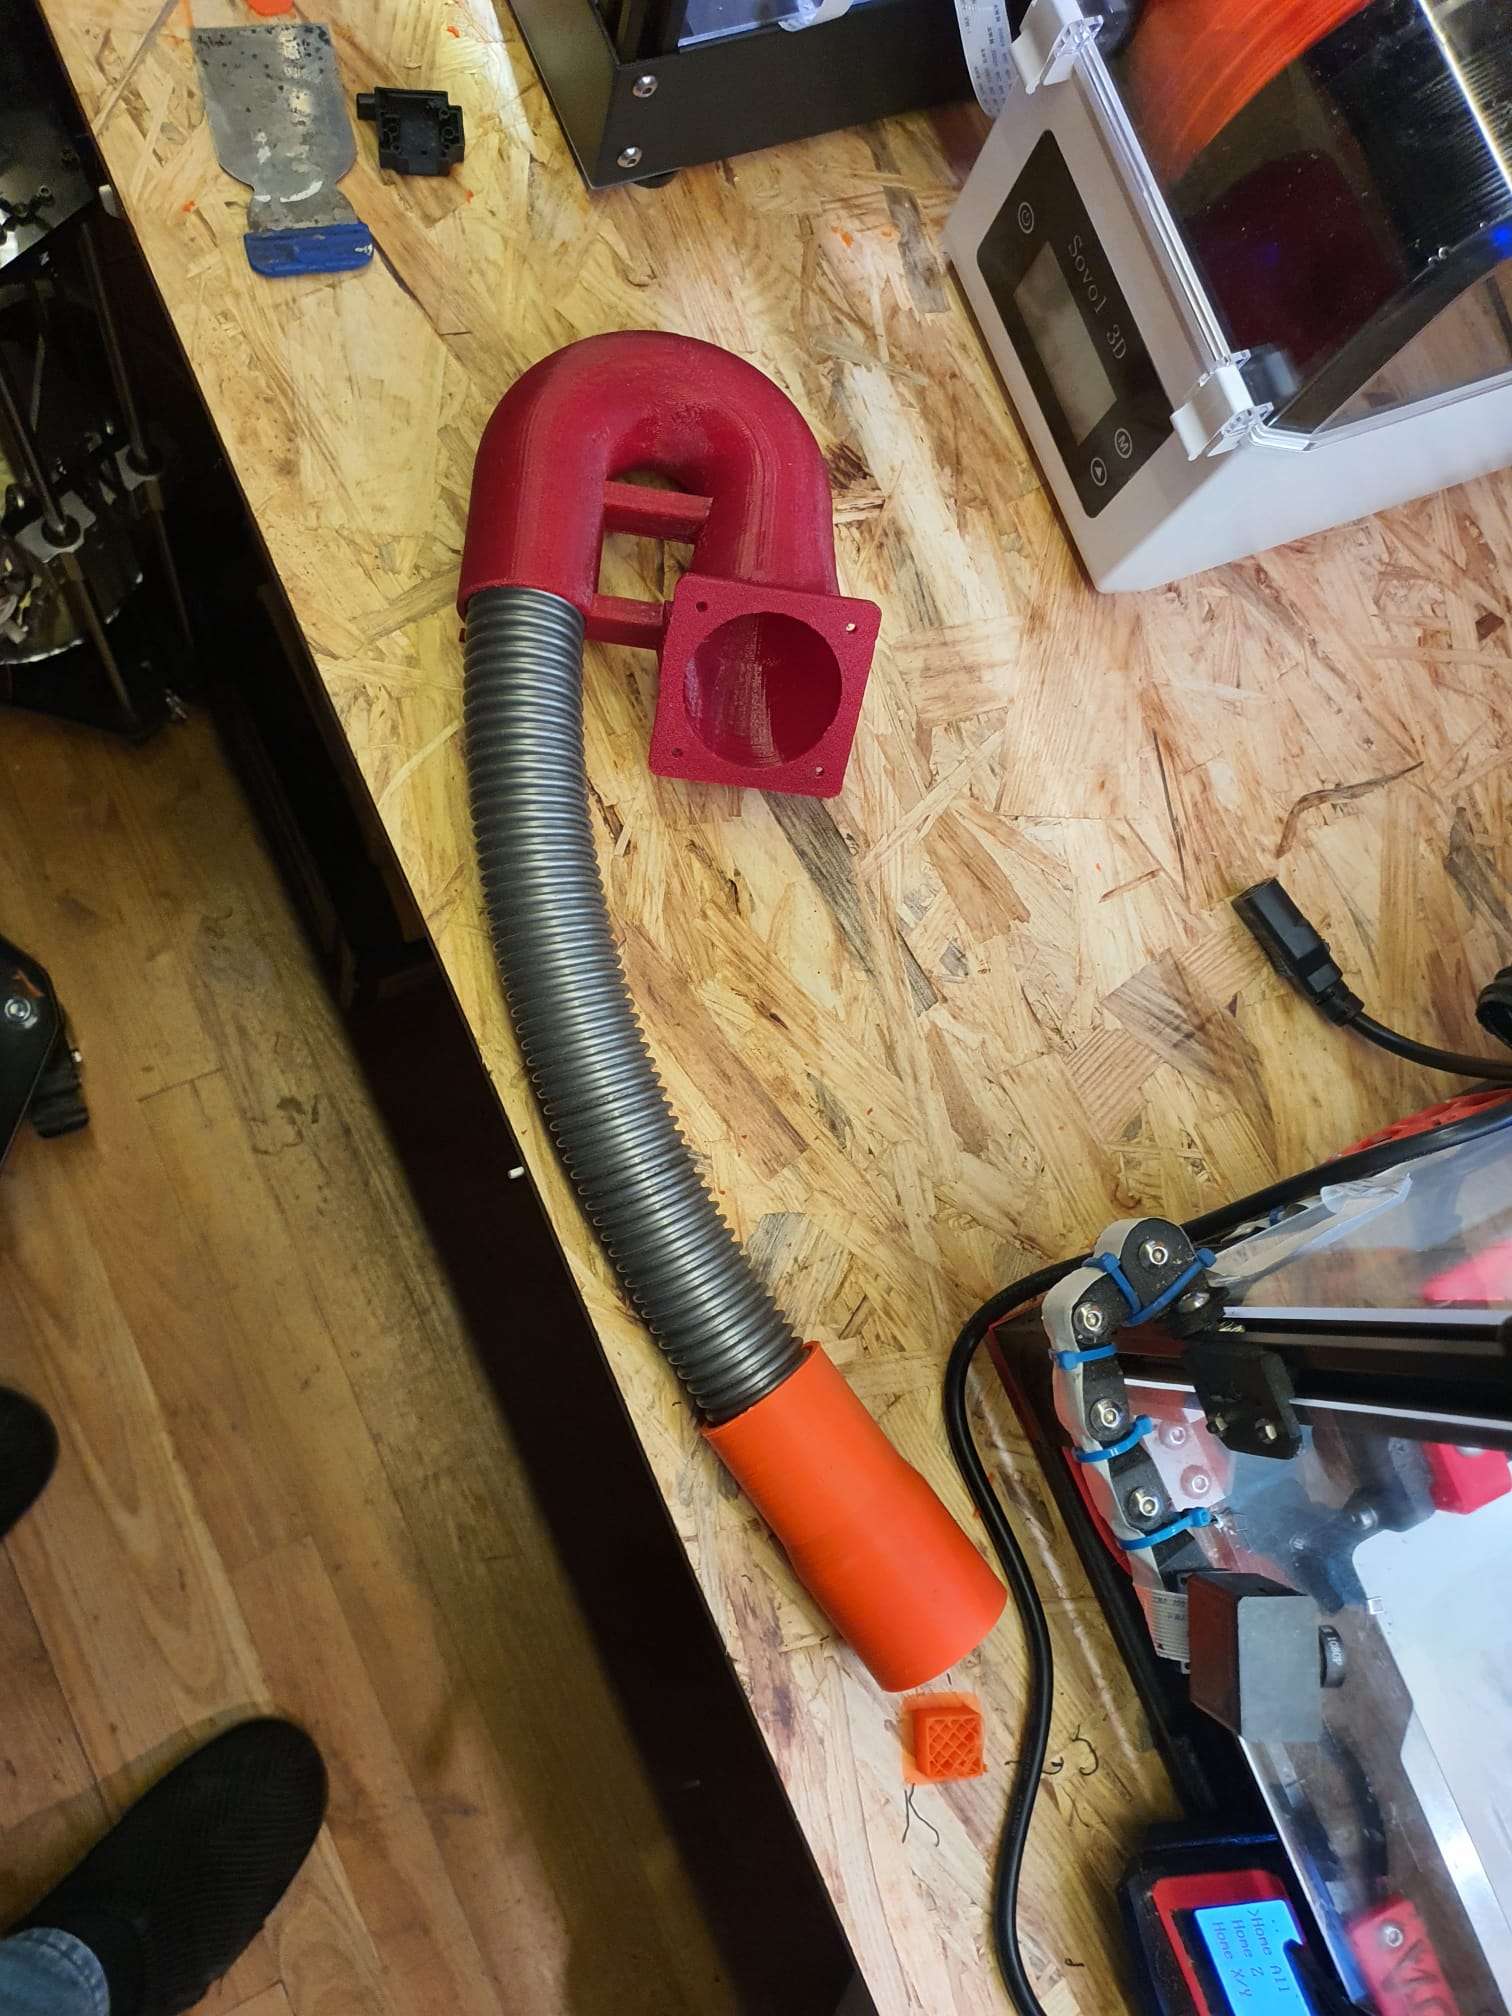
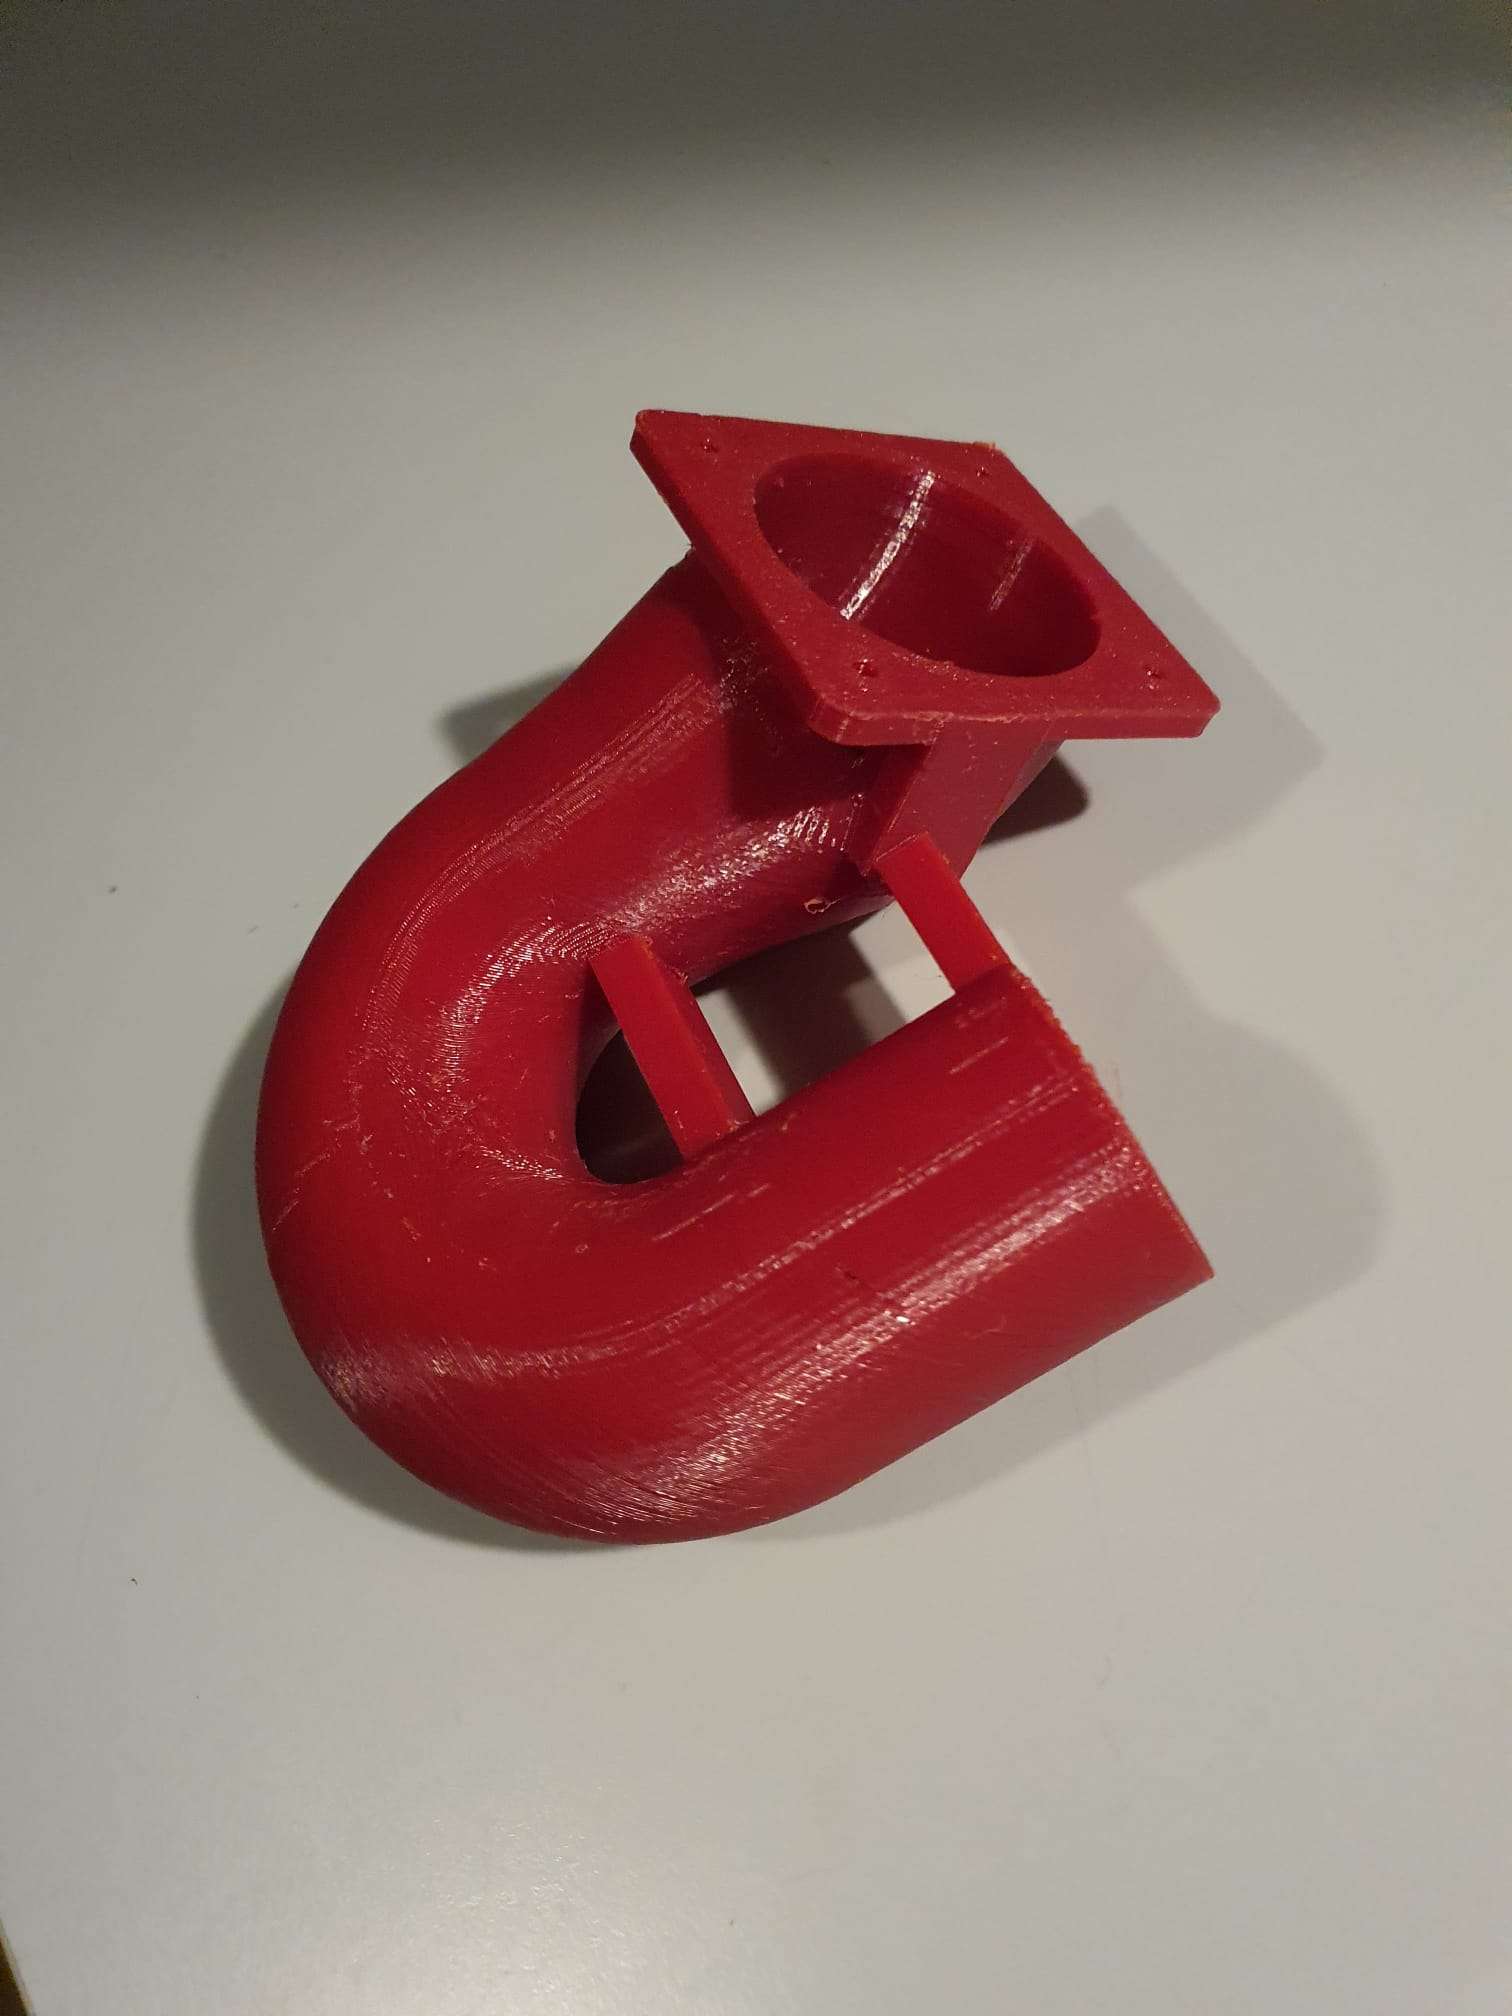
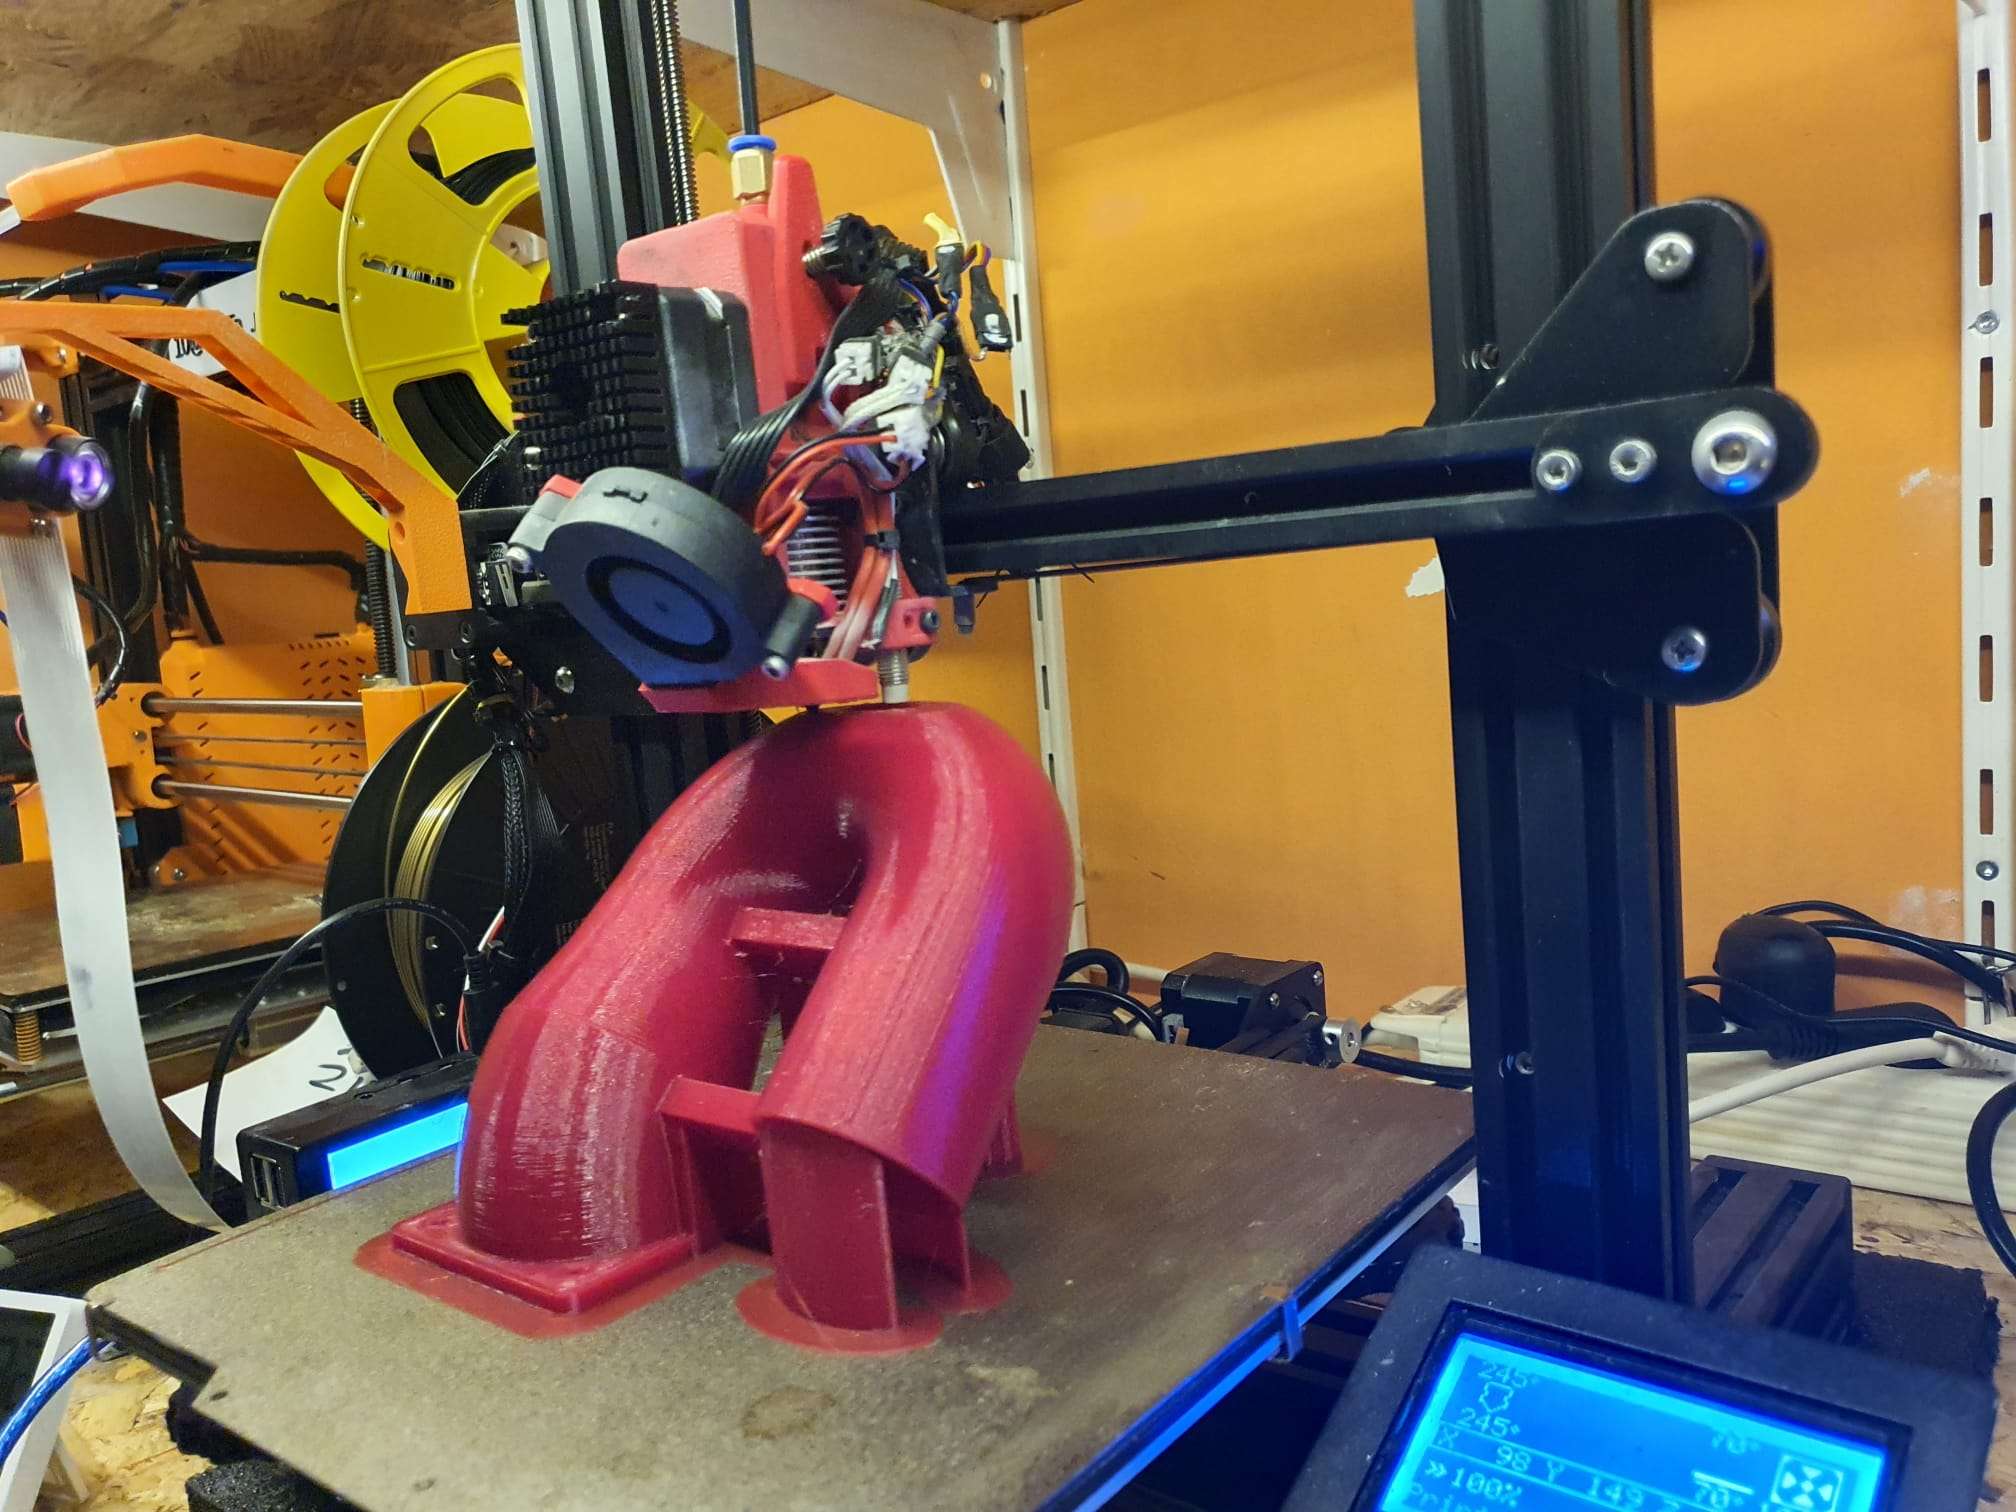
Building a Voron 600x600x560mm 3d printer
For a specific printjob, I need a large 3d printer.
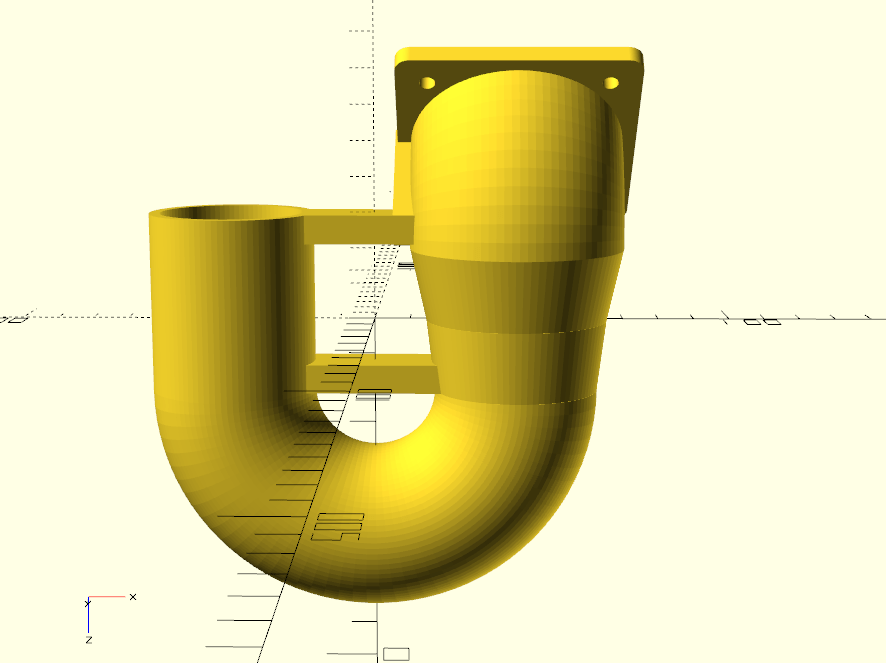
After a lot of searching I decided to build a new Voron 2.4 3d printer, sized 600 x 600 x 560 mm.
The external size of the printer is 760x760x760 which just fits my available space.
I already have most of the required parts available, except the 600×600 heatbed and pei sheet, which I ordered Just now. Not cheap, though.
Traction Avant herstellen gesperd differentieel
De Traction Avant doet het weer NA DE REPARATIE 28-9-2023:
LEES ONDER VERDER
voor het verslag over het gesperd differentieel:
de oorzaak, de oplossing en de aanpak:
DAG 1
Al een tijdje deed mijn cruise control het niet dus wilde ik dat repareren.
Daarom heb ik de onderste veerarm van het linker voorwiel op een bok gezet, met het wiel net vrij. Vervolgens heb ik de sensor van de cruise control goed afgesteld op de magneet die op de aandrijfas-flens van het linker voorwiel is gemonteerd.
Vervolgens de motor gestart en het linker wiel laten draaien om te checken of alles nu goed werkt. Dat heb ik op verschillende snelheden gechecked omdat de cruise control pas vanaf ca. 50 km/uur begint te werken. Maar de wagen bokte opeens na een paar keer uitproberen. Ik heb snel de koppeling ingetrapt en de motor afgezet.
Daarna wilde ik het linker wiel even met de hand draaien en daarbij merkte ik dat het wiel niet meer kon bewegen. Kan natuurlijk gebeuren, als een versnelling is ingeschakeld. Maar ik doe dat nooit. Ik parkeer in de garage altijd met de versnellingsbak in neutraal, omdat ik de auto nog weleens wat wil verplaatsen.
Dus – even checken en de bak stond gewoon in neutraal. Dat is gek. Andere wiel opgekrikt en beide kanten op de bok. Het wiel draait nu prima, alleen draait het andere wiel gewoon mee als ik aan het linker wiel draai. En dan nog wel in dezelfde richting. Oeps.
Opeens was ik helemaal niet meer bezig met de cruise control, maar zag ik visioenen van een complete versnellingsbakrevisie. Of tenminste het differentieel, in het bijzonder de satelliet- en planetaire wielen. Maar dat kan toch zomaar niet?
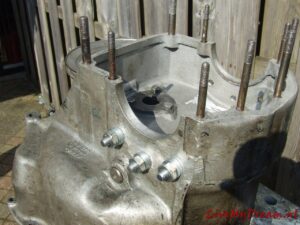
Om er achter te komen zit er natuurlijk maar één ding op: Het differentieel uit elkaar halen en zien wat er aan de hand is.
Klinkt gemakkelijk, maar bij mijn Traction Avant is geen gewone 3-bak gemonteerd, maar een Citroen ID 4-bak (langeslag motorversie), samengebouwd met een koppelingshuis van een Traction Avant. Dat was al een behoorlijk klusje, dus eruit en hopelijke er snel weer in gaat even tijd en moeite kosten.
Maar OK, ik heb het al een paar keer eerder gedaan dus gewoon beginnen en we zien wel.
Dus even nadenken.. het is al een aantal jaren terug dat ik de 4-bak heb ingebouwd, even op mijn website kijken hoe ik dat ook al weer deed…
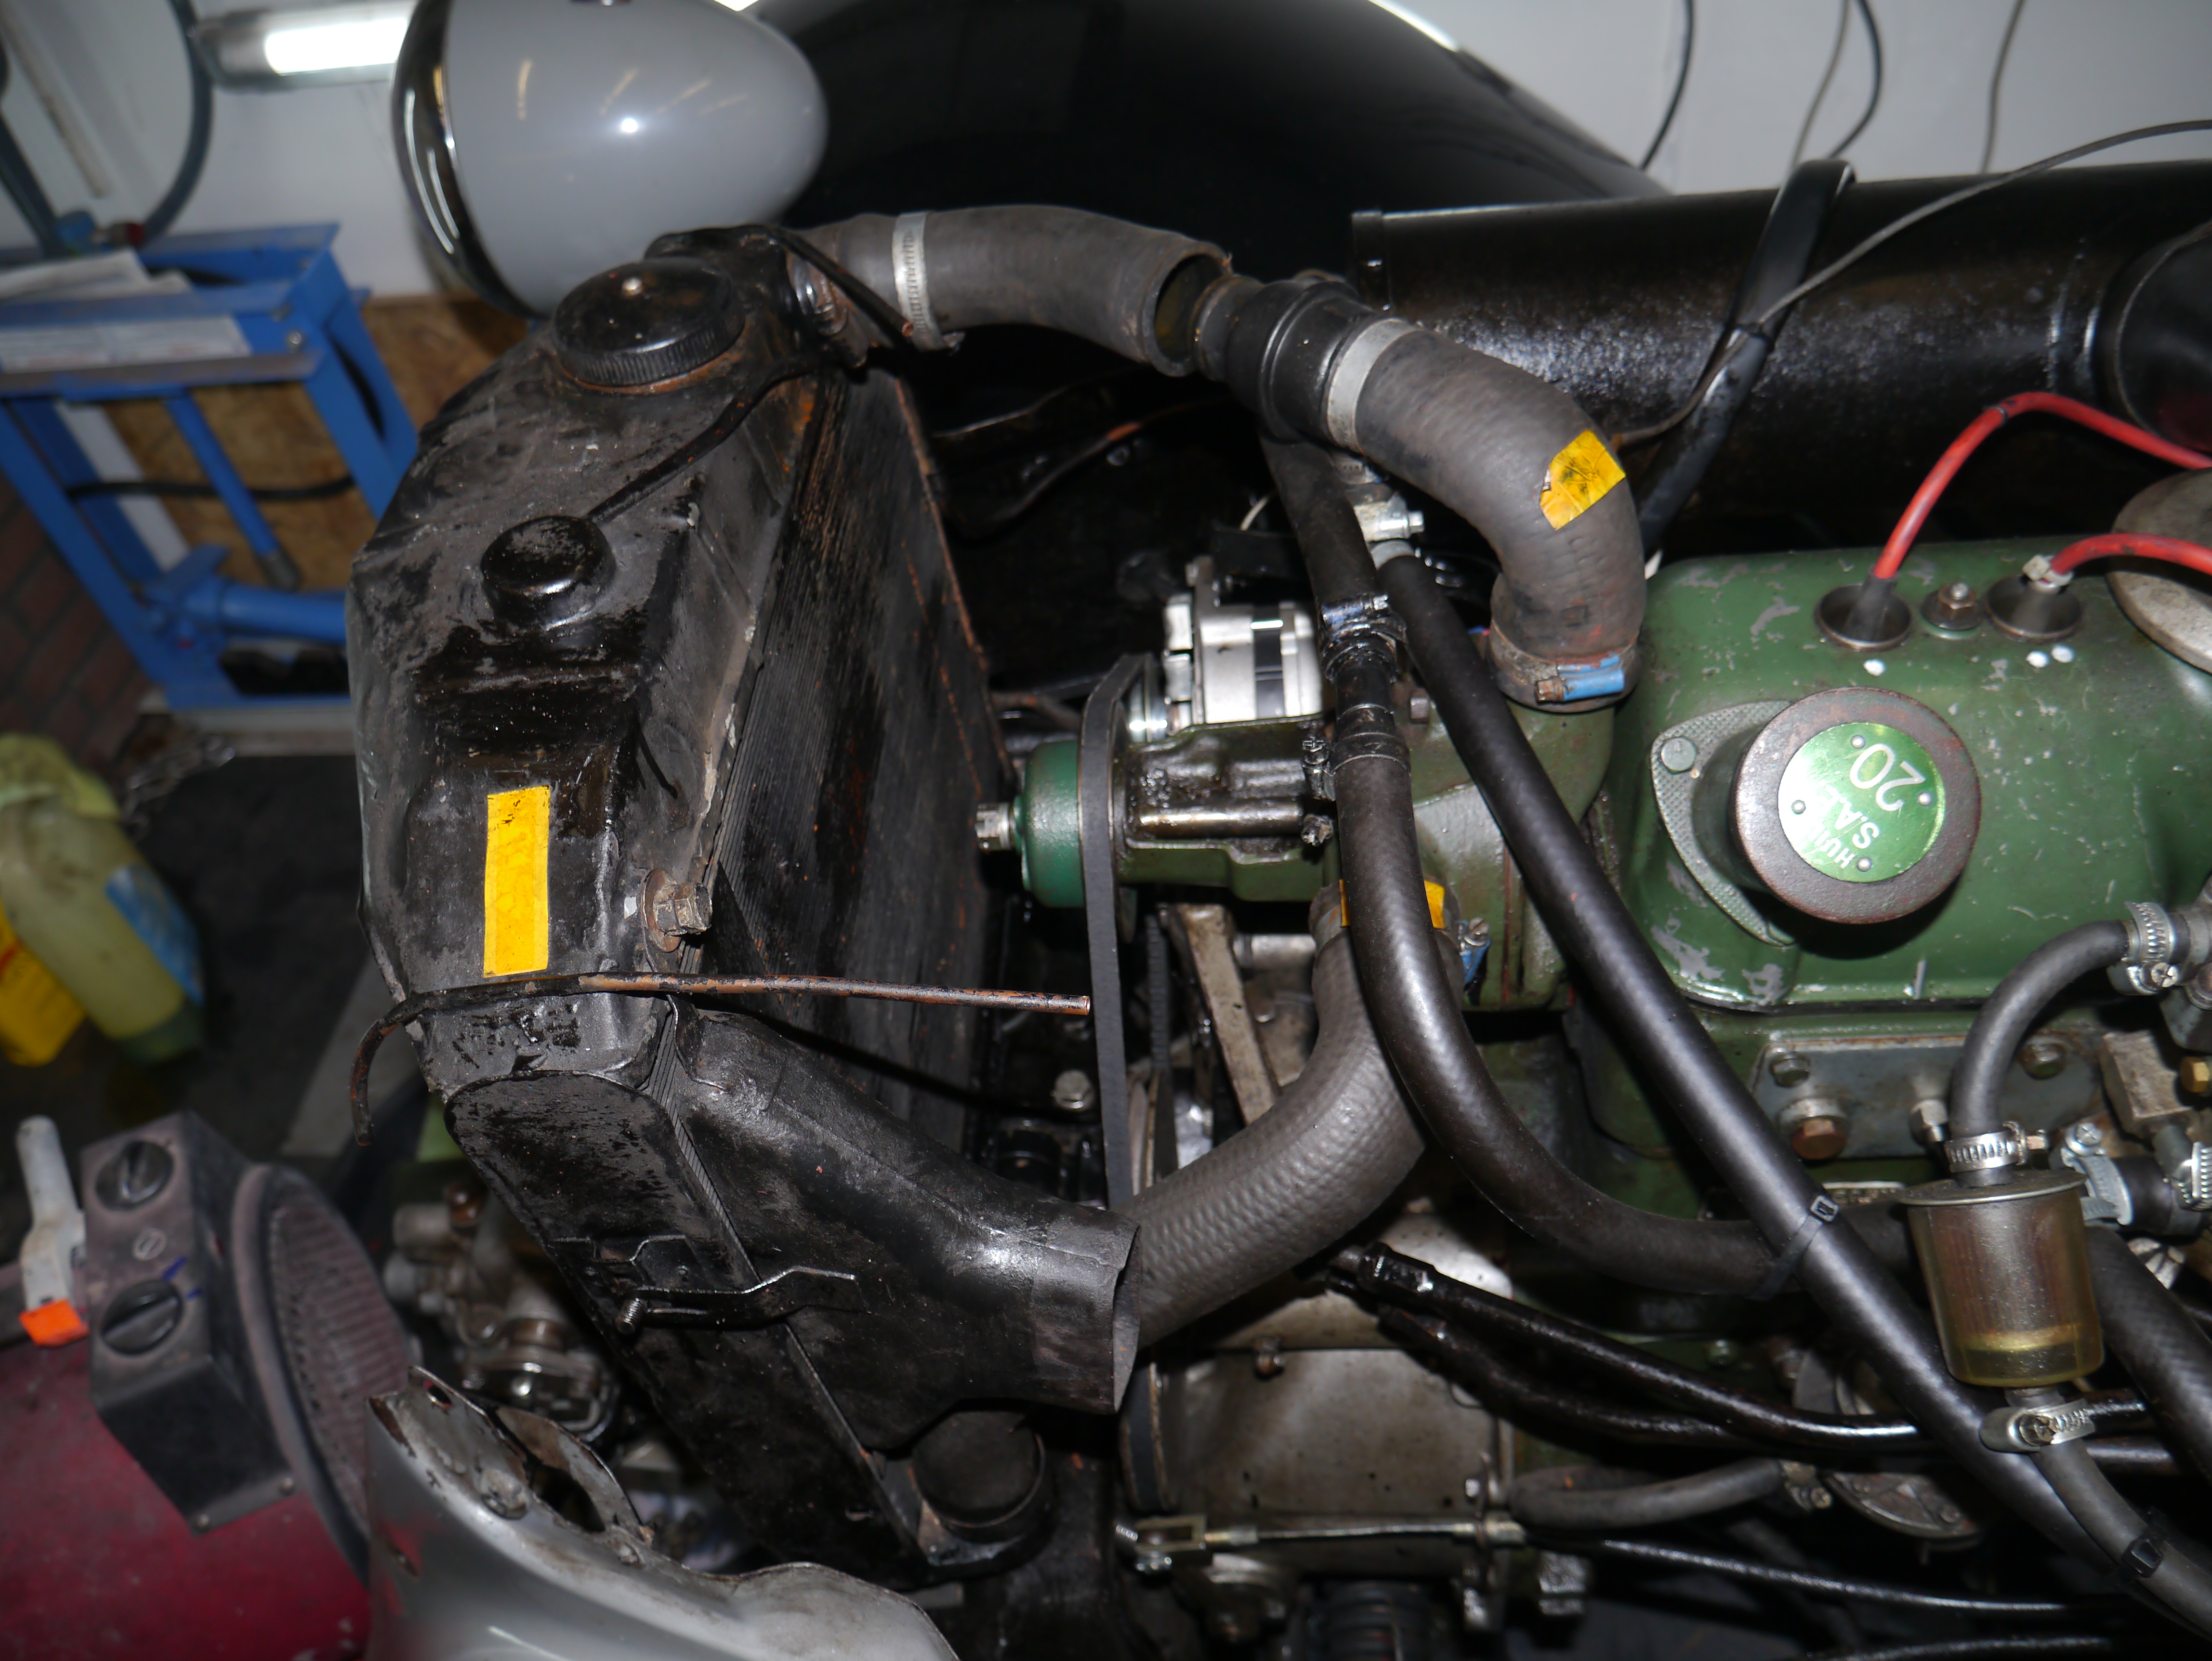
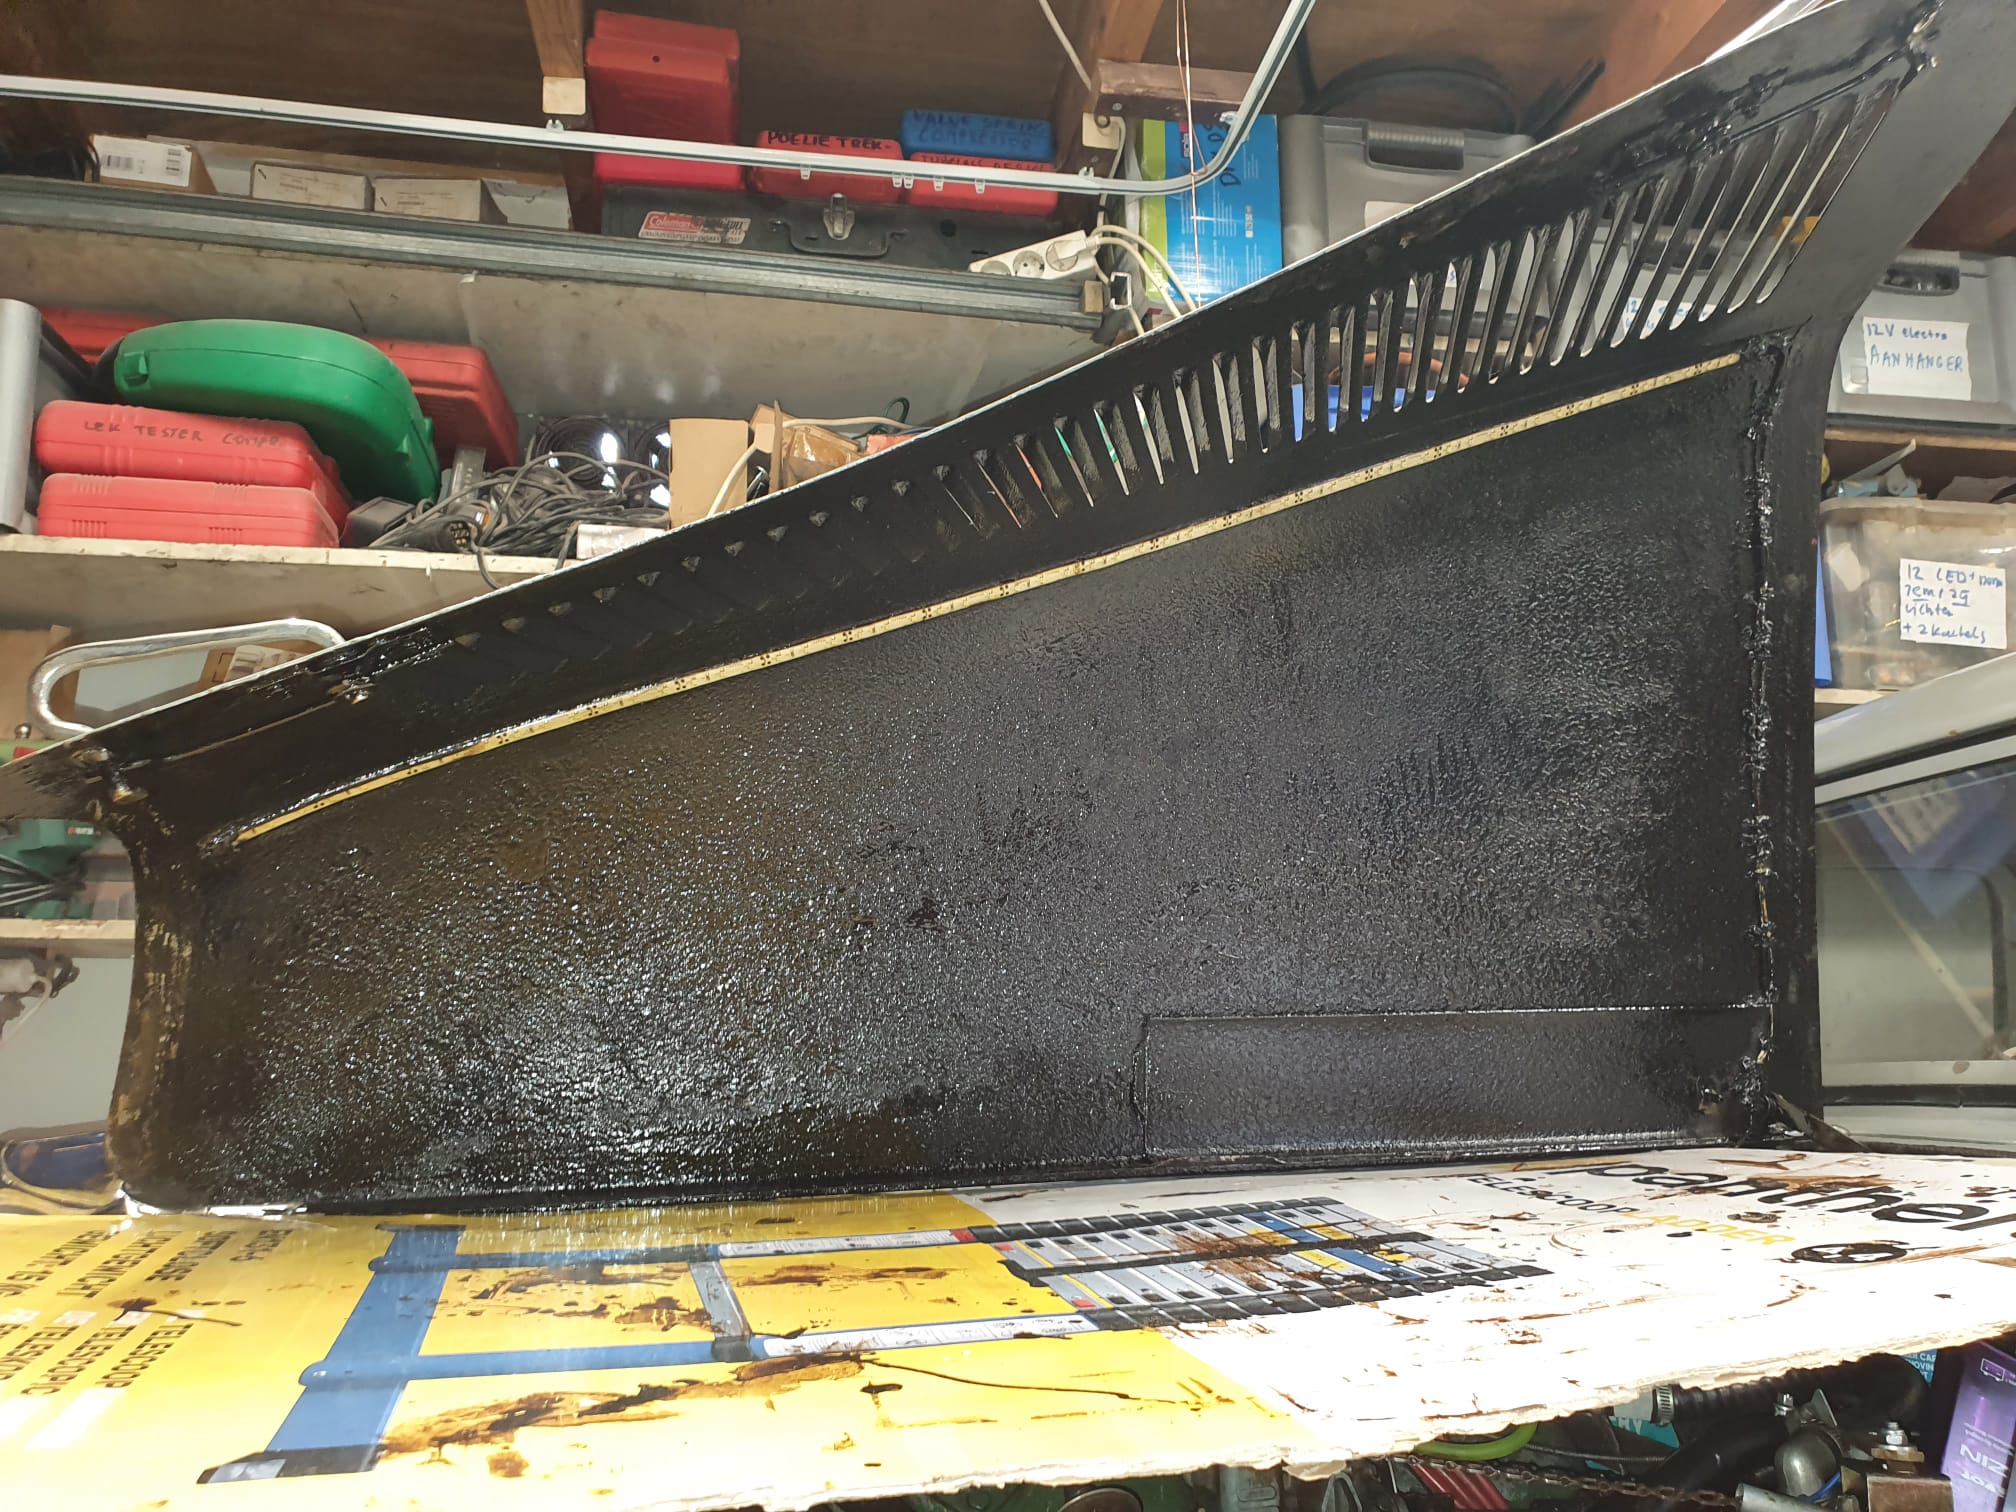
Dus in deze volgorde demonteren: 1) Motorkap, 2) grille, 3) voorbumper, 3) toeters, 4) kabelboom, 5) radiateur, 6) dynamo-aandrijfriem, 7) schutbordje versnellingsstangen, [ nu de krik en/of support eronder], 8) ophangbrug versnellingsbak/aggregaat, 9) ophangbeugel versnellingsbak en beide schakelstangen (afneembaar en specifiek voor dit type versnellingsbak gemaakt) ,
10) linker wiel bovenste fusee lossen,
11) linker wiel flex remslang lossen,
12) asflenzen van bak losmaken 13) opkrikken bak ca 10-15 cm zodat er ruimte is om de flanges te verwijderen,
14) asklauwtjes uitpersen met speciale pers, hierdoor komen de flanges naar buiten uit de bak,
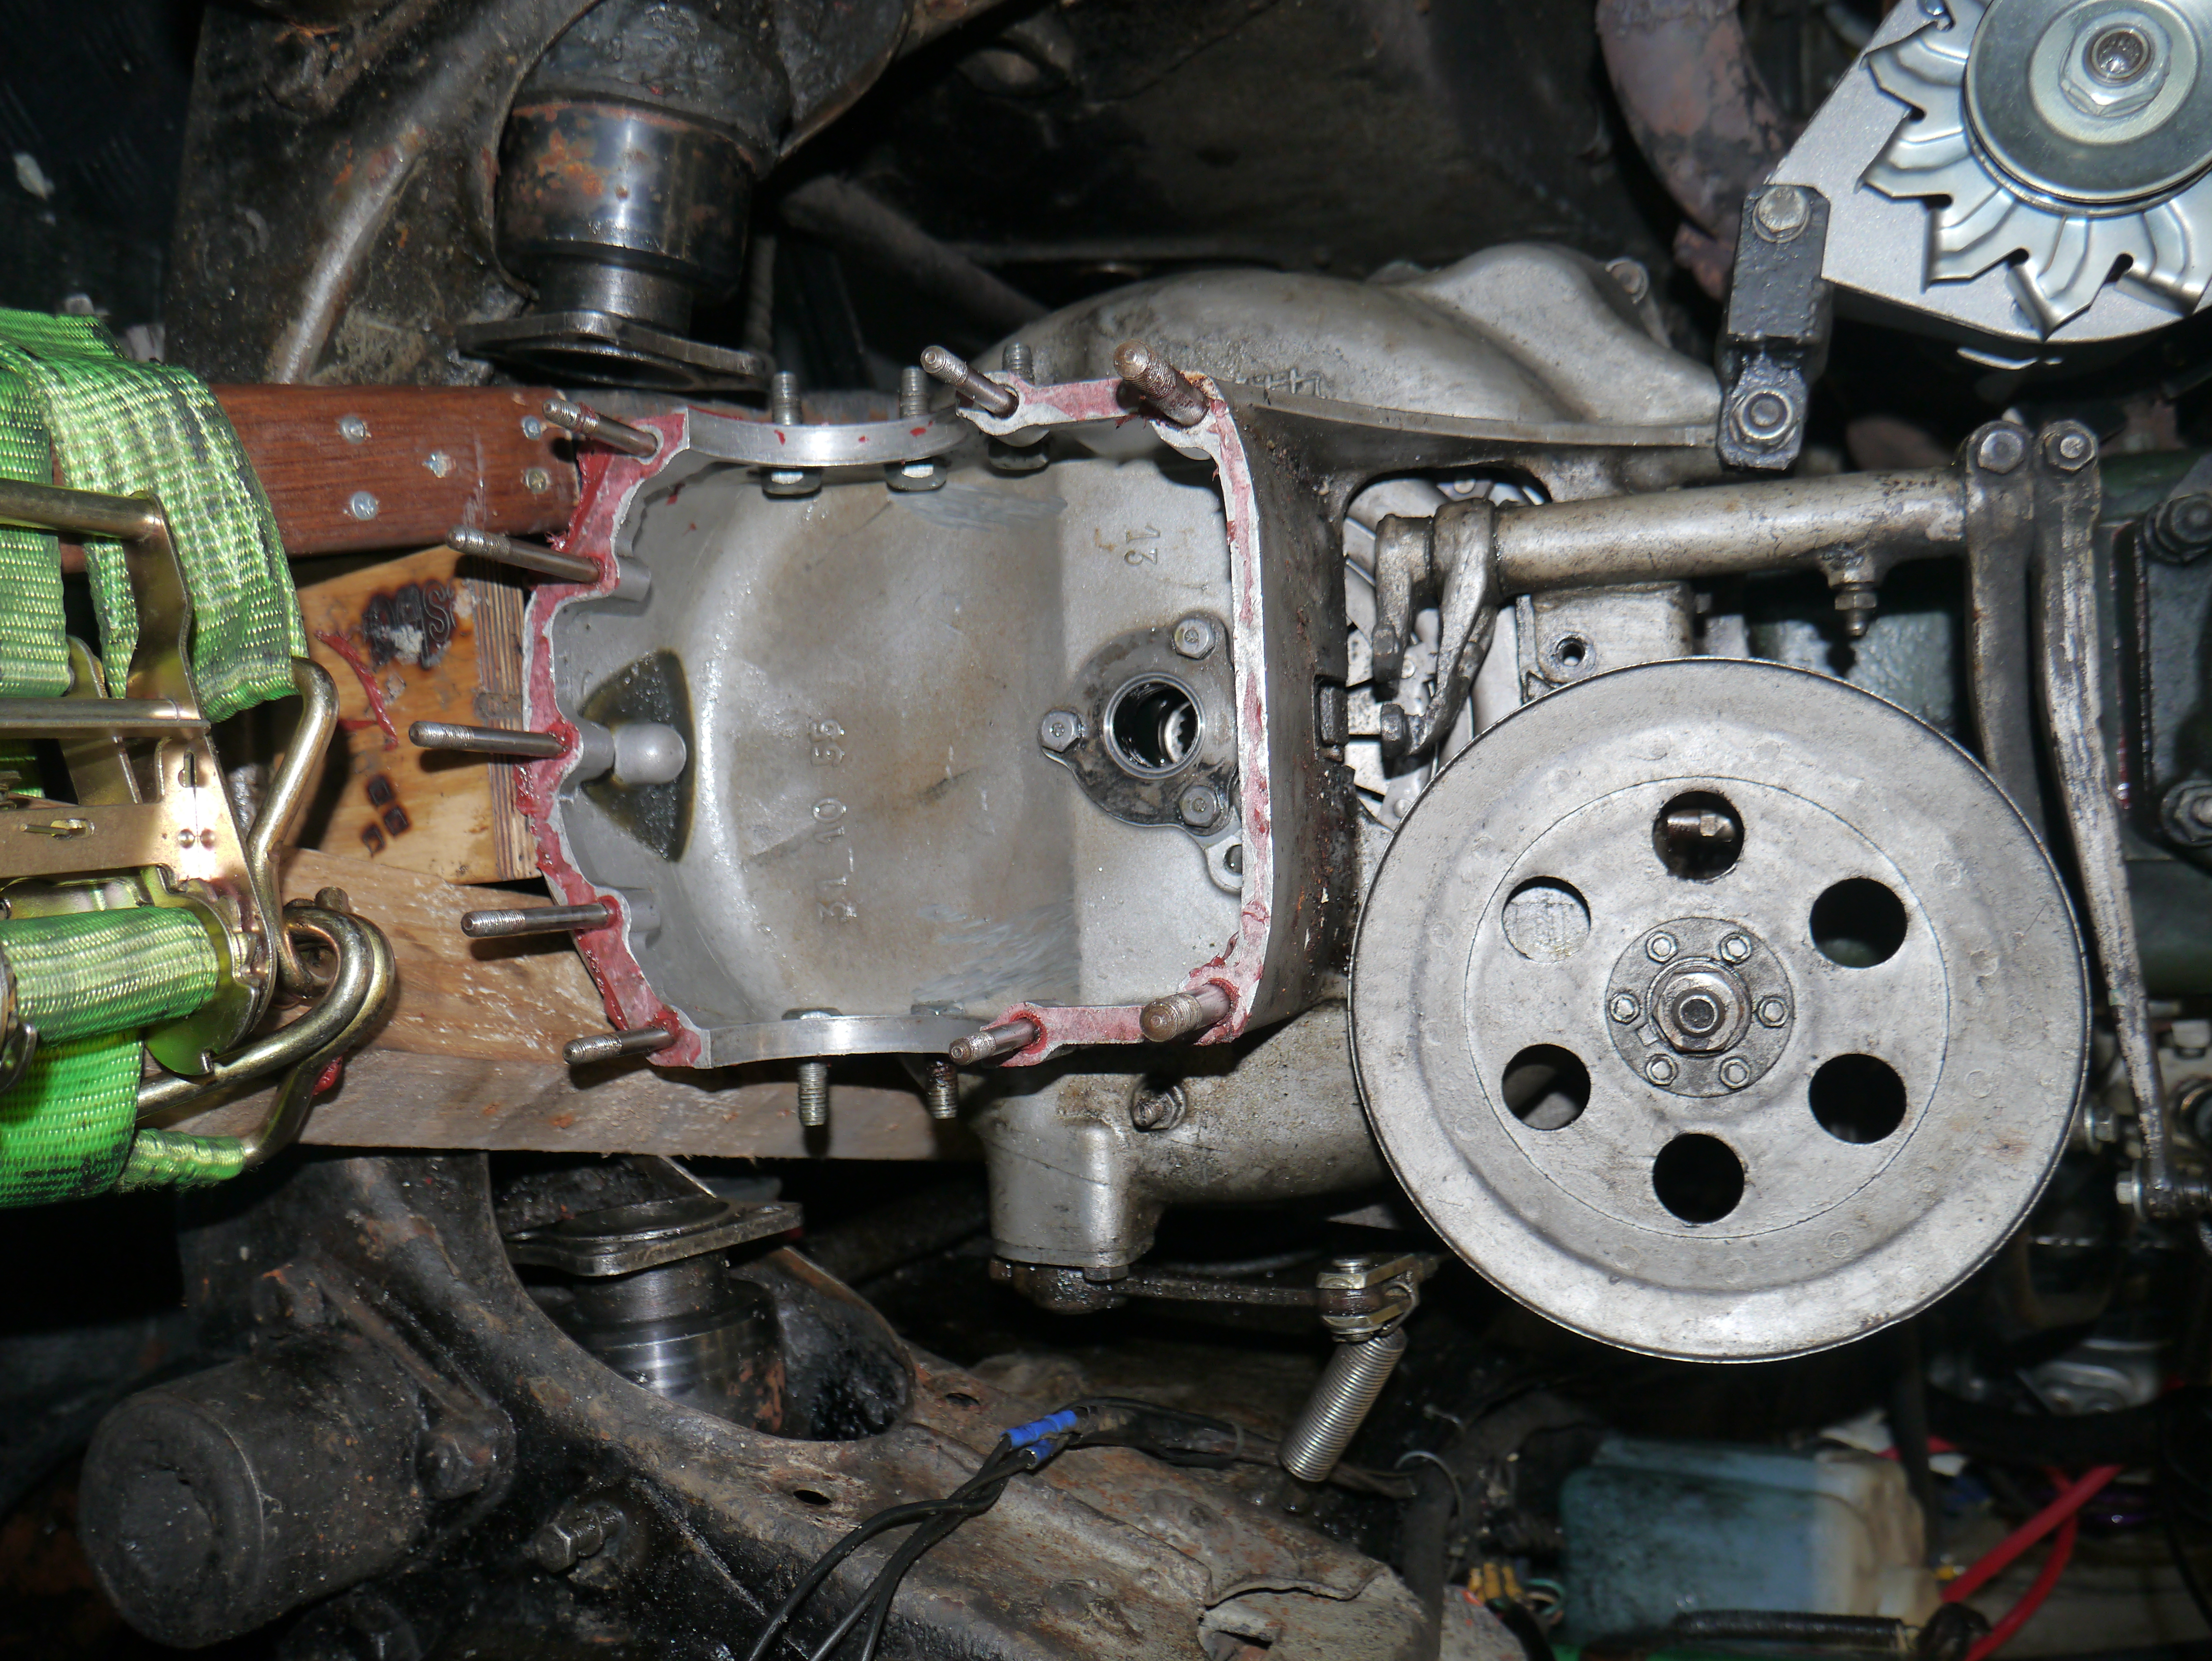
15) bak losmaken van koppelingshuis en demonteren,


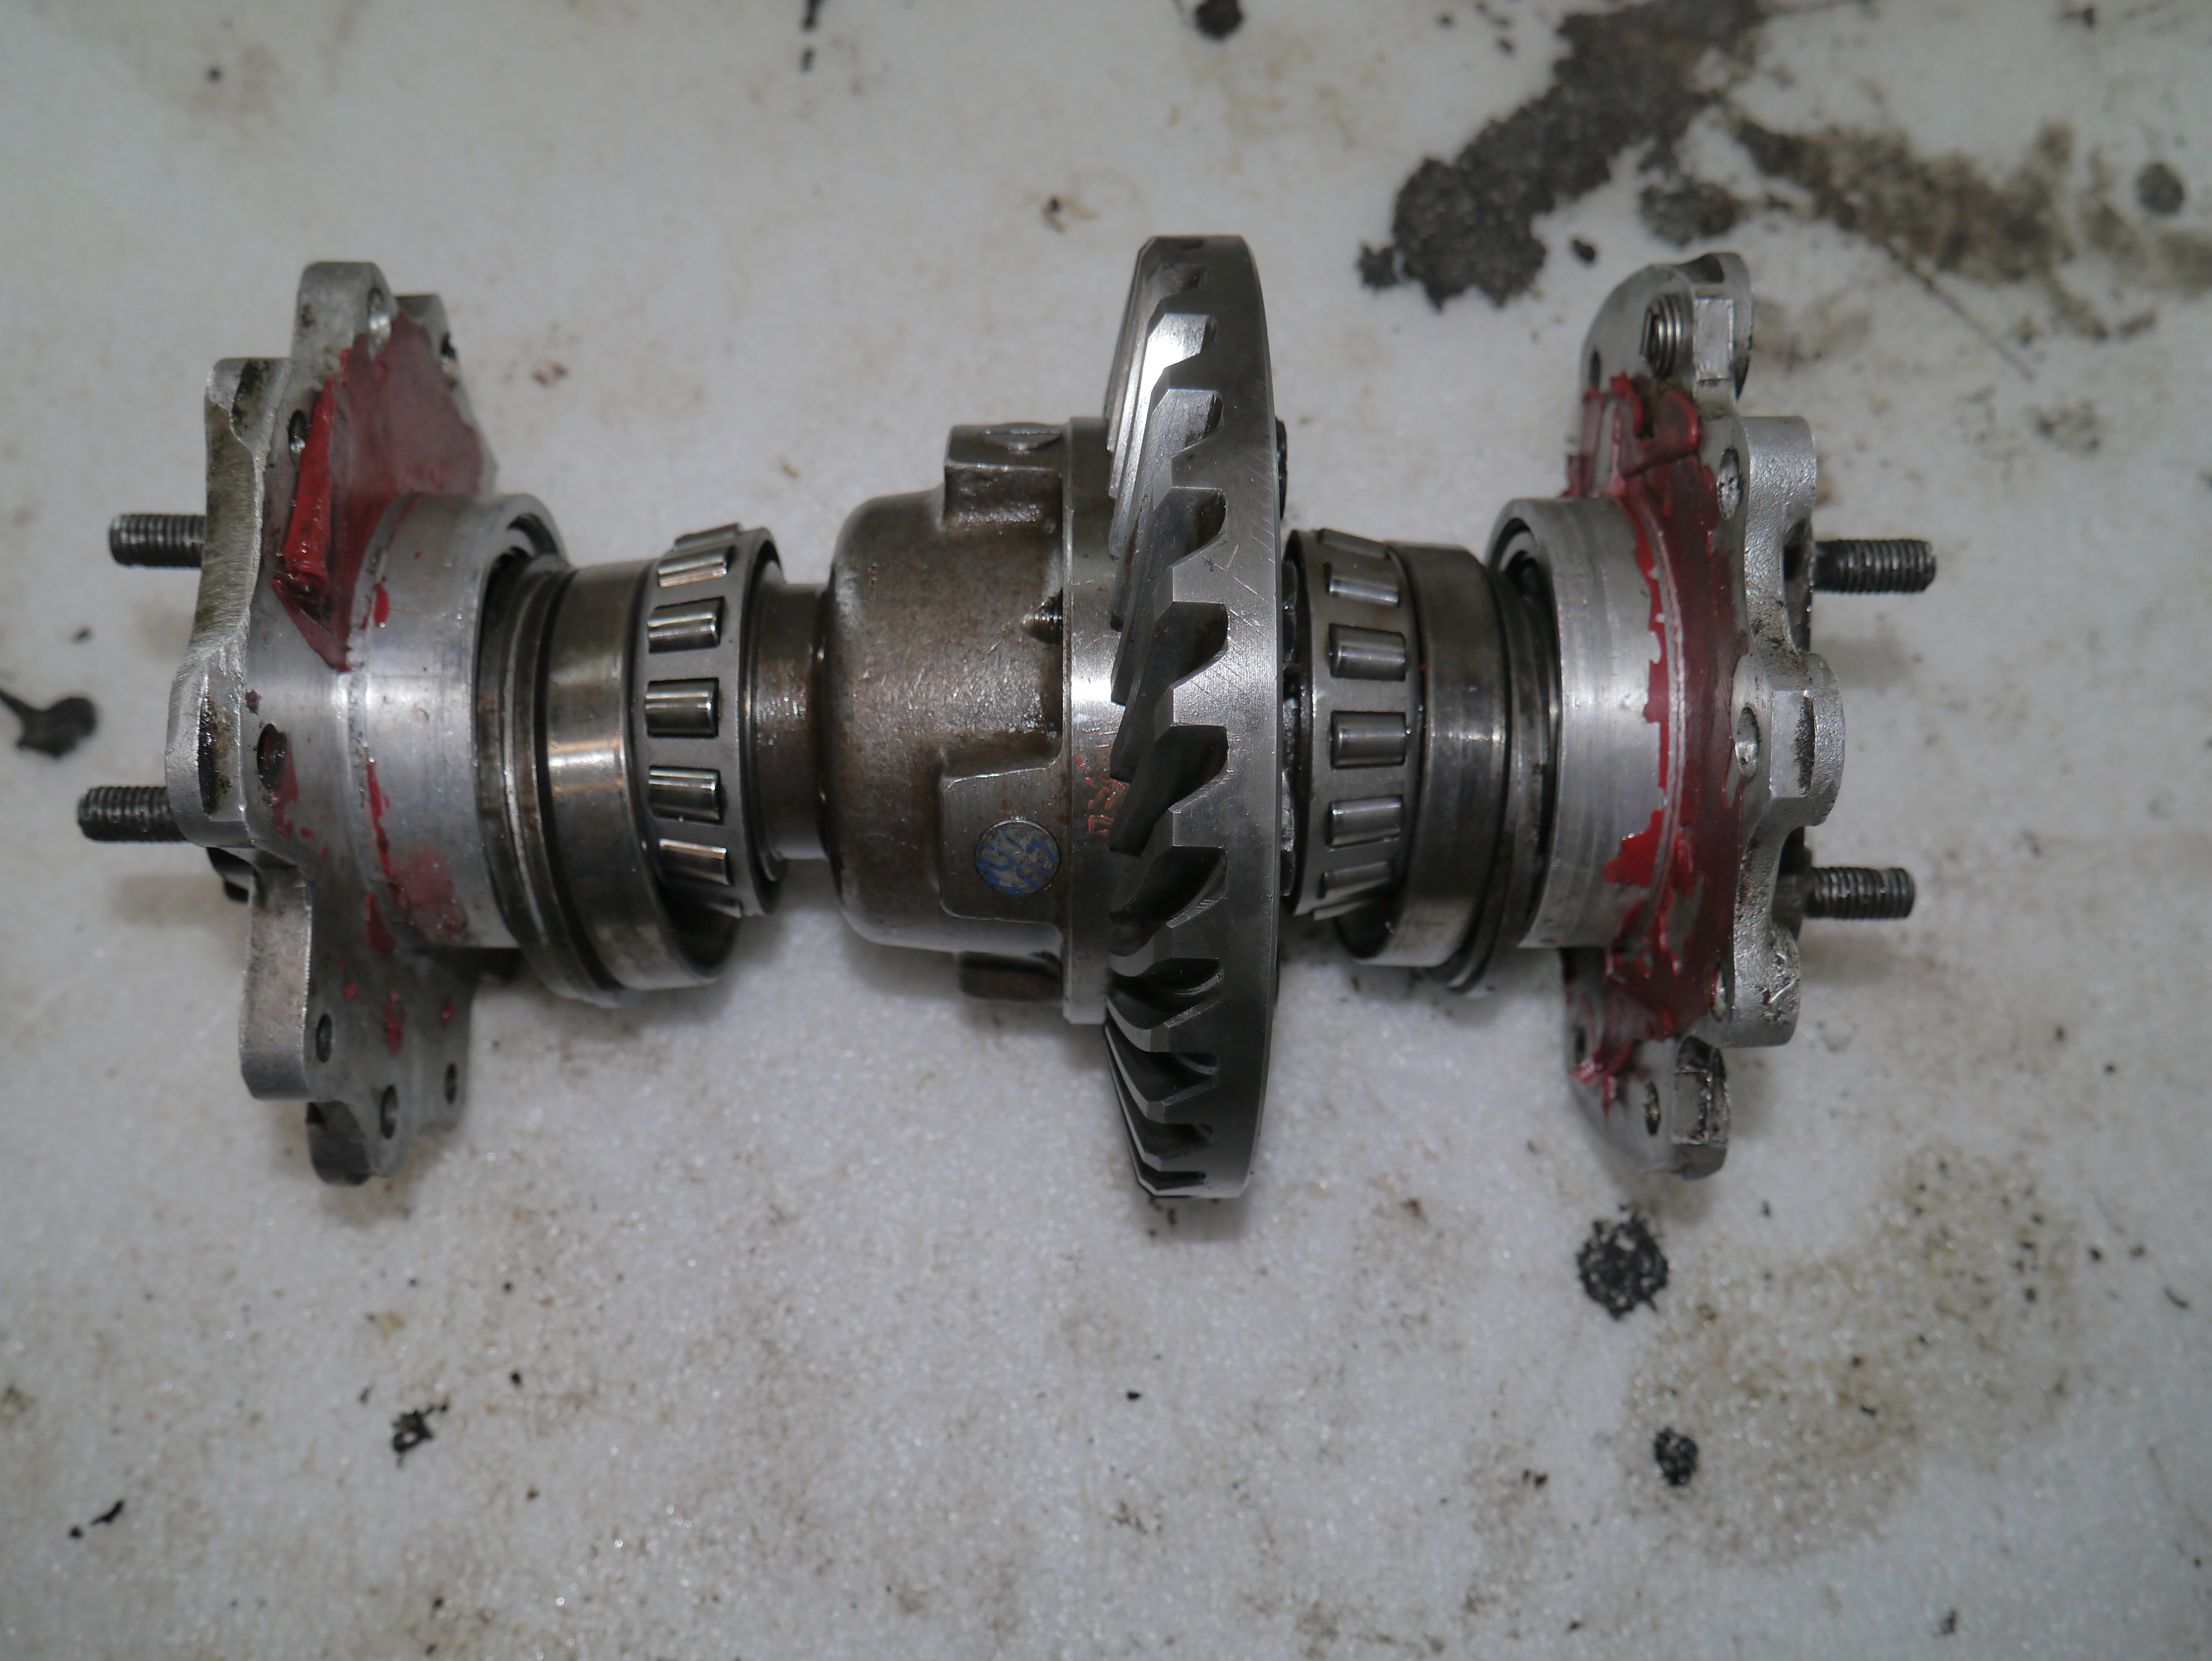
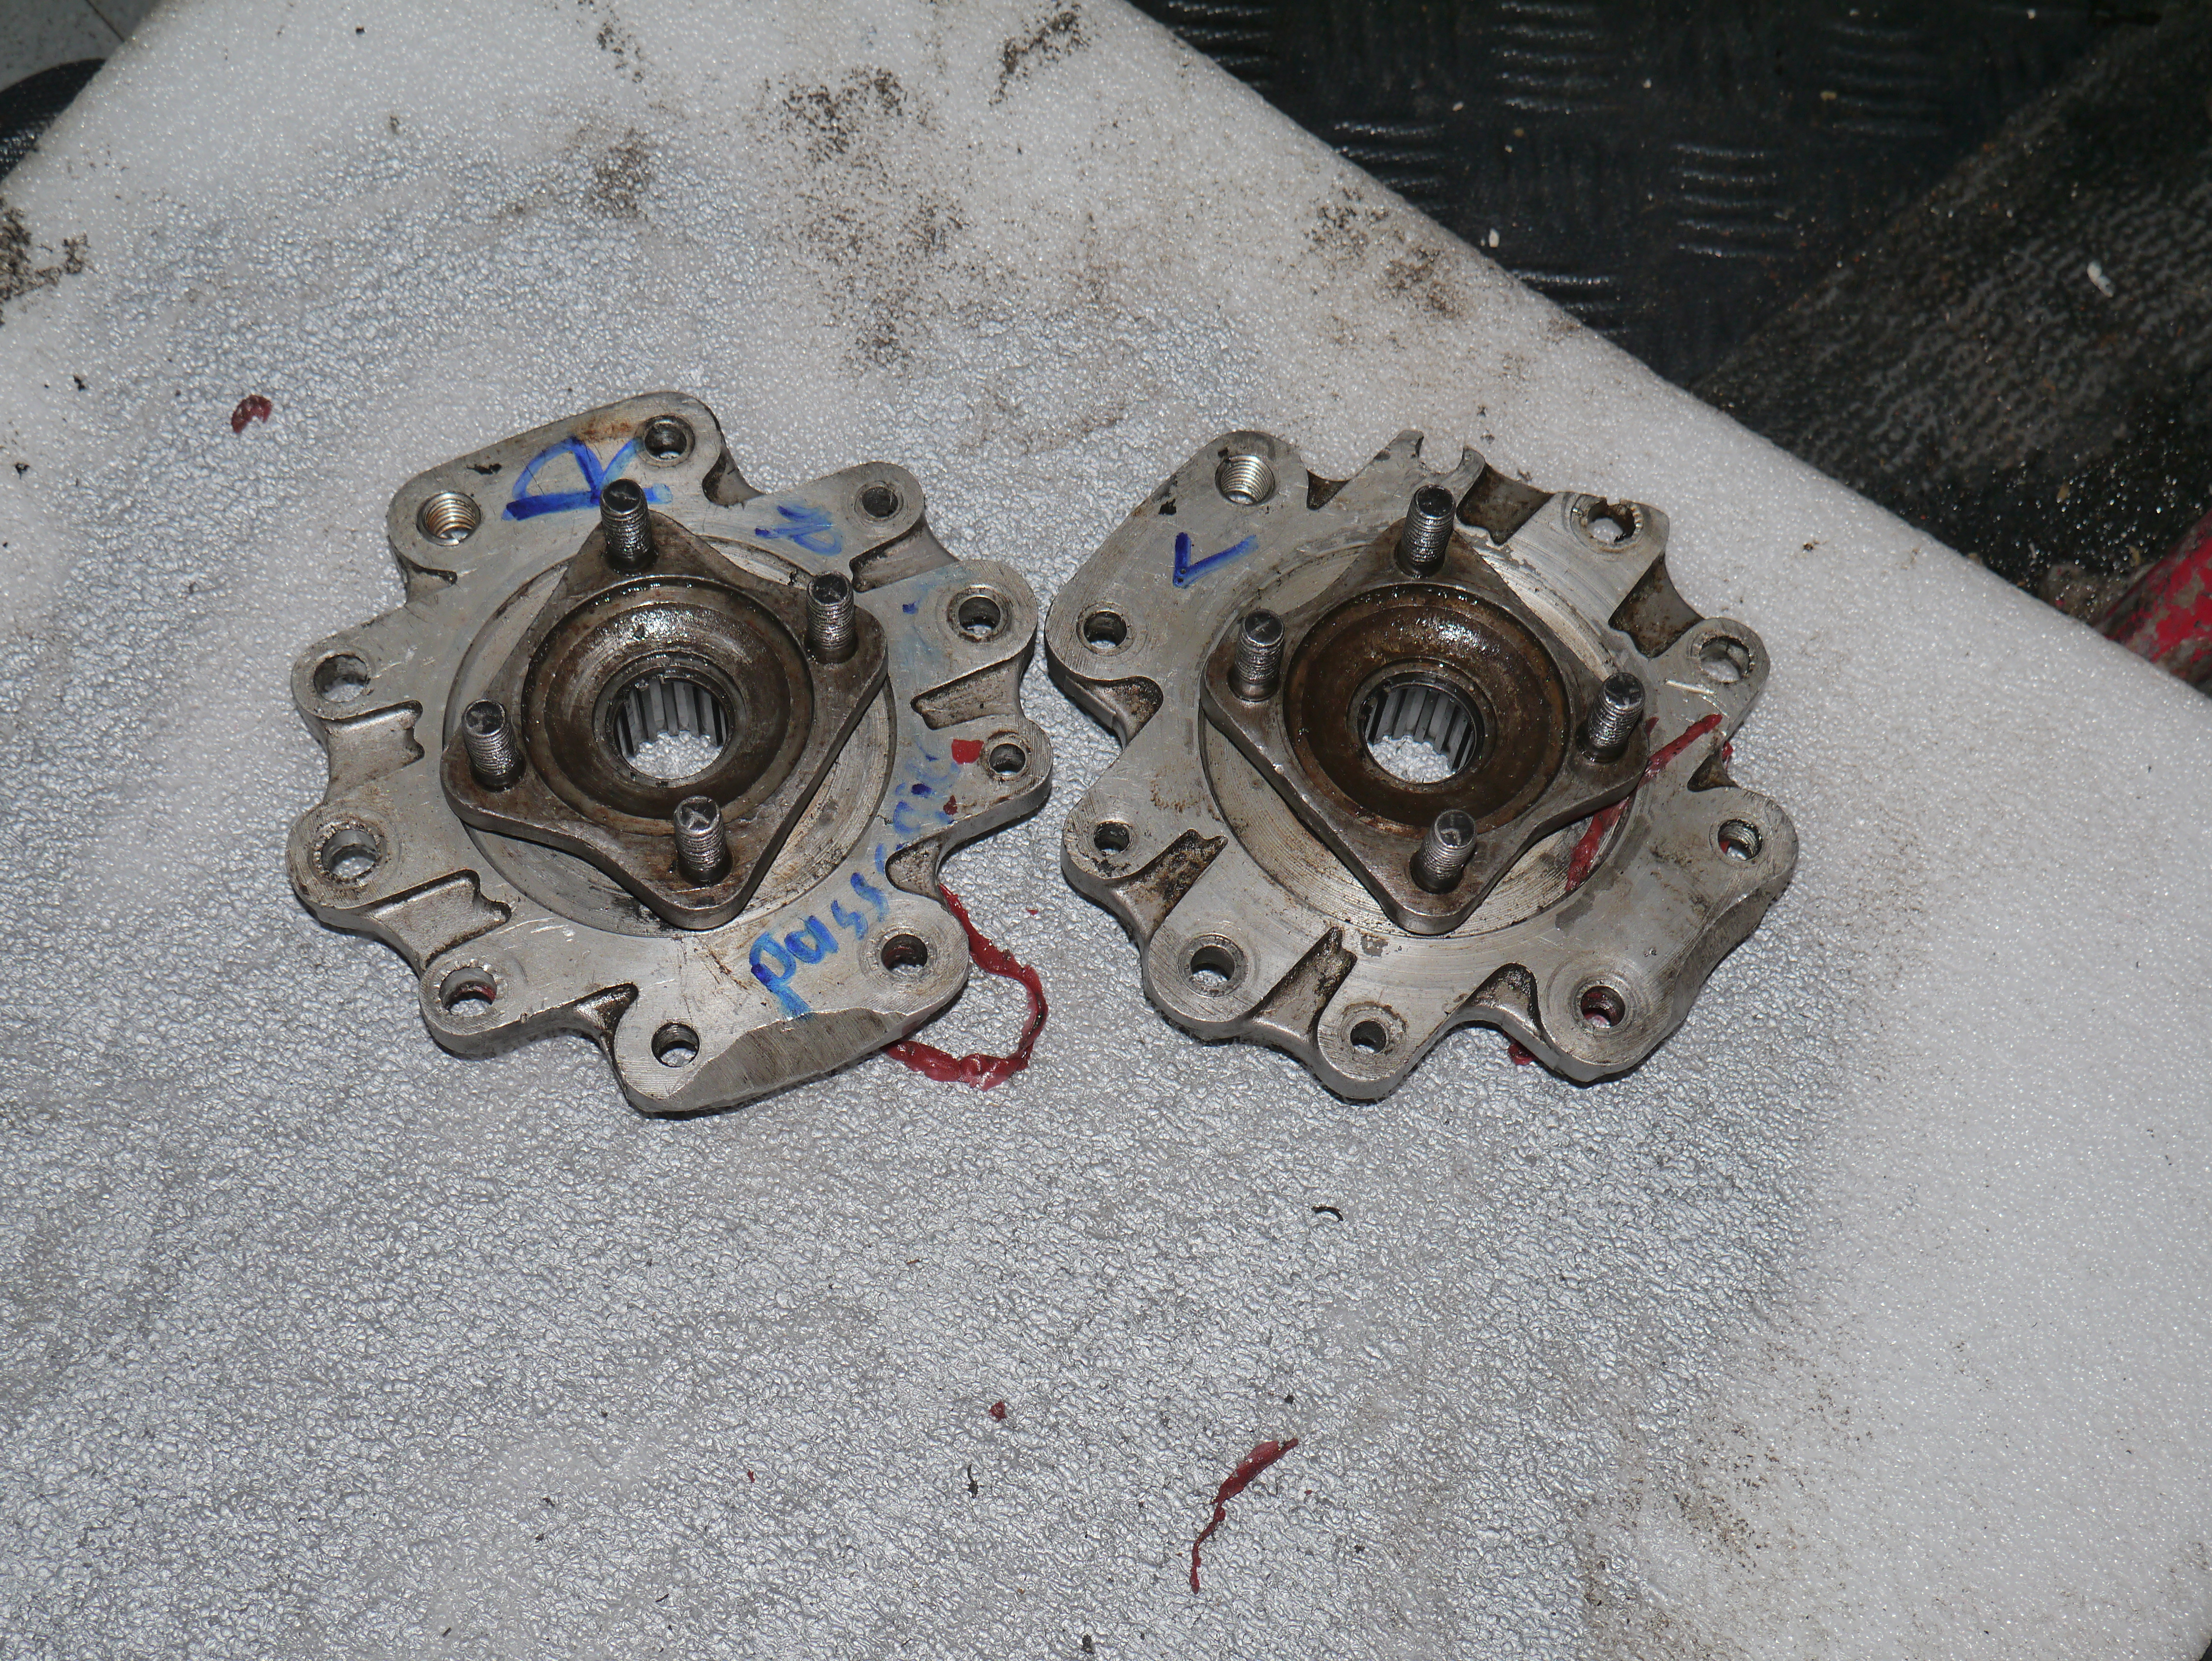
16) Differentieel uit bak halen [alles per kant merken en in 2 aparte links/rechts gemerkte bakjes opruimen, anders moet alles opnieuw worden ingemeten en -gesteld],
DAG 2
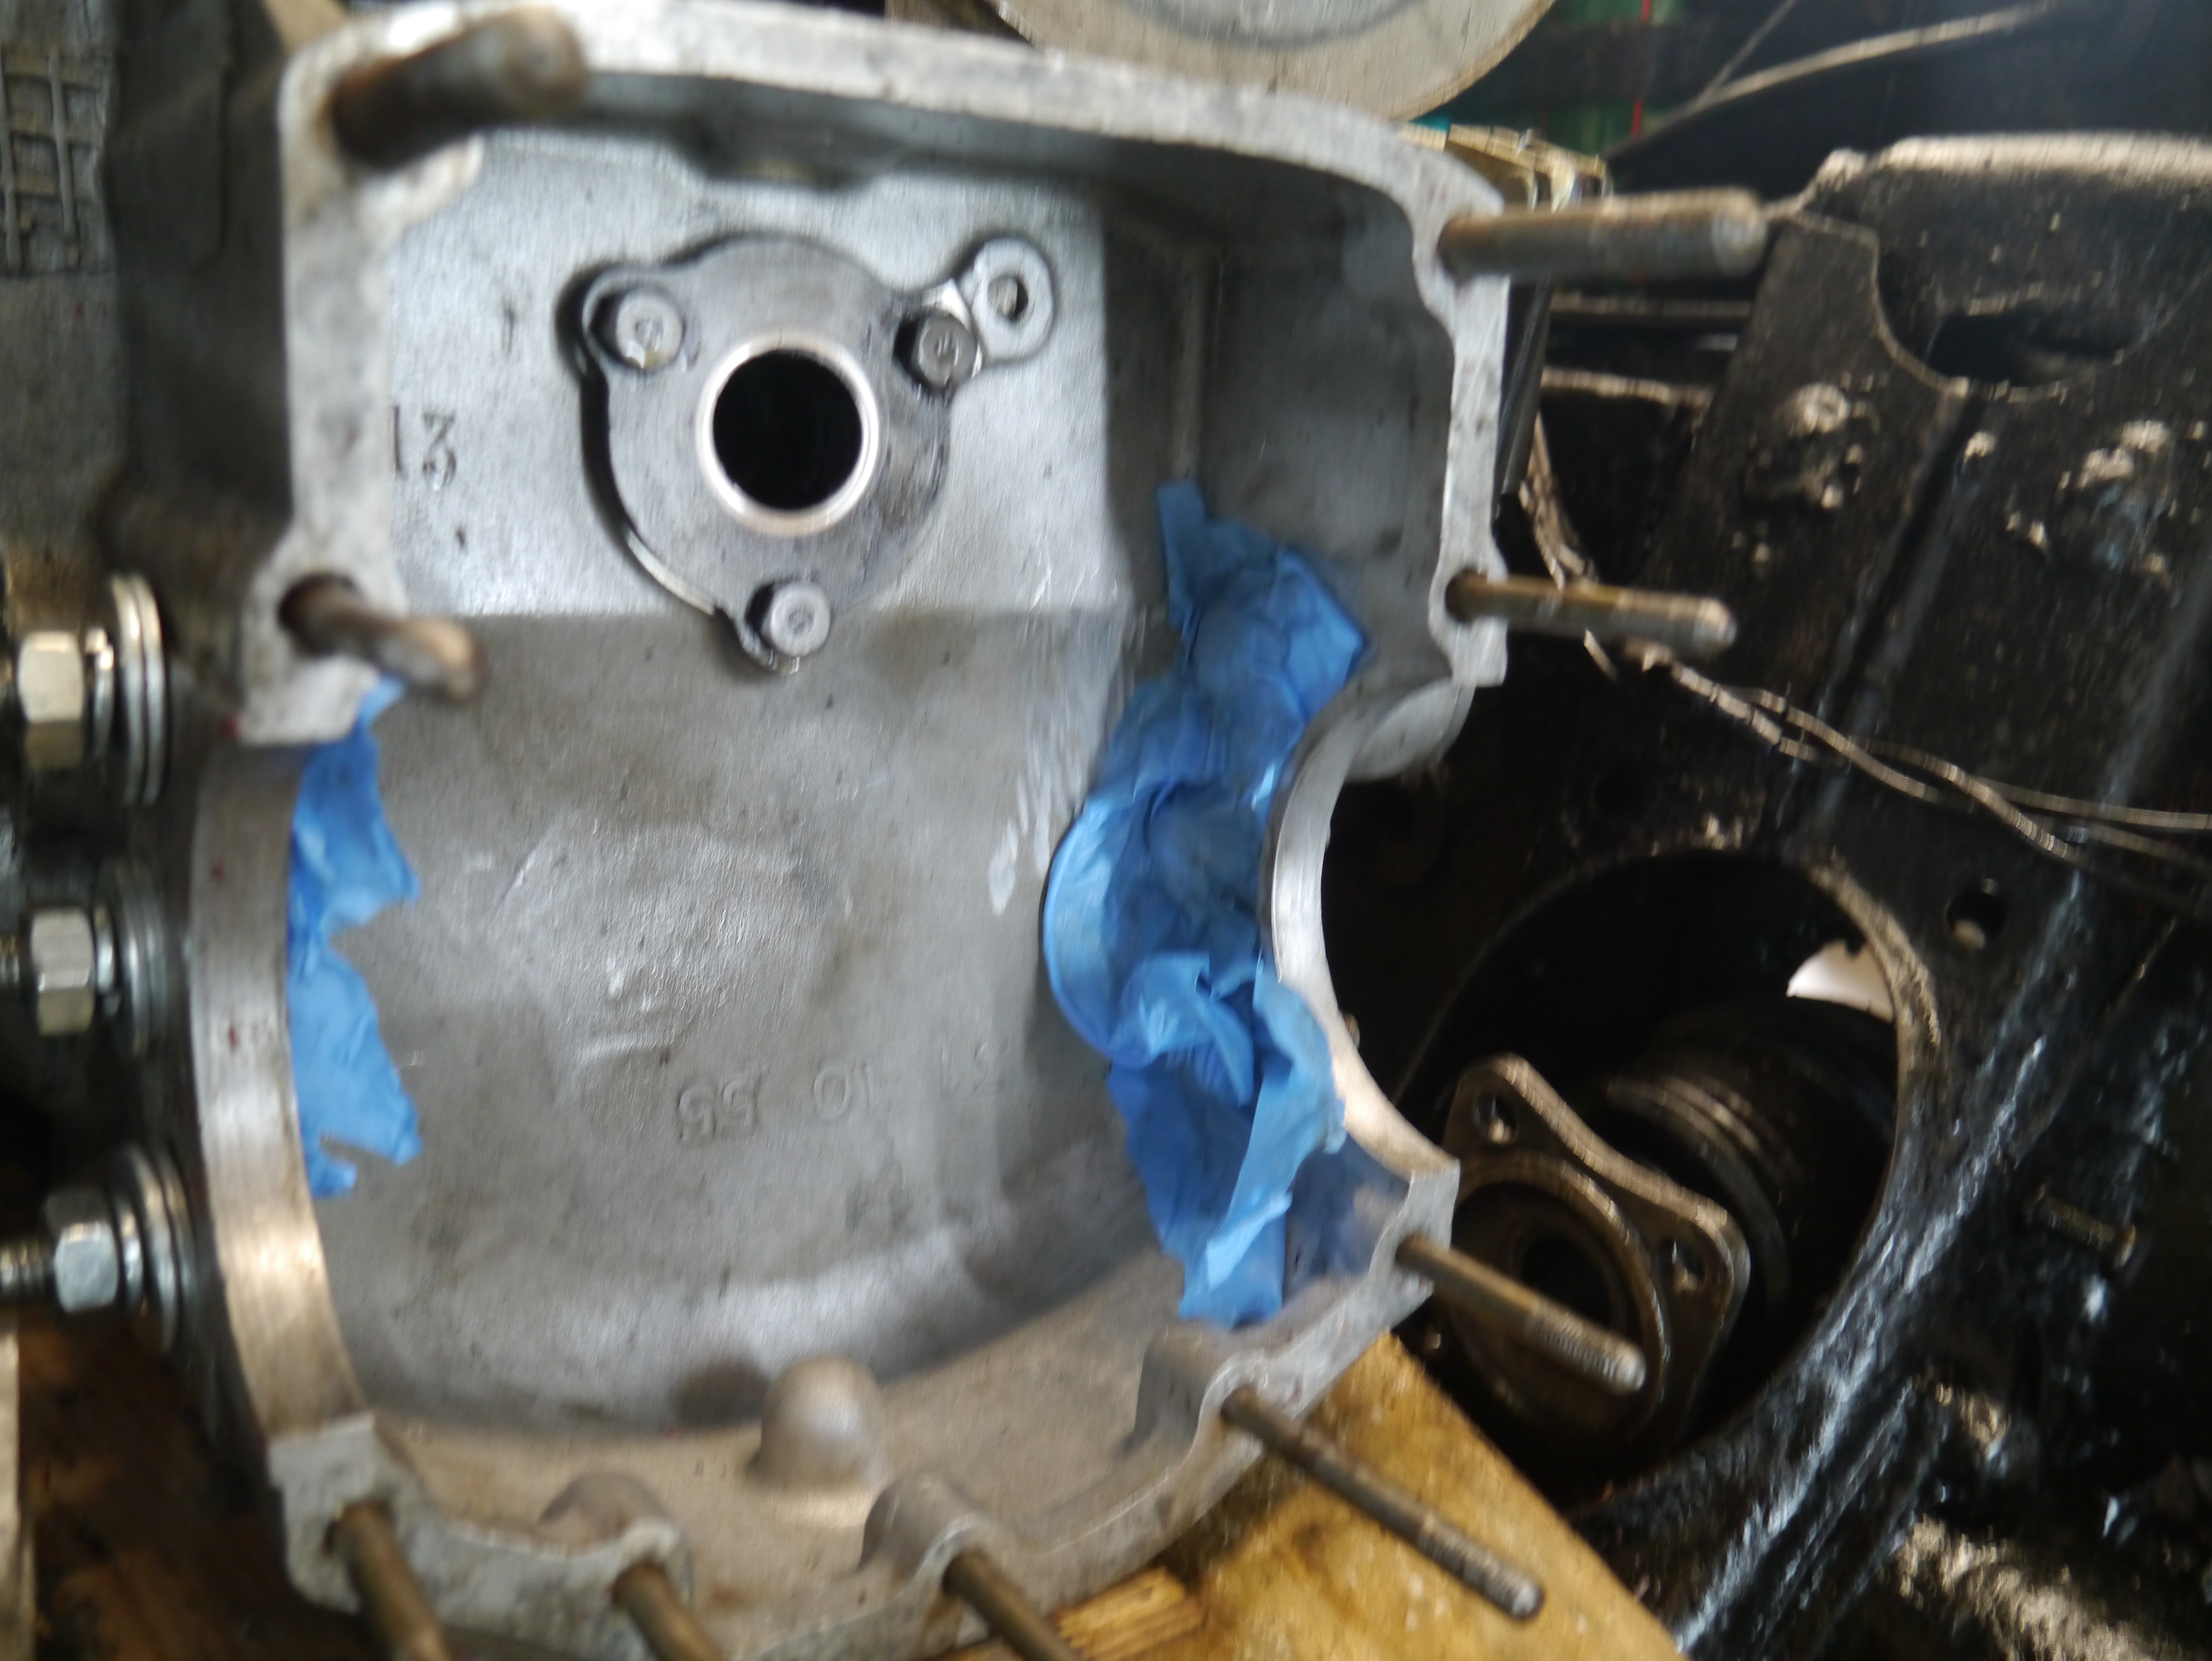
17) differentieel demonteren….
En daar zat de fout. Bij het demonteren van het differentieel bleek de pasbus die ik ooit had gemonteerd in het ID-kroonwiel om de uitgaande as van de TA te geleiden, vast zat om de uitgaande as en kennelijk geprobeerd had om te bewegen in het kroonwiel.
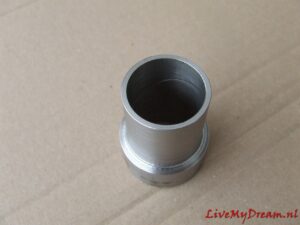
Het lijkt er op dat er onvoldoende vrije ruimte zat in de binnenkant en te veel aan de buitenkant. Ik heb destijds die pasbus uit de vriezer gehaald en in het in de oven verwarmde kroonwiel geplaatst maar dat is geen garantie voor succes gebleken.
Na het uitpersen van as en bus uit het kroonwiel blijkt de schade oppervlakkig. De buitenkant van de pasbus is het meest gehavend,
De binnenkant van het kroonwiel waar de as doorheen moet heb ik gehoond en de as met bus heb ik afgedraaid.
Dat afdraaien was nog wel een klusje want met de drieklauw op de draaibank kreeg ik het niet gecentreerd, ook niet met een vulbus. Dus de 4-klauw gemonteerd en ook met vulbus tegen eventuele schade om de spiebaan van de as heen, netjes gecentreerd midden op de as.
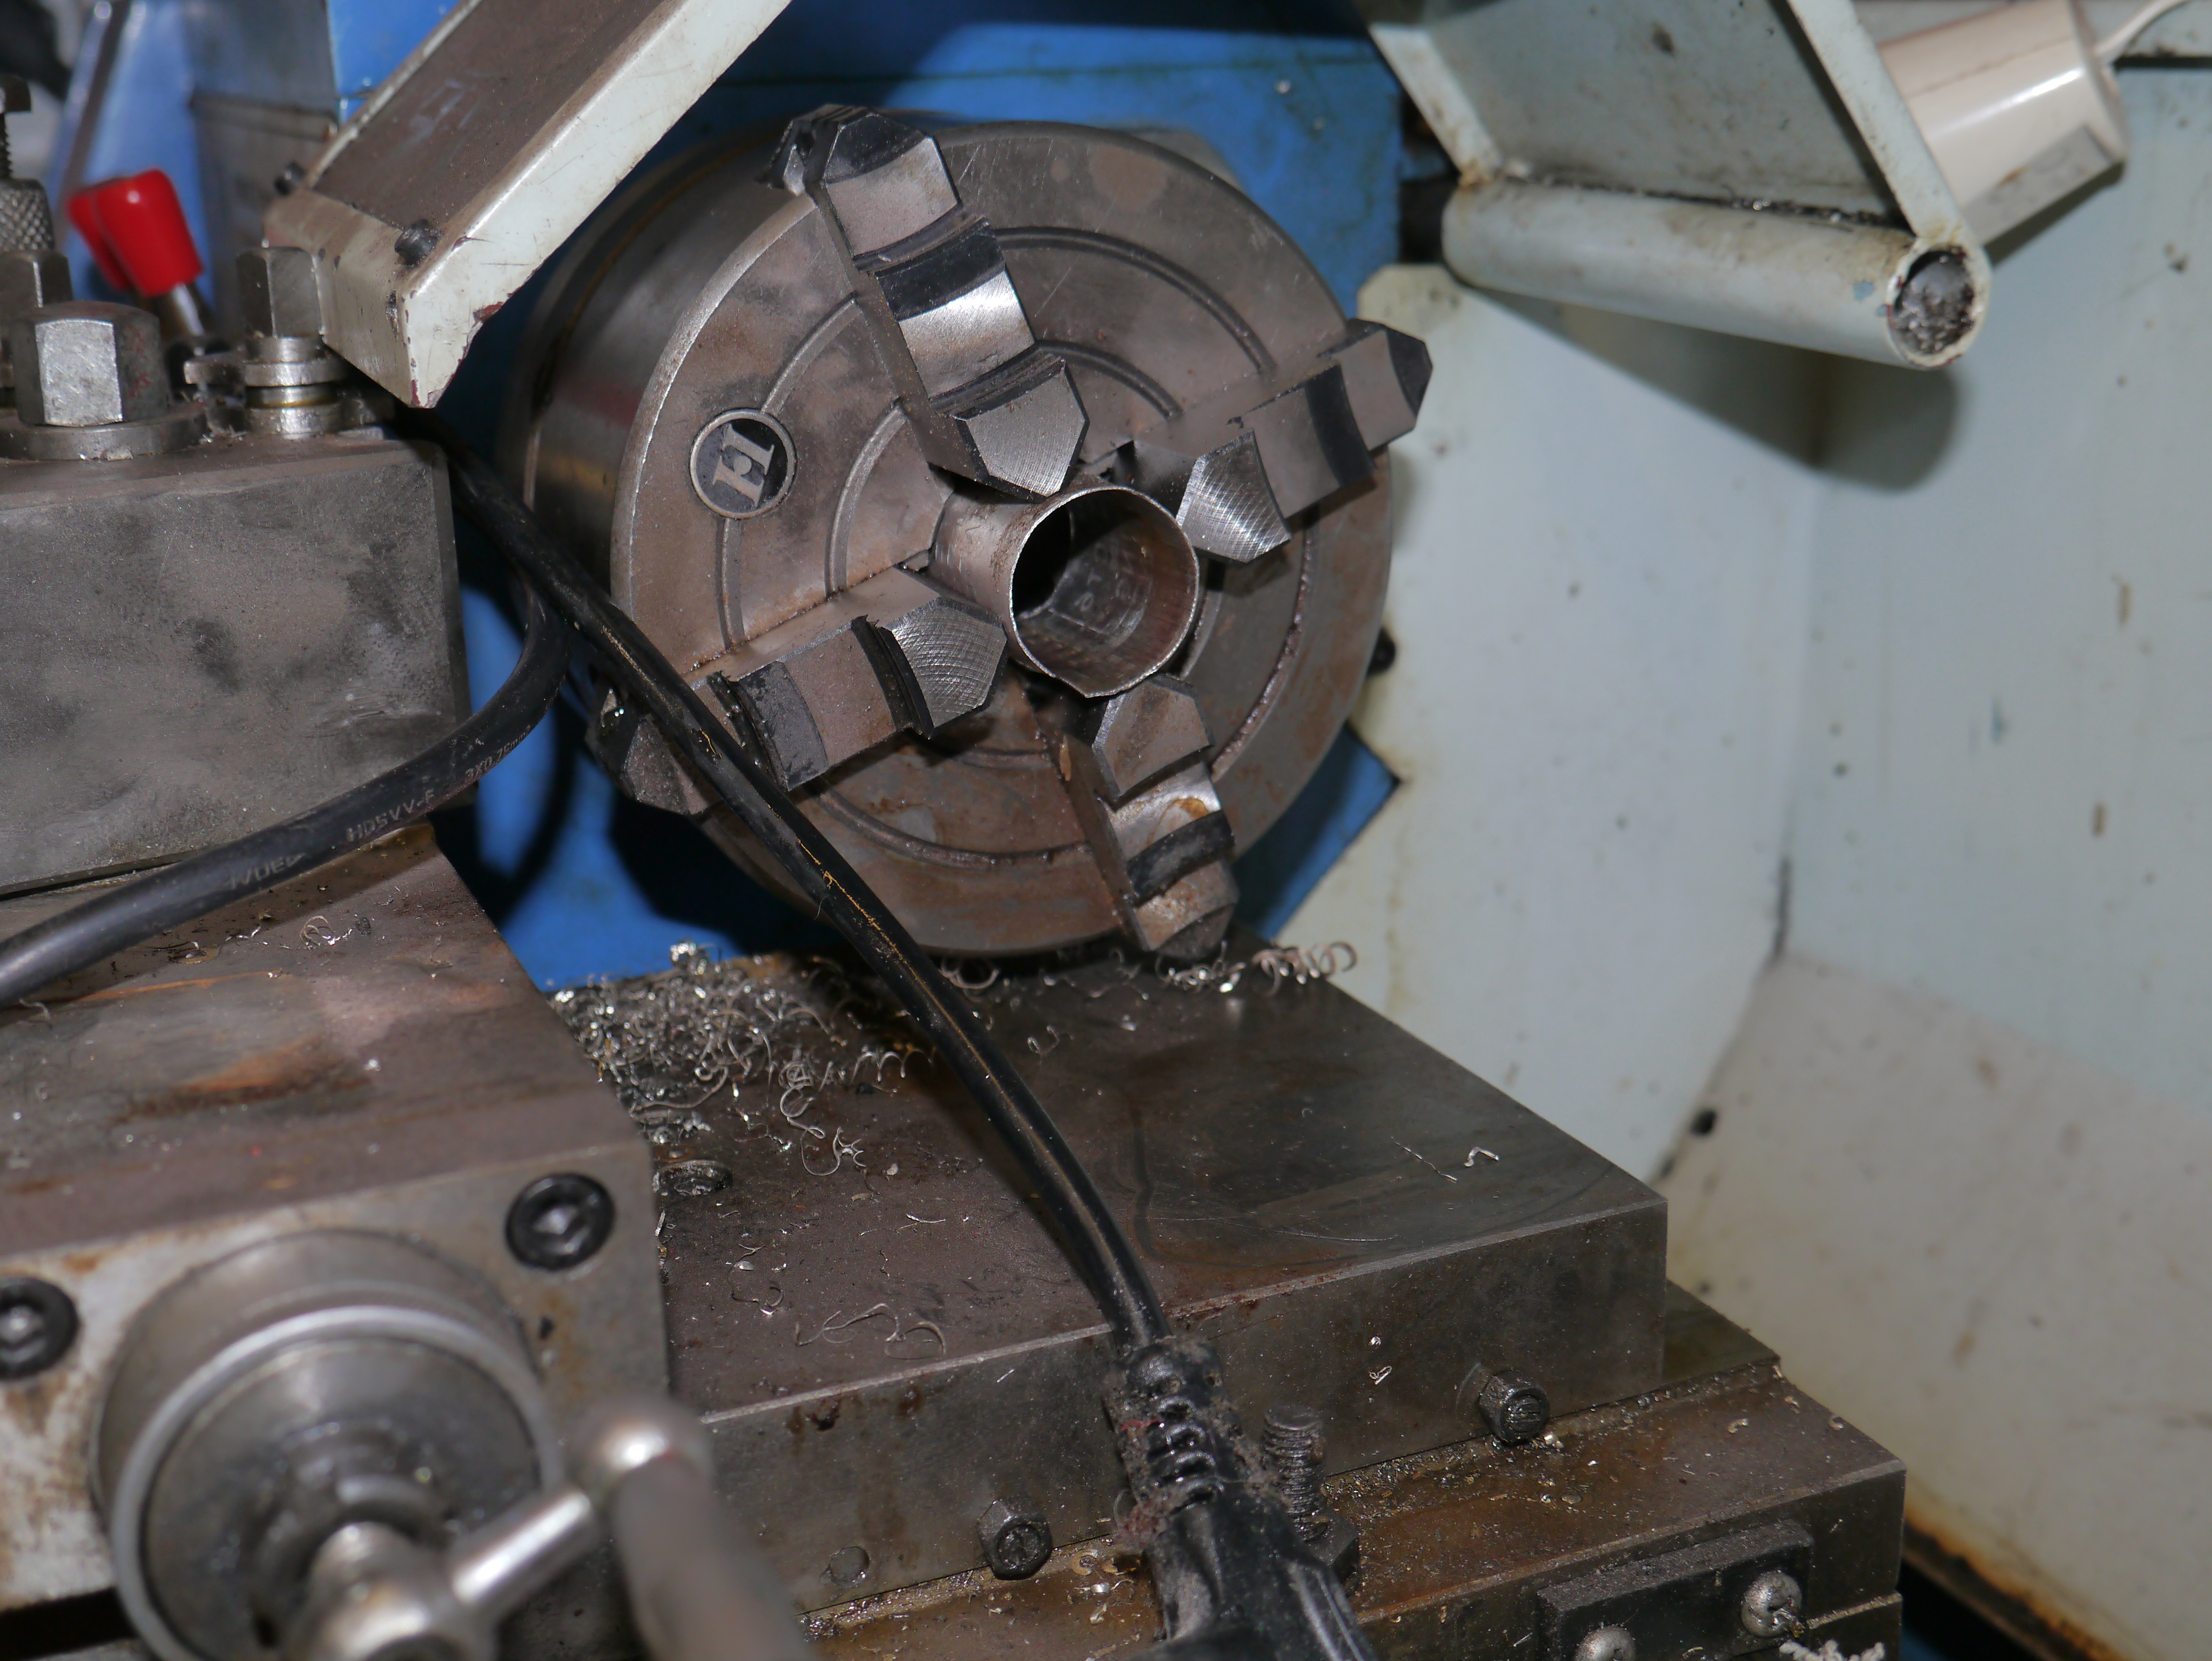
Daarna 0,14 mm in diameter afgedraaid, opgezuiverd met 1600 schuurpapier en olie erop. Het paste prima, zonder olie kun je de as net heen en weer bewegen. Met versnellingsbakolie dempt dat bewegen zodat je het net niet meer voelt. De dikke olie loopt er wel doorheen , zelfs in koude toestand loopt de olie door naar het binnenste deel waar de fiber ring tegen het kroonwiel aan ligt.
Dat is fijn! Nu nog even alles weer monteren!
Van deze fase heb ik destijds geen aantekeningen of detailfoto’s bewaard, en nu weer niet. Dan ben ik gewoon te veel bezig met wat ik aan het doen ben en zit fotograferen er niet in. Gelukkig heb ik nu alles wel onthouden en typ ik het dan maar voor een volgende keer in.
Van de weer gedeeltelijk gemonteerde onderdelen heb ik de volgende dag wel bovenstaande foto’s gemaakt . Ook van de draaibank en de vulbus in de 4-klauw…
Heel grappig, dat ik nog wel wist waarom de bouten van het differentieel allemaal verschillend zijn. Je hebt nl 4 gewone korte bouwen, 3 lange bouten met een soort van afgedraaide lange bolle punt en één afgevlakte bout met een speciaal merkteken. De 3 lange bouten borgen nl. de assen van de planetaire-en satellietwielen. 2 stuks voor de korte assen en 1 voor de doorlopende as. ja kan het zien aan de streepjes aan het eind van de asjes. De doorlopende as wordt aan de andere kant niet vastgezet en de bout die hier in gaat met het speciale merkteken trekt dus alleen de beide helften van het differentieel aan, zoal;s alle 8 bouten overigens doen. Ook de 4 korte bouten.
Nu het differentieel weer in elkaar zit nog even de bouten borgen met de zijkant van de stalen borgplaatjes, door deze omhoog te slaan tegen een vlak deel van de boutkop.
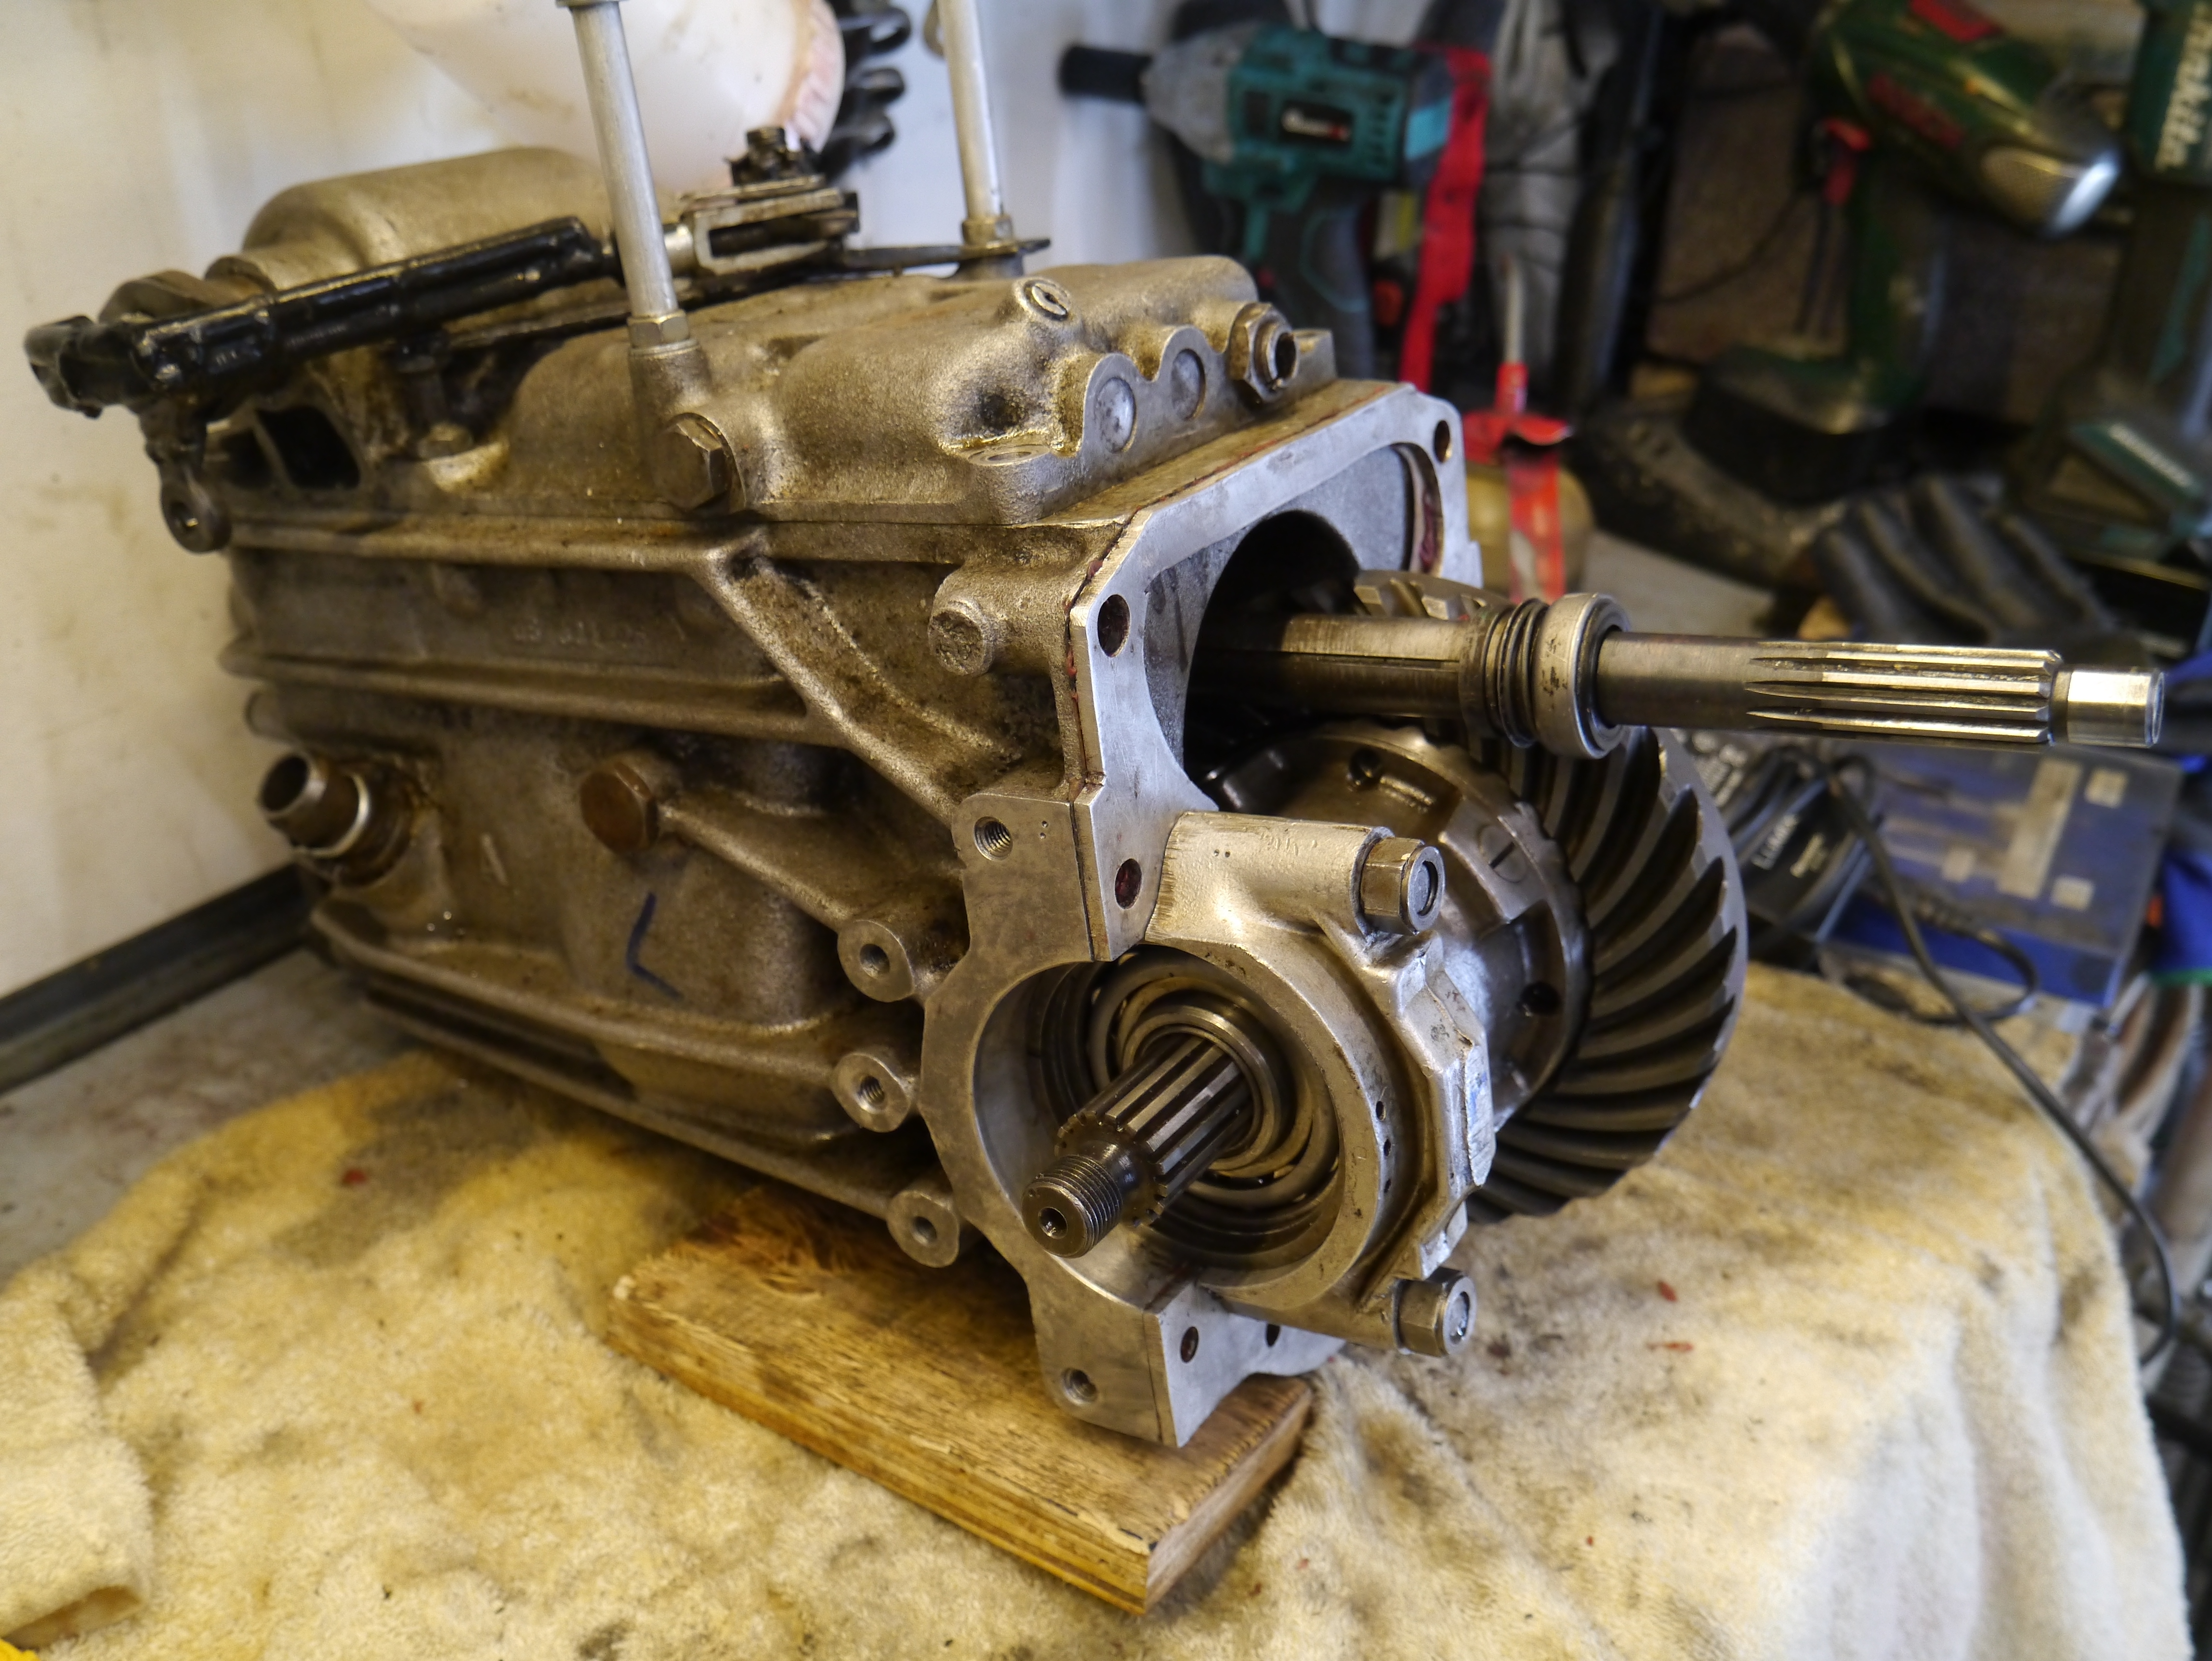
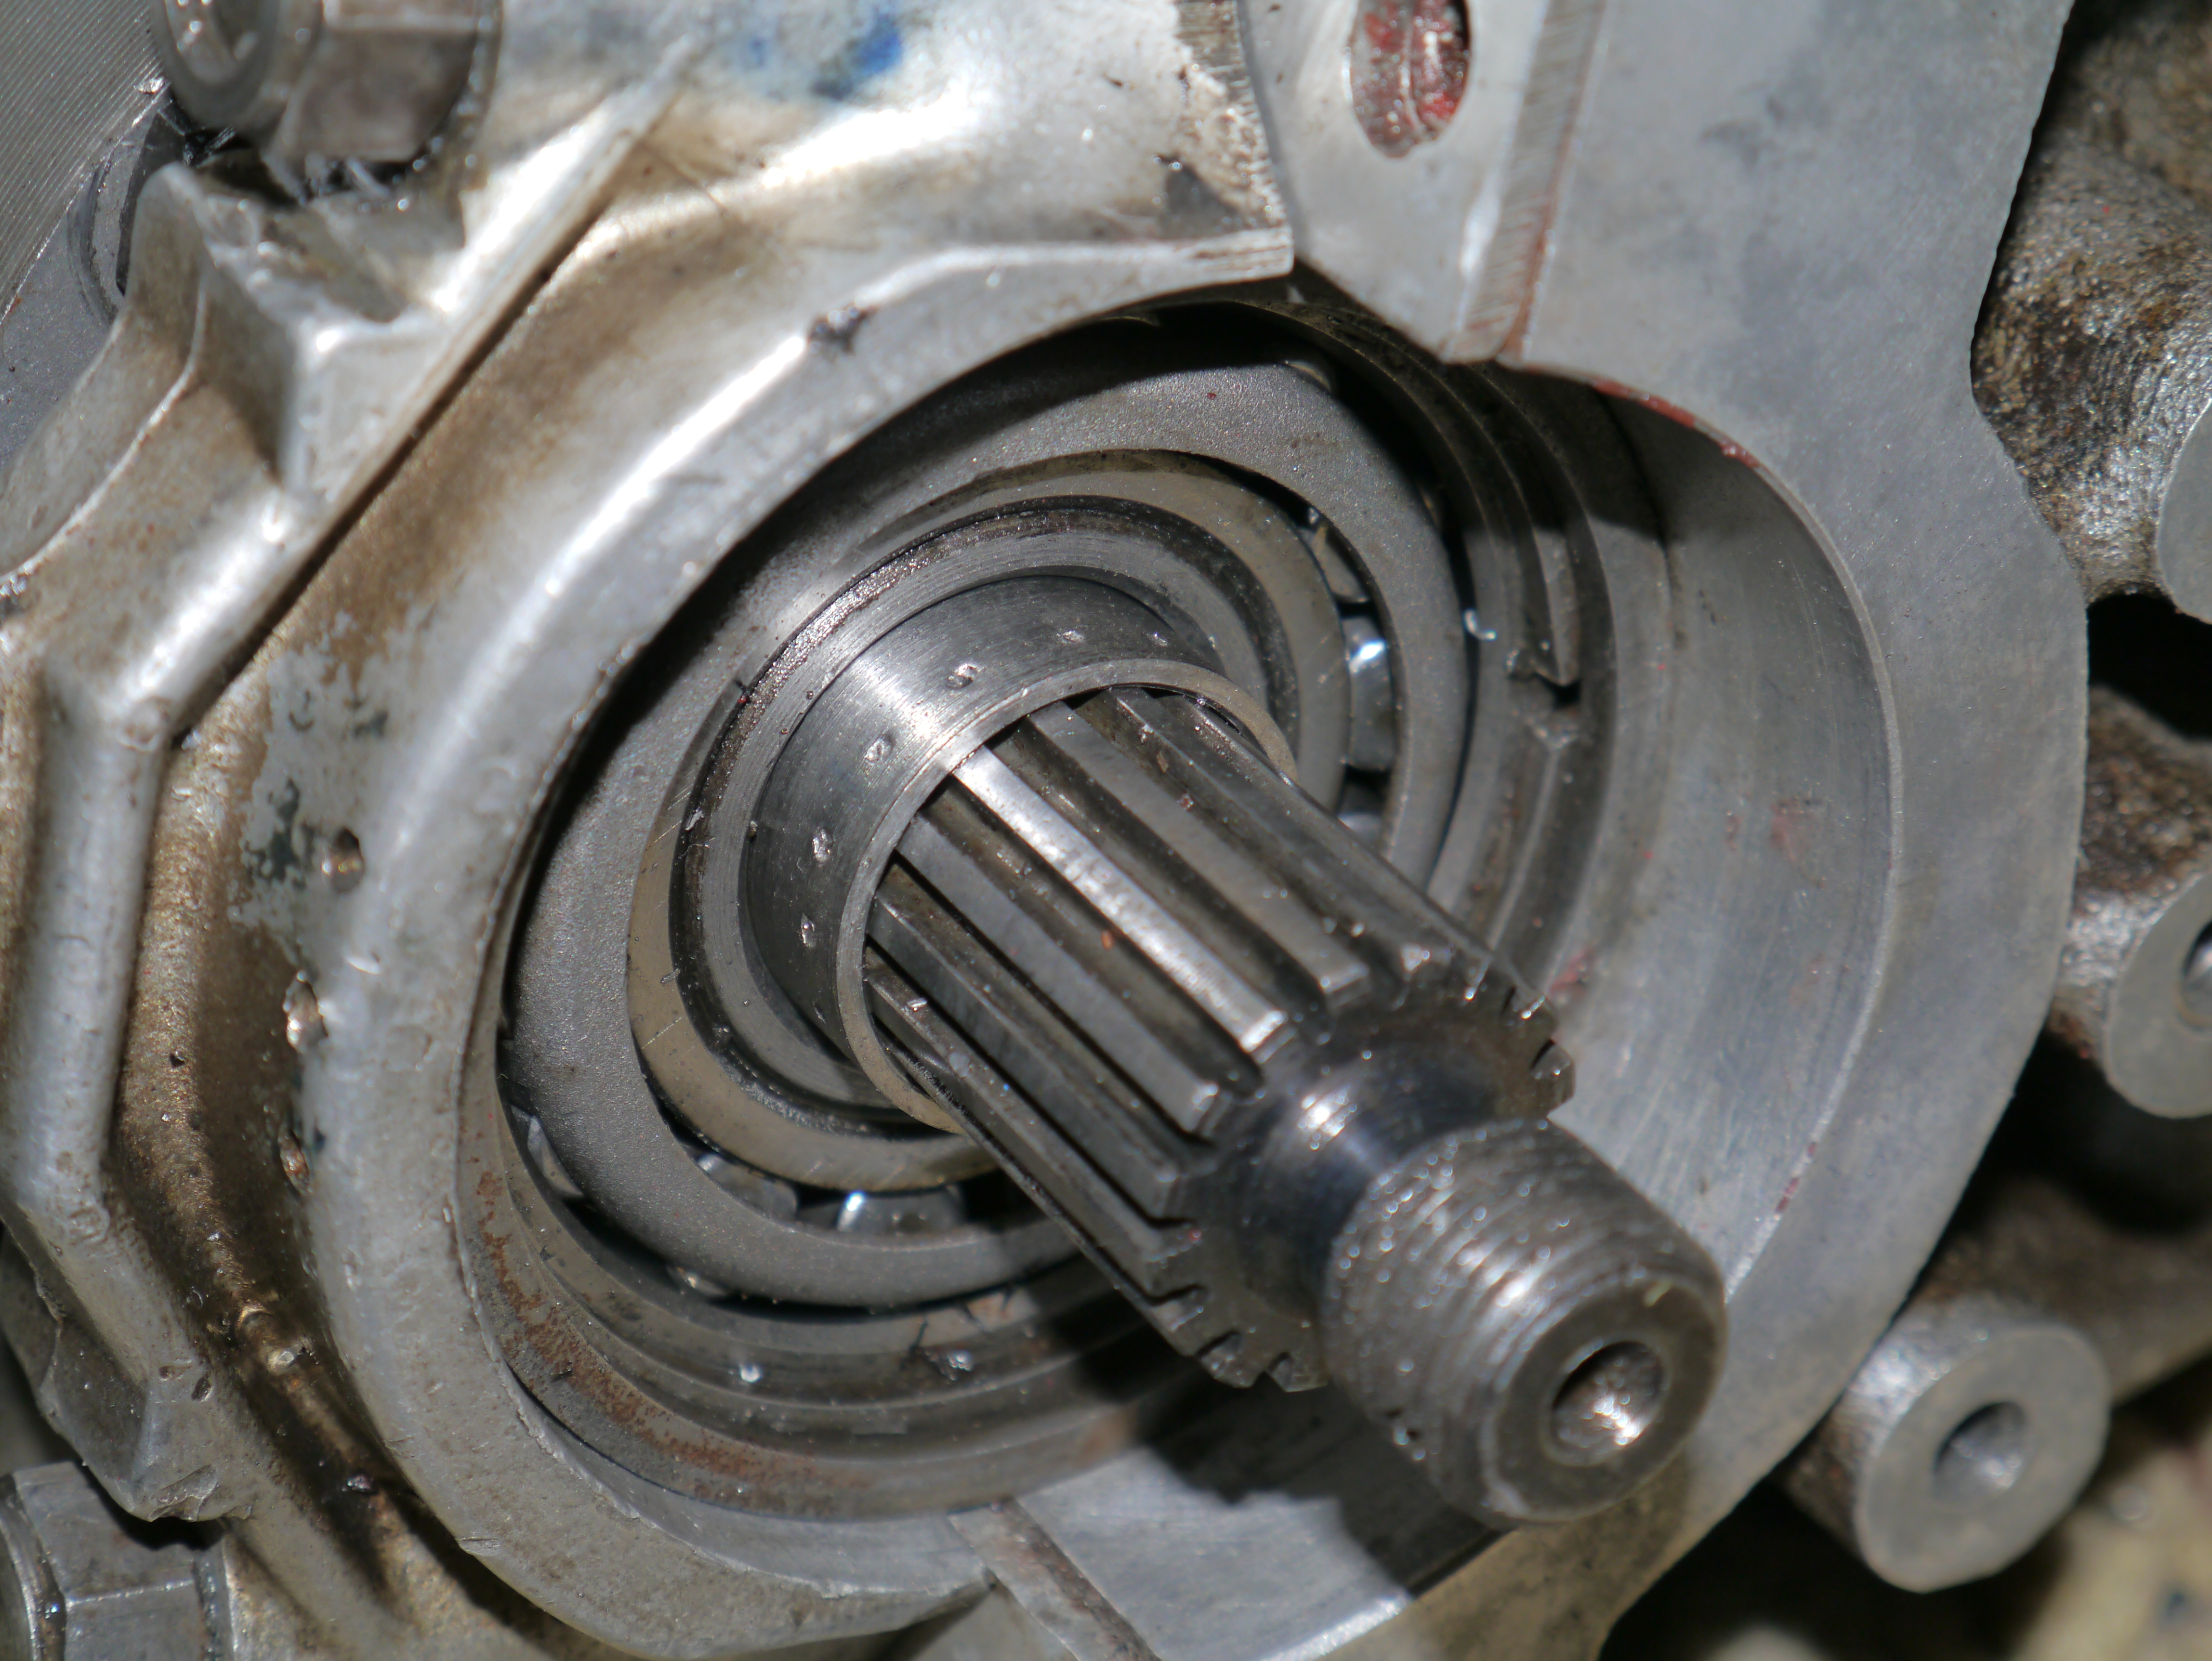
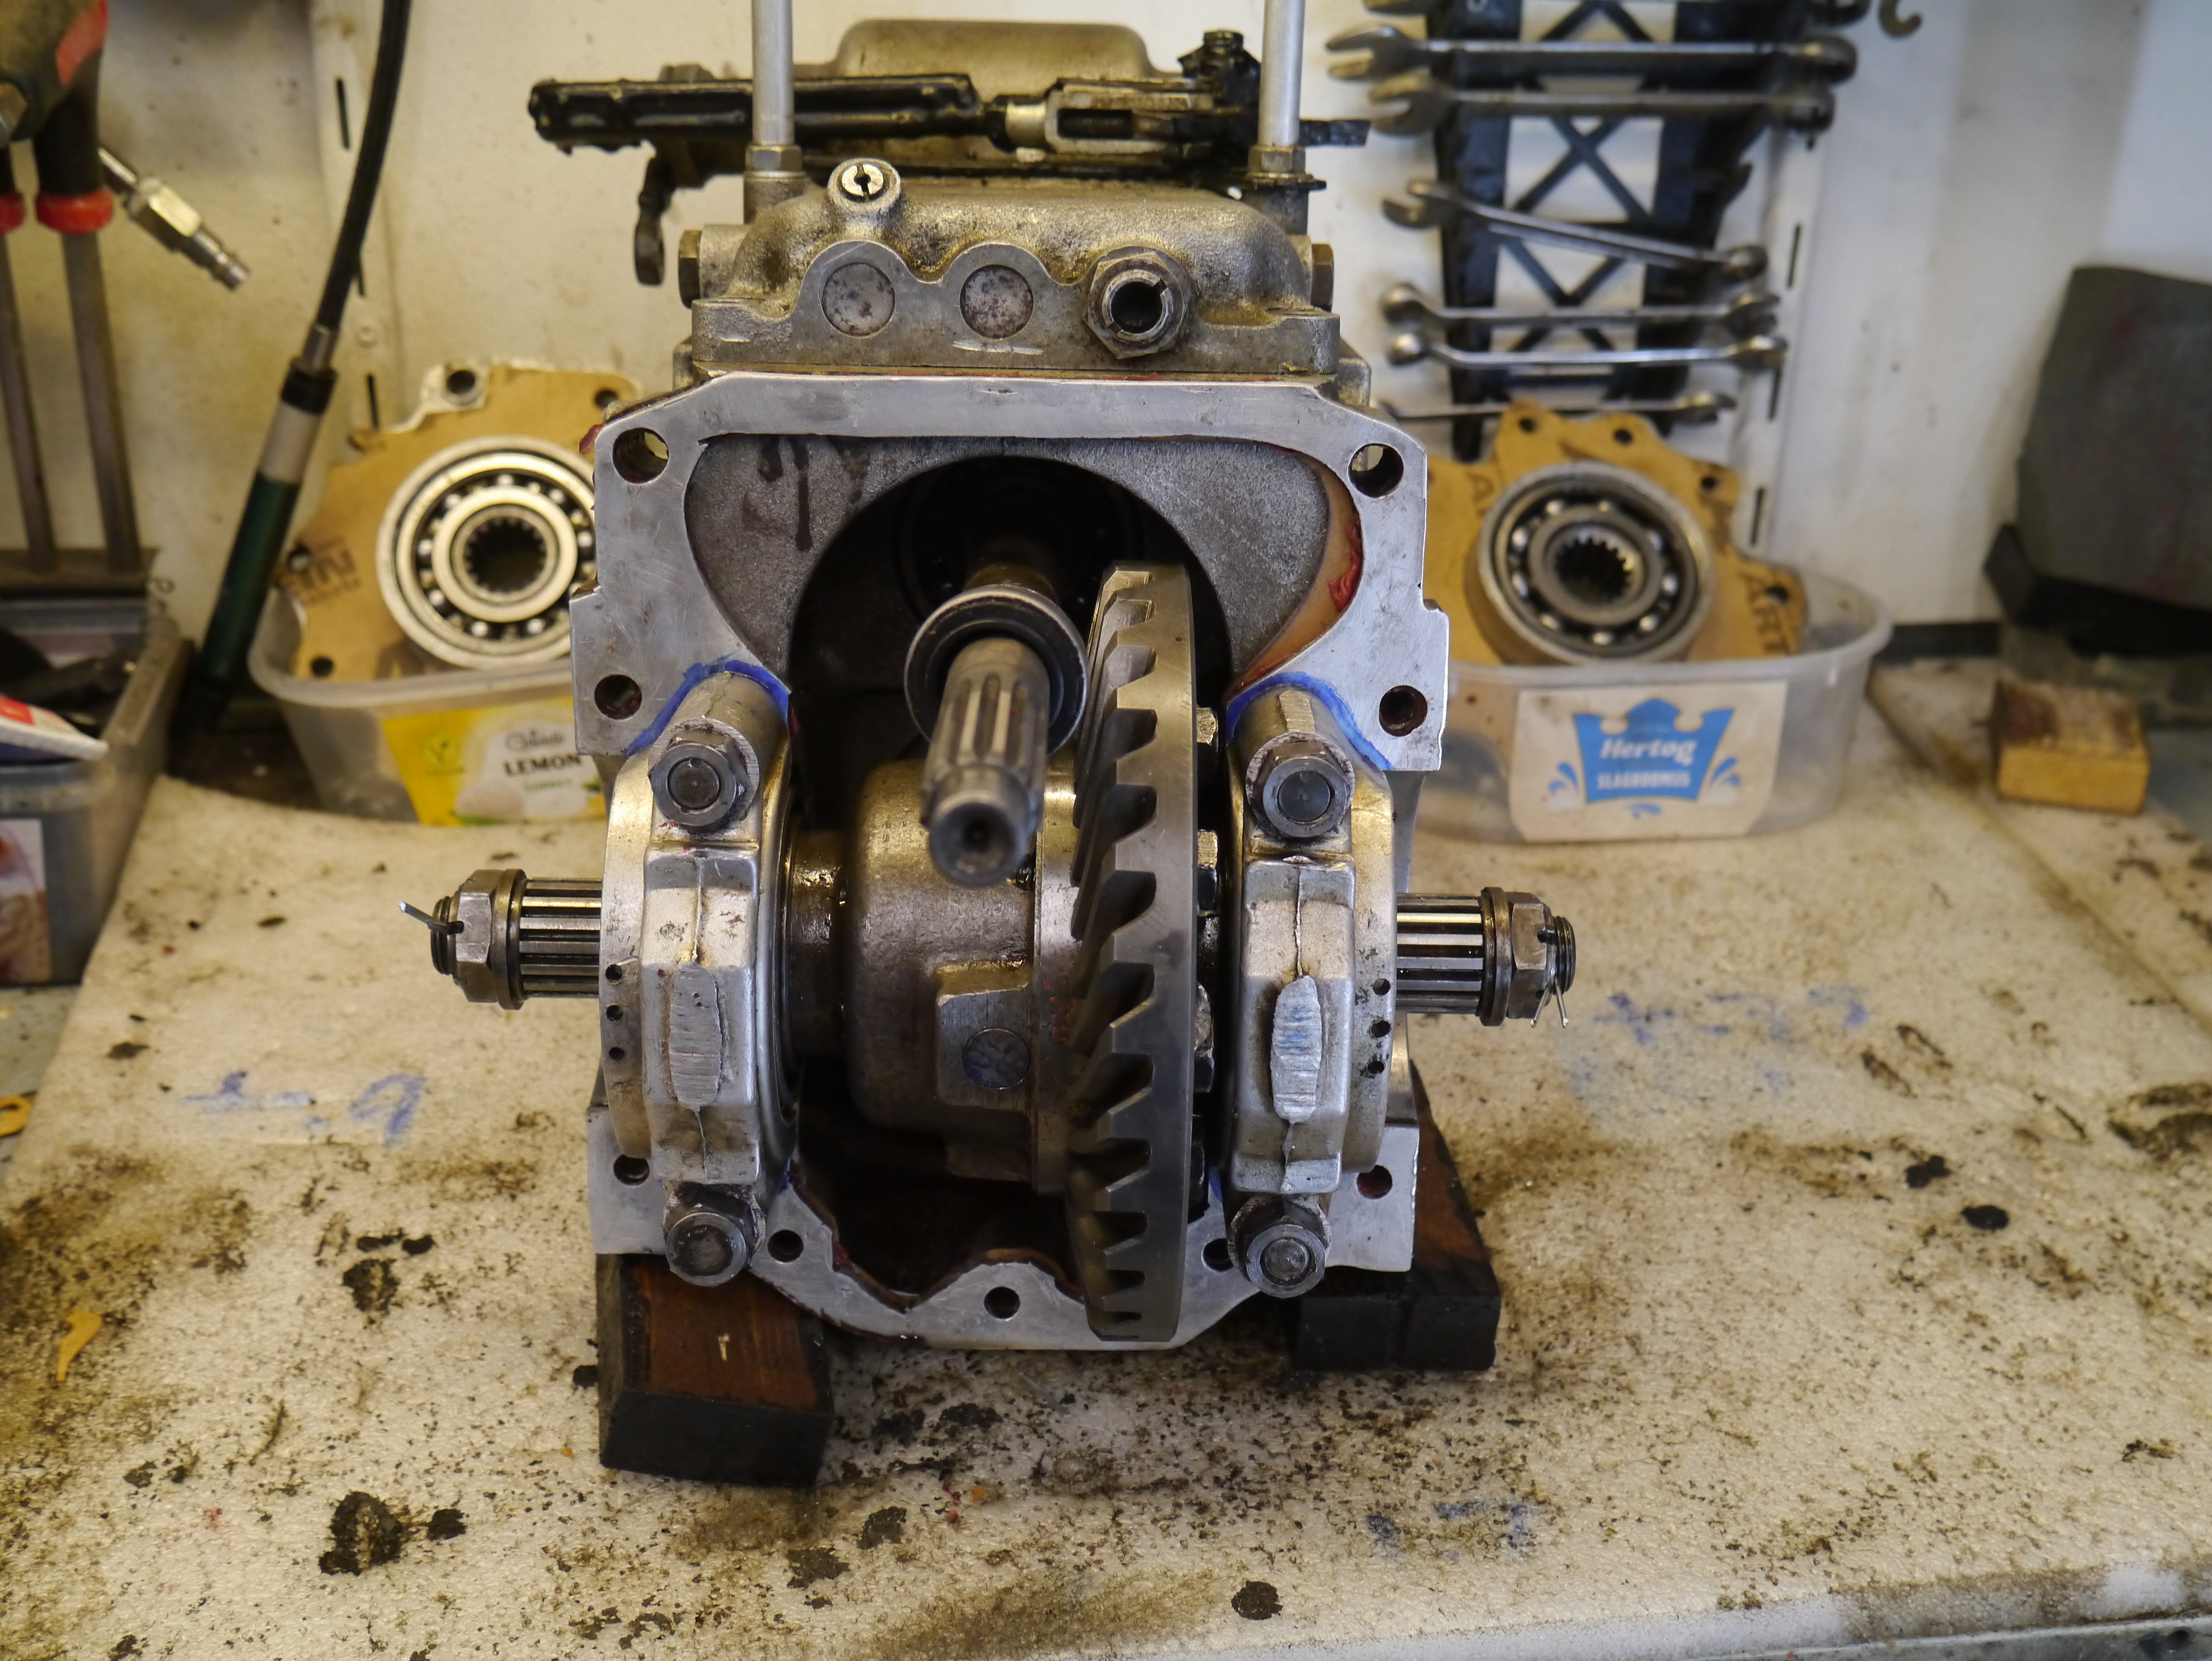
Het differentieel heb ik daarna weer in de bak geplaatst. De legers zijn aan het differentieel gebleven. Dus het differentieel in de bak plaatsen, lagerschalen erop, pasringen (wel de juiste set aan de juiste kant natuurlijk) ertegen en de lagerkappen en moeren erop. Alles los-vast monteren en aanduwen vanaf beide zijden. Gewoon met de hand.
DAG 3 – montage
Vanwege de combinatie van de ID 4-bak met het TA koppelingshuis heb ik een paar zaken die lastiger zijn van elke andere combinatie die origineel is.
Bij een TA koppelingshuis en TA 3-bak is het heel erg simpel, alleen moet je het differentieel zelf heel goed afstellen met de grote schroefringen zodat de timken lagers op de juiste plek en spanning komen waardoor de speling tussen pignon en kroonwiel op norm is.
Bij een ID koppelingshuis en ID 4-bak is het nog gemakkelijker, omdat alles in de fabriek is ingesteld en de pasringen tussen flanges en timken lagers vanuit de fabriek zijn gemonteerd. Uit elkaar en weer in elkaar gaat zonder opnieuw inmeten, mits je de juiste dikte originele pakkingen gebruikt en hetzelfde differentieel/lagers/pasringen monteert.
Omdat ik bij mijn ombouw per se GEEN ID koppelingshuis wilde gebruiken want dit past n.m.m. helemaal niet bij de TA, heb ik een oplossing gebouwd die wat minder eenvoudig is om lekdicht te monteren,.
Dit staat uitgebreid beschreven in mijn artikel Mijn TA 4-bak ombouw
Eventuele aanvulling(en) op dat artikel zal ik hier opnemen!
De oorzaak van het probleem:
Vervelend om te moeten constateren, maar de realiteit is dat dit probleem echt door eigen schuld komt. Ik heb me onvoldoende gerealiseerd dat de pasbus in het differentieel niet is berekend op volle belasting met 60-70 km/uur en daardoor is de pasbus ‘vastgelast’ aan de binnenkant van de interne aandrijfas (passagierszijde). Mijn opzet om het linkerwiel (bestuurderszijde) op te krikken en daardoor de sensor te testen van de cruise control ging eerst nog even goed, maar opeens liep dat vast. Gelukkig geen ongelukken gebeurd in de garage, dat was ook nog mogelijk geweest. Ik had mijn voet op de koppeling en alles stond gelijk stil. Wel even schrikken natuurlijk.
De bedoeling van het differentieel is normaal gesproken alleen om zo weinig mogelijk verschil te hebben in de hoeveelheid omwentelingen van beide wielen. Rechtuit rijden gaat sowieso goed en bij bochten zit er iets verschil in dus normaal komen er geen grote wrijvingsverschillen tussen de ujitgaande assen en het differentieel. Met de huidige reparatie door de pasbus aan de buitenkant af te draaien is het wel weer opgelost, maar het blijft oppassen om niet nog een keer zo’n actie om 1 wiel te laten spinnen uit te voeren. De ruimte tussen het differentieel en de uitgaande as (en pasbus) heb ik qua tolerantie wel iets ruimer gemaakt dan de ruimte die ik bij de originele bouw aan de binnenkant van de pasbus heb aangehouden. De olie vloeit er in ieder geval goed doorheen, ook in koude toestand. Dat zou i.i.g. een meer stabiele werking moeten garanderen.
Aanvullingen m.b.t. de montage van de versnellingsbak:
In het ID-bakhuis heb ik alle M8-gaten die gebruikt worden om de beugel waarmee de bak en motor aan de eerste chassisbeugel wordt gemonteerd, voorzien van helicoils. dat zorgt voor een permanente goede fixatie. En dat is nodig, omdat ik bij de demontage merkte dat 2 van de 6 stuks M8-bouten waren losgekomen, ondanks montage met threadlocker.
De M8-gaten zijn onderdeel van de gaten rondom de flanges waarmee zowel (eerst) de flanges als (daarna) de ophangbeugel van de bak wordt gemonteerd.
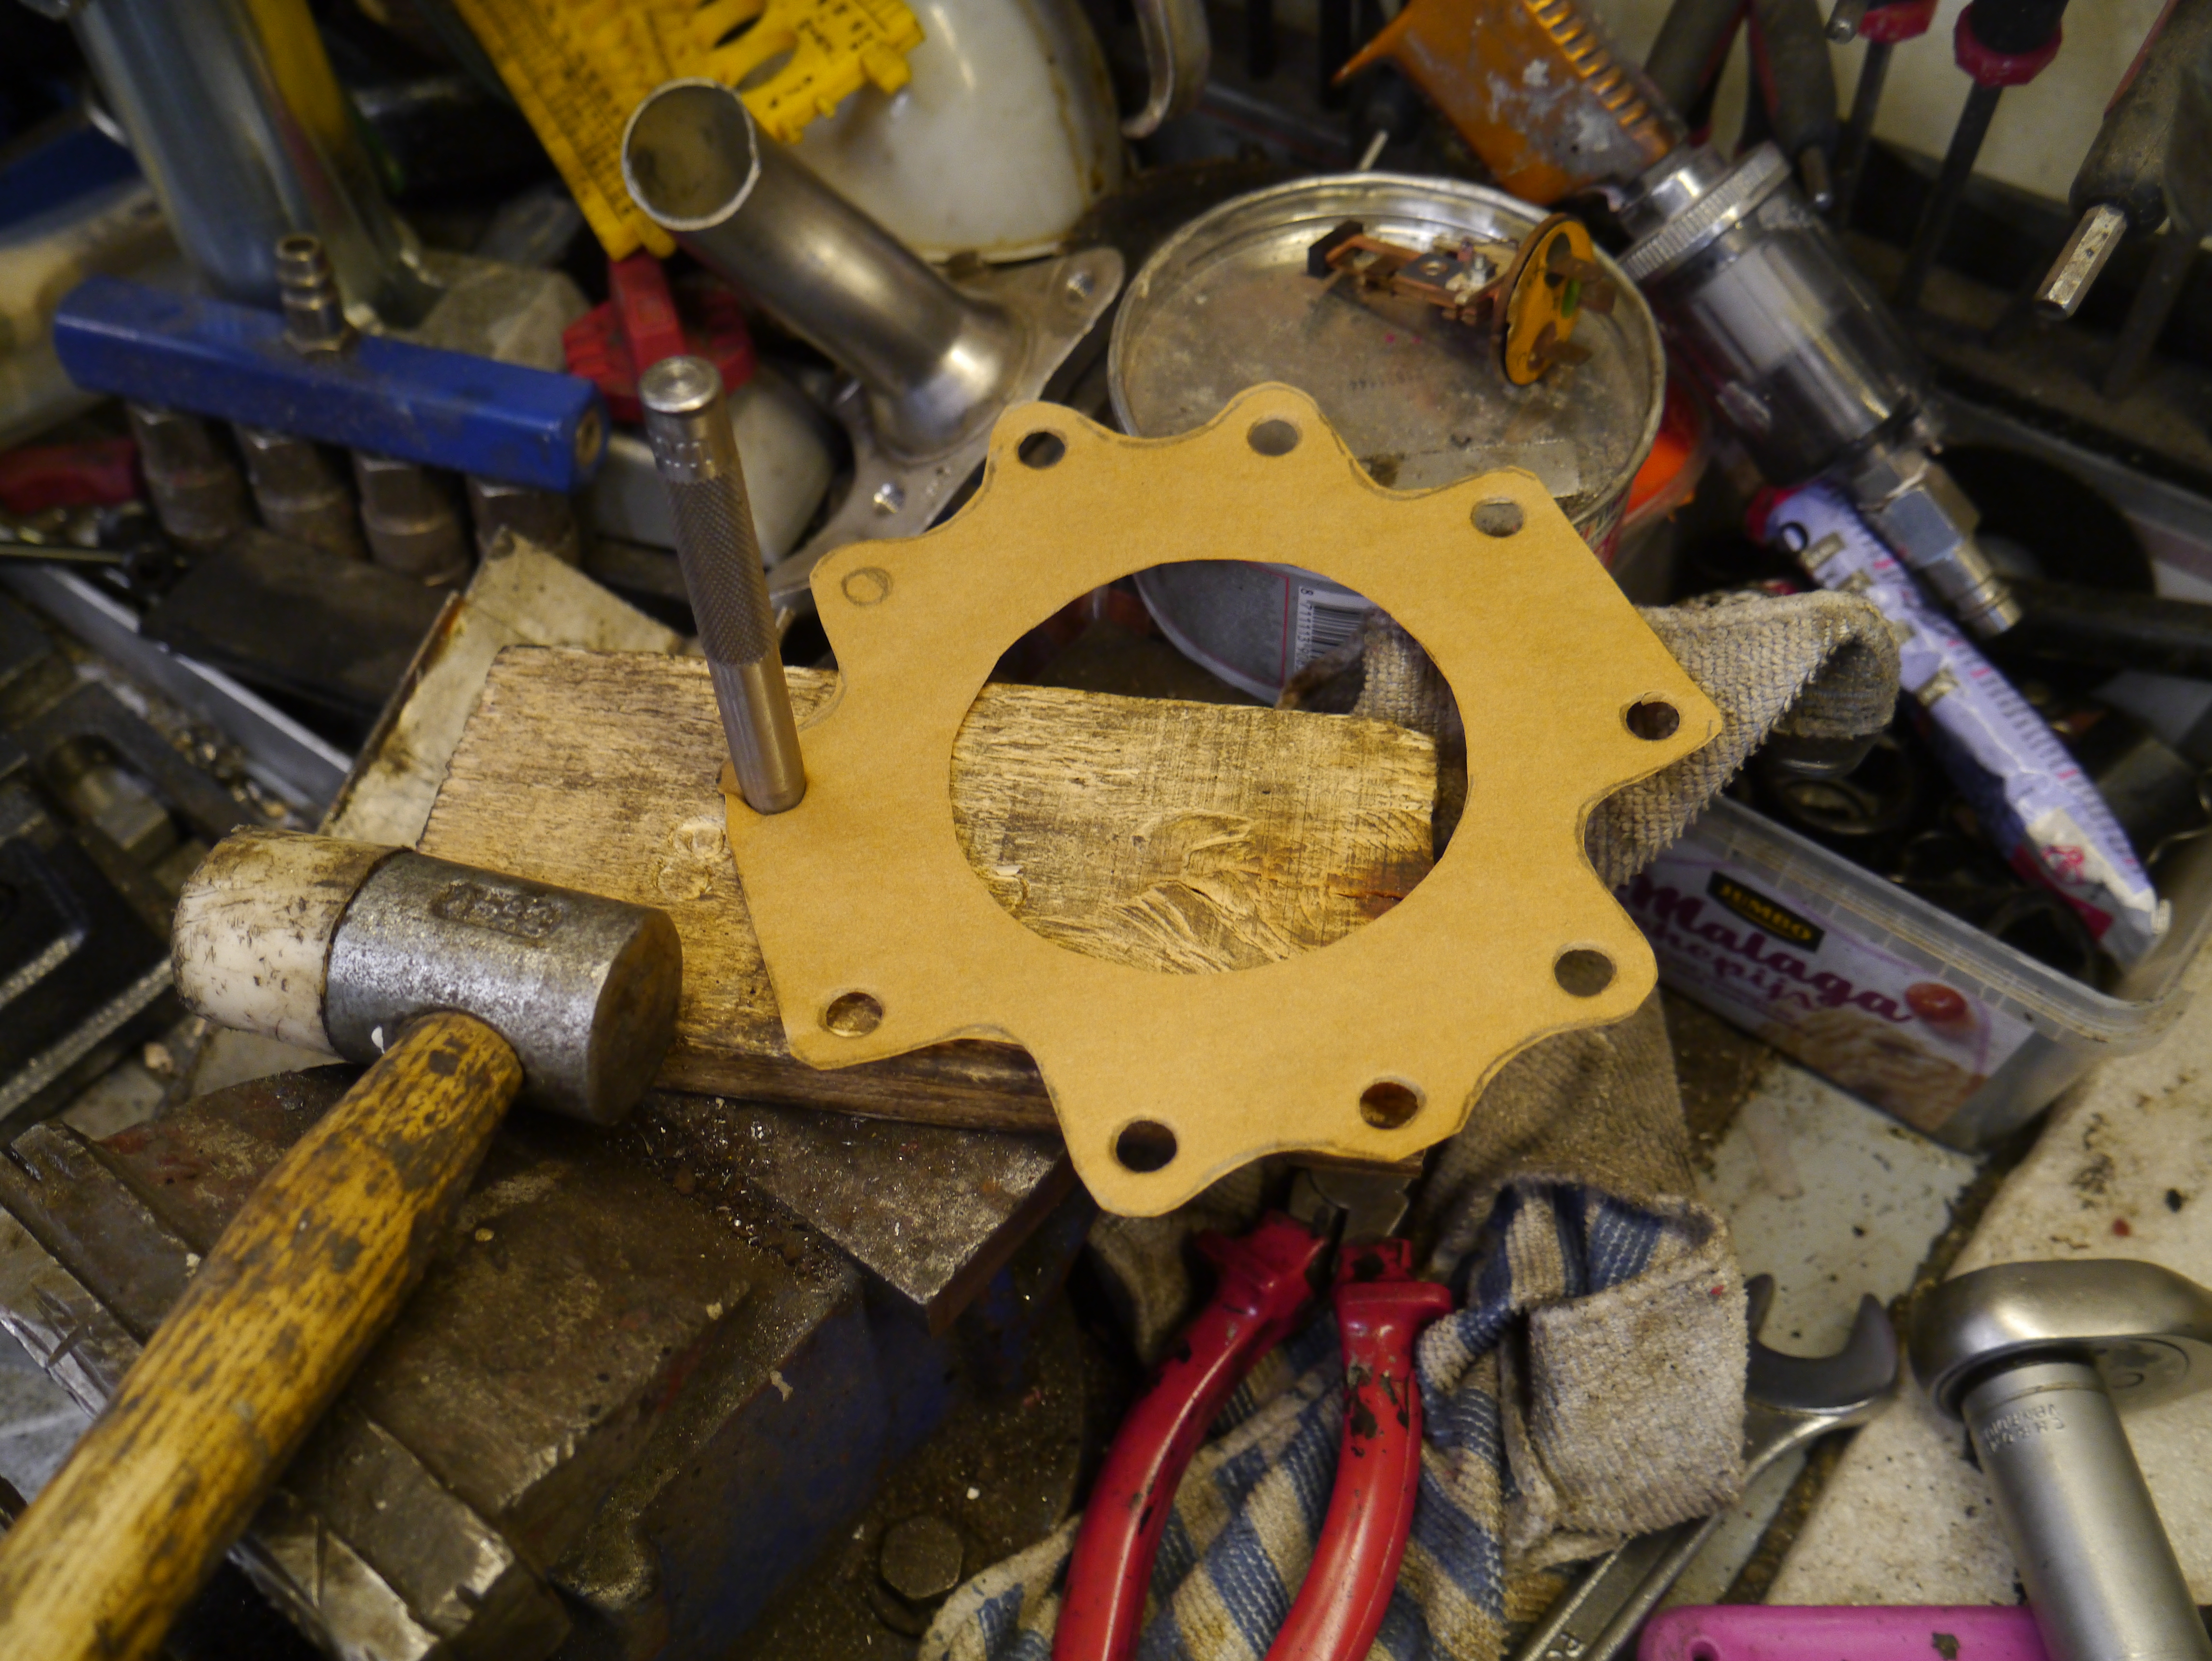
Om alles weer te monteren moet ik ook nog even nieuwe pakkingen maken…
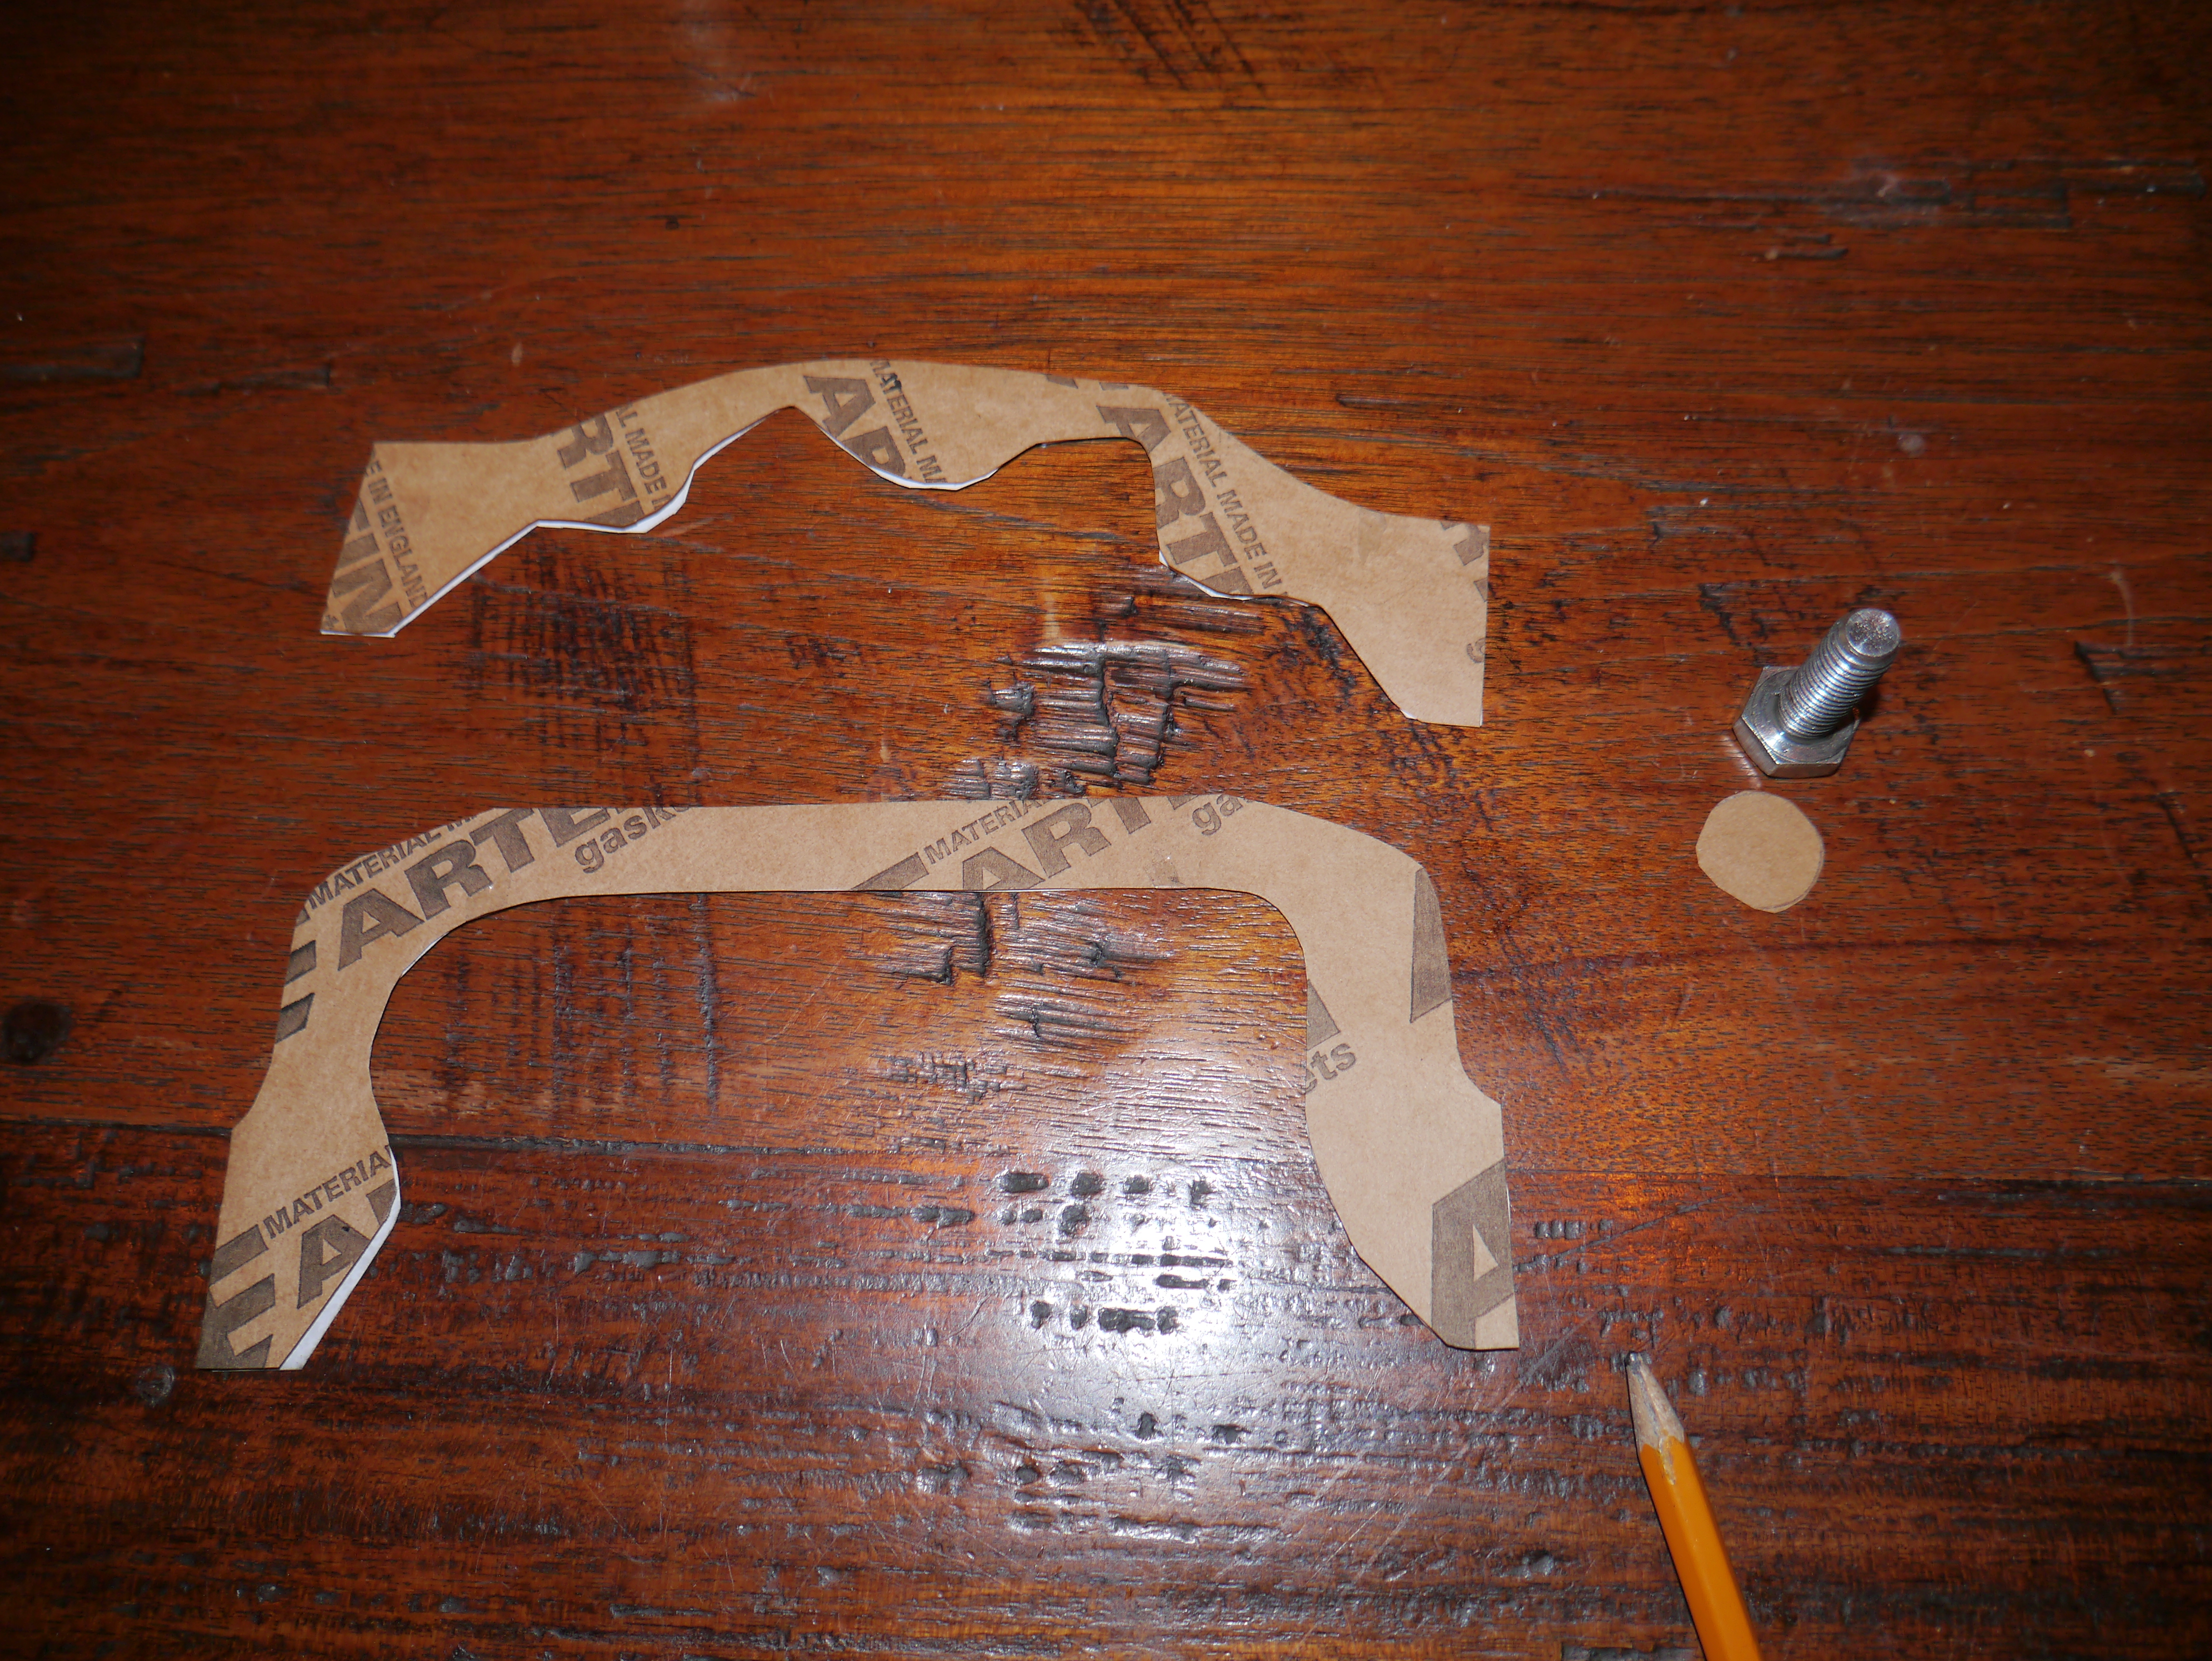


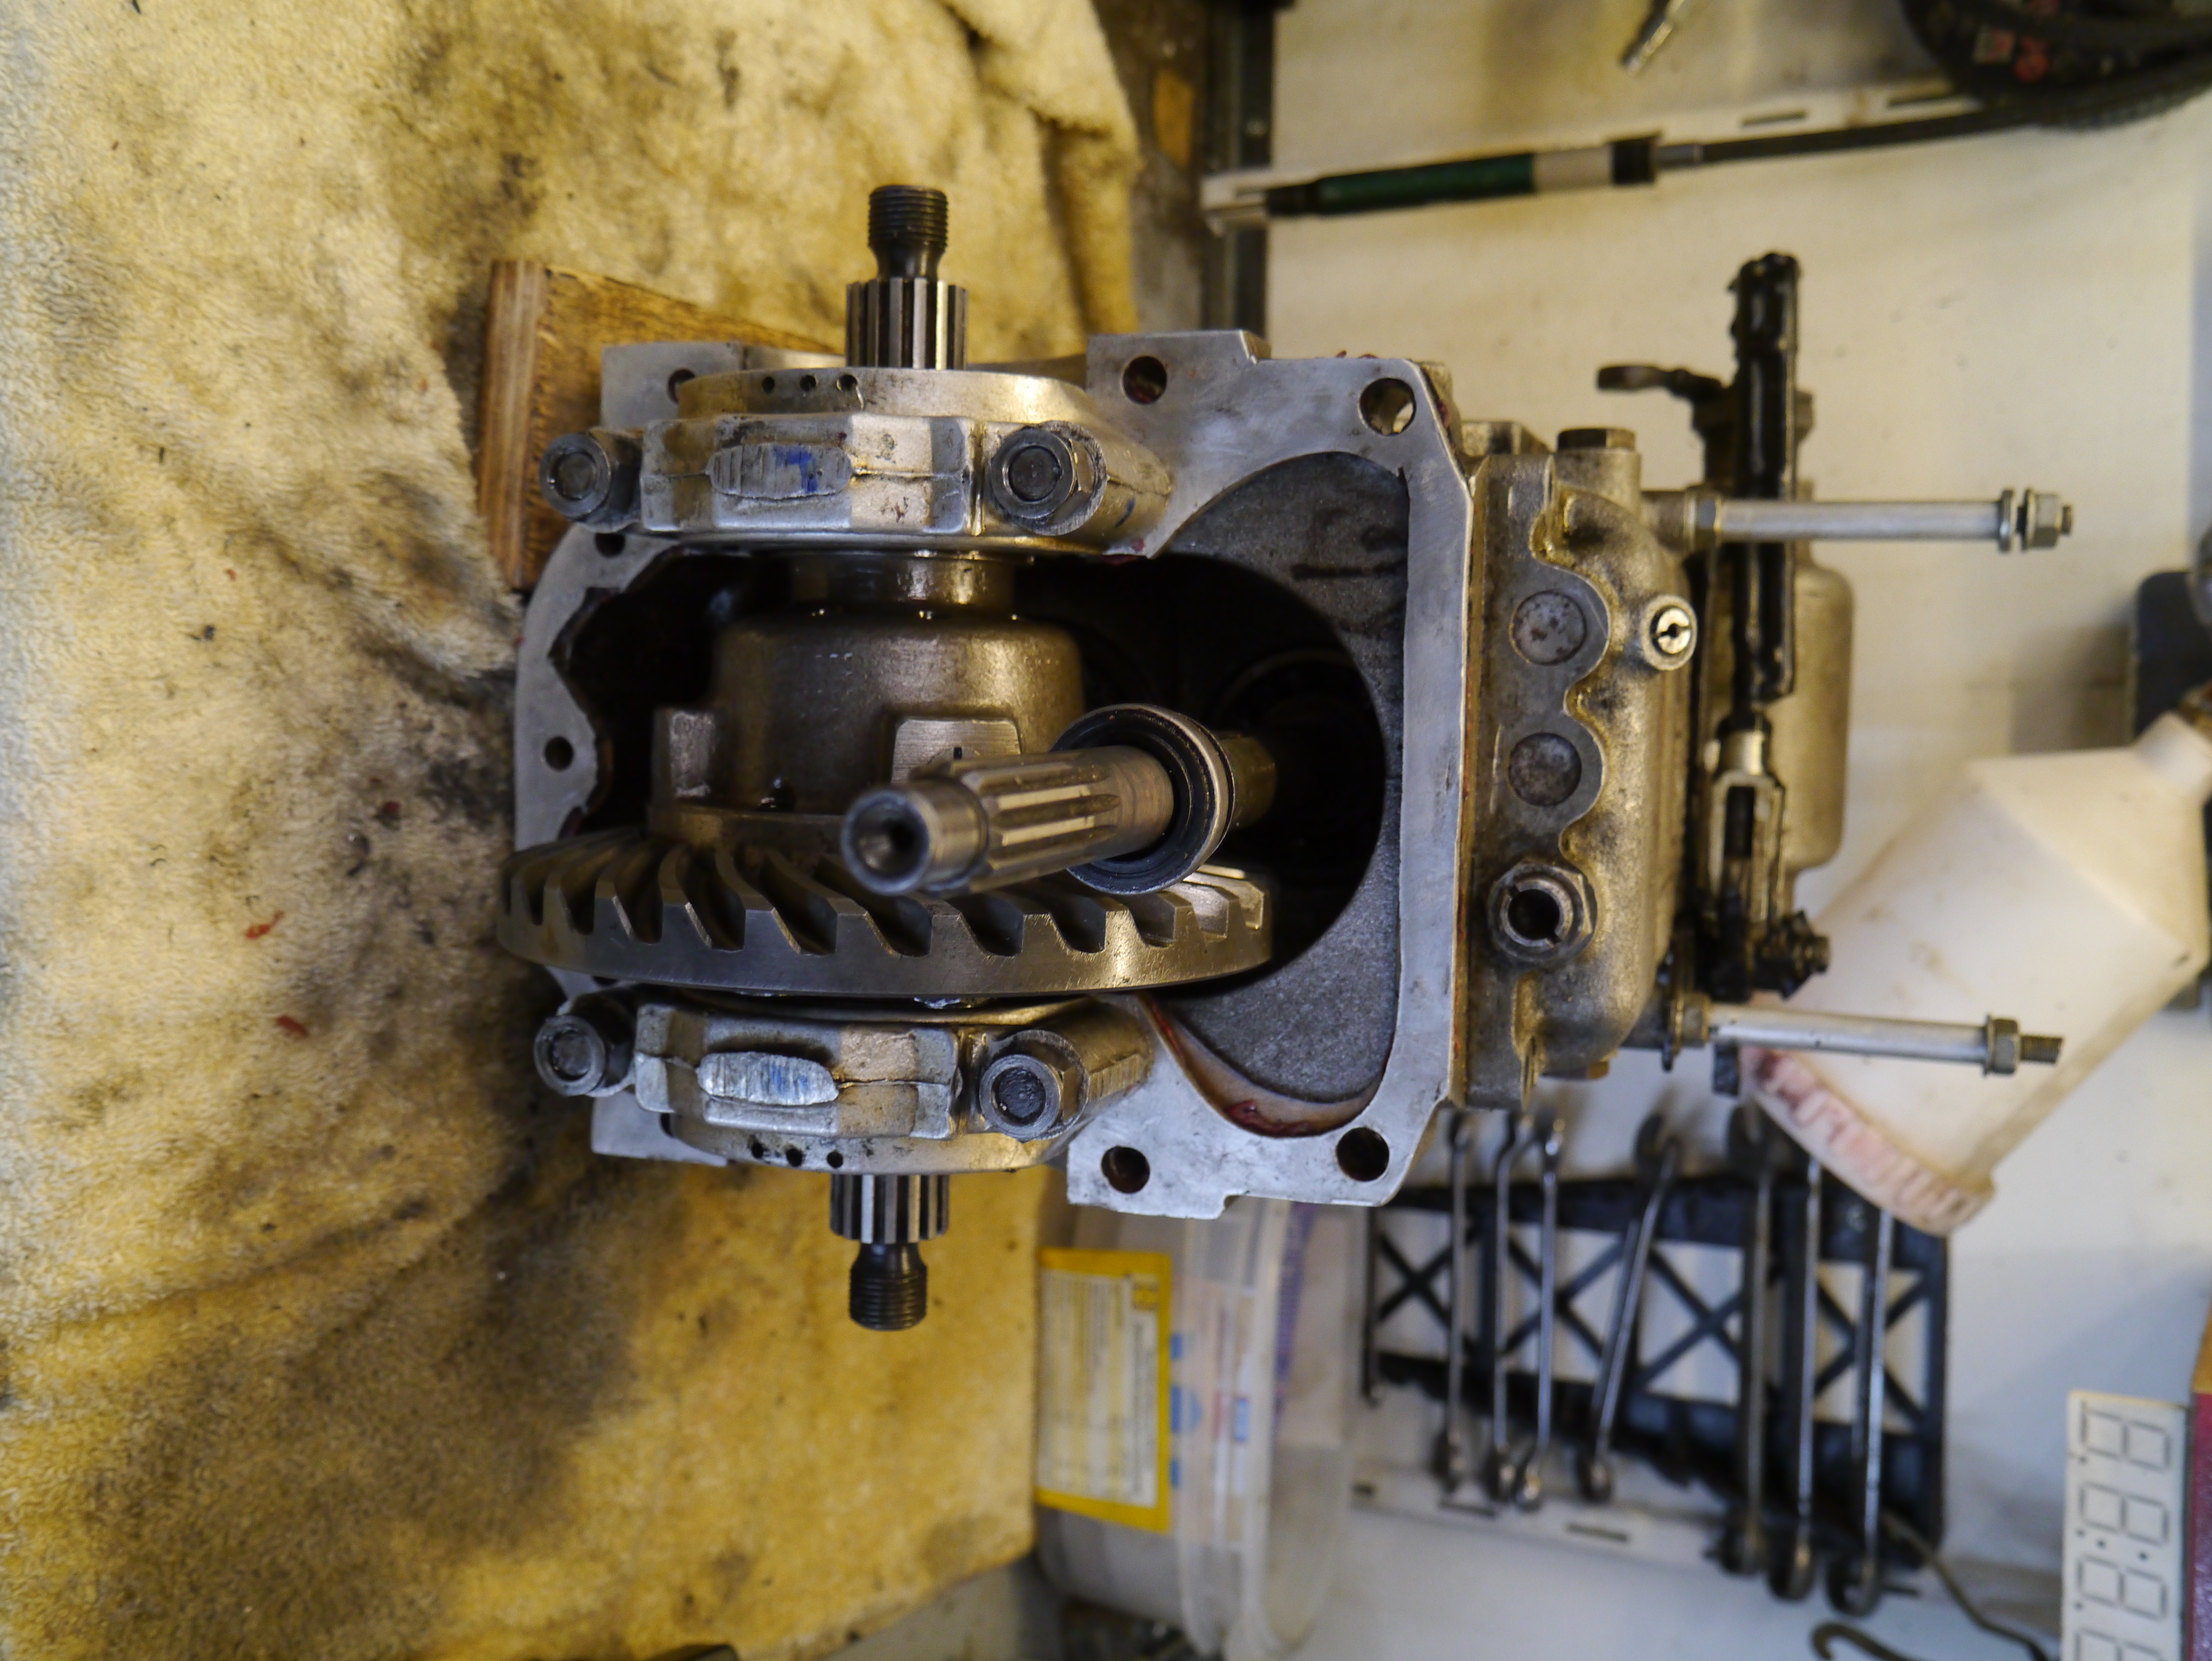
Bij de combinatie van ID-bak en TA-koppelingshuis is de volgorde van montage heel belangrijk. Eerst moet het differentieel worden uitgepast in de bak zodat de timken lagers op de juiste plek worden gefixeerd. Hiermee wordt de passing van het kroonwiel op het pignonwiel geregeld.
Dat komt omdat er TA-lagerkappen op de ID-bak worden gemonteerd over de Timken klagers en -ringen heen. . Bij gebruik van het originele ID- koppelingshuis worden de Timken lagers vastgezet vanuit de binnenkant van het koppelingshuis dus kun je dat later doen nadat de flanges zijn gemonteerd en daardoor de timken lagers hebben gefixeerd op de vooraf ingestelde plek.
Het passen van de flanges moet op de werkbank dus de lagerkappen erop, losjes vast. Dan de flanges erop aan beide kanten en ten minste de 6 M8 bouten op de flanges erop en vast. Dan de lagerkappen definitief afspannen met de lagerkapmoeren, uiteraard gelocked met 271 high torque threadlocker. Ik heb vorige keer alles helemaal uitgepast en gebruik voor de flanges GEEN pakkingen,, alleen siliconen pakking. Dat is de laatste jaren heel goed blijven zitten, lekvrij.
Maar- alles moet helemaal schoon en echt vetvrij zijn!
Het koppelingshuis wordt voorbewerkt. De M8 bouten die naar buiten steken zijn eerder al gemonteerd met loctite 271, en de montage is destijds gedaan inclusief een papieren pakking. Dat heeft nooit gelekt maar 1 bout is los gekomen bij de demontage. Dat was de Linker (bestuurderszijde) hoogste bout, waarmee ook de ophangbeugel vast zit. Deze bout is vervangen en opnieuw gemonteerd. Om er voor te zorgen dat alles nog beter is gefixeerd worden de 6 bouten die in het koppelingshuis zitten vervangen door nieuwe exemplaren en worden deze gemonteerd met Loctite EA3455 2K epoxy aluminium-gevulde lijm. De 6 bouten worden daarna met ringen en moeren vanaf de buitenkant van het koppelingshuis vastgezet om uit te harden.
Na het goed passen en vast zetten van het differentieel (i.c. de Timken lagers) gaan de flanges er weer af.
DAG 4:
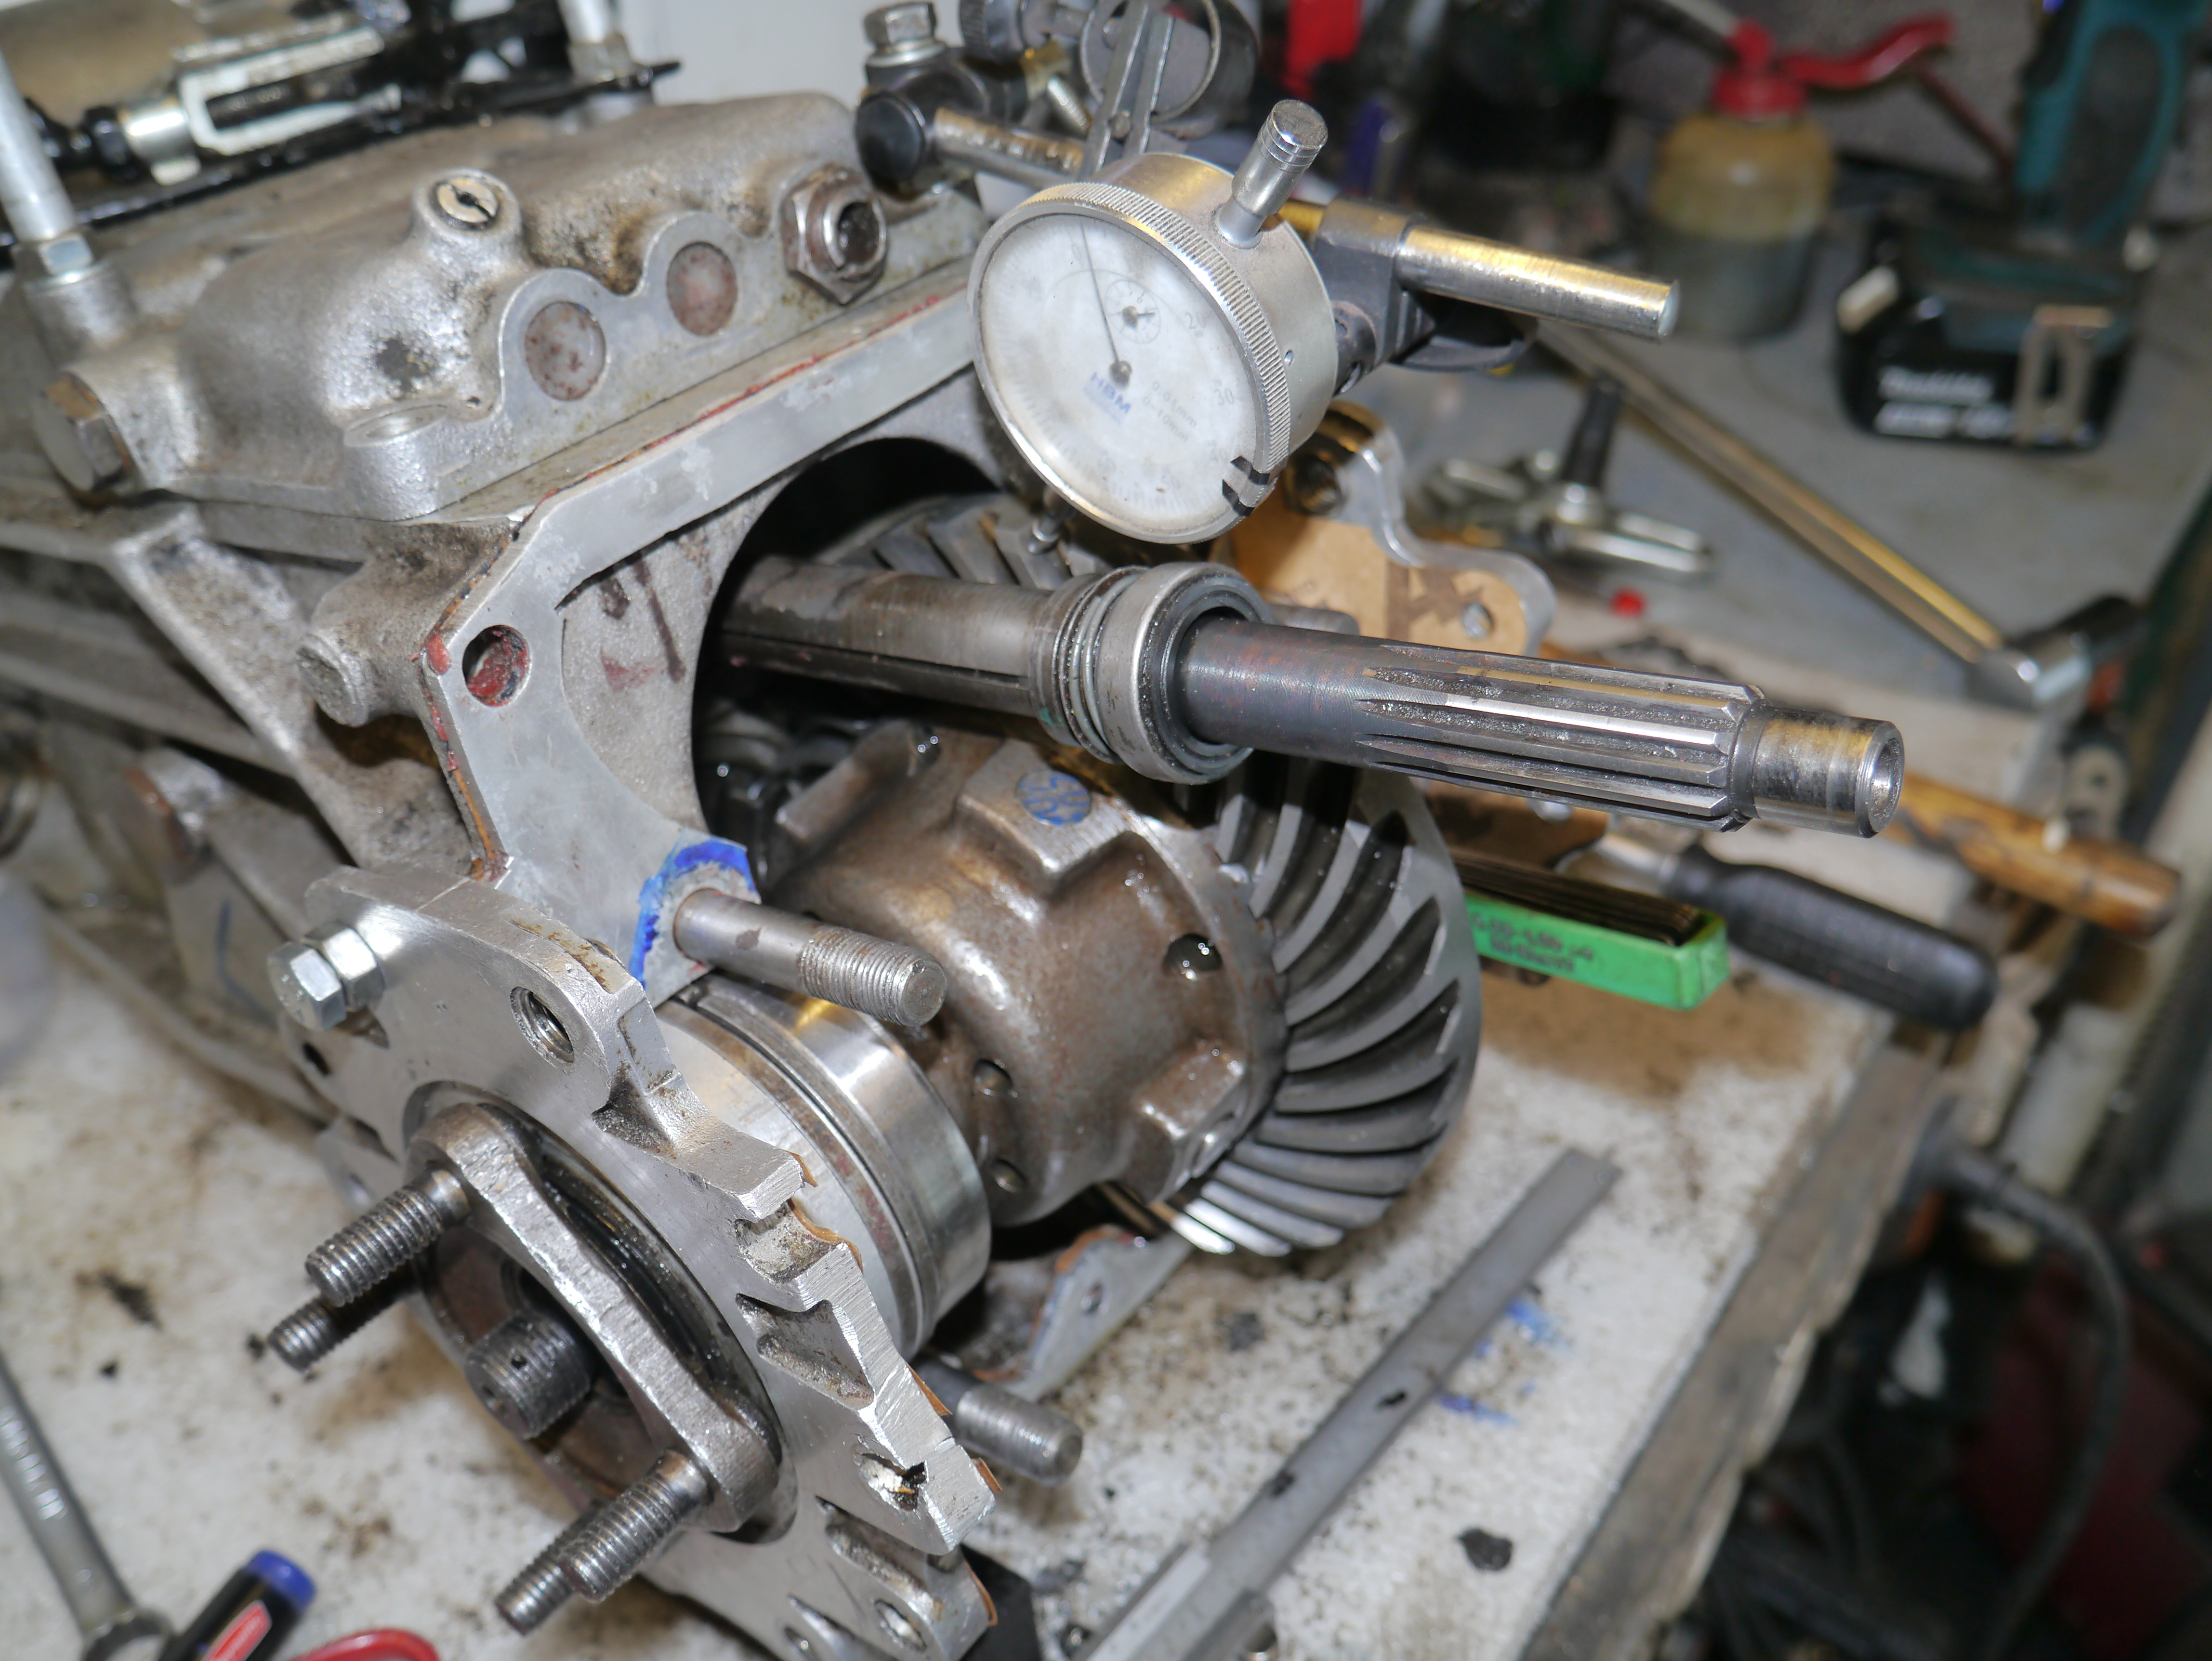
Nu de bak losjes op het koppelingshuis monteren met pakkingen die met Vloeibare Pakking dunnetjes 2-zijdig zijn bedekt. deze 2 pakkingen worden voorgemonteerd op het koppelingshuis.
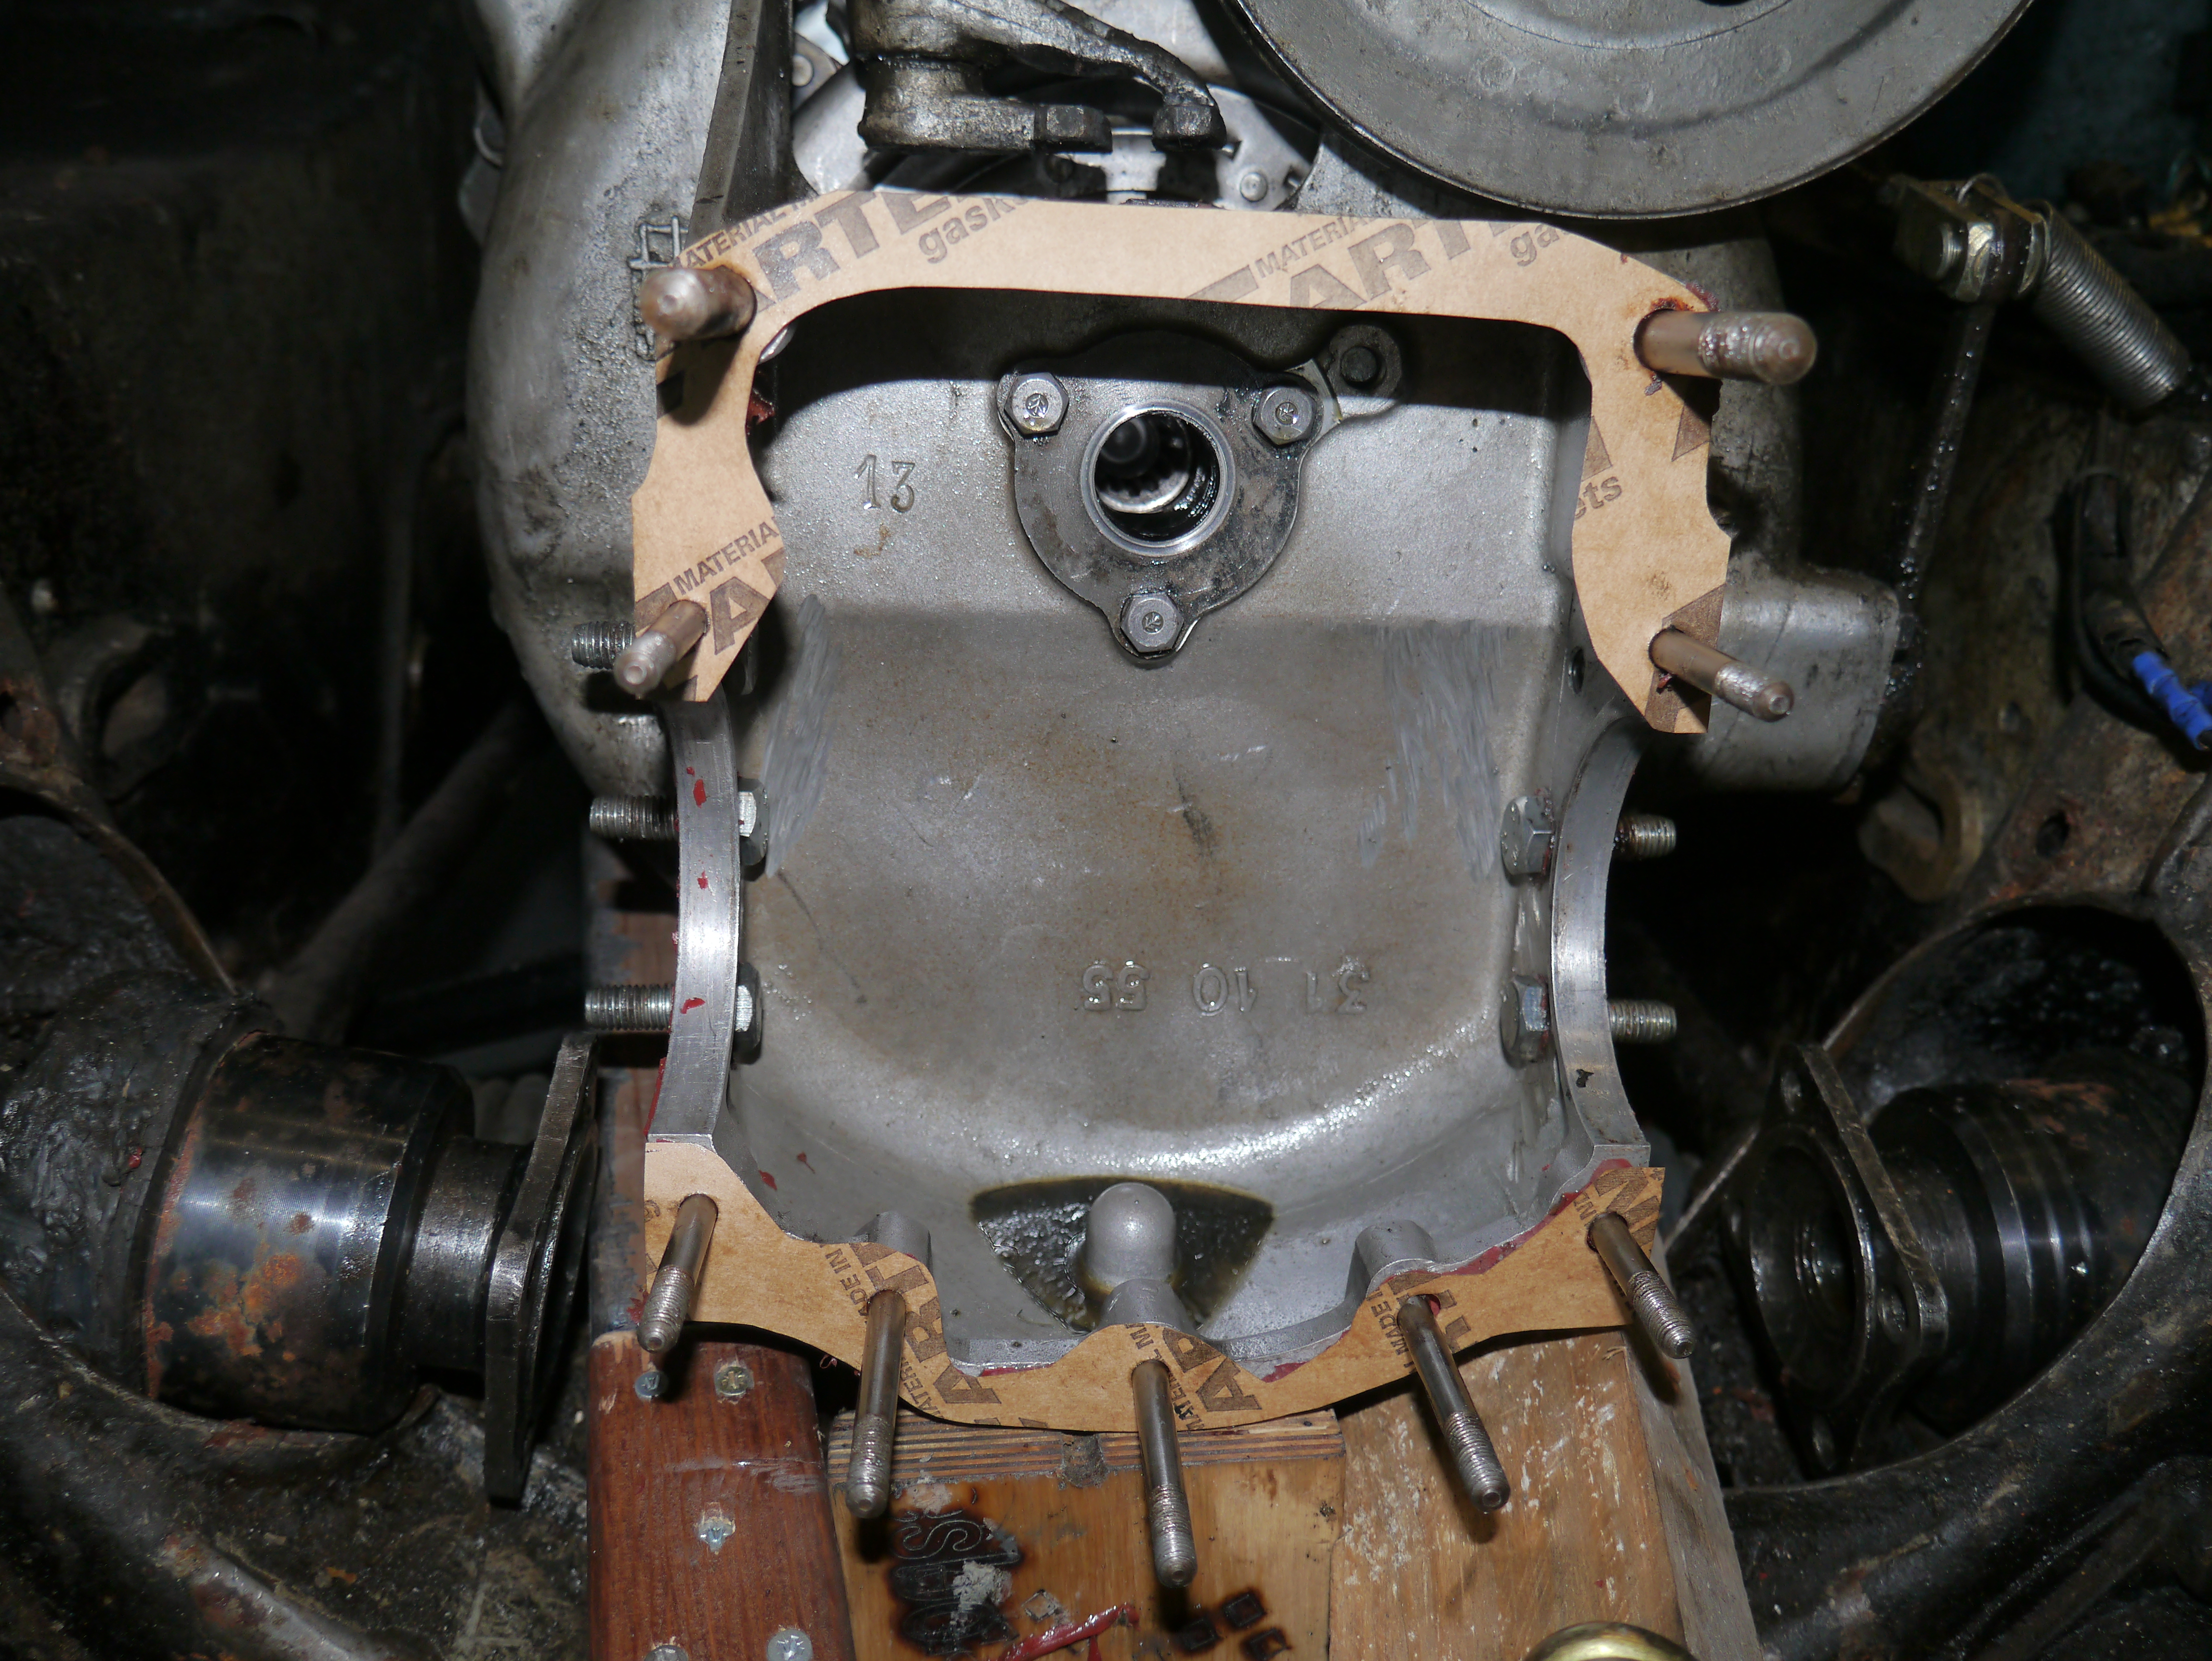
Na plaatsen van de bak komen de bedieningsstangen, de ophangbeugel en de flanges erop met op het pasdeel van de flanges aan de kant van het koppelingshuis hi-temp silicone. De silicone komt met een dubbele laag aan de zijde van het koppelingshuis. De pakking van de flanges heb ik aan de bakzijde aan beide kanten van de pakking van VP voorzien en de hele voet van de flange, waar deze in de uitsparing van bak en koppelingshuis komt, een kruiplaagje hight-temp silicone in de hoek.

Om de flanges goed te monteren moeten de 2 grote ringen en moeren van de bevestiging van beide bakasjes er voor zorgen dat de asjes helemaal over de spiebanen van de halve aandrijfassen schuiven. Dit moet eerst worden gedaan, pas daarna kunnen de flanges worden vastgezet met de bouten en moeren rondom. En de bak mag niet te vast zitten, anders passen de binnenkanten van de flanges niet soepel in de opening en kun je de lagers van de bakasjes ongewild uitpersen.
Hierna: de flanges losjes rondom met alle bouten en moeren monteren aan bak en koppelingshuis.
Nu stukje bij beetje alles vastdraaien, rondom de bak aan het koppelingshuis en de flanges. Maar nog niet TE vast! Mijn ervaring met siliconen is, dat je een halve dag wacht en dan pas definitief met het juiste aandraaimoment alles vast zet en borgt. Dat betekent dat het gebruik van thread locker lastig wordt.
Na mijn ervaring met de threadlocker op de bouten en moeren van de flanges en versnellingsbak heb ik besloten om in plaats van threadlocker zelfborgende ringen te gebruiken voor de bak en de flanges. Het enige dat ik weer met threadlocker heb gemonteerd zijn de moeren van de lagerkappen van het differentieel.
Het was even zoeken naar M7 veerringen maar bij een scooterzaak toch de juiste versie en sterkte gevonden!
Na een halve dag wachten definitief aandraaien van de moeren en bouten. Dit moet ook in een voorgeschreven volgorde: Eerst de flange schroeven van de bakzijde, dan de bak aan het koppelingshuis, daarna als laatste de 6 grote moeren van de flanges aan het koppelingshuis. Deze 6 moeren heb ik niet te vast aangedraaid, gewoon net op spanning met de hand aangedraaid. Precies zo, dat de veerring net helemaal is ingeveerd. op de bovenste bouten kon geen veerring, die heb ik zonder veerring en zonder loctite gemonteerd.
Omdat ook de ophangbeugel gelijk met de bak wordt gemonteerd niet vergeten om bij het plaatsen van de ophangbeugel ook de bedieningsstangen eerst te monteren, en vooral de 2 lange schroeven die bovenin de bak worden geschroefd direct te plaatsen inclusief de vulbussen tussen de ophangbeugel en bak . De schroeven heb ik allemaal eerst losjes gemonteerd tot de bak verder helemaal goed is gemonteerd.
Tussendoor heb ik ook alle delen die nu bereikbaar zijn, met TEMU antiroest zwarte verf behandeld. Dus ook de binnenkanten van de wieg, de bak-, c.q. aggregaatbeugel, de aandrijfassen en alle omliggende metalen delen. De versnellingsbak en het koppelingshuis blijft aluminium zoals origineel.
Na de montage van de bak heb ik versnellingsbakolie type Classic Gear EP 90 van KROON OIL gebruikt om de bak te vullen. Het is een type olie voor oude bakken die eigenlijk GL4 nodig hebben, maar dan modern ontwikkeld. Ben benieuwd!

Nu is het een goed moment om te checken op lekkages. Een mooie methode vind ik om de bak te vullen met olie , de garagekachel erop te zetten en te kijken of er lekkage is. Beter vooraf te doen dan na volledige afmontage. Neem hier de tijd voor (minimaal een dag) en maak alles vooraf helemaal schoon en droog. En..volgende dag was alles nog helemaal droog. Pfff.
DAG 5: Het volgende gedaan:
-
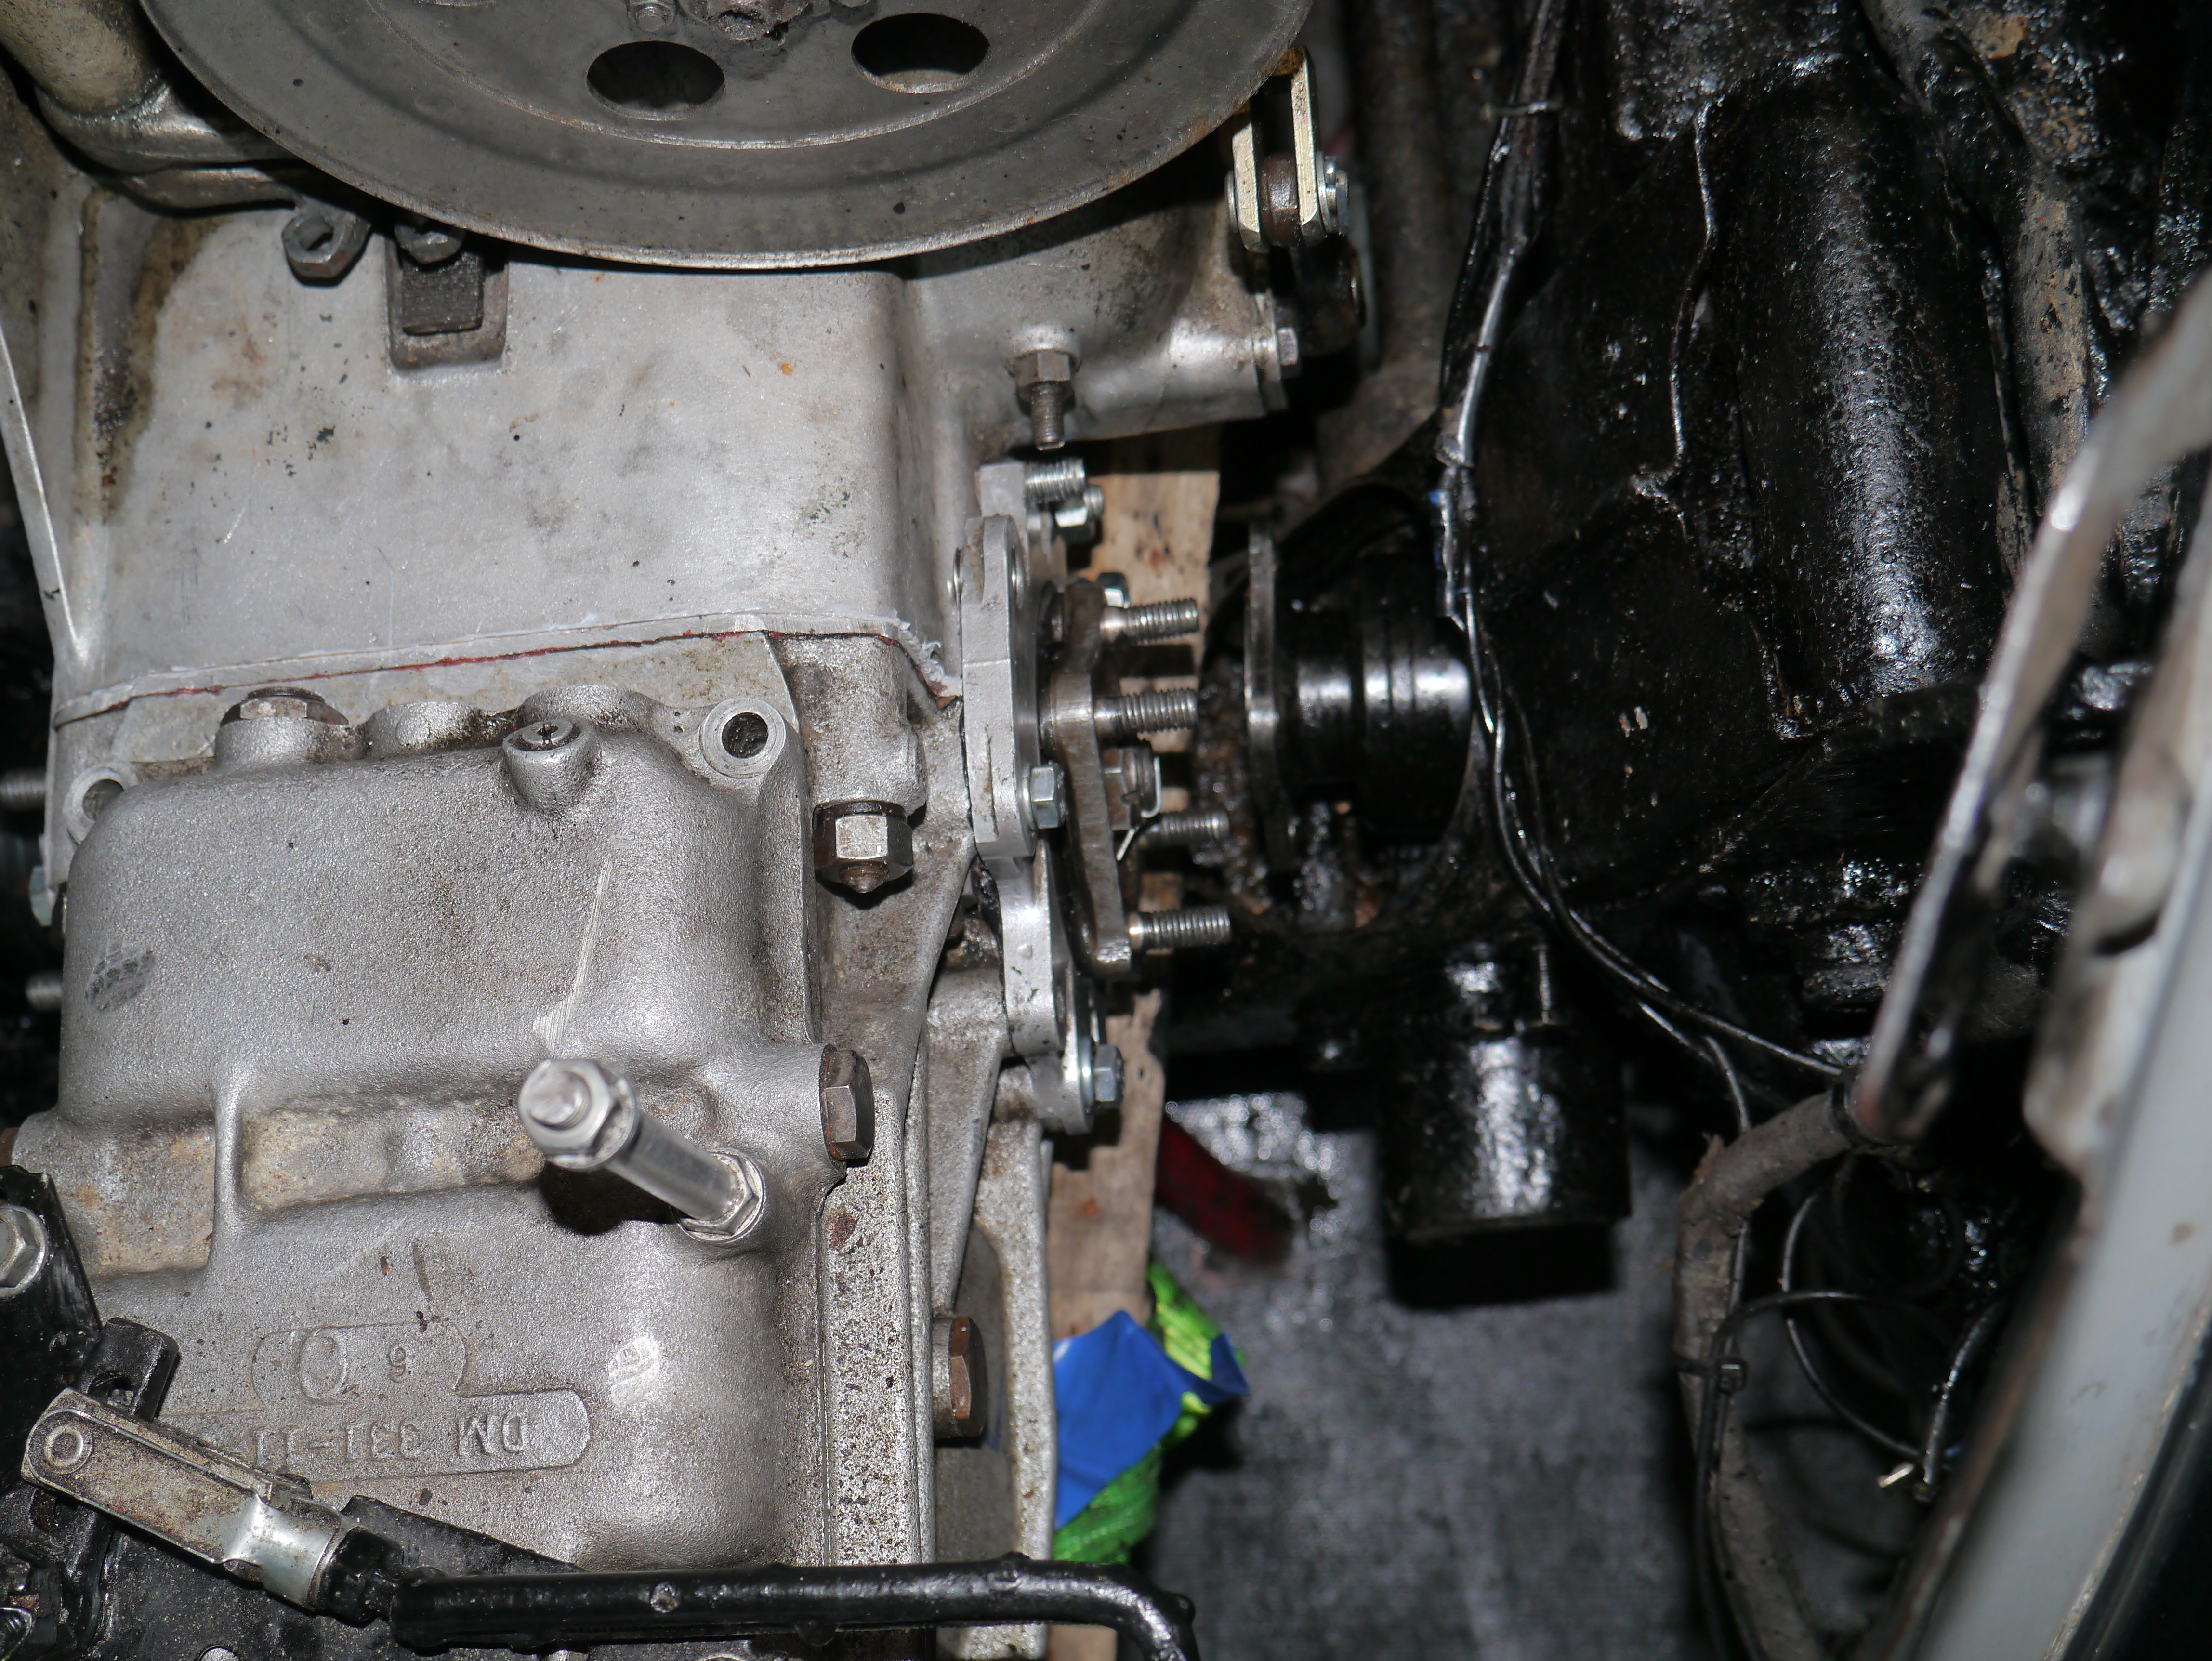
- Controle of de motor goed in beide motorsteunen rust. Dat was dus niet zo, aan de bestuurderskant was de pen uit de veer geschoten, dat kostte nog wel wat moeite om alles weer op de goede plek te krijgen.
- Aandrijfassen losjes gemonteerd inclusief magneet voor CC op linker aandrijfas
- Blokje hout onder versnellingsbak in wieg (voorzorg) gehouden en laten zakken op blokje hout
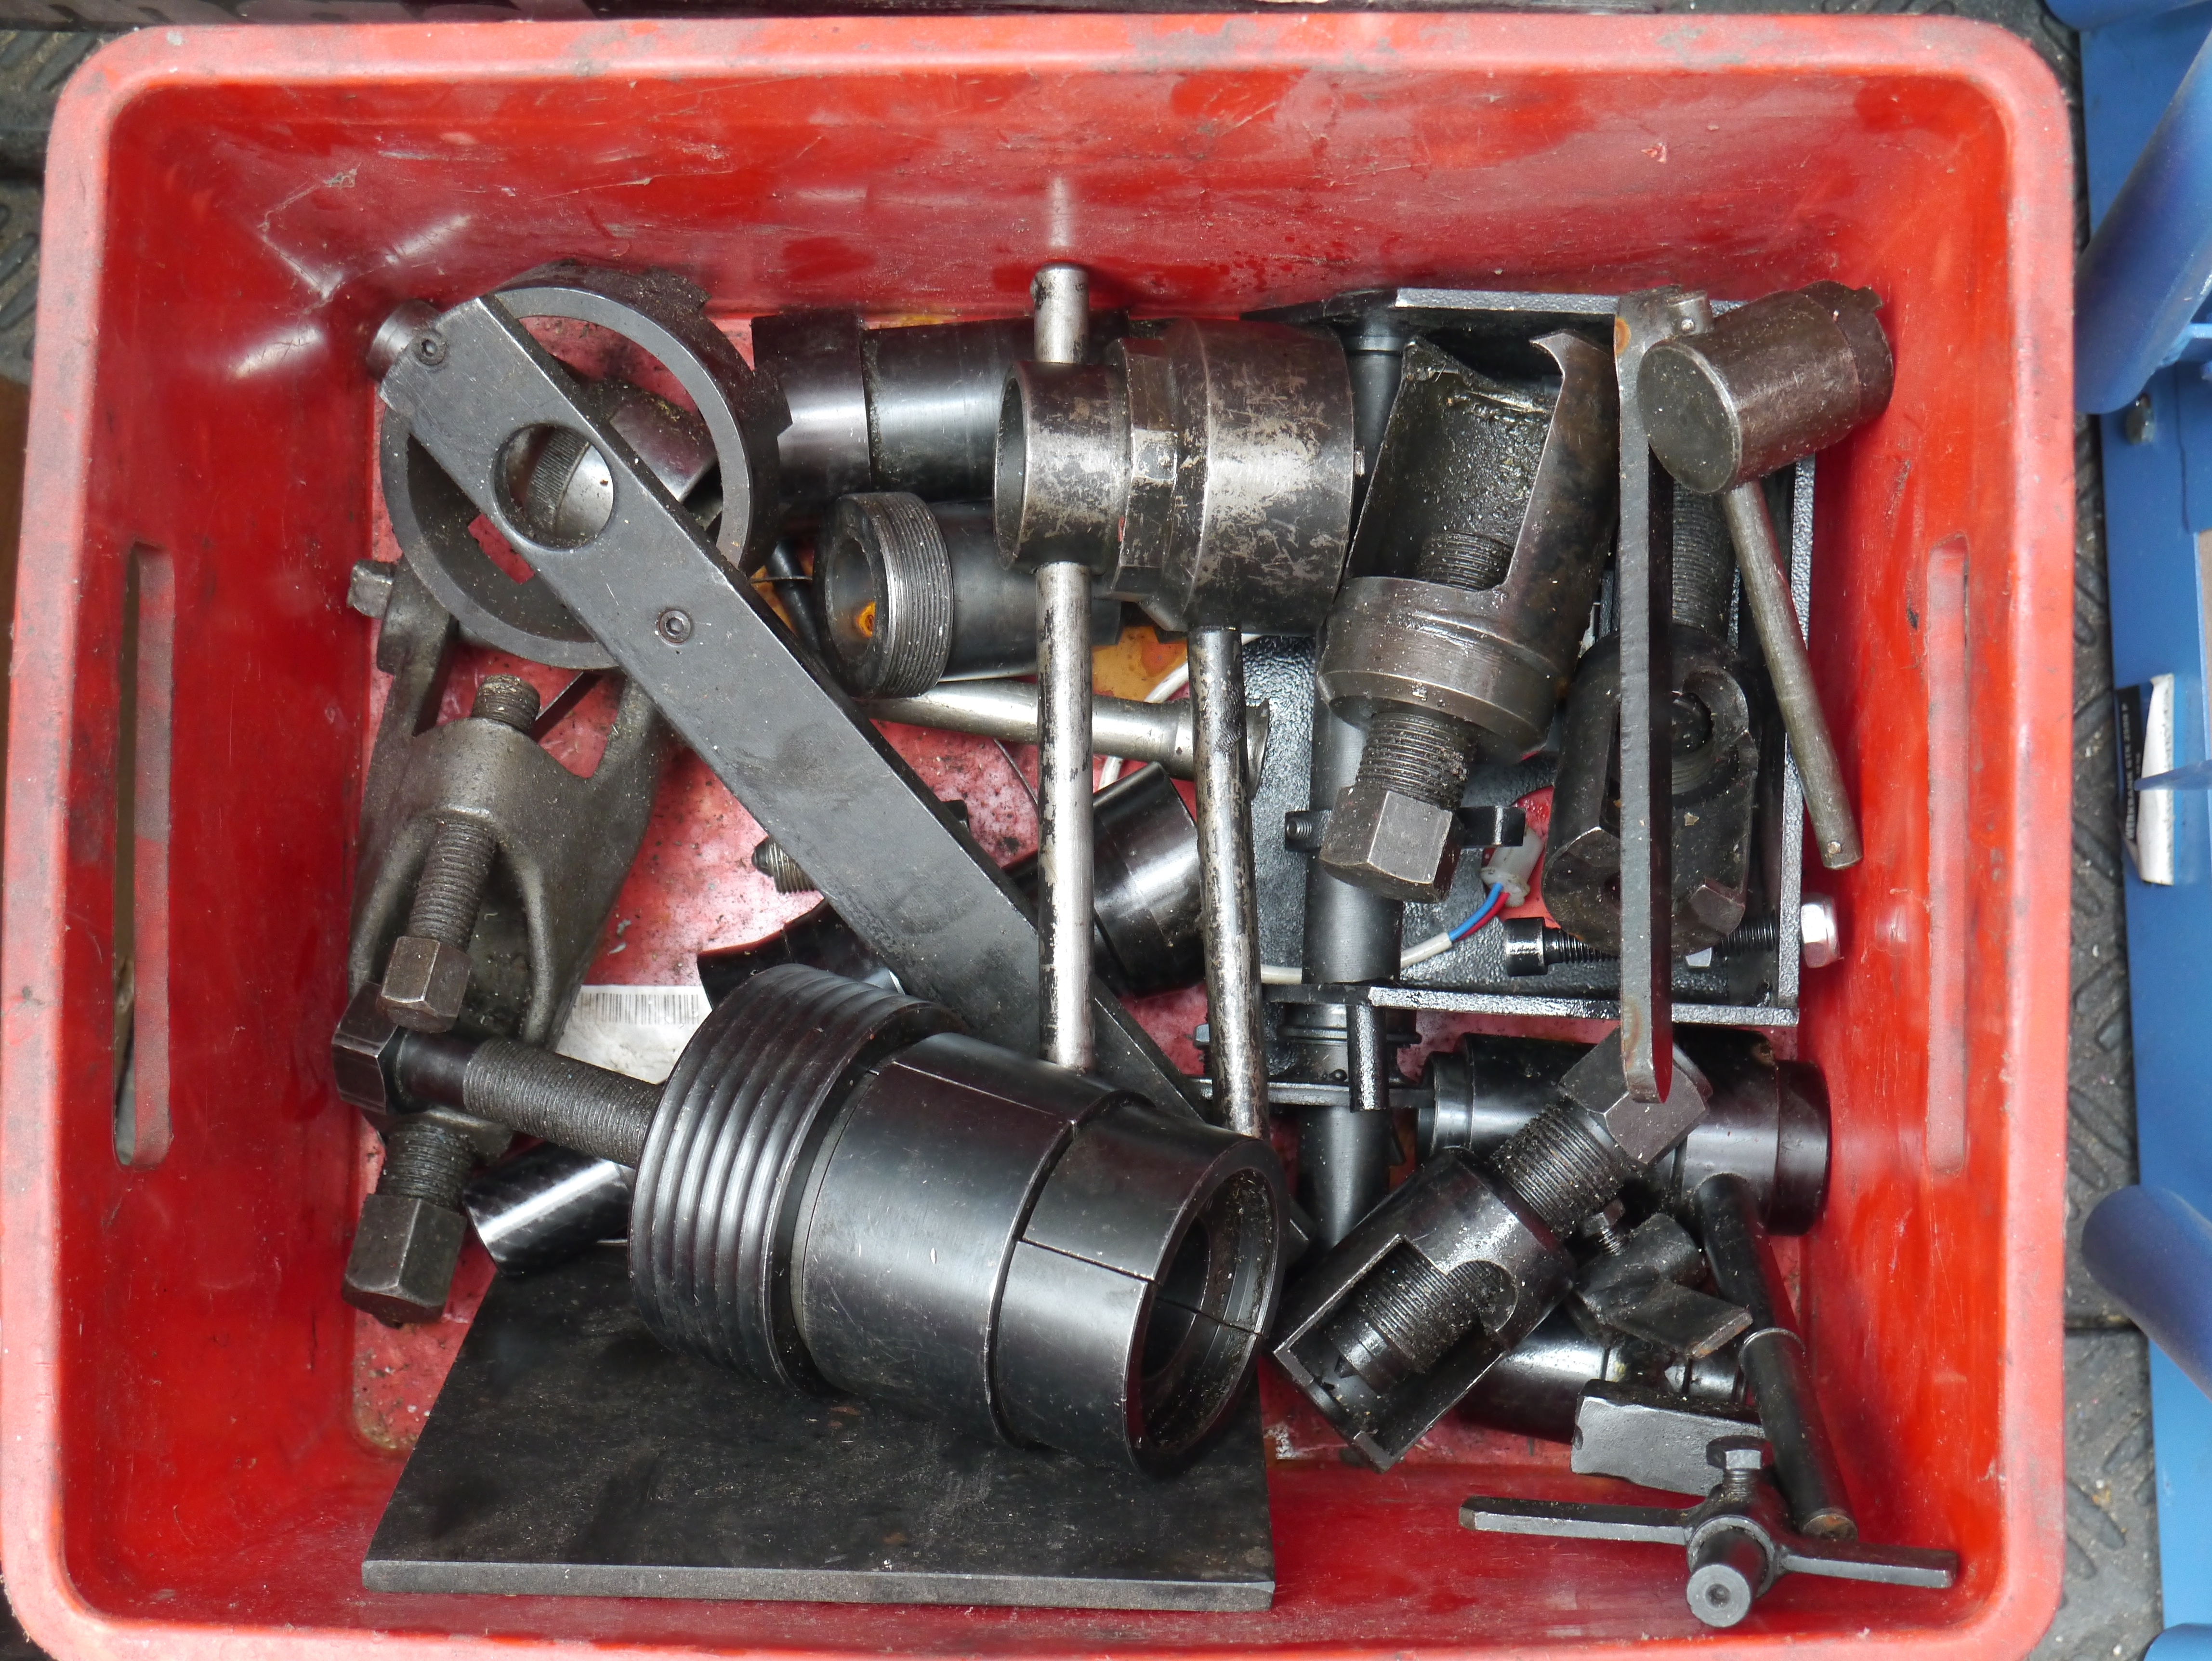
- Linker voorwiel: Bovenste fusee weer monteren. Ik heb alle vet verwijderd en vervangen, en ik heb een dop afgedraaid om de binnenmoer van de bovenste fusee goed te kunnen bereiken. Het helpt wel dat ik overal origineel gereedschap voor heb, zoals de bovenste fusee-sleutelset.
- Remleiding weer gemonteerd
- Remmen ontlucht en vloeistof aangevuld DOT3. Er kwam hele donkere drab uit de linker voorrem, even lekker doorgeperst tot alles er uit was.
- Traverse subframe gemonteerd en de bakbeugel gemonteerd aan traverse
- V-riem dynamo/waterpomp gemonteerd
- Dynamo gesteld en kachelslangen-beugel gemonteerd
- schutplaatje versnellingsstangen/toren gemonteerd
- waterpompventilator vergeten te monteren
- Schroefdraad montage radiator 2xM10 opgezuiverd en radiator gemonteerd met nieuwe M10 ringen en moeren, in kopervet
- Koelvloeistof gevuld
-
-
DAG 6: Het volgende gedaan:
- Assteunen onder de voorwielophanging L en R zodat alles kan worden getest. Steunen zo ver als mogelijk bij de wielen geplaatst om een normale situatie te simuleren. Kachel op de versnellingsbak gezet en voorverwarmd tot ca 40 graden Celsius. Schakelen, koppelen, alle versnellingen getest en ca 70 km/uur laten draaien met beide wielen vrij in de lucht. Alles in orde dus verder naar het afmonteren!
- Radiator afgetapt, gedemonteerd, koelvin gemonteerd, radiator gemonteerd en met koelvloeistof afgevuld
- Toeters gemonteerd
- Radiatorhoes bediening gemonteerd
- Meetkabel versnellingsbak gemonteerd
- Opnemer cruise control L voorwiel bij bakas gemonteerd
DAG 7: Het volgende gedaan:
-
- Kabelboom gemonteerd incl. connectorblokje op coque passagierszijde (voor koplamplicht R)
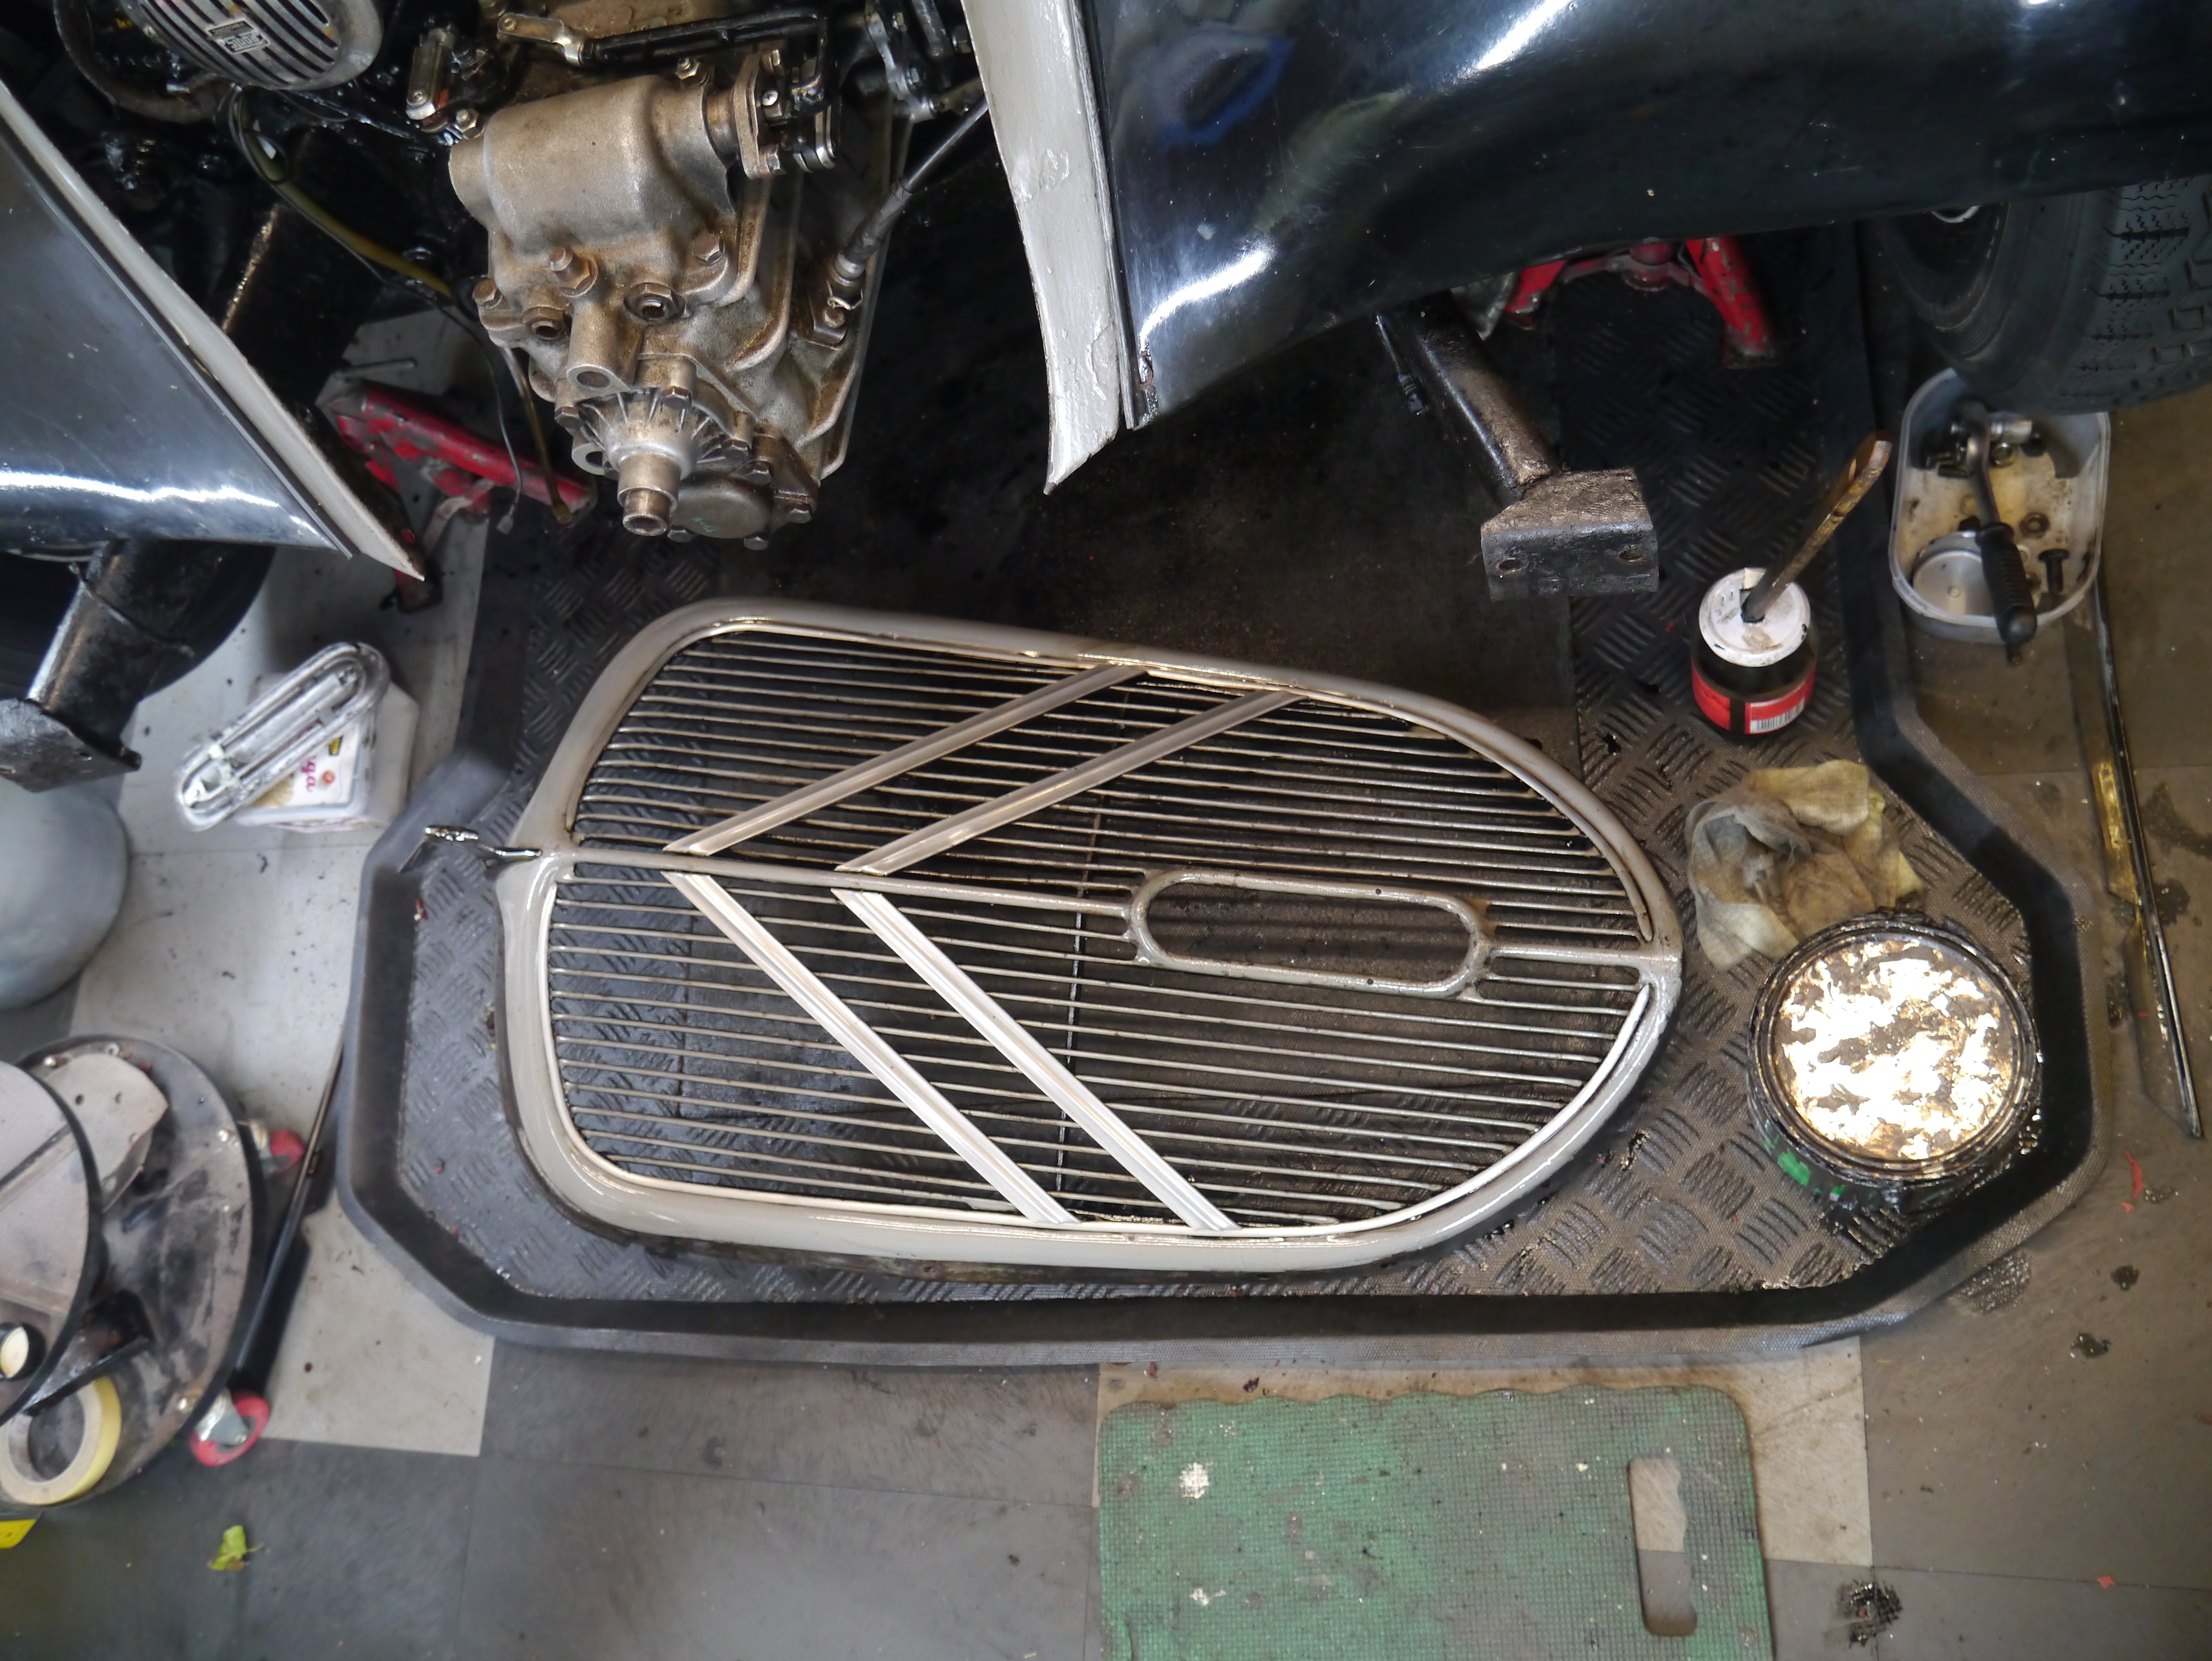
- Grille gemonteerd
- Kachelbuis gemonteerd
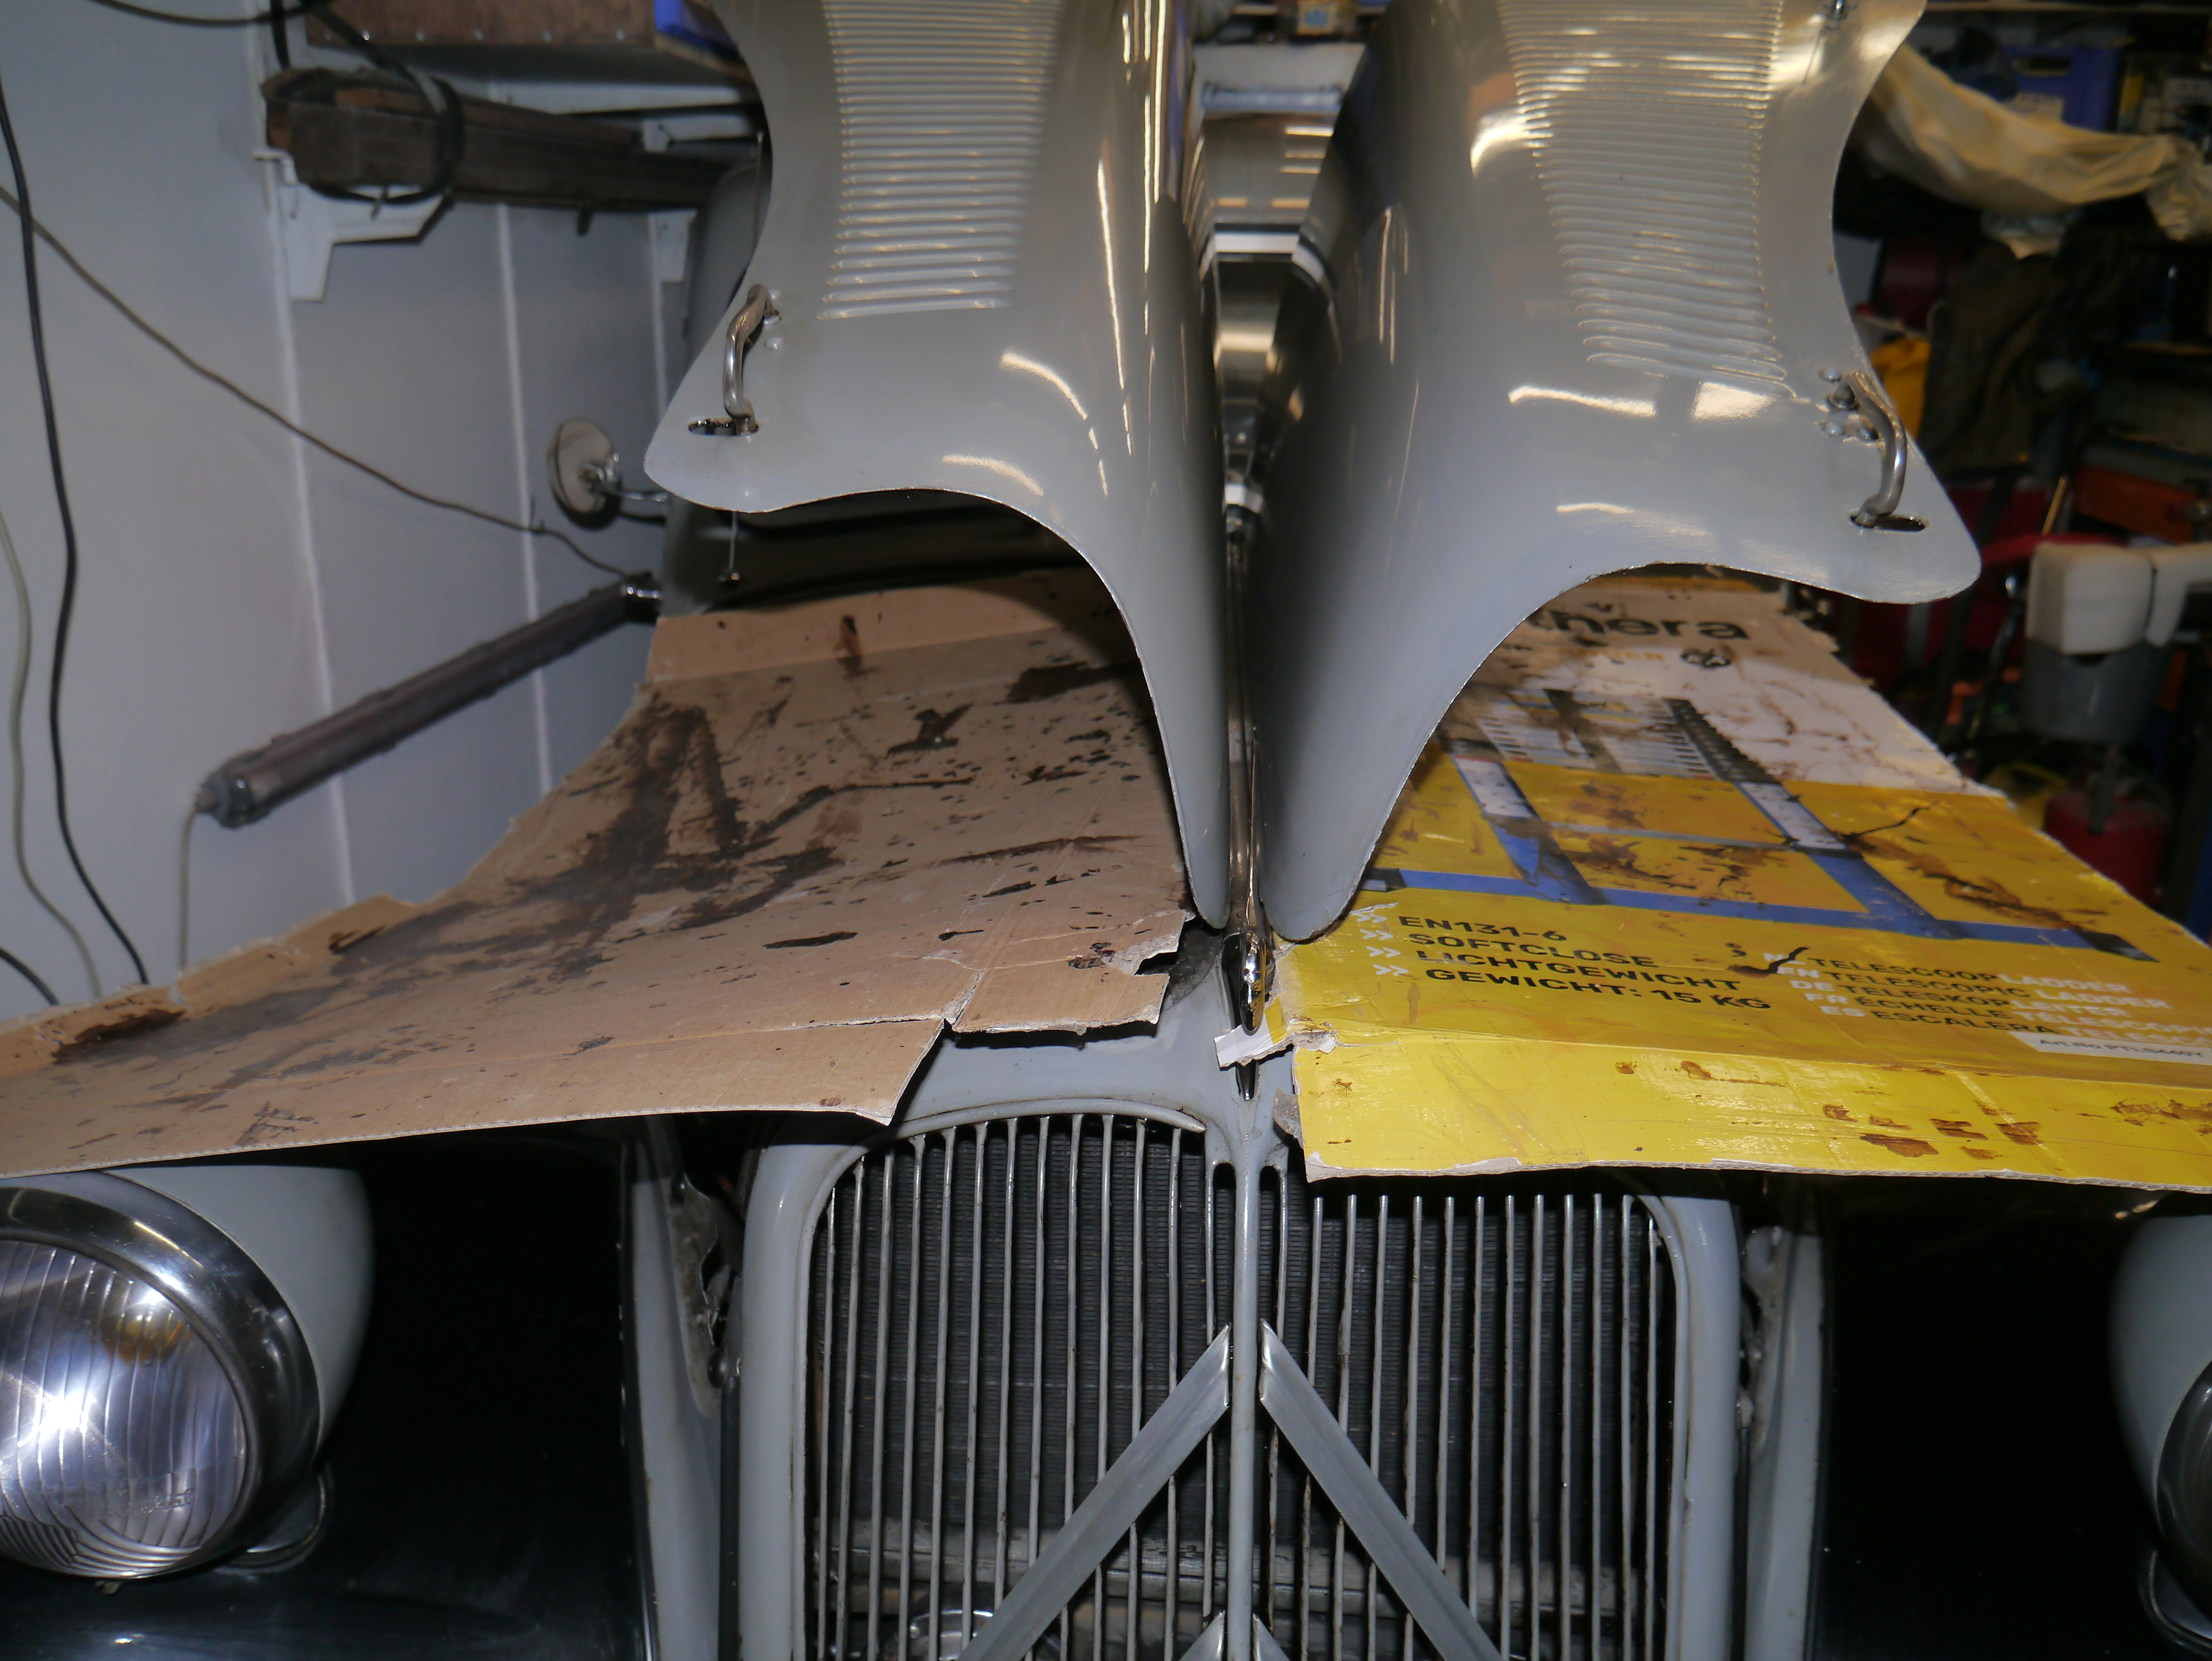
- Voorbumper gemonteerd
- Motorkap gemonteerd
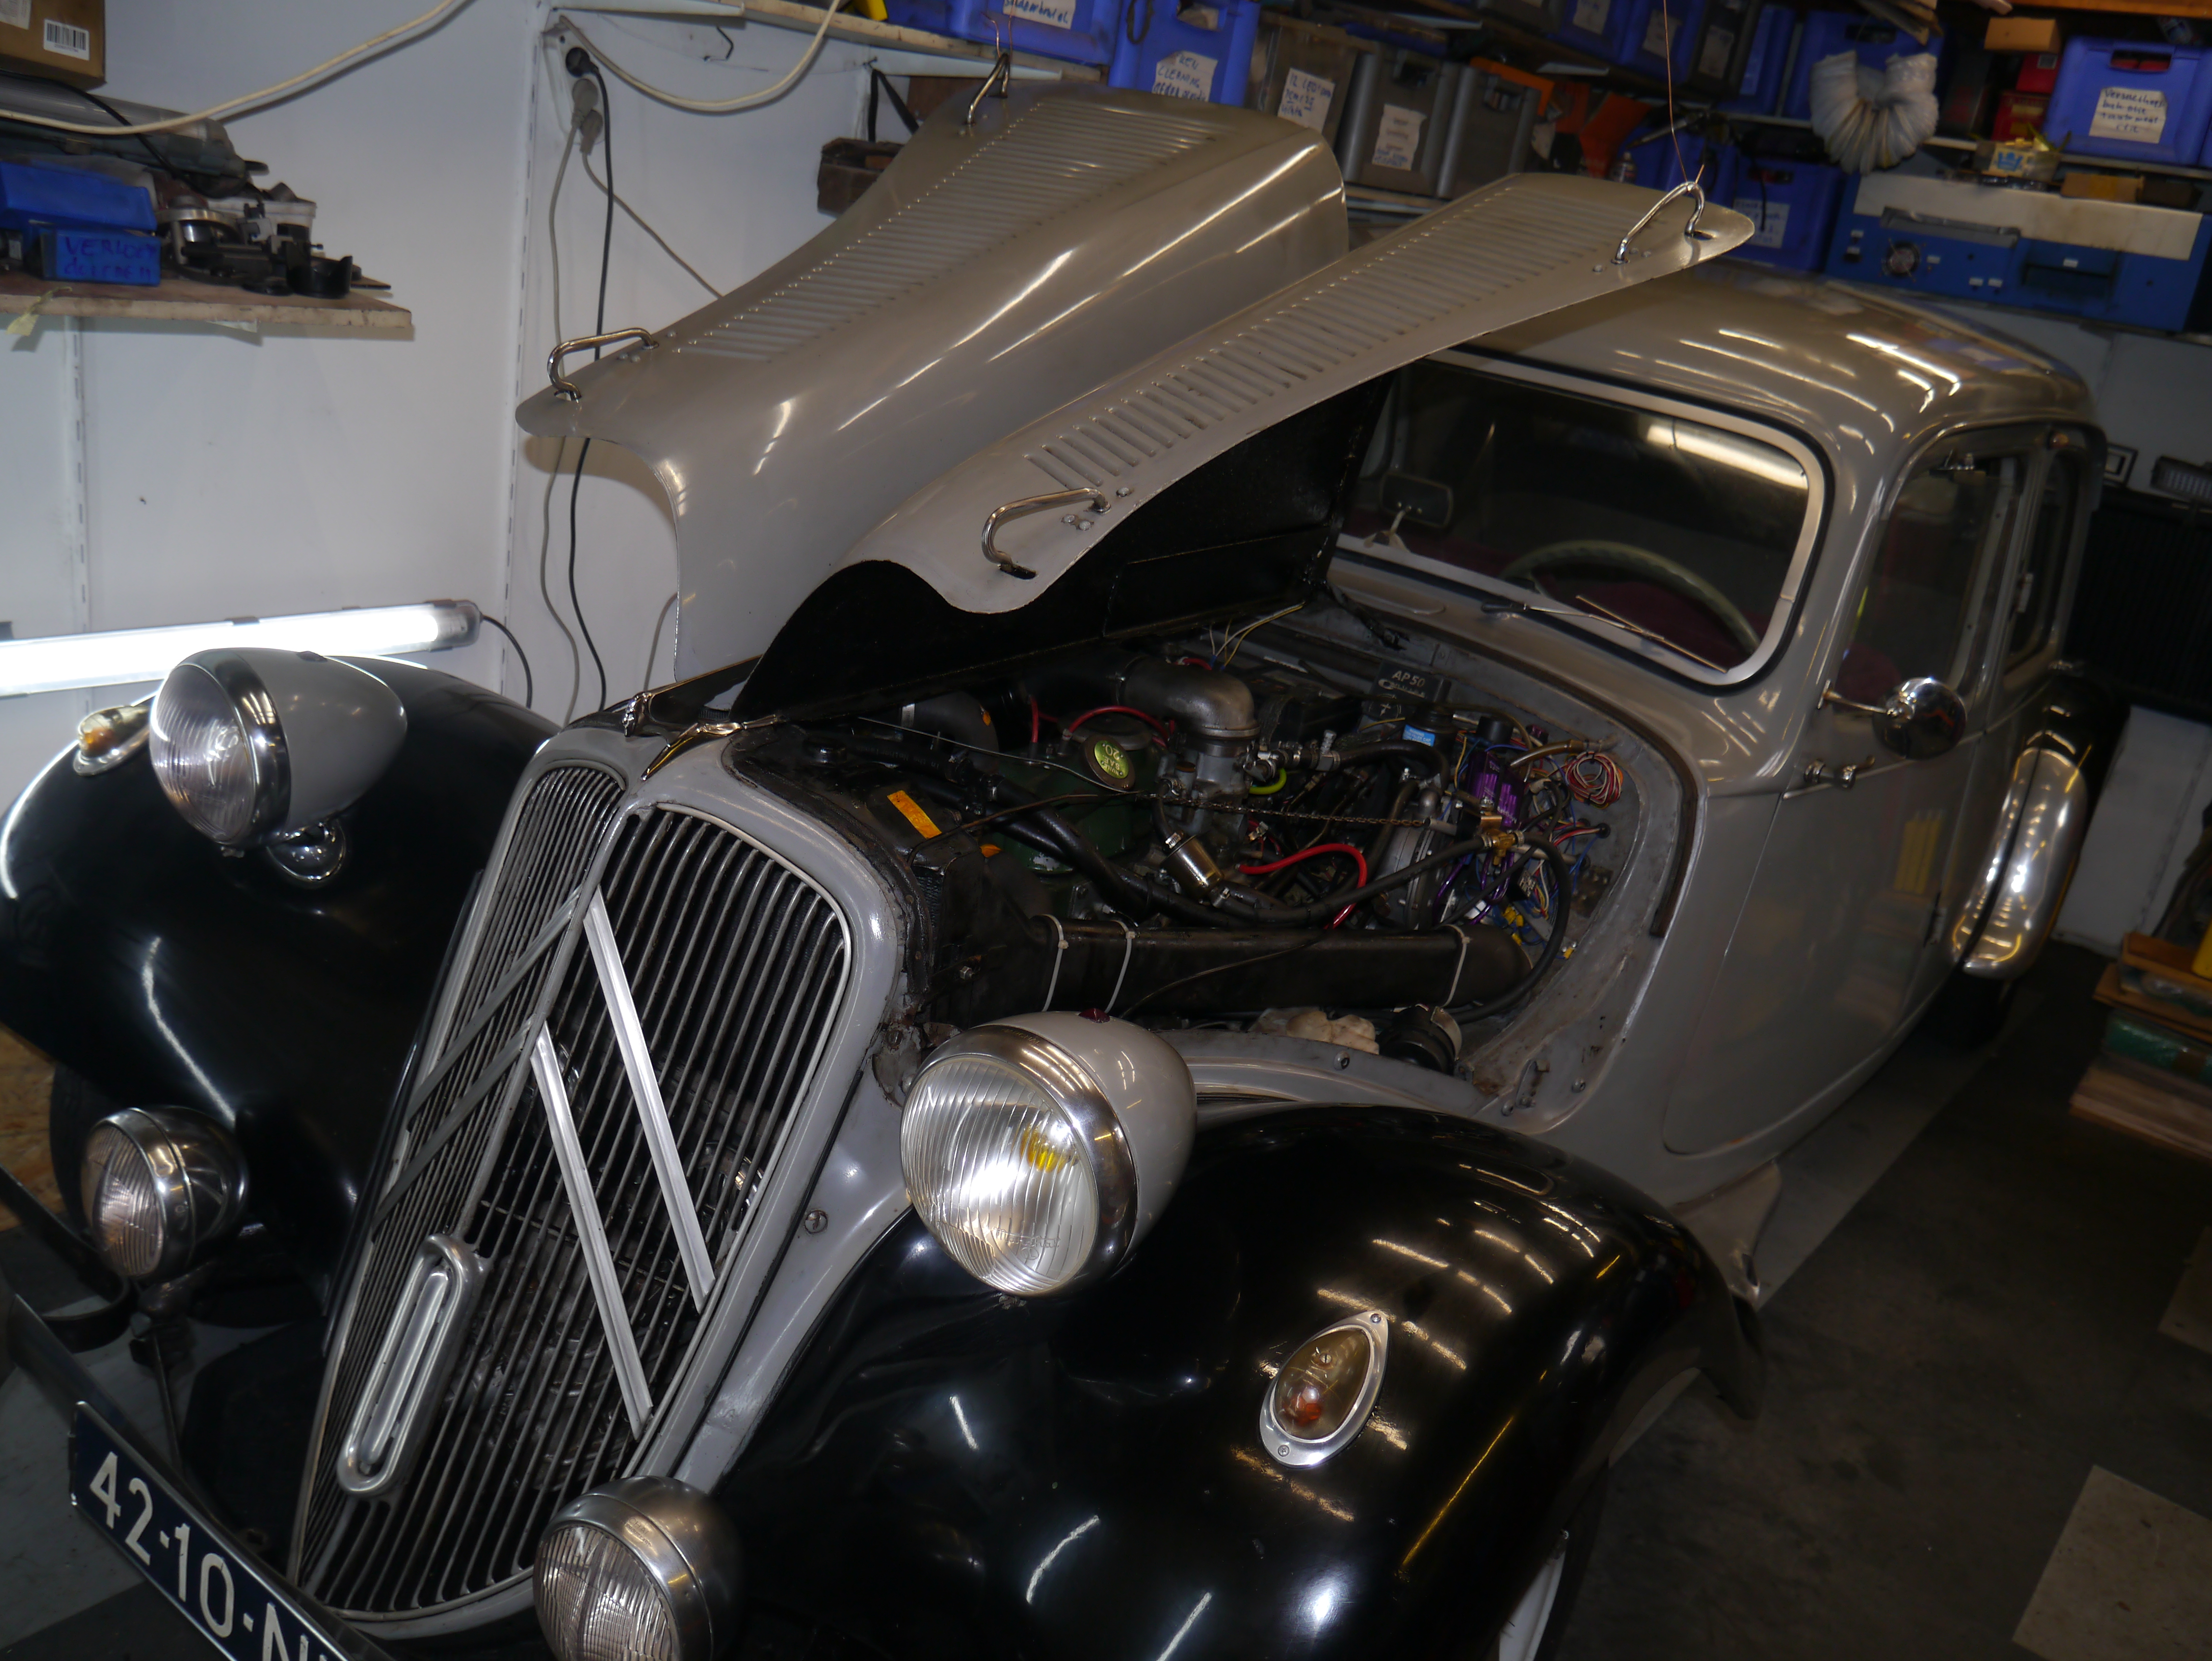
Nu nog even buiten uitproberen natuurlijk!
BYD Atto 3: Gebruikerservaringen na 9 maanden en 15.000 km
Deze review vervangt mijn eerdere reviews van mijn Atto 3, omdat alle door mij gewenste software verbeteringen de afgelopen periode zijn ingevuld. Inmiddels is software versie 1.4 via de OTA in de auto geladen op 18-9-2023 en is de auto wat mij betreft qua software helemaal OK.
Dat is natuurlijk erg persoonlijk. ik ben inmiddels gewend aan de piepjes en andere geluidjes die het systeem maakt wanneer er iets wordt gesignaleerd of gedetecteerd dat ik niet direct altijd als gevaarlijk interpreteer.
Dat het systeem ingrijpt bij gevaarlijke situaties heb ik inmiddels zelfs leren waarderen. Laatst reed ik gewoon in de stad (zonder cruise control aan of zo) achter een voorganger die opeens midden op de kruising vol op de rem ging om onbekende reden. Voordat ik kon remmen werd de auto al erg fors afgeremd zodat er geen aanrijding plaats had. Ik had eerder nog geen soortgelijke ingreep van de auto gehad en was er erg blij mee. Het geeft ook aan dat je eigenlijk pas weet wat je nodig hebt wanneer je het (ongemerkt) hebt. Ik ben op dit punt dus helemaal om. Veiligheid lijkt soms betuttelend maar een aanrijding voorkomen is wat mij betreft genoeg reden om de veiligheidsaspecten van de Atto 3 te waarderen.
Ingrijpen door de auto op het stuur wanneer je de rand van de weg te veel nadert vond ik eerder heel vervelend, en het bijbehorende piepje dus ook. Maar ik kan ook iets meer afstand van de berm houden en het ingrijpen voorkomen. Kwestie van doen.
Zoals ik in mijn eerdere reviews al had aangegeven waren er best veel zaken qua luchtbehandeling net niet lekker ingeregeld, waardoor rijden met de wagen niet comfortabel was. Dat waren zaken als haperende airco bediening, of net de verkeerde luchtverversingsfuncties beschikbaar maar ook dingen als het feit dat de airco niet onthield wat de laatste stand van de instelling was en daar volgende keer weer standaard mee zou moeten beginnen. Dat is nu allemaal wel helemaal opgelost.
Ook beloofde naleveringen zoals Apple Carplay en Android auto zijn er al weer een tijdje. Zelf gebruik ik Android auto en dat werkt helemaal top!
Negatieve puntjes die over zijn gebleven:
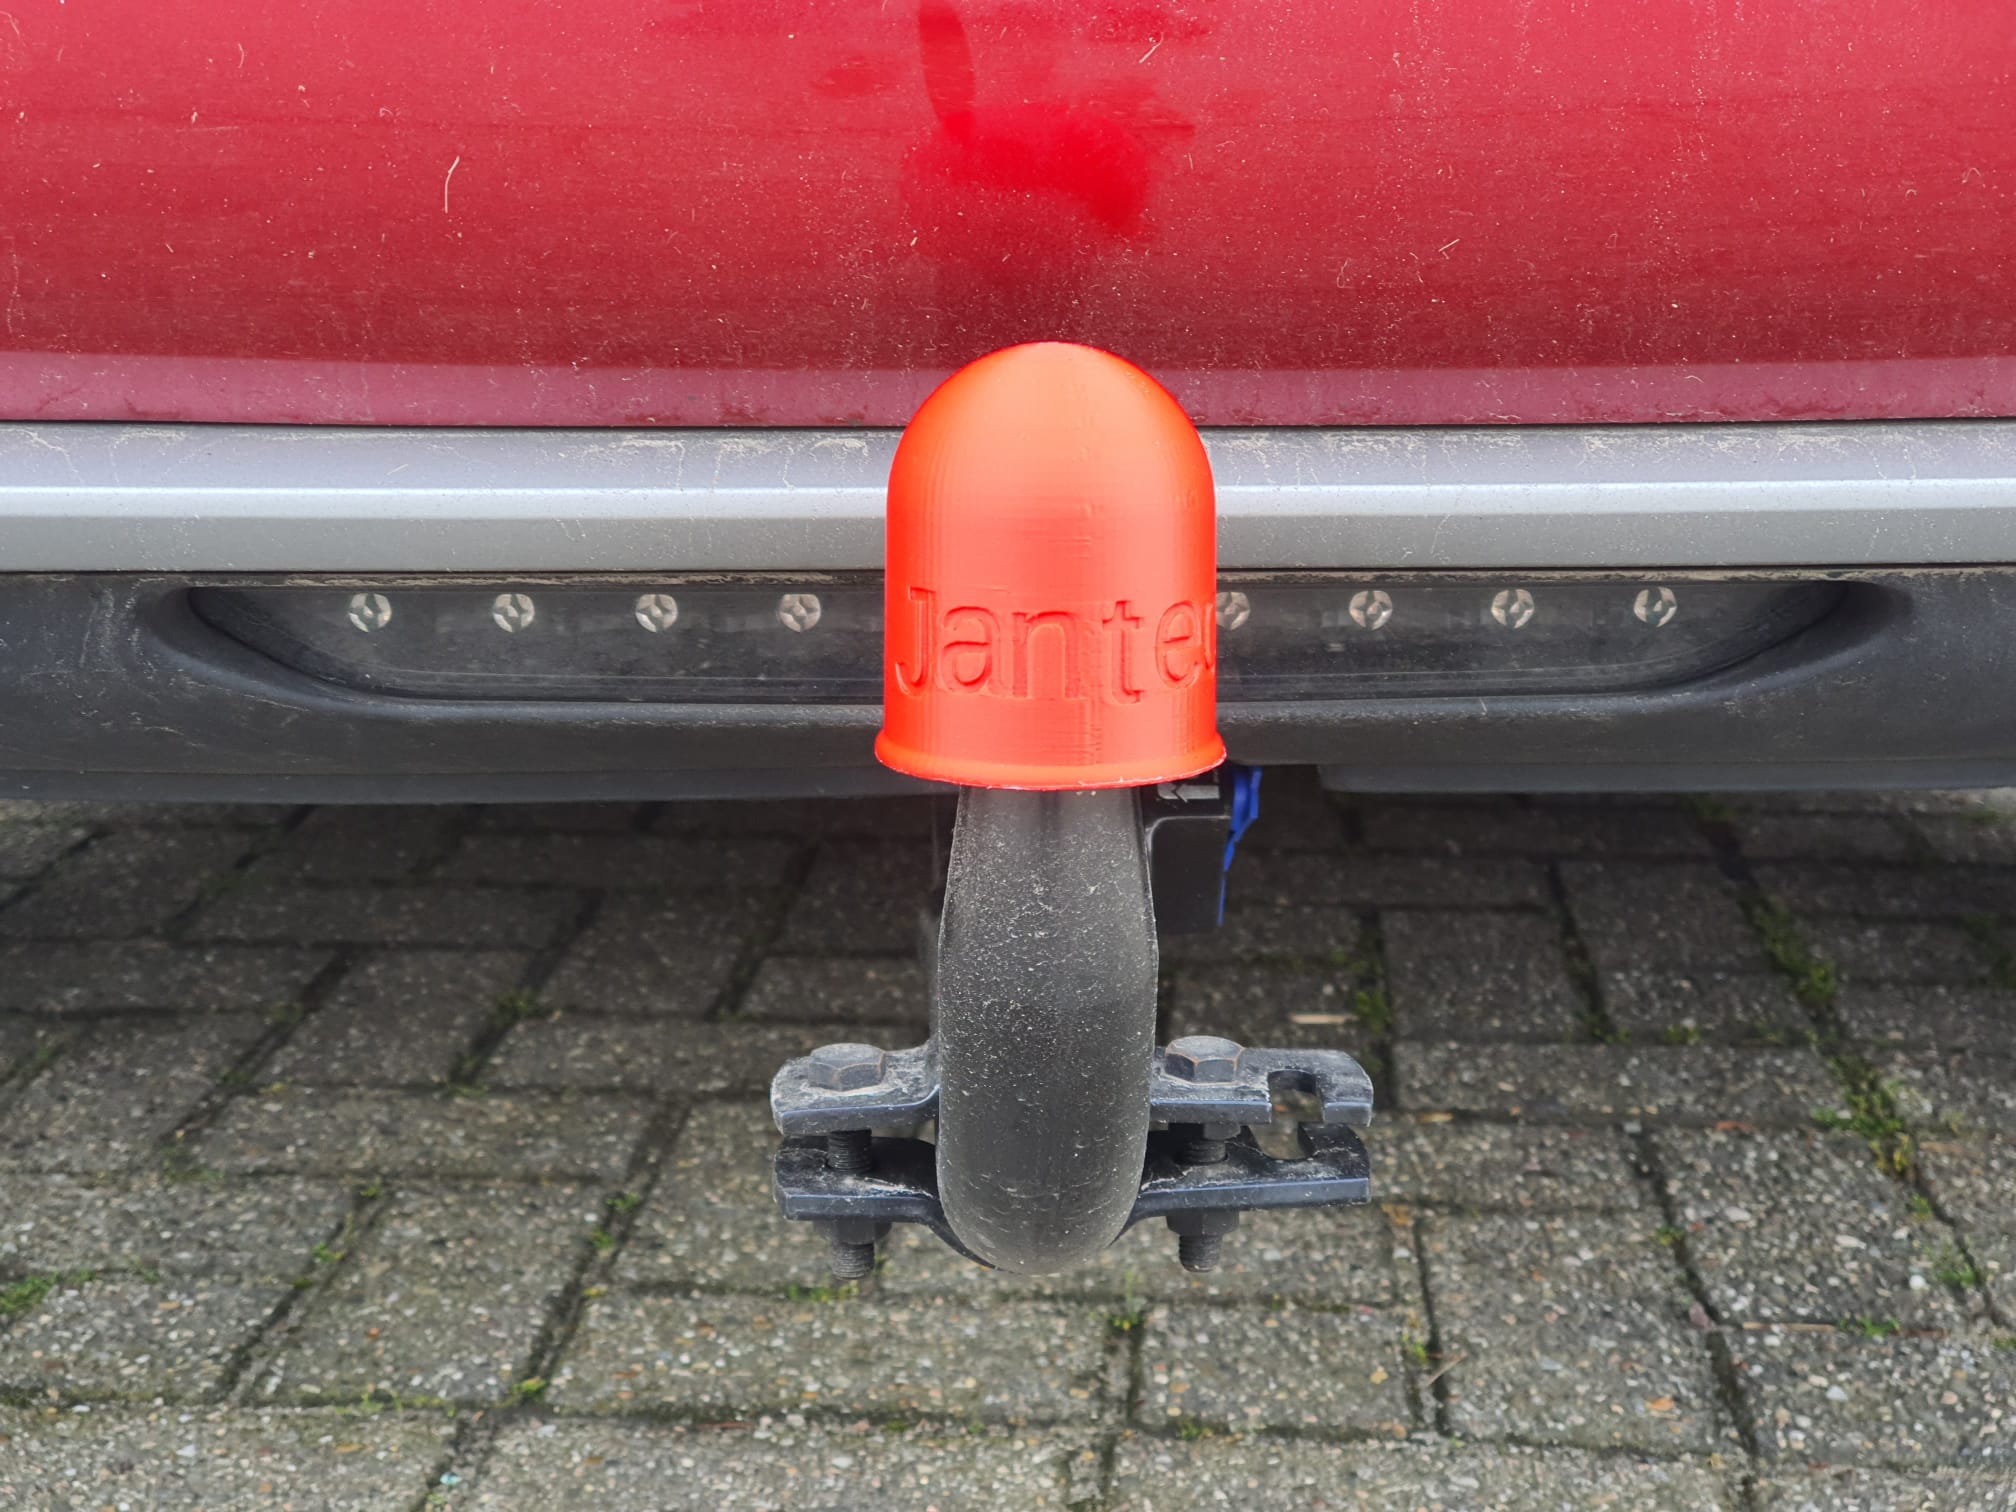
1) De trekhaak heb ik, maar de auto mag officieel geen gewicht trekken omdat de auto niet ‘gehomologeerd’ is. Dat wil zeggen dat er geen trekgewicht staat op het Certificate Of Conformity van de auto. Dat kun je later nooit meer krijgen, alleen bij de kentekening van de auto. Erg jammer, vooral omdat ons min of meer mondeling beloofd was bij de aanschaf dat dat allemaal nog wel zou komen.
2) Geen standaard dashcam functie terwijl de kabel wel is voorgemonteerd. De camera is gewoon niet af-fabriek (voor NL) gemonteerd. Dat heb ik achteraf zelf opgelost, lees HIER.
3) Geen regensensor voor de ruitenwisser. dat was ik even helemaal niet gewend dus was het extra wennen dat ik steeds zelf de schakelaars moet bedienen. Dit kan ik oplossen maar ik ben er vanwege een probleempje met mijn Traction Avant nog even niet aan begonnen. Zodra de garage weer beschikbaar is begin ik aan de regensensor inbouw. Lees HIER de voortgang.
Verder nog gedaan:
Ik heb achteraf zelf een reservewiel geplaatst, heb je natuurlijk nooit nodig maar wanneer je het wel nodig hebt.. ja, precies!
En gelijk bij ontvangst de standaard zomerbanden door all-weathers laten vervangen.
Camera op achterruit. Naast de dashcam achter de voorruit heb ik de dashcam die ik tijdelijk VOOR had, een Garmin mini2, naar de achterruit verplaatst. Die had ik opeens toch over. Gewoon stroom via de lange voedingskabel uit de USB aansluiting gehaald, achterop de middenconsole. De Garmin werkt via een app op de telefoon, ik ga nog kijken of iik dat ook via Android auto kan laten lopen, zodat ik het overzetten van beeld ook via de USB aansluiting onder het dashboard kan laten lopen.
Rij-ervaringen
De auto heb ik al vanaf mijn eerste rit in november 2022 prettig gevonden qua rijbeleving en weggedrag. Door de software verbeteringen is mijn beleving nog beter geworden. De Atto 3 rijdt niet als een kleine middenklasser maar gedraagt zich op de weg heel vergelijkbaar met mijn vorige auto(‘s), Volvo V70. Misschien een rare vergelijking, maar ik rijd ook met regelmaat in andere auto’s en daarmee ervaar ik wel verschil maar tussen de Atto 3 en een laatste versie V70 dus niet. Ja kan ook zeggen dat een V70 een lompe bak is natuurlijk, maar dat is met de laatste versie V70 niet mijn ervaring. PS: Mijn laatste versie V70 F (BW), 2 liter benzine/LPG had een leeggewicht van 1450 kilo, de Atto weegt leeg 1825 kilo….
Maar goed, ik was en ben nog steeds erg tevreden over de Atto 3.
Wat rij-ervaringen betreft en het bereik van de auto heb ik gedurende de afgelopen 15.000 kilometers ook wel het een en ander meegemaakt. Uiteindelijk viel het mij helemaal niet tegen. Je gaat er na een tijdje anders mee om dan met een ICE auto. Nu vertrek ik meestal met een volgeladen auto. Dat kost nl. toch geen extra gewicht en de blade accu van de Atto 3 kun je net als een Tesla 3 niet overladen. En je kan het laden ten minste 10.000 keer doen, tot helemaal vol. No problem. Dat is heel anders dan bij veel andere elektrisch aangedreven auto’s.
Wanneer ik ’s avonds thuiskom gaat de auto dus altijd aan mijn lader en ik maak me onderweg helemaal geen zorgen over bijladen, tenzij ik naar het buitenland ga. Dan plan ik een stop in om te laden. Met het rijbereik van de Atto 3 van WLTP 420, en regulier zonder op te letten 350 km kom ik net niet heen en weer tussen Amsterdam en Groningen. Die afstand is 400 km heen en weer en dat vind ik niet fijn, bijna leeg rijden. Dus ergens na tenminste 100 km te hebben gereden gewoon een willekeurig laadpunt pakken om 100 km bij te tanken is genoeg om ook weer terug te komen.
Rijden in een EV is wat dat betreft wel heel anders dan een auto op fossiele brandstof. Even snel volgooien duurt sowieso wat langer dan aan de pomp hangen.
De Atto 3 weegt dus wel 1825 kilo. Minpuntje dat samenhangt met een betrekkelijk zware EV: Je moet echt erg opletten met sommige verkeersdrempels, om er niet altijd zomaar met de geadviseerde snelheid overheen te gaan. Vaak gaat het goed maar ik heb er inmiddels 1 in mijn route zitten waar ik niet sneller dan met 40 overheen wil terwijl er een advies staat van 60. Op een 80 km/h meg. het erop rijden is OK, maar met afrijden is het bij 60km/h net of je van een platform af valt
Verbruik en laden
Maar, met name bij de buitenland reizen het afgelopen jaar bleek dat alles heel goed gaat wanneer je vooraf bekijkt WAAR je WAT met welke pas of app kan laden. Omdat de Atto3 ‘ maar’ met 88 kiloWatt kan snelladen duurt het wel even om helemaal opnieuw de auto te laden. Dus doe ik dat bij 40-50 % overgebleven lading. En dan is 15 minuten genoeg om weer op 90-95% te zitten. Dan moet je misschien meer stoppen onderweg maar dat vind ik voor 15 minuten niet zo erg. Je rijdt met de Atto 3 van 100% naar 50% ongeveer 210 kilometer. Dus stoppen bij ca. 200 km na 2 uur rijden dus past mij heel prima.
En dan kom je op het echte verschil tussen fossiel rijden of elektrisch: Alles wat je doet kost stroom- en bij een EV dus ook rijbereik. Tegenwind: 10% minder bereik. Gemiddeld verbruik bij 90 km per uur is ca. 14 kWh voor 100 km dus kom je dan met ene volle tank van 60 kWh ruim 400 km ver, zelfs de 420 km WLTP waarde kun je dan halen. Tenminste, ’s zomers met 90-95 km/h op een vlakke weg zonder storm, zonder tegenwind en zonder al te veel belading.
Ik heb een aantal rijscenario’s uitgeprobeerd en mijn meest opvallende scenario is op de A2 van Breukelen naar Abcoude met 130 km/h zonder tegenwind of storm, wel ’s avonds met verlichting aan. Gemiddeld verbruik: 35 kWh voor 100 km. Als je dus langere duur 130 km/h zou rijden kom je krap 250 kilometer ver en dan is de accu leeg.
Opeens begreep ik waarom de Atto 3, net als de meeste nieuwe kleinere EV’s is afgetopt op 160 km/h…
Wanneer je vooral op provinciale wegen rijdt en/of stedelijk en je kan je voet een beetje bedwingen met accelereren, kun je gemakkelijk onder de 15 kWh/100km blijven, ik red soms zelfs gemiddeld 14 kWh/100km.
Het blijft natuurlijk toch een small/medium SUV en de daarmee samen hangende mindere stroomlijn heeft ook negatieve invloed op het verbruik..
BYD Atto 3: User experiences after 9 months and 10,000 miles
This review replaces my previous reviews of my Atto 3, as all of my desired software enhancements have been completed filled in by BYD.
Meanwhile, software version 1.4 was loaded into the car via OTA on 18-9-2023 and as far as I am concerned, the car is completely OK in terms of software.
This is of course very personal. by now I am used to the beeps and other sounds the system makes when something is signaled or detected that I do not always immediately interpret as dangerous.
I have even learned to appreciate the fact that the system intervenes in dangerous situations. The other day I was driving behind a driver who suddenly hit the brakes in the middle of the intersection for some unknown reason. Before I could brake, the car was slowed down so that no collision occurred. I had not had similar intervention from the car before and was very pleased with it. It also shows that you really only know what you need when you have (unnoticed). So at this point I’m all over the place. Safety sometimes seems patronizing but avoiding a collision is enough reason, as far as I am concerned, to learn to appreciate the safety aspects of the Atto 3.
Intervention by the car on the steering wheel when you approach the edge of the road too much I previously found very annoying, and so did the accompanying beep. But I can also keep a little more distance from the shoulder and avoid the intervention. Matter of doing.
As I had mentioned in my earlier reviews, there were quite a few things that were just not set up nicely, which made driving the car uncomfortable. These were things like faltering A/C controls, or just the wrong air freshening functions available but also things like the fact that the A/C did not remember what the last setting was and should start with that again by default next time. That’s all fixed now, though.
Also promised afterthoughts like Apple Carplay and Android auto have been around for a while. I myself use Android auto and that works absolutely great!
Issues that remained:
1) I have the tow bar, but the car is officially not allowed to tow any weight because the car is not “homologated”. That is, there is no towing weight on the car’s Certificate Of Conformity. You can never get that later, only when the car is registered. Very unfortunate, especially since we were more or less verbally promised at the time of purchase that all that would still come.
3) No rain sensor for the windshield wiper. I was not used to that at all so it was getting used to having to operate the switches myself all the time. I can fix this and ordered the parts but I haven’t started yet. Read the progress HERE .
Other topics:
I retrofitted a spare tire myself, of course you never need it but when you do… yes, exactly!
And immediately upon geting the car I had the standard summer tires replaced with all-weathers.
Driving experiences
I have liked the car from my first drive in November 2022 in terms of driving experience and handling. The software improvements have made my experience even better. The Atto 3 does not drive like a small mid-size car but behaves on the road very similar to my previous car(s), Volvo V70. Maybe an odd comparison, but I also drive other cars with regularity and with that I experience difference but between the Atto 3 and a latest version V70 so not. You could also say that a V70 is a dodgy car, but that is not my experience with the last made version V70’s. PS: My last version V70 F (BW), 2 liter gasoline/LPG had an empty weight of ‘only’ 1450 kilos, the Atto weighs empty 1825 kilos….
Anyway, I was and still am very satisfied with the Atto 3.
As far as driving experiences and the range of the car are concerned, I have also experienced a few things over the past 15,000 kilometers.
Driving an EV is very different from driving a fossil fuel car. Filling up the charge level takes longer than filling up at the gaspump.
The Atto 3 weighs 1,825 kilos. Minus point associated with a relatively heavy EV: You really have to be very careful with some speed bumps, not to always just go over them at the advised speed. Often it goes well but I now have 1 in my route where I don’t want to go faster than 40 while there is an advisory of 60. On an 80 km/h meg. driving on it is OK, but when driving off at 60km/h it’s like falling off a platform.
Consumption and charging
But, especially on the trips abroad this past year, it turned out that everything goes very well when you check in advance WHERE you can charge WHAT with which pass or app. Because the Atto3 can ‘only’ fast charge at 88 kiloWatts it does take a while to charge the car all over again. So I do that at 40-50% remaining charge. And then 15 minutes is enough to be back at 90-95%. Then you may have to stop more along the way but I don’t mind that for 15 minutes. You drive with the Atto 3 from 100% to 50% about 210 kilometers. So stopping at about 200 km after 2 hours of driving so suits me very well.
And then you come to the real difference between fossil driving or electric: Everything you do costs electricity, and with an EV, so does range. Headwind: 10% less range. Average consumption at 90 km per hour is about 14 kW for 100 km, so a full tank of 60 kWh will get you over 400 km, even 420 km WLTP. At least, in summer at 90-95 km/h on a flat road without storm, without headwind and without too much load.
I have tried a number of driving scenarios and my most notable one is on the A2 from Breukelen to Abcoude at 130 km/h with no headwind or storm, though at night with lights on. Average consumption: 35 kW for 100 km. So if you would drive 130 km/h for a longer period of time, you would get barely 250 kilometers and then the battery would be empty.
Suddenly I understood why the Atto 3, but now most new EVs are capped at 160 km/h….
If you drive mostly on county roads and/or urban and you can control your foot a bit with acceleration, you can easily stay under 15 kW/100km, I sometimes even manage to average 14 kW/100km.
Of course, it still remains a small/medium SUV and the streamline also affects consumption….
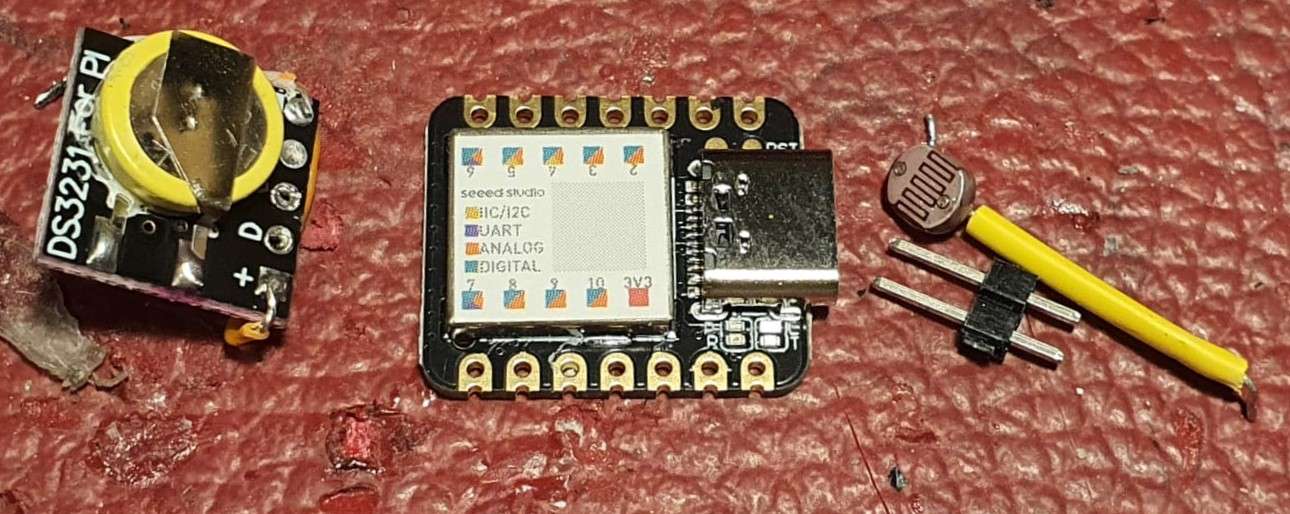
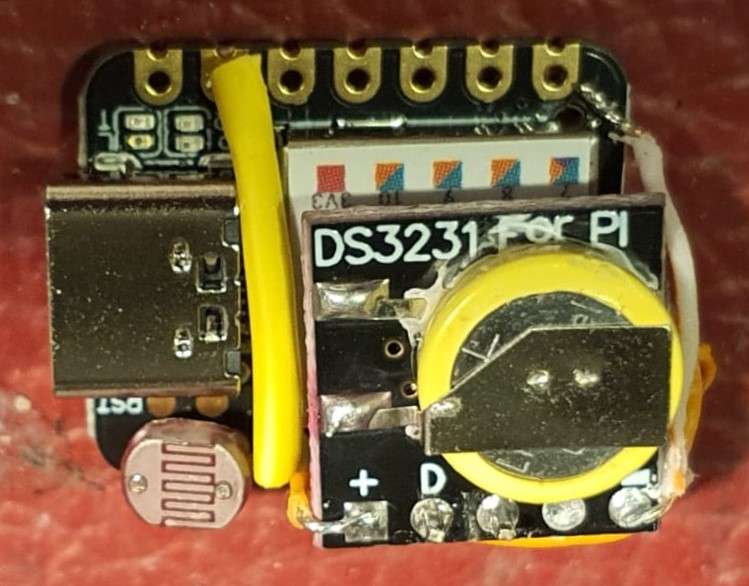
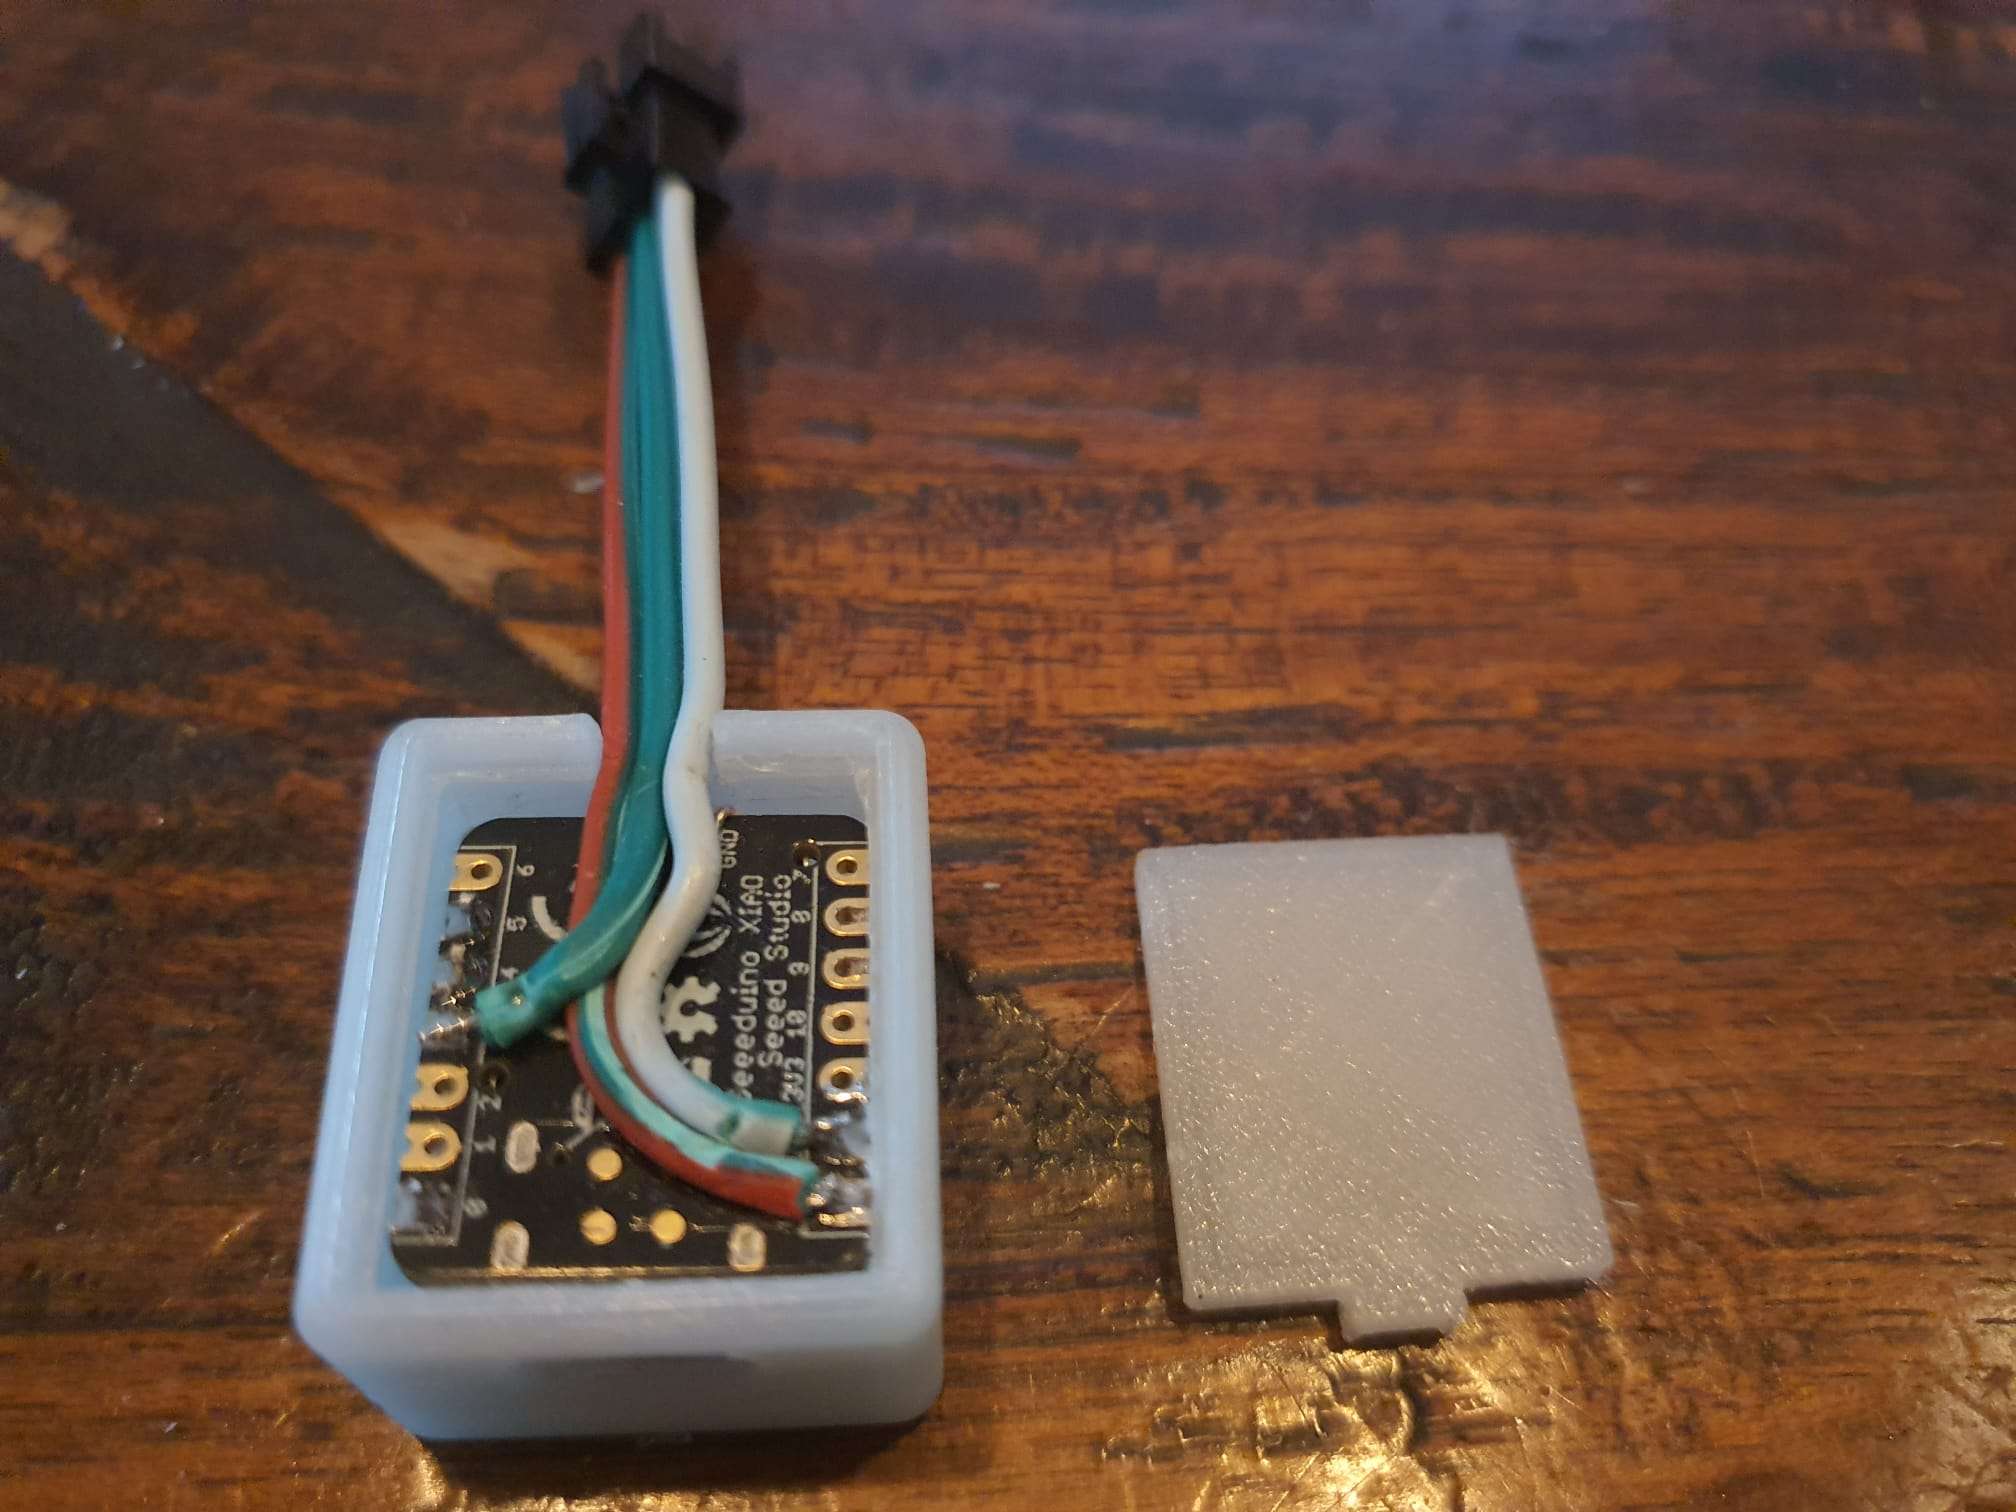
Ster en klok met Smart LEDs WS2812, Seeeduino xiaosamd21 cortex m0+ microcomputer, LDR control en DS3231 RTC nauwkeurige klok chip
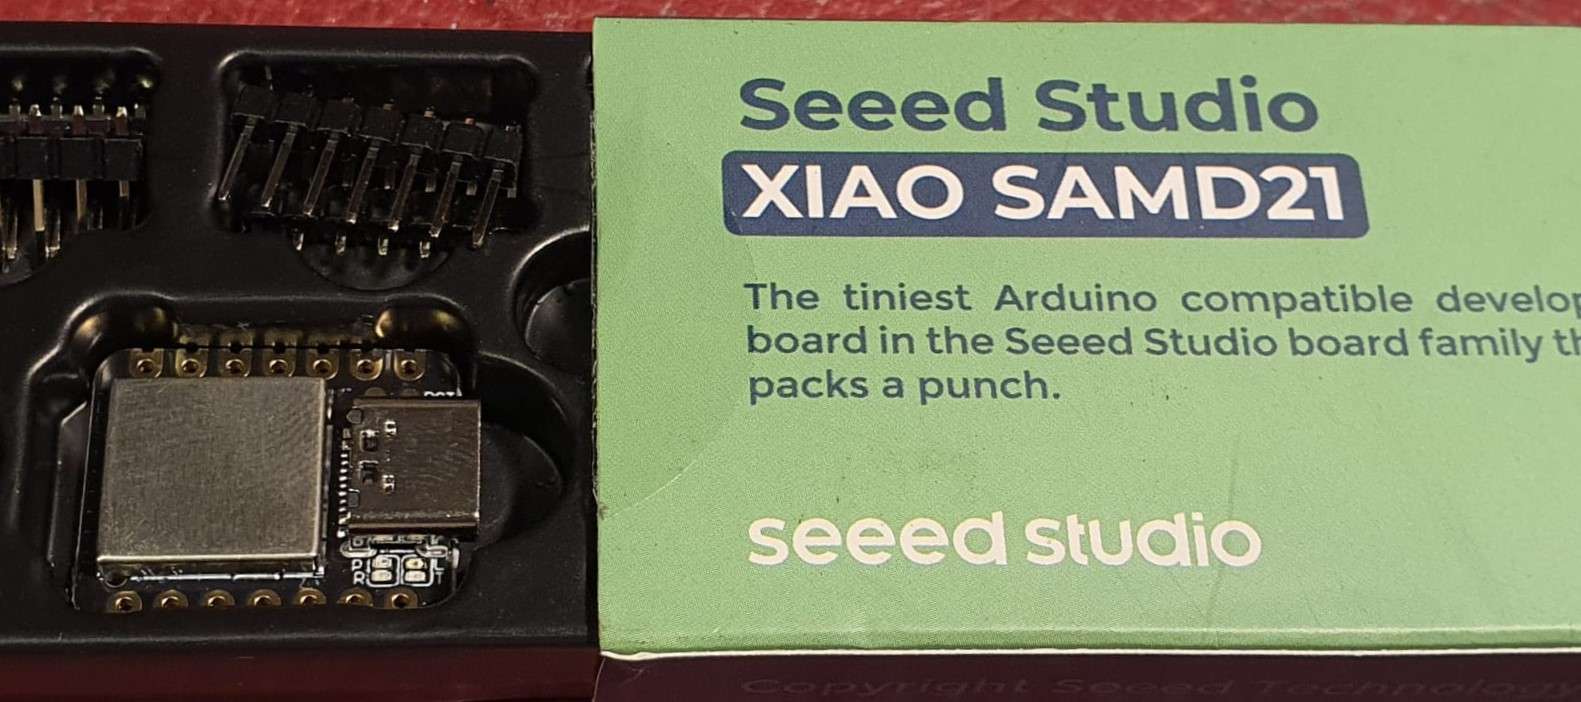
De gebruikte onderdelen: Meestal gebruik ik een AVR-type microcomputer zoals een Nano of een Mega maar bij een paar projecten met LEDS loop ik steeds vast op de beperking van geheugen. Daarom ben ik voor meer complexe projecten overgestapt op de Seeed studio XIAO SAMD21. Lekker klein, snel en veel beschikbaar geheugen. Wel jammer dat ik alle code van de klok en dergelijke opnieuw moest maken, omdat de eerder gebruikte code alleen op AVR typen werkte.
De klok spreekt voor zich, de LDR gebruik ik voor automatisch aanpassen van de lichtintensiteit, indien gewenst. Alle belangrijke instellingen zijn via de USB-poort in te stellen. De klok draait op UTC tijd en stelt zich zelf op het juiste moment in op de lokale zomer-of wintertijd. Je moet dan eerst wel in de code de juiste regio selecteren.
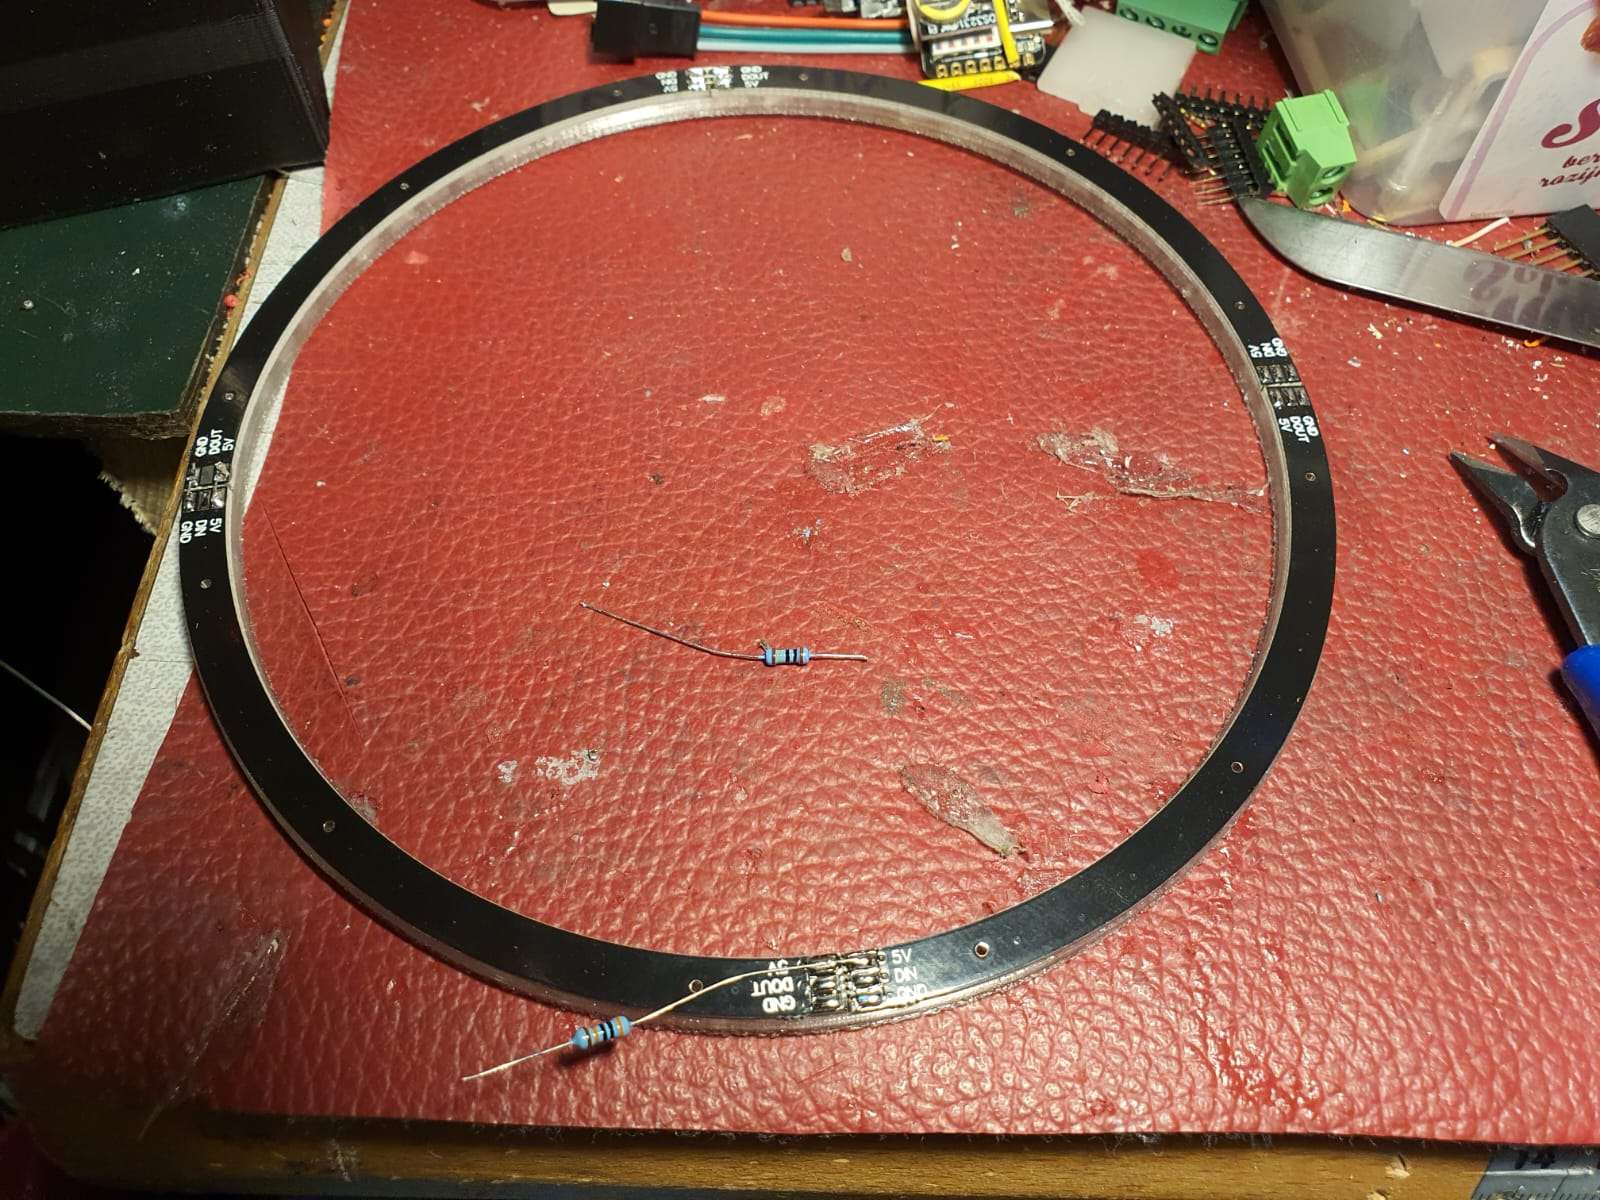
Gemonteerd en heel compact:
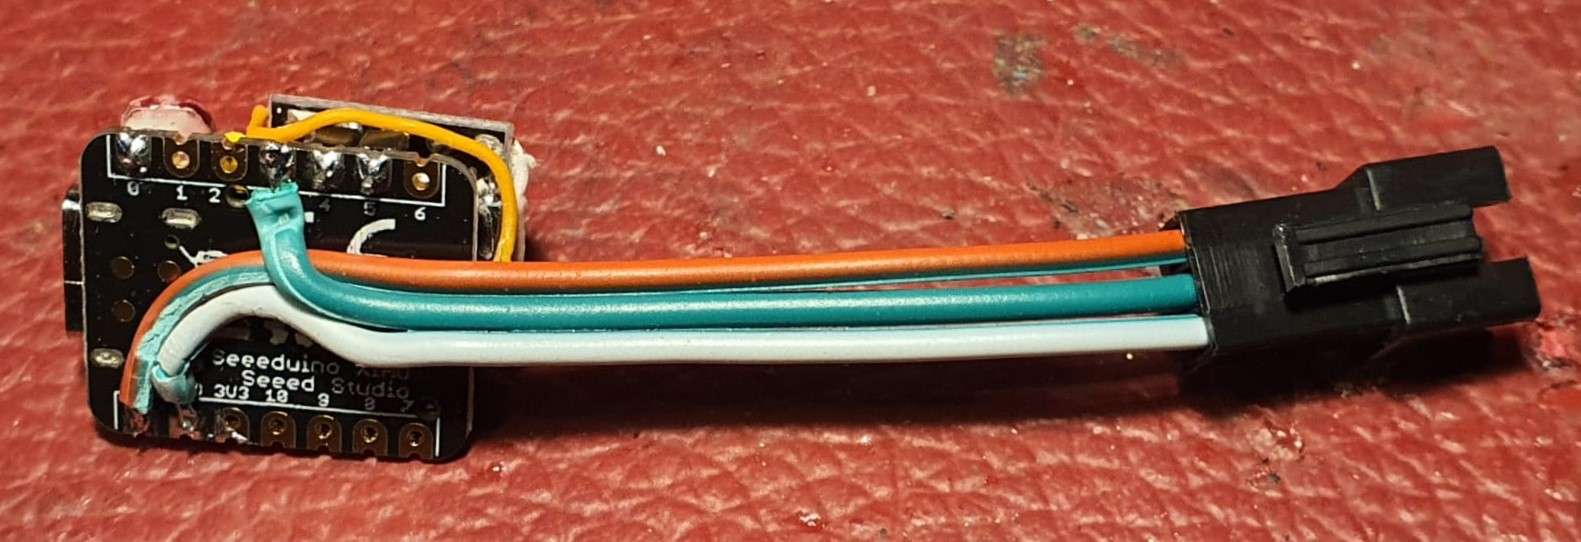
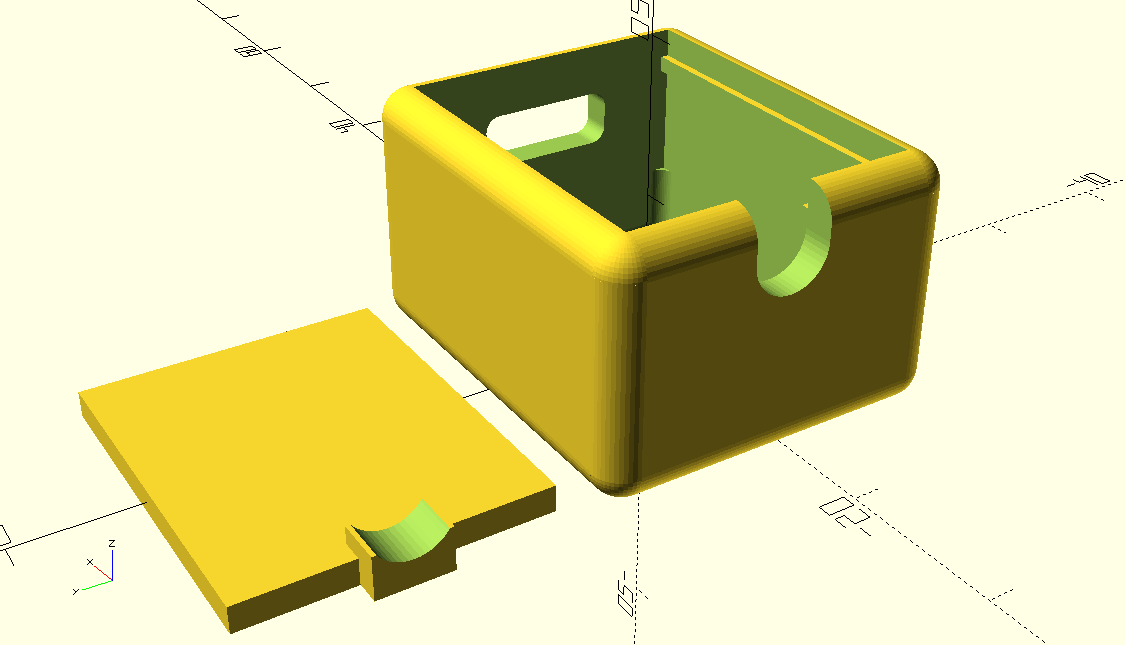
En de montage van de 4 delen van de klok-LEDS in de 3d-geprinte ring waarin de delen met de LEDS worden gemonteerd:
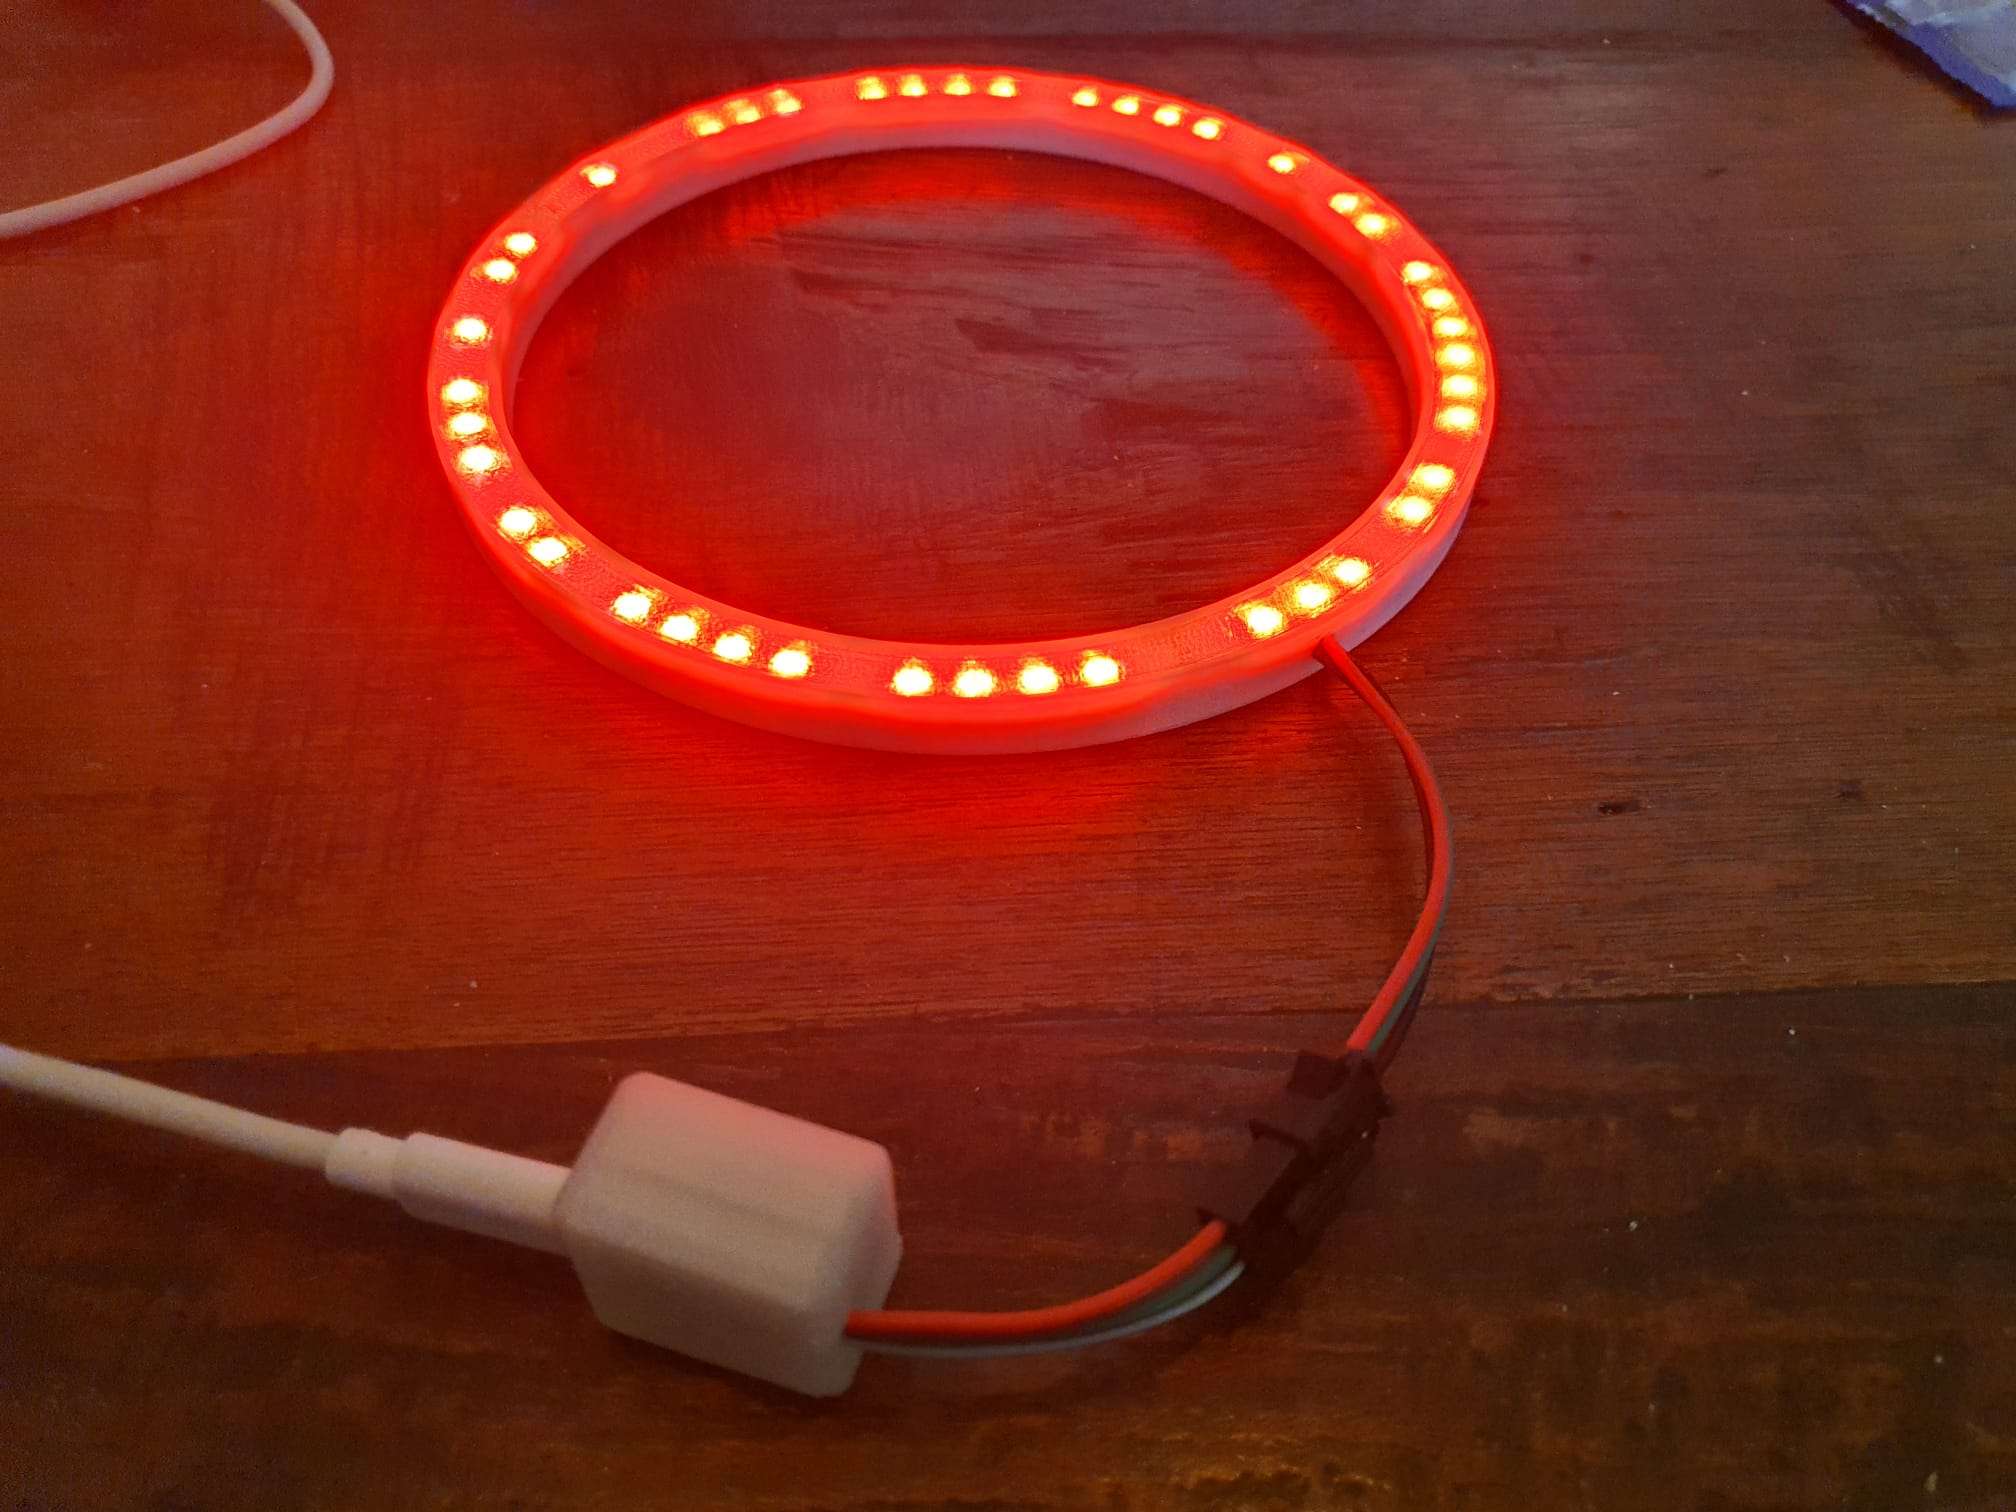
En de werkende klok hier nog met een Arduino nano in plaats van een Seeeduino XIAO SAMD21 M0 en met een standaard klok voorbeeld programma:
https://jantecnl.synology.me/downloads/Neopixel_clock_with_3231_2020_12_15_OK.ino
En meer gericht op effect dan op tijd:
Het coderen van een ster is iets complexer dan een ring omdat je meer figuren kan maken. Een klok weergeven in een ster is misschien ook mogelijk, maar je moet er dan wel wat fantasie bij gebruiken.
3D printers opnieuw gehuisvest
Poeh, dat was achteraf gezien wel veel werk.
Eerst de linker helft van de hobbykamer helemaal leeggehaald, daarna de F-rails aan de muur gemaakt. Vervolgens de vooraf op maat gezaagde ODF platen van 244×61 cm geplaatst. Daarna alles weer opnieuw ingedeeld.
Uiteindelijk heb ik alleen de 9 meest gebruikte 3d-printers geïnstalleerd, de rest heb ik voorlopig even opgeslagen. In de praktijk gebruik ik mijn delta printers nooit voor productiewerk en de KP3 printer is ook nooit meer voor productiewerk in gebruik sinds ik voor het serieuze productiewerk ook mijn 2 Prusa mini + printers heb.
Voor de CNC- en laser graveer machines heb ik nog geen vast plekje vrij kunnen krijgen. Maar eigenlijk wil ik dat soort equipment sowieso niet binnen gebruiken. Daarom staan de grote CO2-lasercutter en de 2 grote CNC machines al in de garage. Als er werk voor is kan ik altijd de kleine CNC machine en de kleine laser graveermachines tijdelijk in de garage plaatsen.
Ook het werkplekje in de hobbykamer voor het raam is opnieuw gemaakt, en de rechterkant van de kamer is helemaal gelijkvormig gemaakt met 3 stellingrekken naast elkaar en F-rails met dragers en 40cm diepe platen ODF daarboven.
Nu kan ik lekker overzichtelijk werken. De 3d printspullen staan allemaal links en aan de rechterkant heb ik nu alle computer-gerelateerde zaken staan.
Ik ben nog op zoek naar Eurobakken van L60xB40xH20 voor een redelijke prijs, zodat ik zowel de 60cm diepe als de 40cm diepe ODF platen helemaal kan benutten en alles netjes kan sorteren.