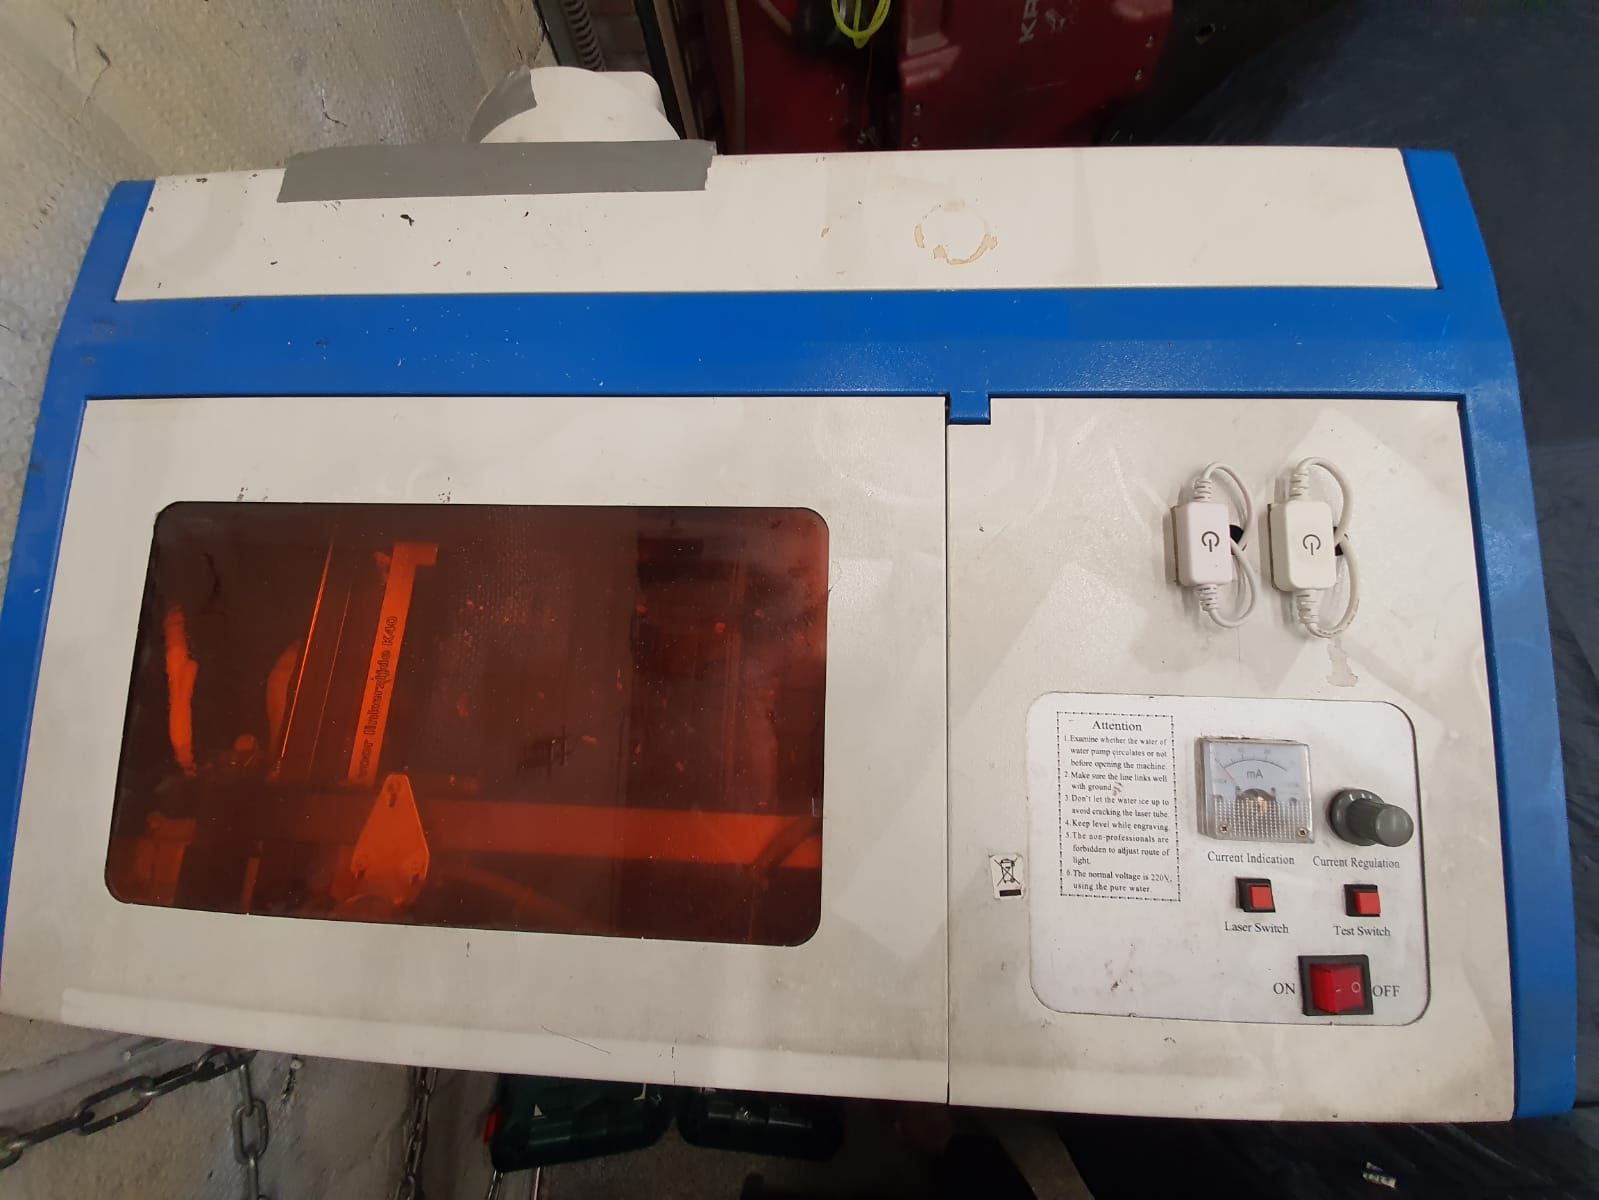
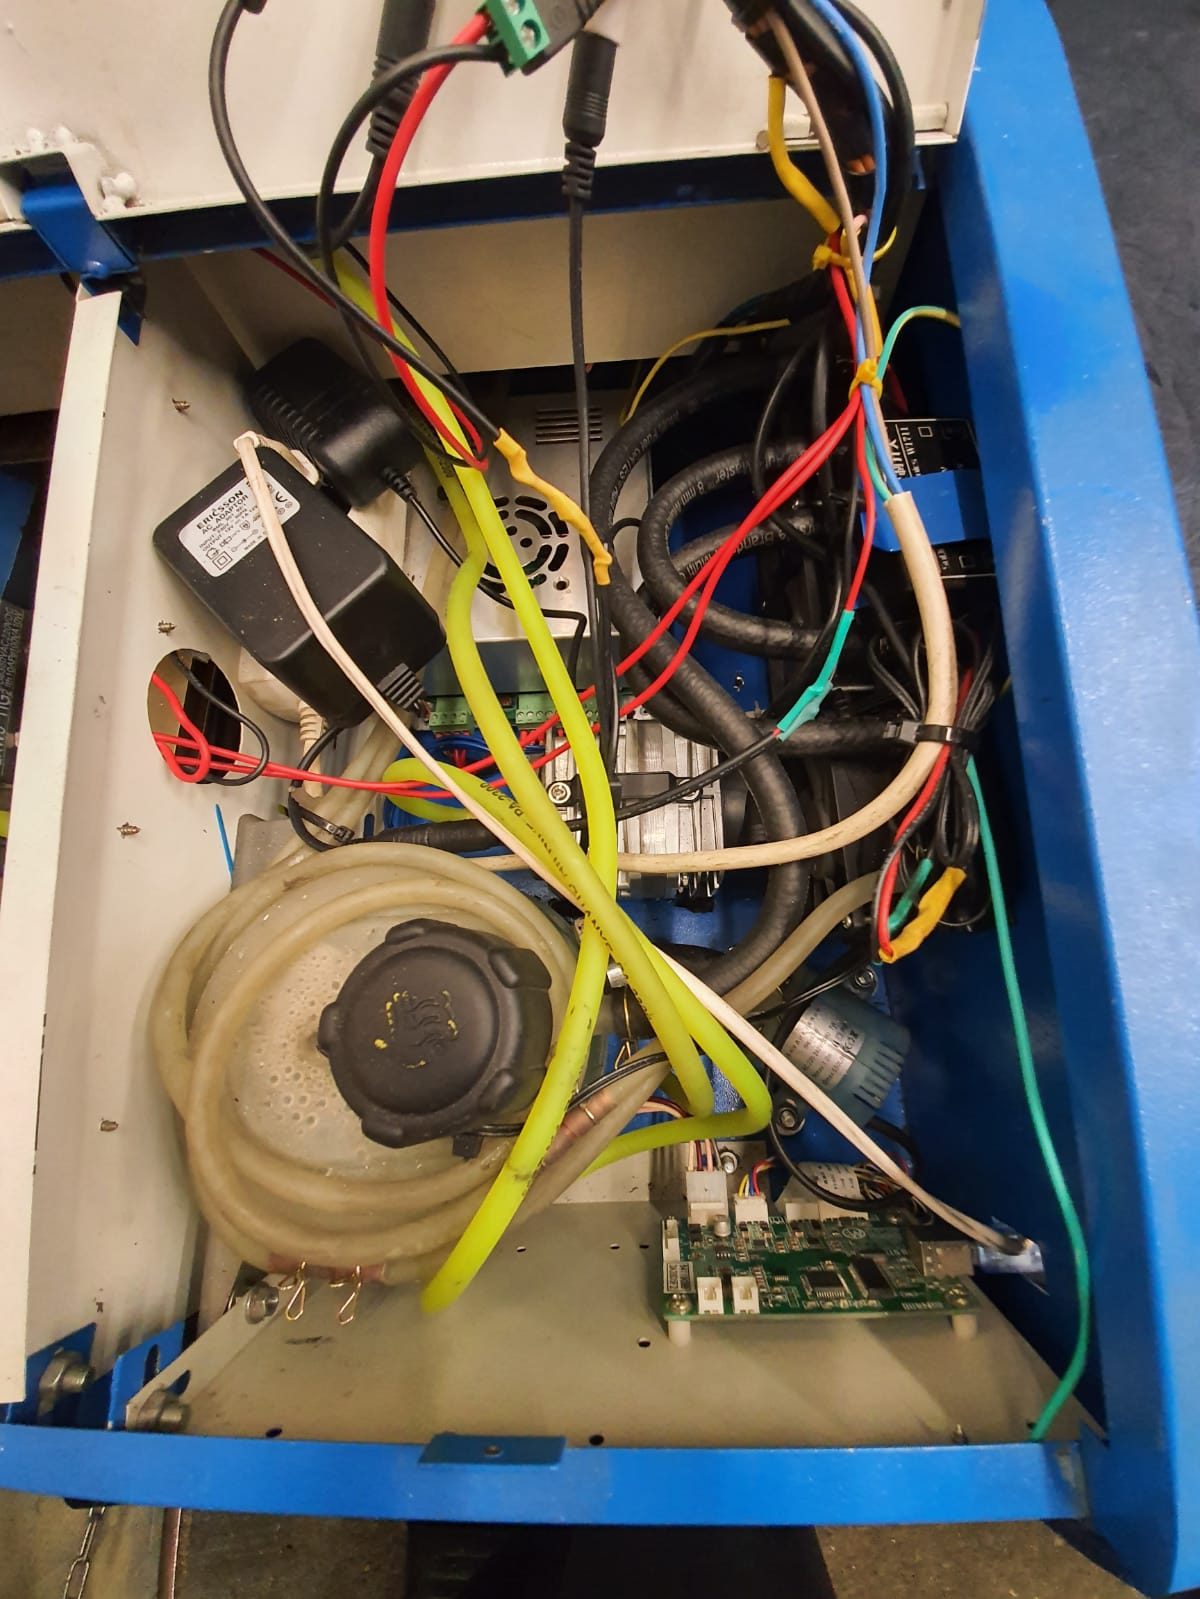
Mijn Chinese lasercutter die ik al in 2014 kocht, heeft in de loop der jaren een upgrade gekregen. Zoals vele anderen heb ik het koelsysteem voor de laserbuis in de behuizing gekregen, een aantal LED lampjes binnenin toegevoegd en ook een luchtpomp voor de laserkop toegevoegd.
Al met al werkt de machine nu goed, maar het relatief kleine werkgebied blijft de bottleneck om deze machine voor echt interessante projecten te gebruiken.
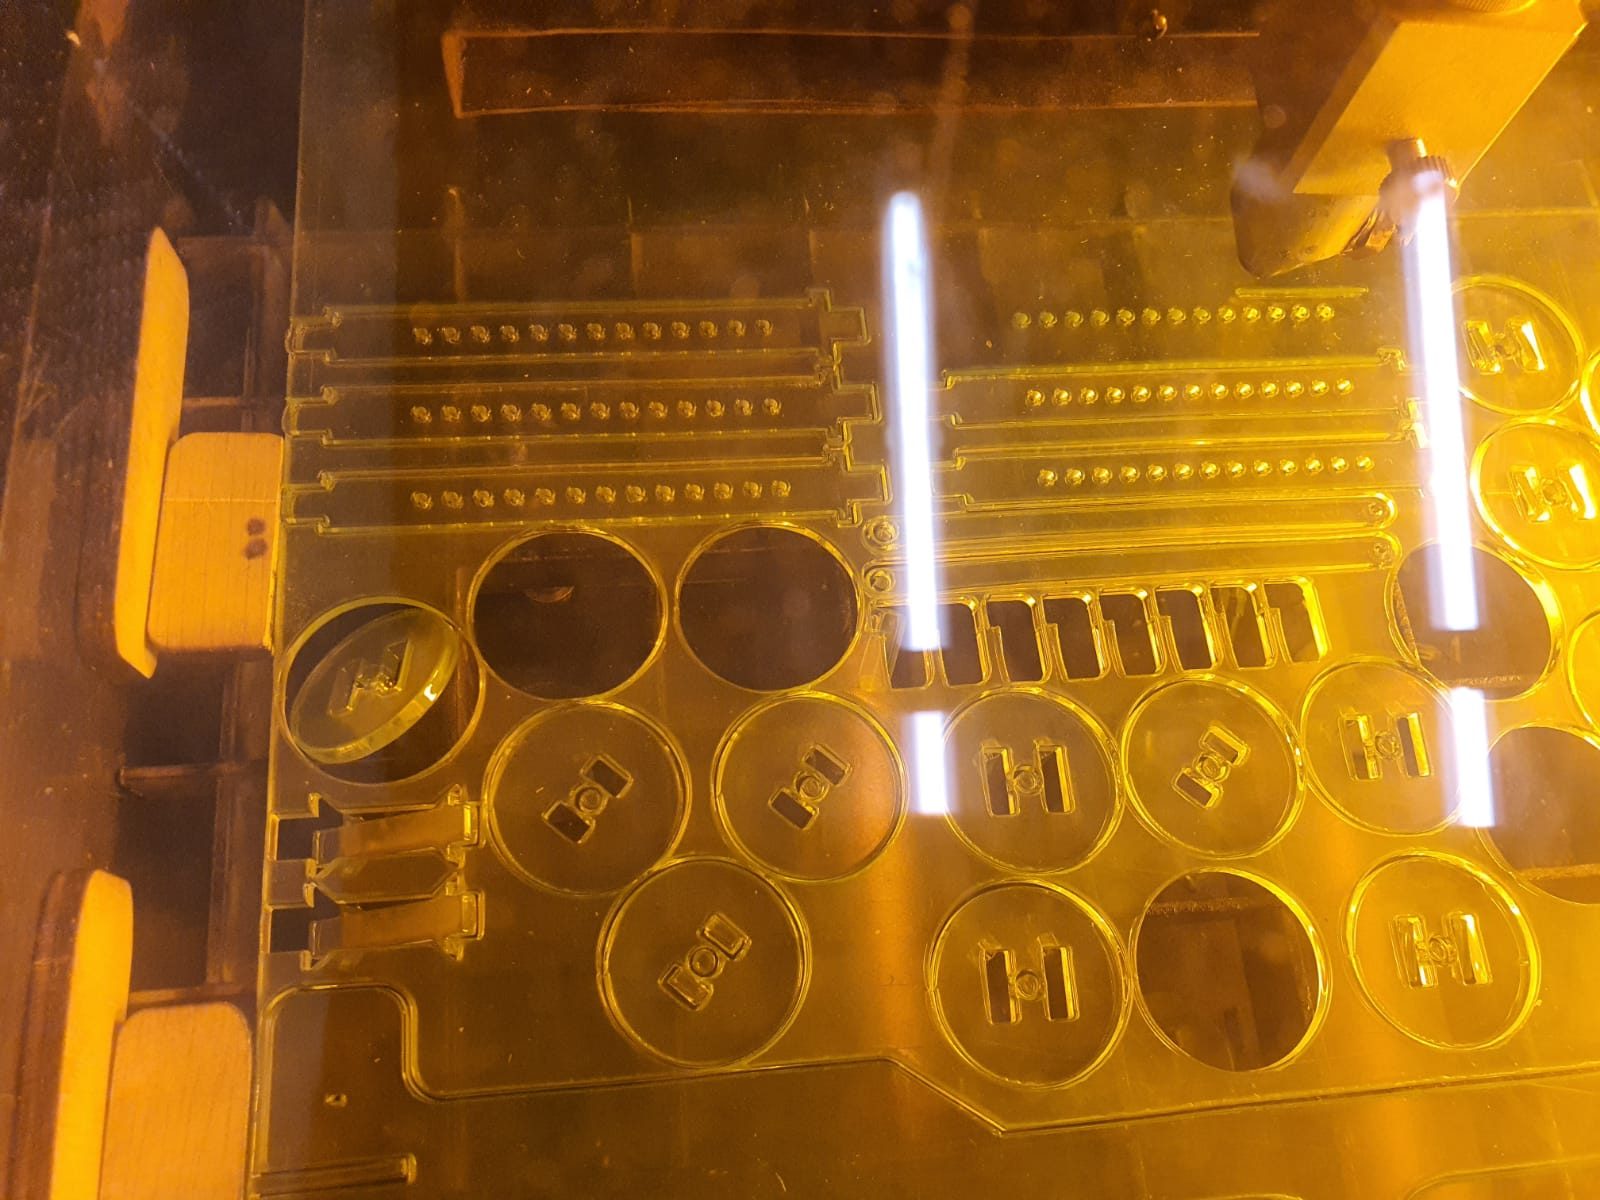
Midden 2020 heb ik de lasersnijder gebruikt voor een paar projecten waarbij ik reeksen gesneden acrylaat nodig had. De machine deed dit vlekkeloos, maar ik heb hem wel buiten gezet om te voorkomen dat er rook in ons huis zou komen.
Ik heb wel wat ideeën om de machine te upgraden met een grotere werkruimte en de elektronica en waterkoeling in een aparte behuizing te plaatsen. Daar zijn geen materialen voor nodig, behalve 3 lineaire rails en wat aluminium profielen. Maar- (status mei-2021) ik zal alleen aan dit project beginnen als er werk aan de machine is, aangezien hij al goed werkt zoals hij nu is, hoewel de werkruimte beperkt is.
Ik gebruik Inkscape (freeware) voor het maken van ontwerpen in SVG en importeer deze .SVG bestanden in K40whisperer (ook freeware) die dan de benodigde Gcode naar de K40 lasercutter kan sturen. Dit werkt allemaal erg goed en snel, je hebt hier geen snelle computer voor nodig. Ik gebruik hiervoor een 10 jaar oude dedicated HP laptop.
In de toekomst wil ik deze lasercutter hetzelfde bord laten gebruiken als mijn grote LED lasersnijder, zodat ik GRBL op beide kan gebruiken.
Zoals je waarschijnlijk weet, kan een K40 of een andere CO2 lasersnijder een bepaald soort materiaal snijden terwijl een gewone LED lasersnijder andere soorten materialen beter kan snijden, als gevolg van het gebruikte soort licht op beide die verschillen in golflengte.
De CO2 snijder kan gemakkelijk acryl snijden en de LED lasersnijder kan dat niet.
De LED snijder heeft een soort stof in het te snijden materiaal nodig om goed te werken.
Wees ervan bewust dat de veiligheidsbril die je nodig hebt ook specifiek is voor één van beide machines.
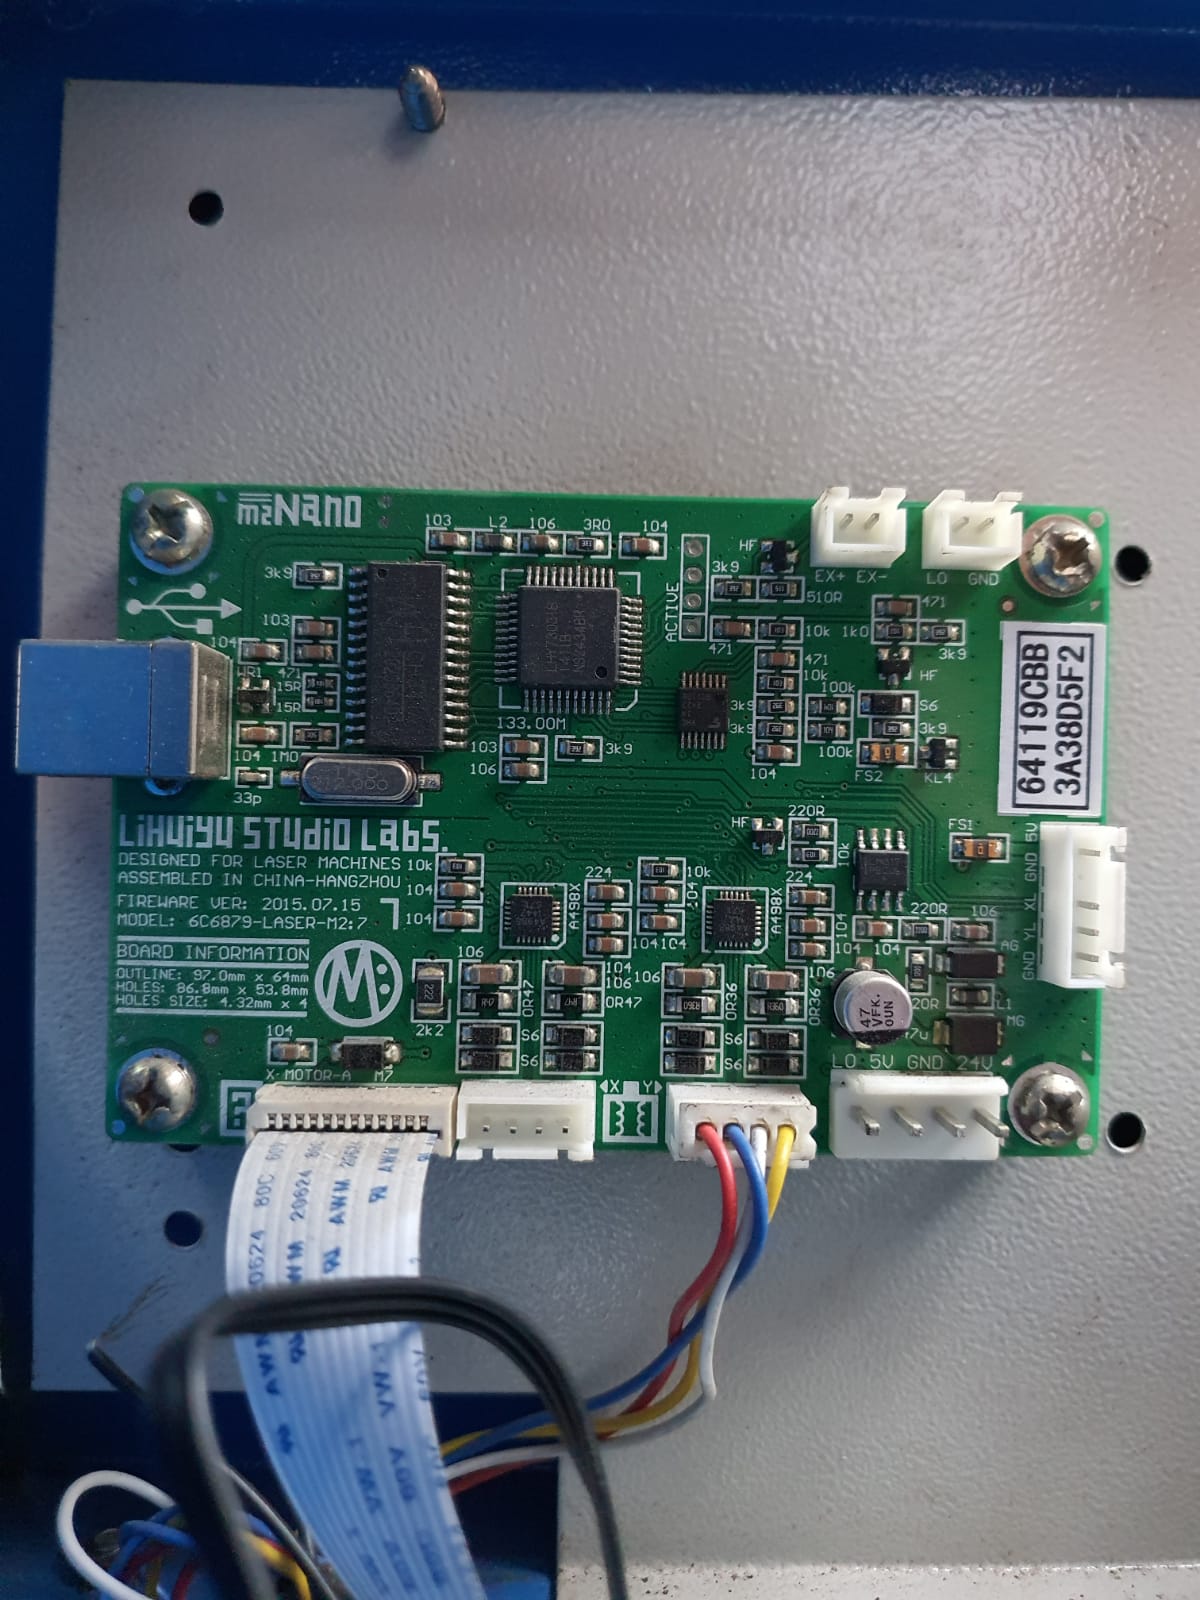
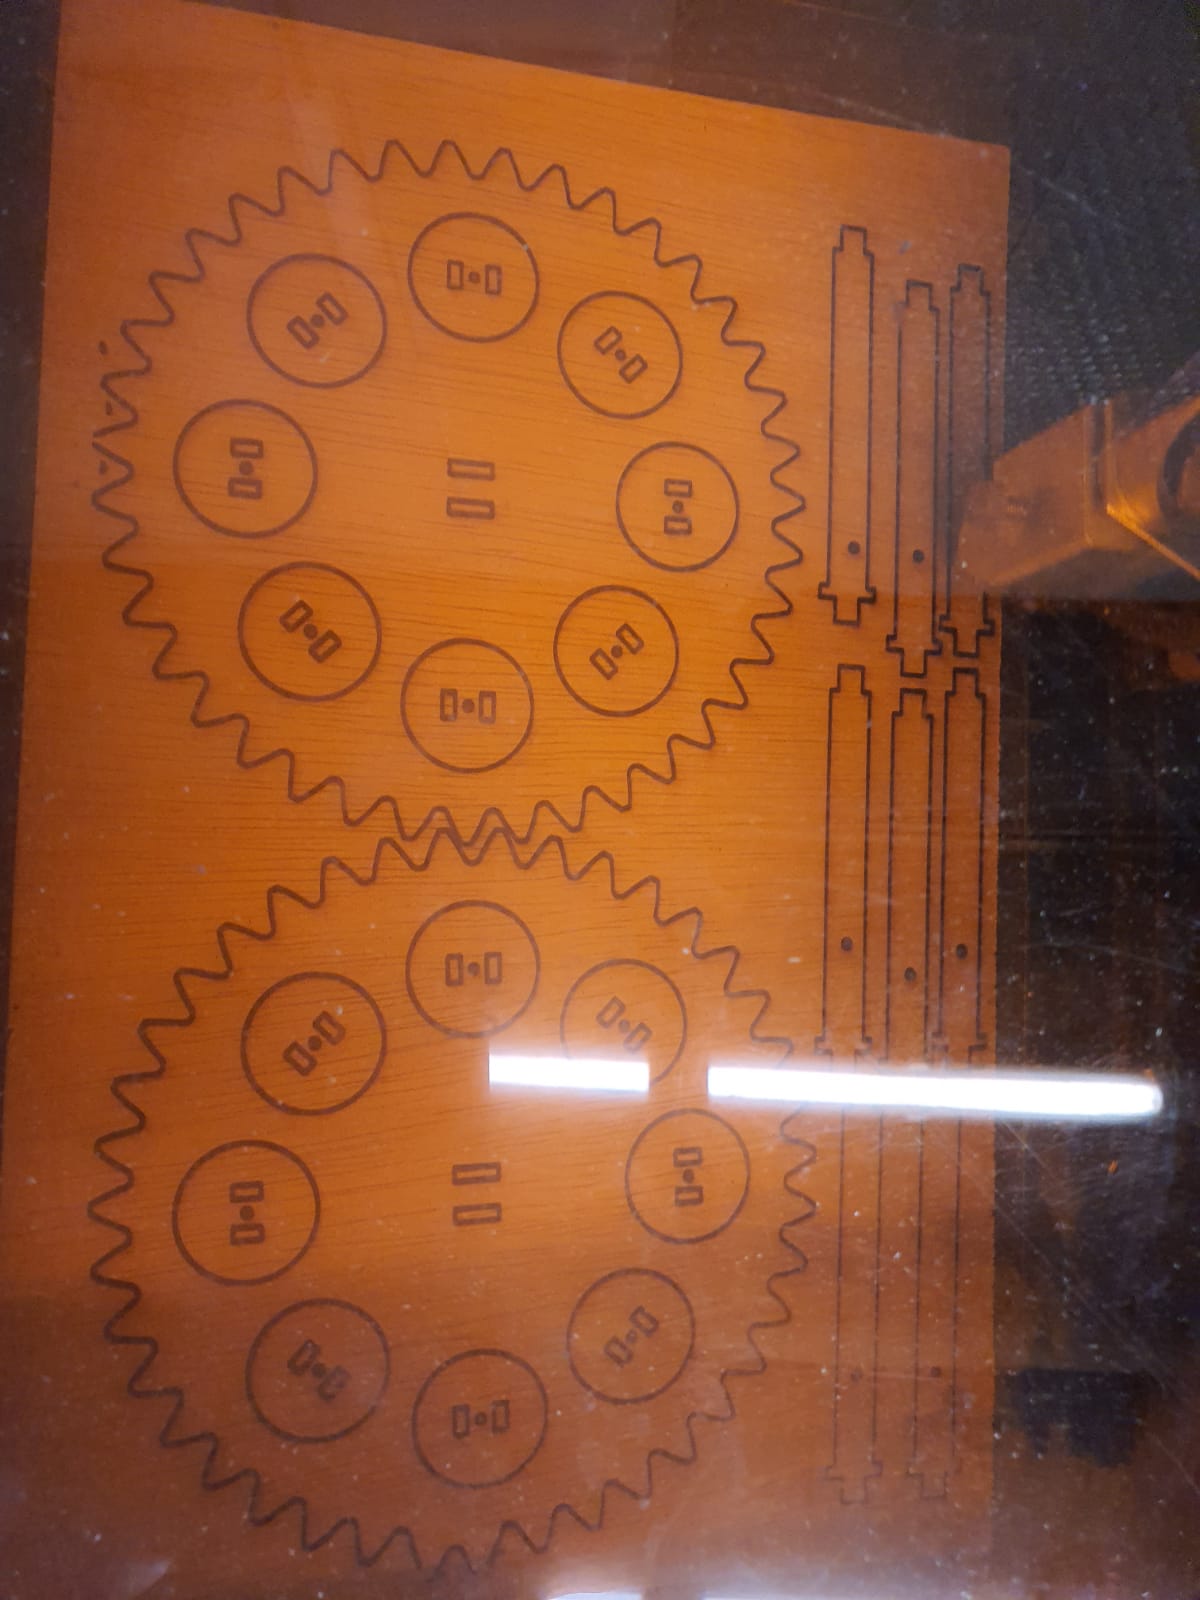
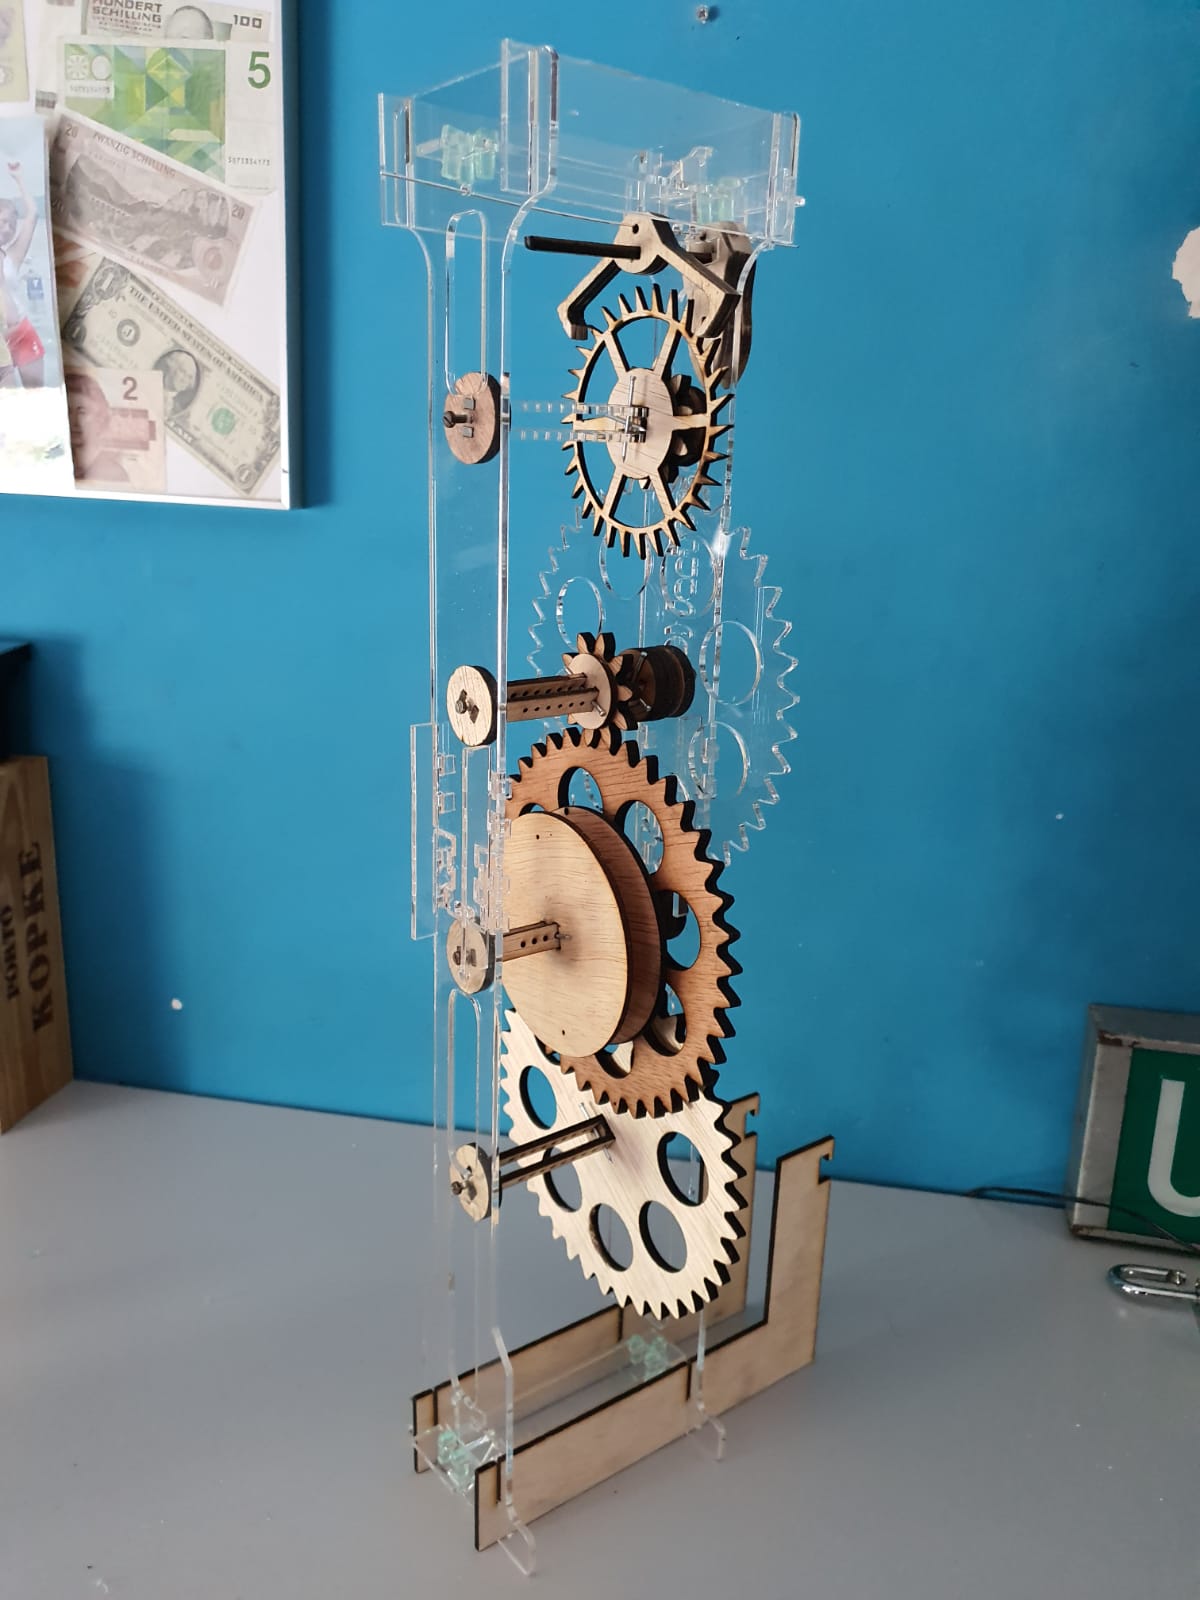
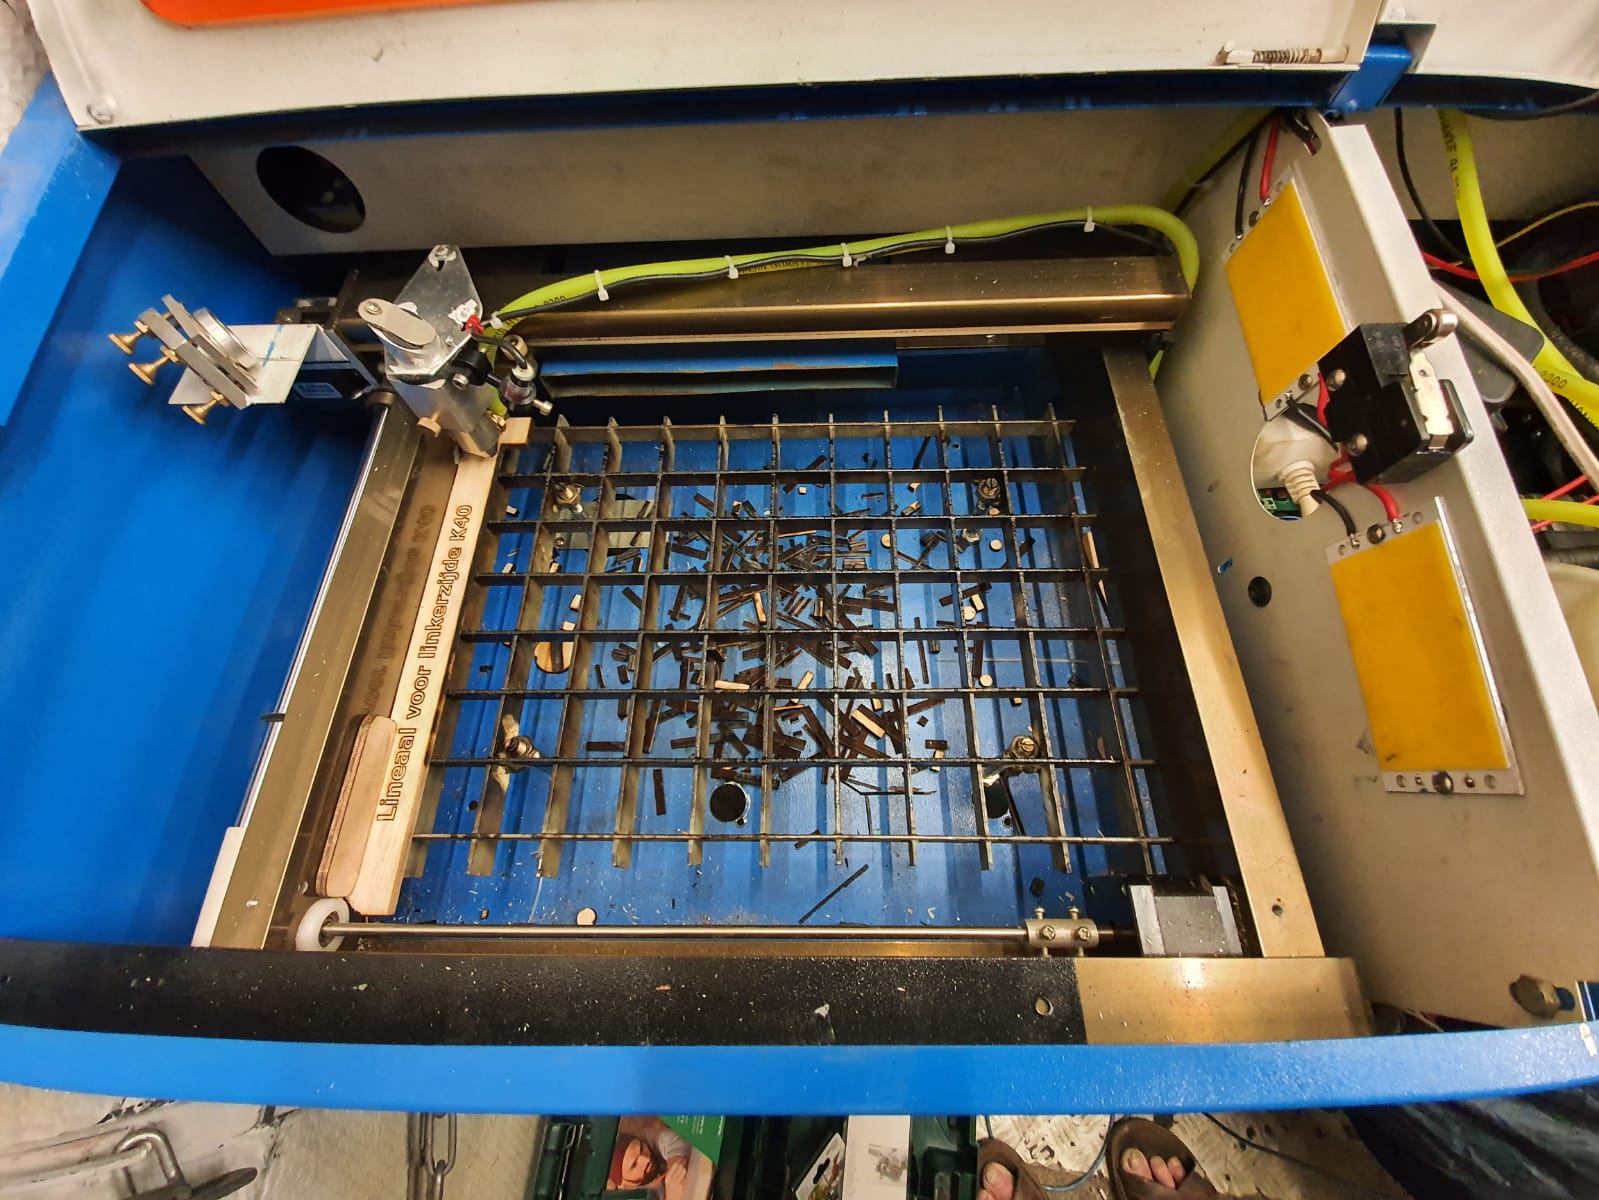
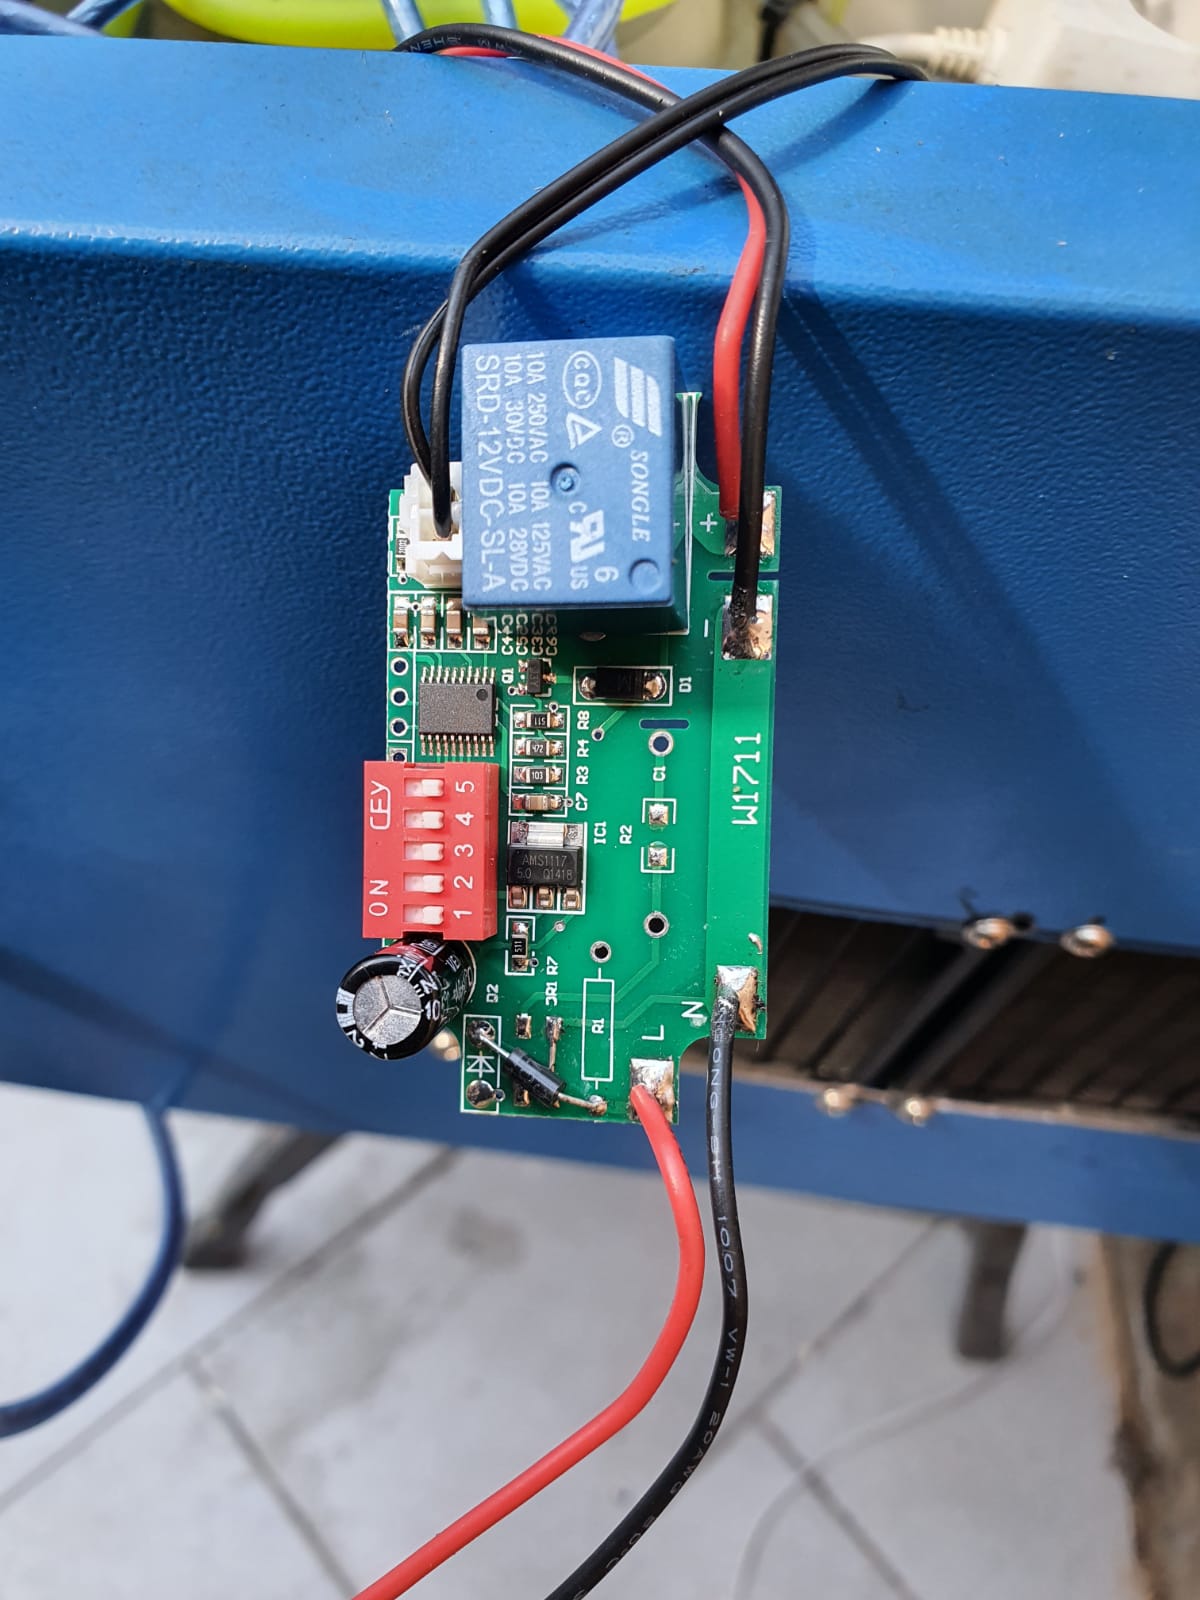
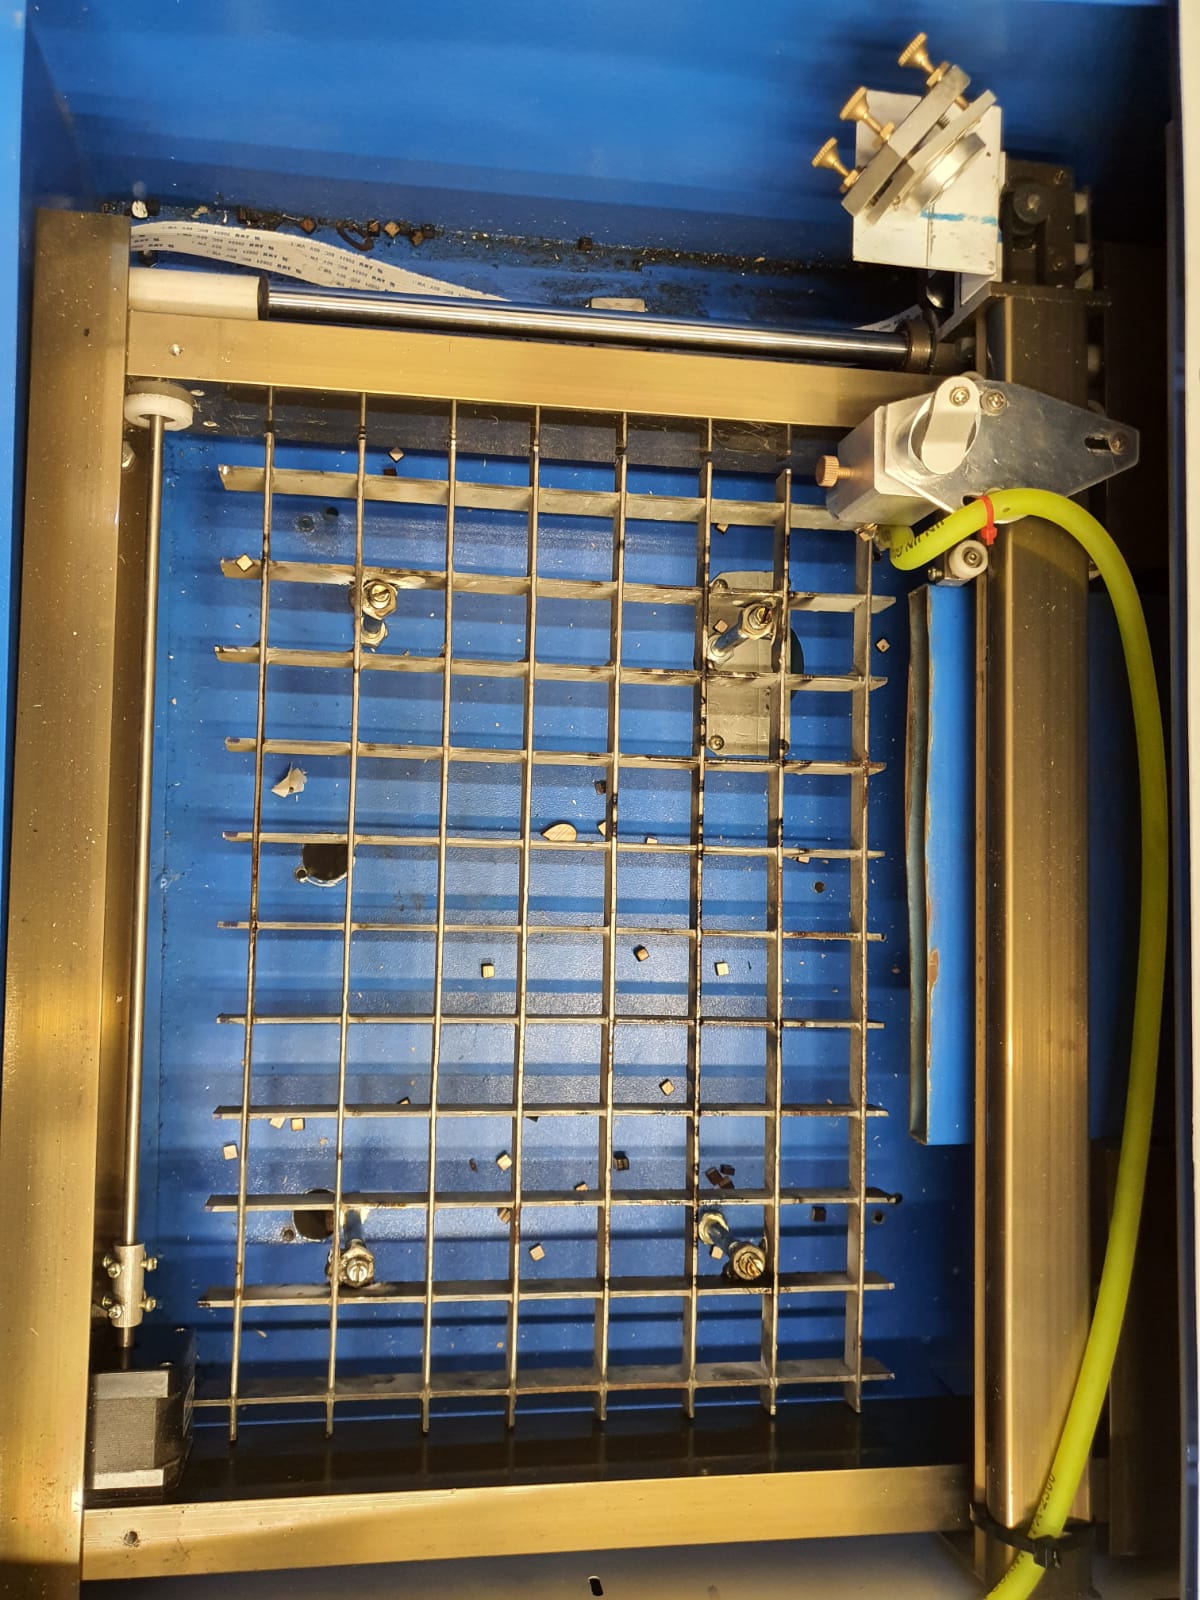
The original driver board of the K40 CO2 lasercutterFirst cut on a piece of tripledeck 4mm multiplex for my clock piecesThe clock’s interior and stand pieces, wood and acrylic. Both cut on the K40The inside of the K40’s work space with the debree on the bottom. The air hose is green silicon. Also added an emergency cutoff switch for the laser tube. open the hood and the power stops.The electronics and water cooling on the Right hand side of the K40’s housing. The air cooled radiators are just out of sight to the most right hand side of the housing, 3 pieces of 40x40mmThe acrylic cut for the clock, done in 1 time. This is 3 mm thick.The thermostatic control of the coolant pump, taken out of its case to set the working temperaturesMy solution for the cutting bed was to use an old footboard maze and I welded 4 nuts in it with long bolts that act as feet. This makes it possible to adjust the height 1x for optimum focussing the laser in the center of the to be cut material.
Door de tijd die ik als gevolg van de Corona situatie kreeg (mei, 2021), had ik wat tijd over om aan andere dingen te besteden dan alleen maar werken.
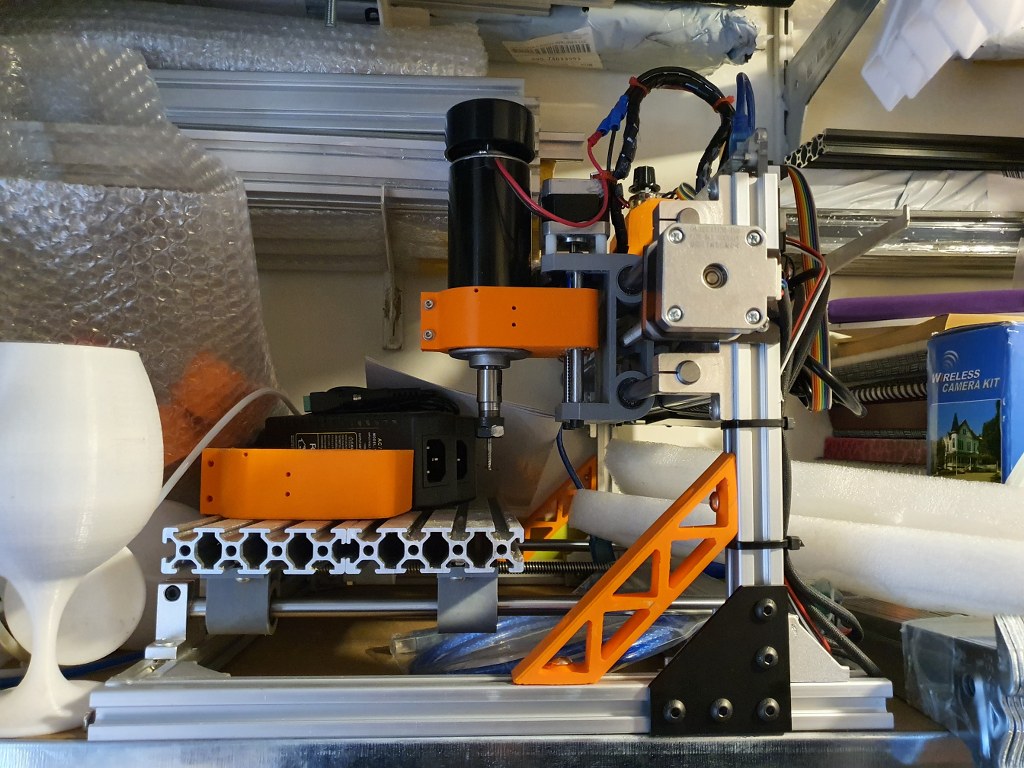
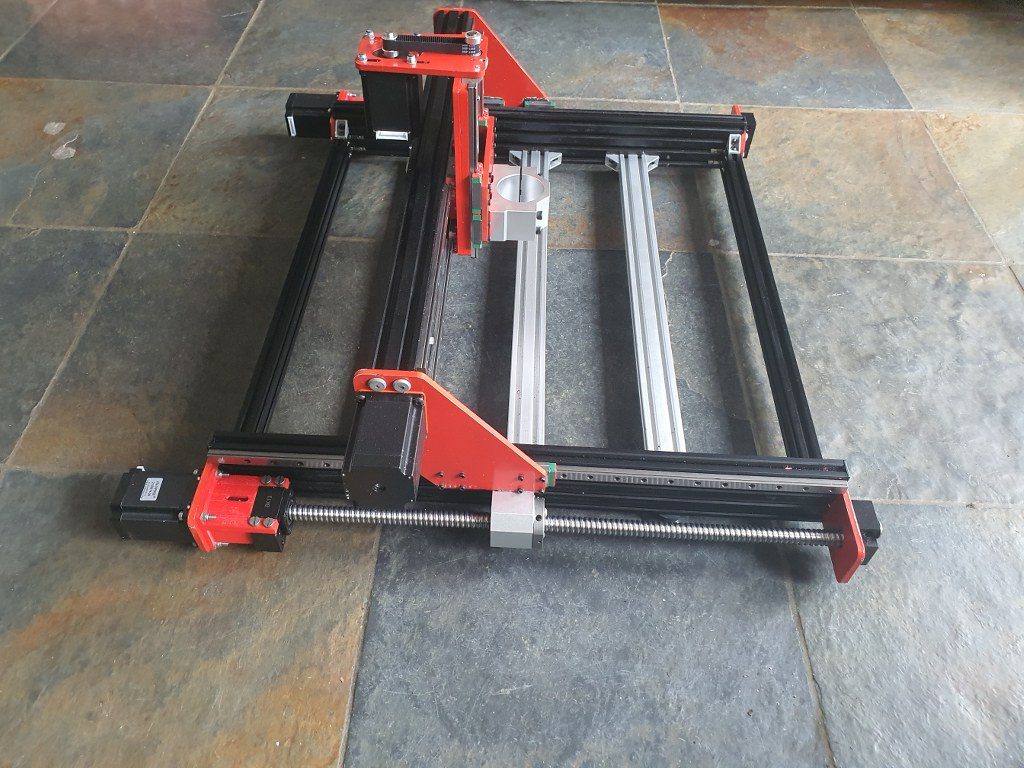
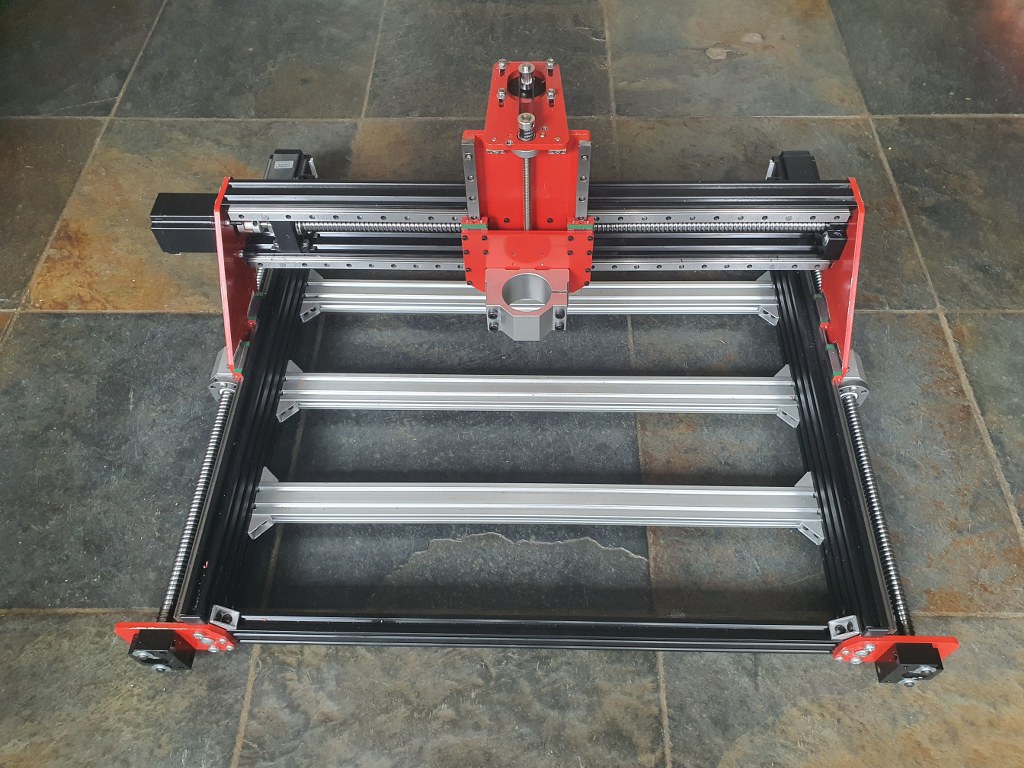
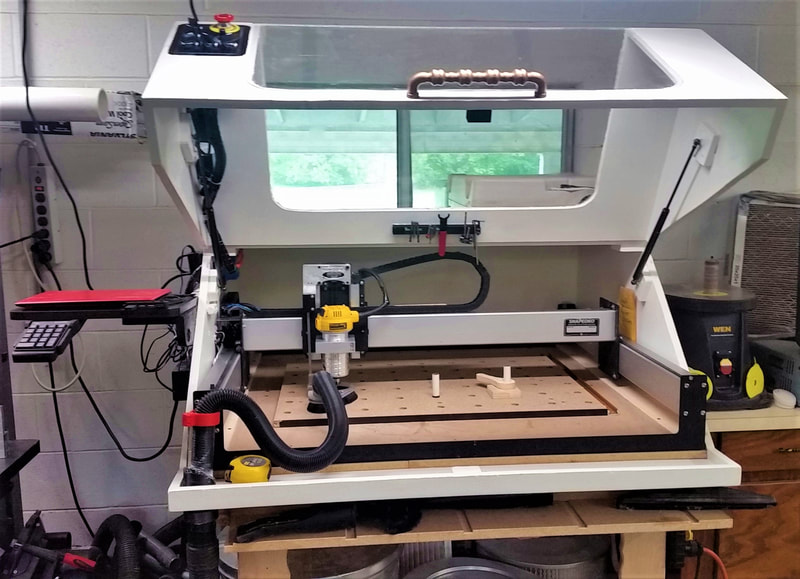
Ik had al een opgewaardeerde 3018 CNC-machine met een 0,5 kW spindelmotor:
en een eenvoudig GRBL 3-assig bord dat heel goed werkt. Maar- het zou leuk zijn om een CNC machine te maken die echt met aluminium kan werken en eventueel ook met koper en messing. Ik heb in het verleden al wat onderzoek gedaan naar wat voor CNC machine geschikt zou zijn voor mijn doelen. En de IndyMill CNC macine zat al meer dan een half jaar in mijn hoofd.
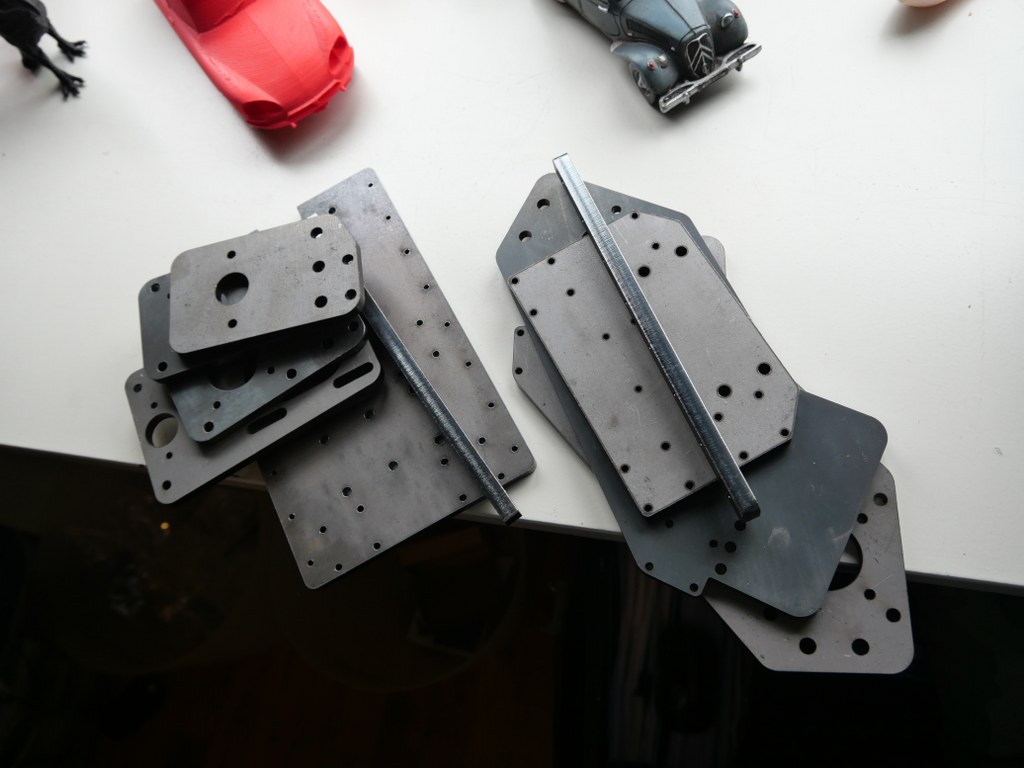
Dus- vorige week heb ik de handleiding en de stalen platen besteld:
voor de bouw en heb wat andere onderdelen besteld bij Ali. Ik heb ook al aardig wat onderdelen op voorraad, uit mijn 3d printer voorraad. De Nema23-motoren en de extrusie, moederbord, drivers, voeding, schakelaars en sondes zijn al beschikbaar.
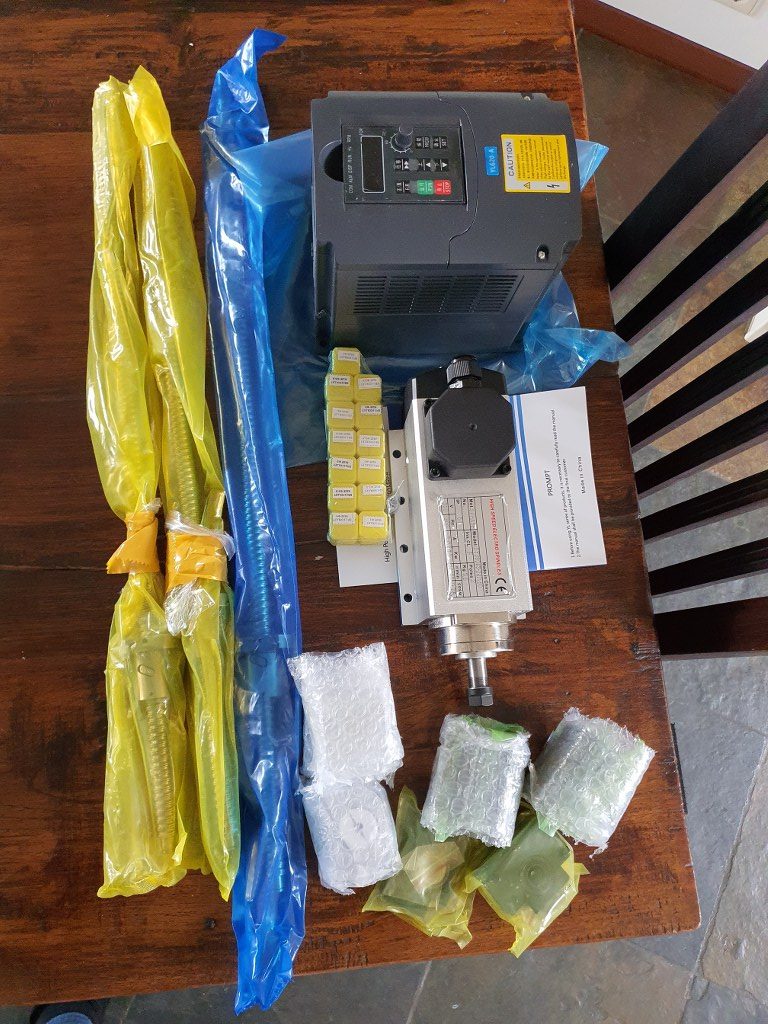
2021-5-09; First parts delivery for the Indymill: 3 ball bearing leadscrews with kit of end bearings and screw block holders, the frequency regulator 1 phase in, 3 phase out and the 1.5 KW 3 phase spindle of 3.6 kilograms
De benodigde geprinte onderdelen worden op dit moment geprint (begin mei-2021). Ik print alle geüpgrade STL’s, de laatste versie, omdat deze vrij beschikbaar zijn op Thingiverse (zoek gewoon op IndyMill) . En dan zie je de kracht van delen: het ontwerp was al geweldig, en met de upgrades is het nog beter geworden. De geüpgrade versies van de ophangpunten voor de lineaire lagers zijn echt een stuk steviger dan het originele ontwerp en de nieuwe eindstophouders zijn erg handig om te hebben.
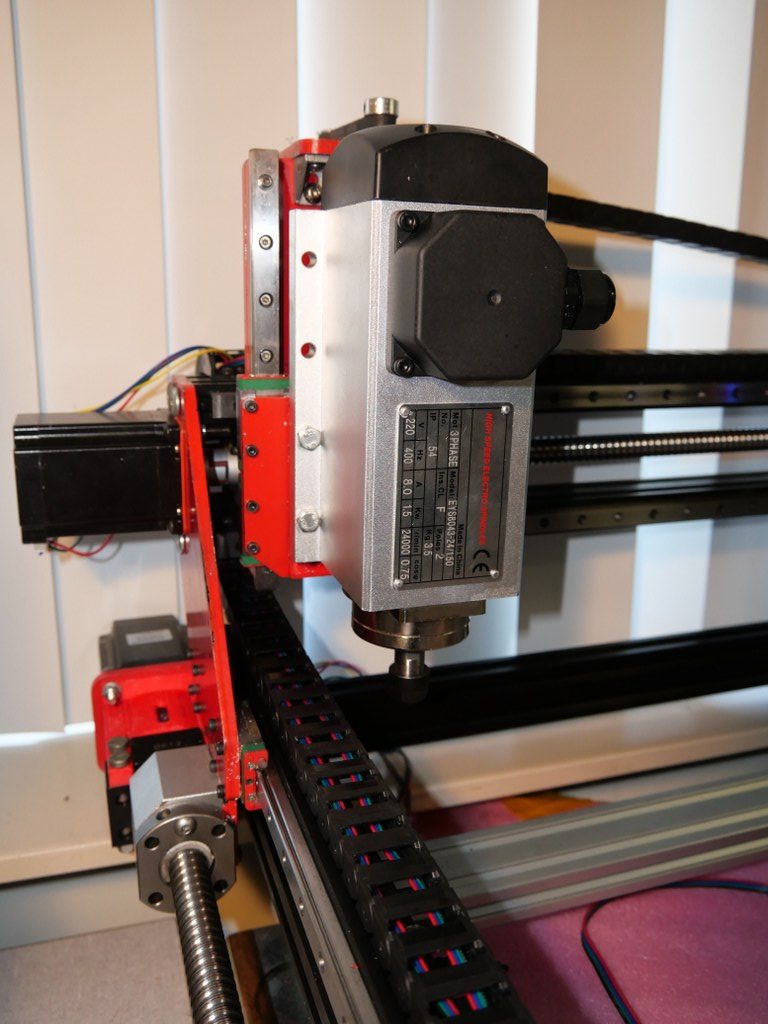
Ik heb de kosten voor het bouwen van deze machine ruwweg berekend en het was een stuk goedkoper dan het kopen van een vergelijkbare CNC machine van deze grootte. Als je verstandig inkoopt, kunnen de kosten voor alle materialen net onder de Euro 1000 uitkomen, als je de originele BOM volgt en inclusief de 1,5 KW luchtgekoelde spindelmotor met regelaar….
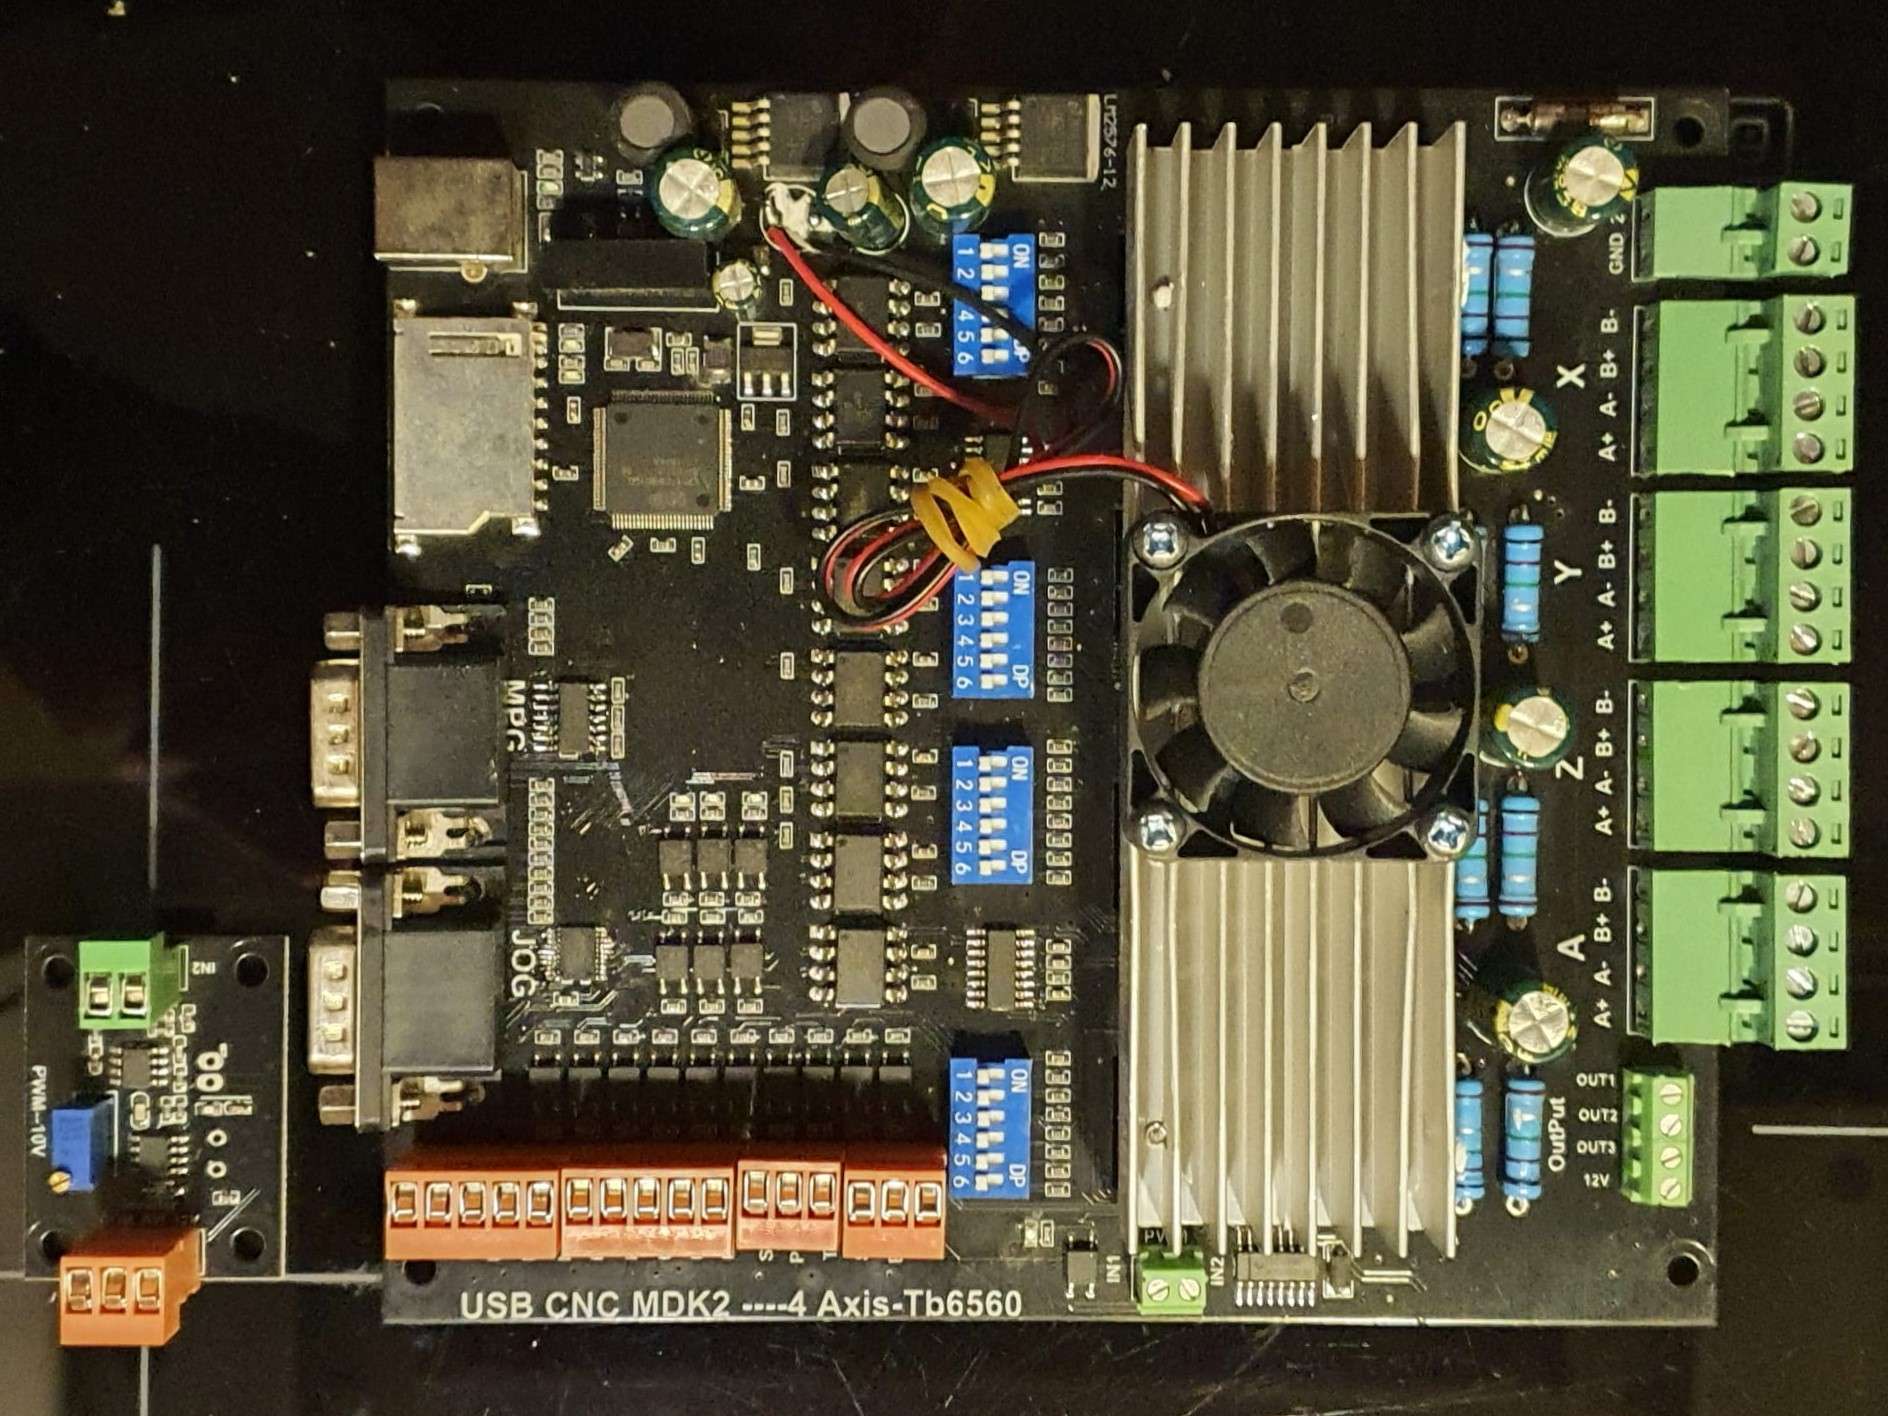
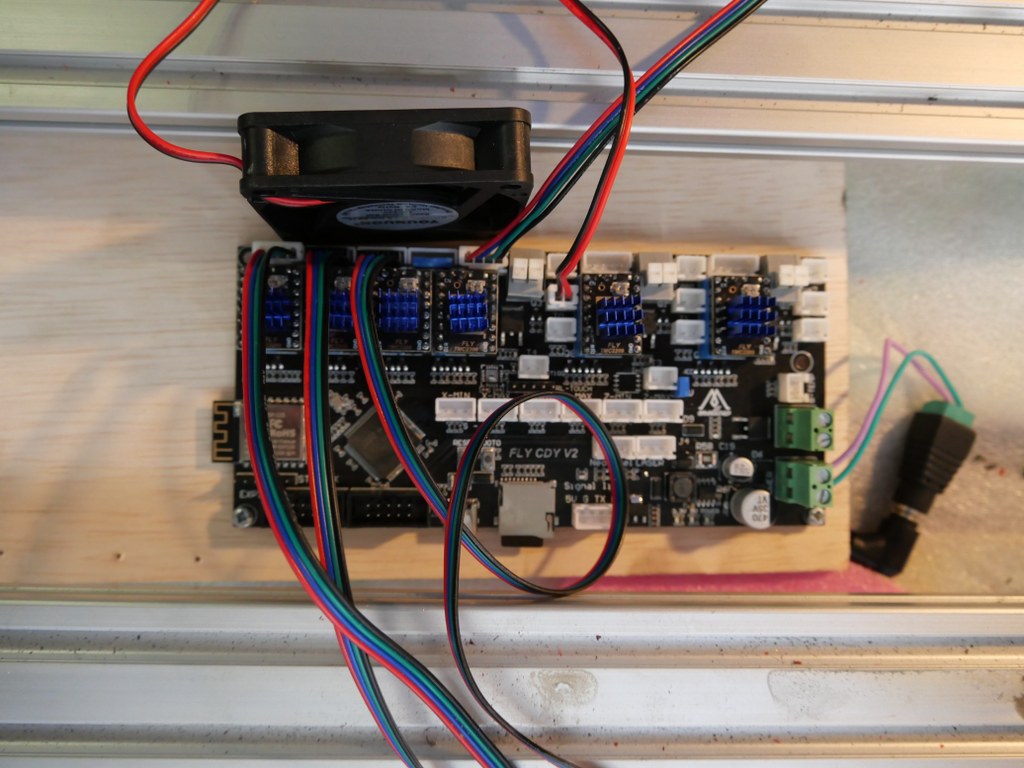
Als je een ander board wilt installeren dan de standaard Arduino UNO met het standaard Arduino CNC shield, kan dit je een extra bedrag van 120 tot 500 Euro kosten. Ik gebruik een FLY_CDY_V2 met Mellow’s originele TMC2209 stepper drivers. Vergeet NIET de schakelaars aan de onderkant van deze steppers op ON te zetten als je sensorloze homing wilt gebruiken!
Mijn toevoegingen aan de originele bouw:
Momenteel gebruik ik een 10 Ampere afneembare 24V PSU, zal een 30 Ampere worden.
Sensorloze homing met behulp van een FLY-CDY-V2 moederbord en TMC2209 stepper drivers. Dit werkt geweldig maar ik ben verder gegaan om eindstops toe te voegen en een stabielere en verwisselbare setup te maken.
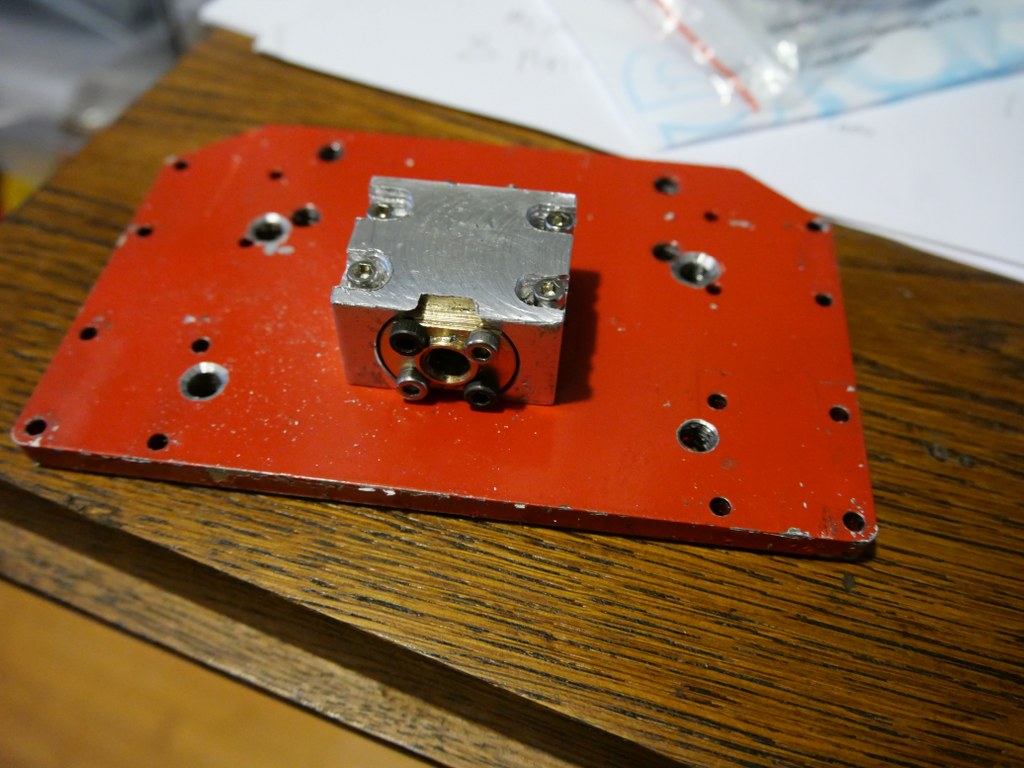
Originele bevestigingen en gebruik van de houder van de kogellagerschroefmoer, en van de originele BK12 en BF12 lagerhouders om te voorkomen dat de kogellagerschroef de verkeerde kant op beweegt.
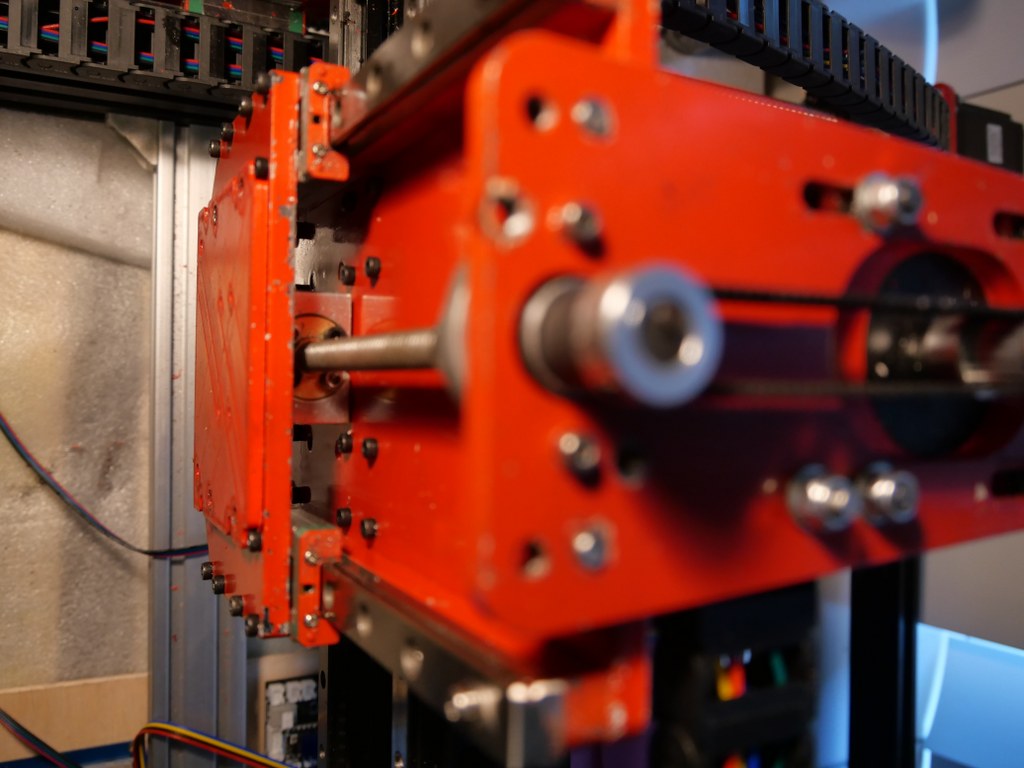
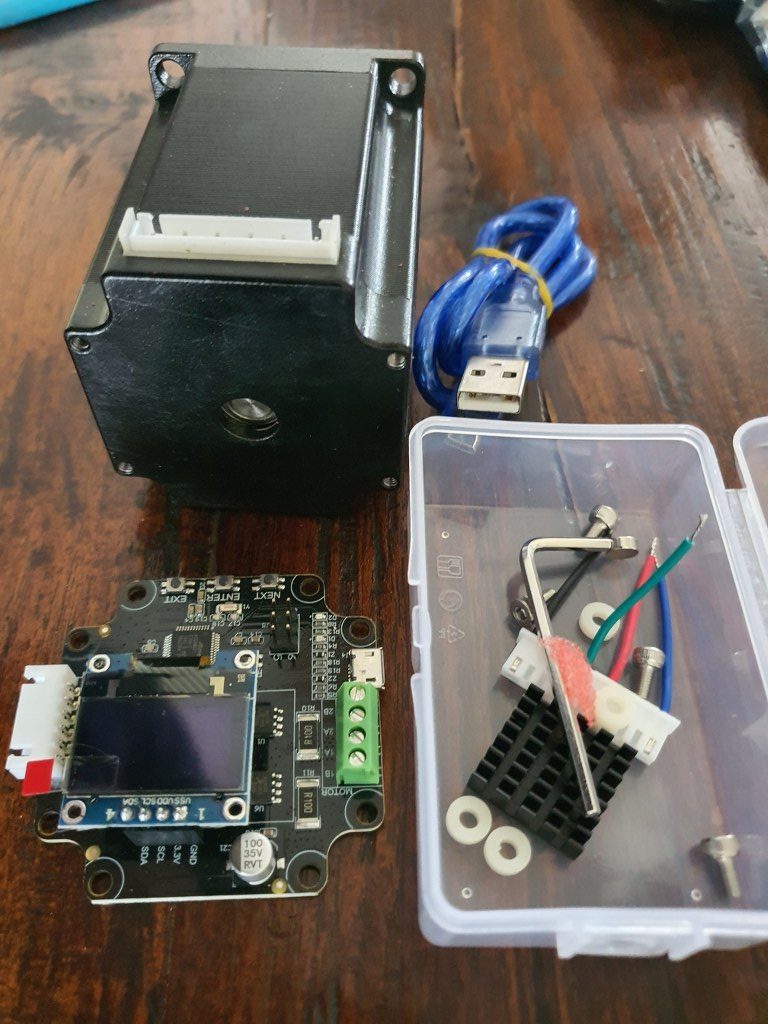
Gesloten lus NEMA23 stappenmotoren drivers MKS Servo57A V1.0 zal worden gemonteerd aan de achterkant van de steppers, nog te monteren, maar zal conflicteren met sensorloze homing
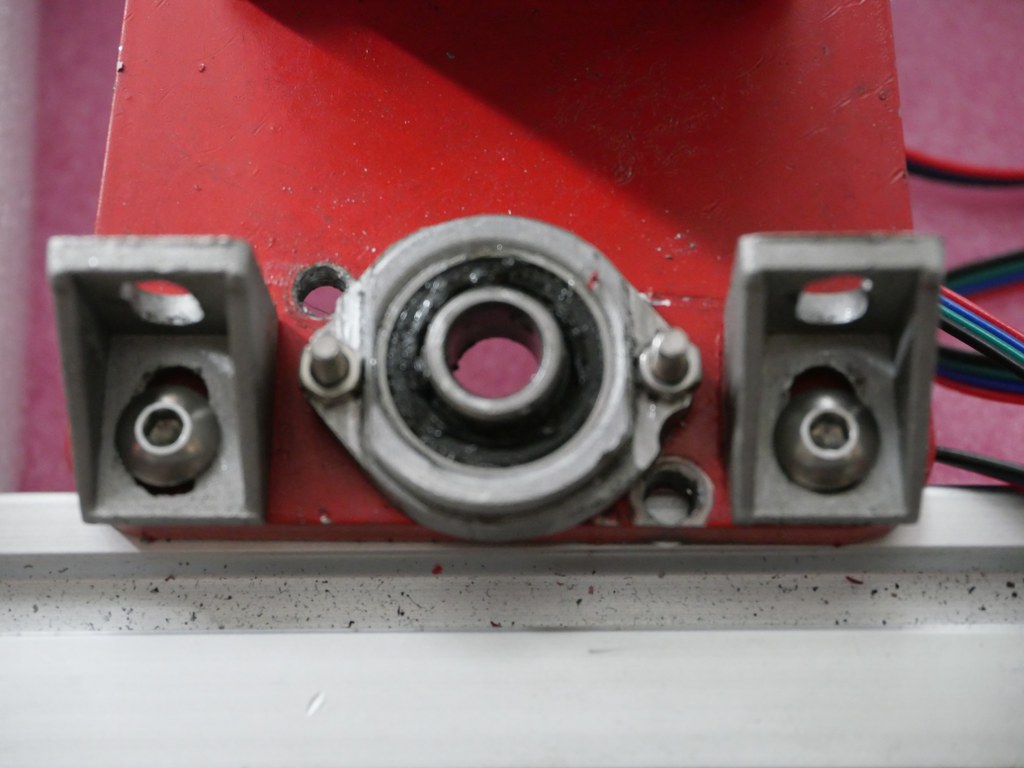
Nema 23 stepper with the Closed loop kit
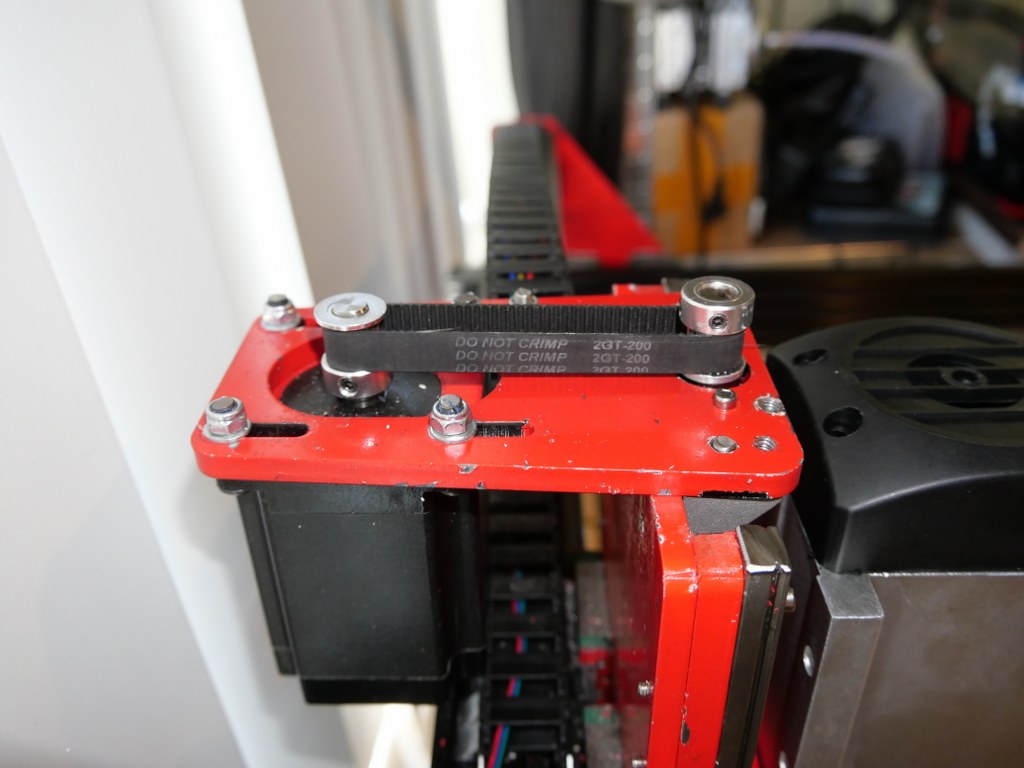
10 mm GT2 200 mm riem tussen de Z-motor en de Z-leadscrew met GT2 10 mm brede 16-tandwielen
Op de Duet support website is een project beschikbaar om zo’n apparaat om te bouwen naar een seriële interface, met een geprogrammeerde Arduino (pro) mircro of -nano ingebouwd het apparaat:
Stevige verbindingsplaat tussen de achterzijde van de bovenste en onderste lineaire rails van de X-as. Moet nog komen.
Piëzo-probes op alle start- en eindposities van de assen, in plaats daarvan heb ik eerst de FLY CDY V2 reprap board met TMC2209 en sensorless homing, en later met mechanische eindstops.
Koelvloeistof nevel installatie en vloeistof verzameling-, pomp, reservoir enzovoort is besteld. Moet nog geïnstalleerd worden, en de pompen leverden niet voldoende druk voor de koelvloeistofnevel, moet naar een andere oplossing zoeken.
Onafhankelijk aangedreven (en onafhankelijk afgestelde homing) Y-motoren om eventuele problemen tussen links en rechts te voorkomen. Dit werkt feilloos met de FLY_CDU_V2 reprap setup, maar het kostte me heel wat uurtjes finetunen om te werken met de 3,5 kilogram zware spindel motor…
2080 profielen rondom (ook voor en achter) met 4 extra brede hoekbeugels eronder. Ik koos ervoor om dit anders uit te voeren met 3 extra bodemverbindingen en hoekbeugels, omdat ik de voorkant van het frame laag moet zijn en plaats moet maken voor de vacuümslang van de spindel.
Anmd – the frame as it is ready, but with the spindle holder of the 500 Watt motor. I will not use this motor after all for this build–
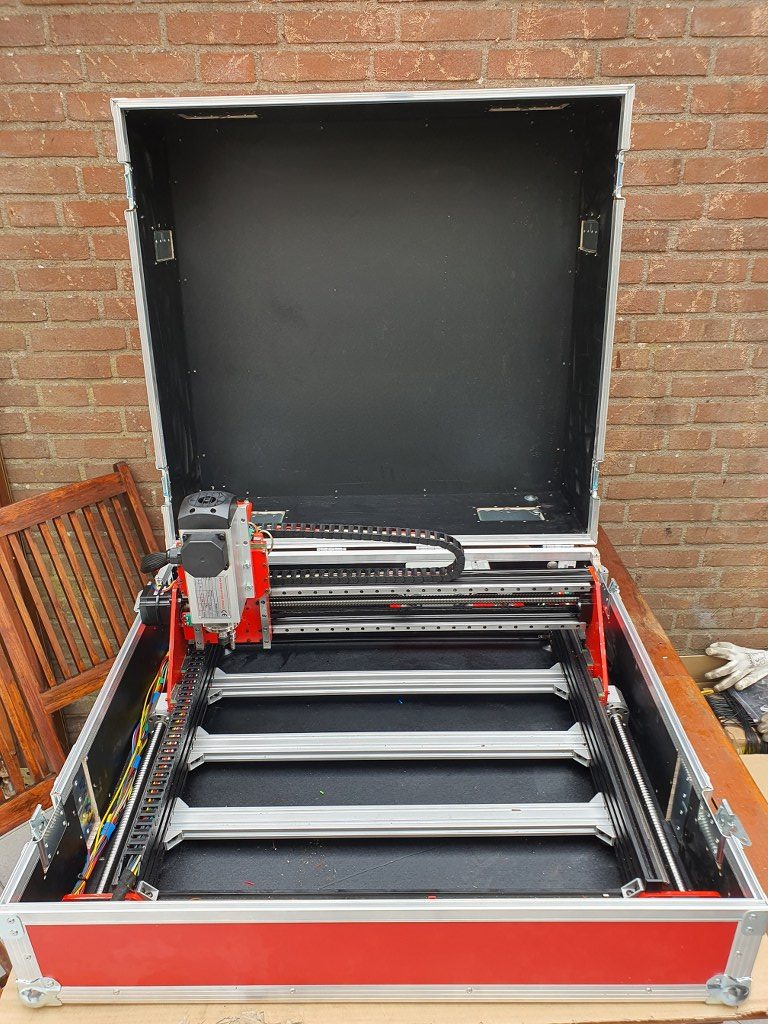
Slimme behuizing met Scheppach stofzuigeraansluiting zoals dit voorbeeld van https://www.shophacks.com/cncenclosure.html#/ DIT IS ECHT NODIG!
My solution for an enclosure ia a 84x78x45 cm flightcase
Beschermkappen voor alle geleidingsschroeven en lineaire rails (besteld in China)
Later indien mogelijk: Wielen aan de achterkant of aan 1 kant en een handvat aan de voorkant (of andere kant) om de machine gemakkelijker op te bergen en op te bergen, dit heb ik onder de flightcase gemonteerd!
Gemakkelijk afneembare besturingseenheid (en) met stevige connectoren, is al gemaakt en in gebruik.
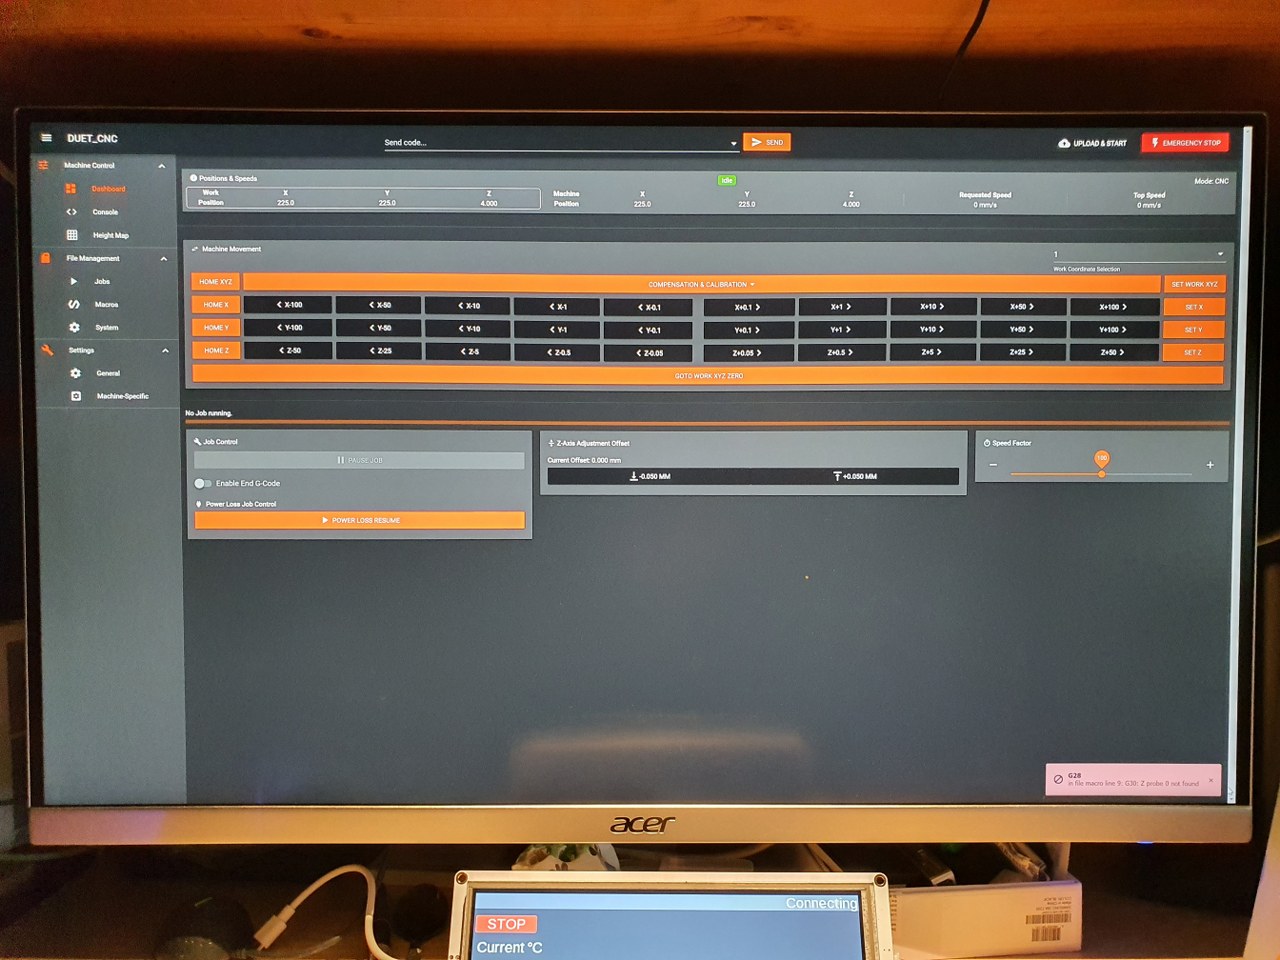
Ik ben begonnen met een FLY_CDY-V2 reprap board om te experimenteren met reprap CNC en de webinterface die voor deze setup is ontwikkeld. Dat werkt allemaal prima en is in de praktijk getest. De controle van de spindle controller loopt via een omvormer van PWM naar 0-10 Volt en werkt inmiddels ook prima via M42 S (0-1) besturing
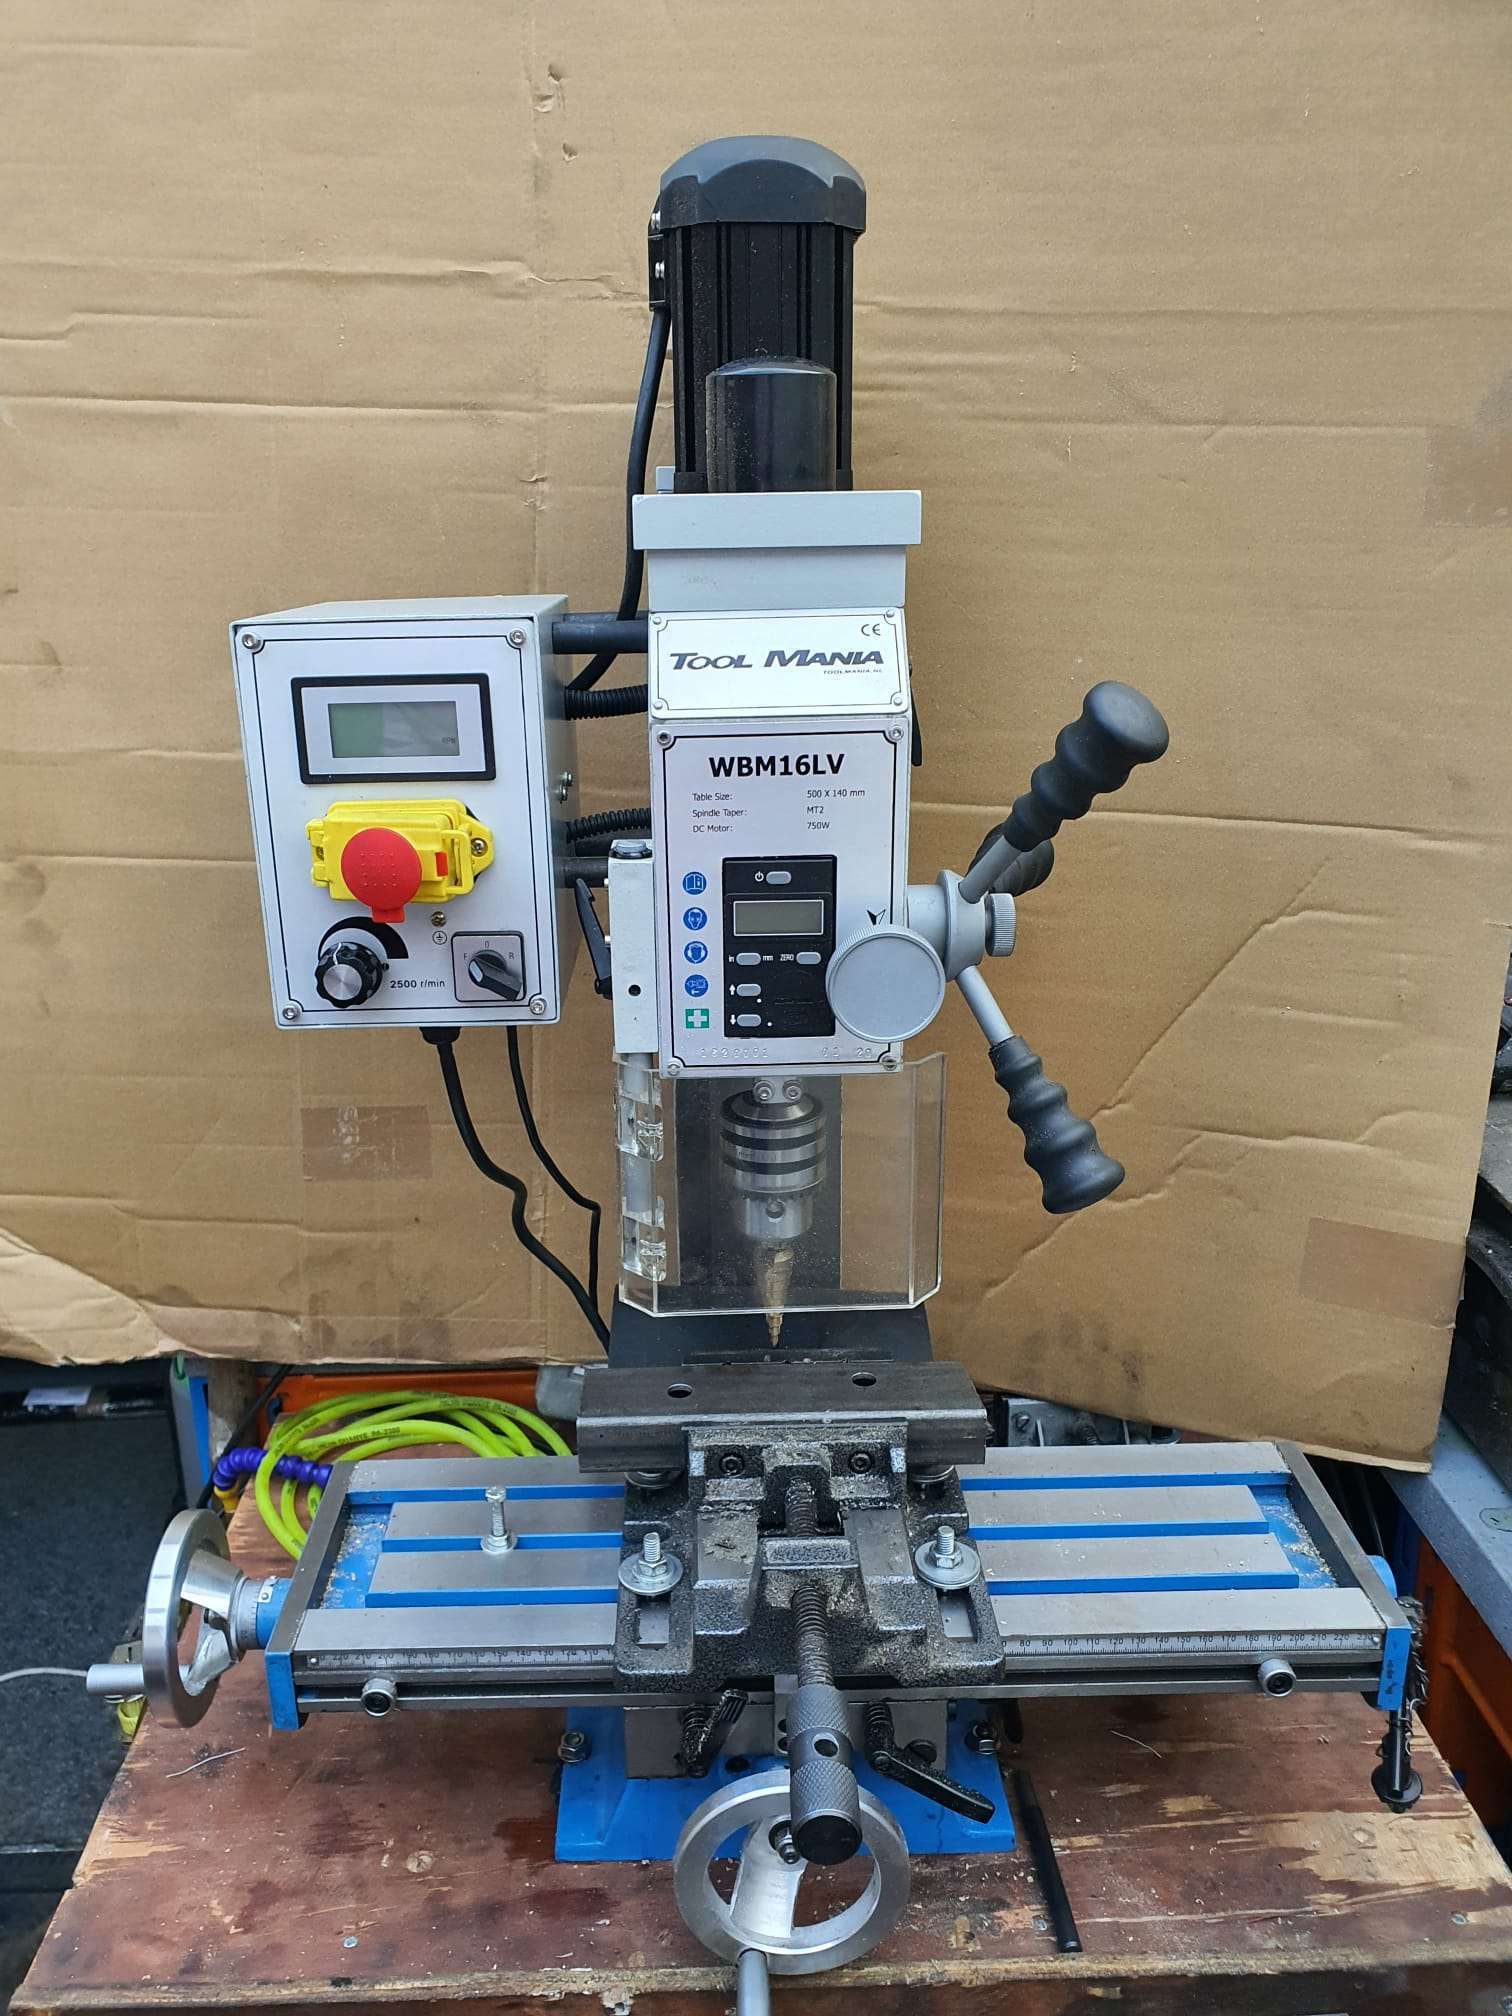
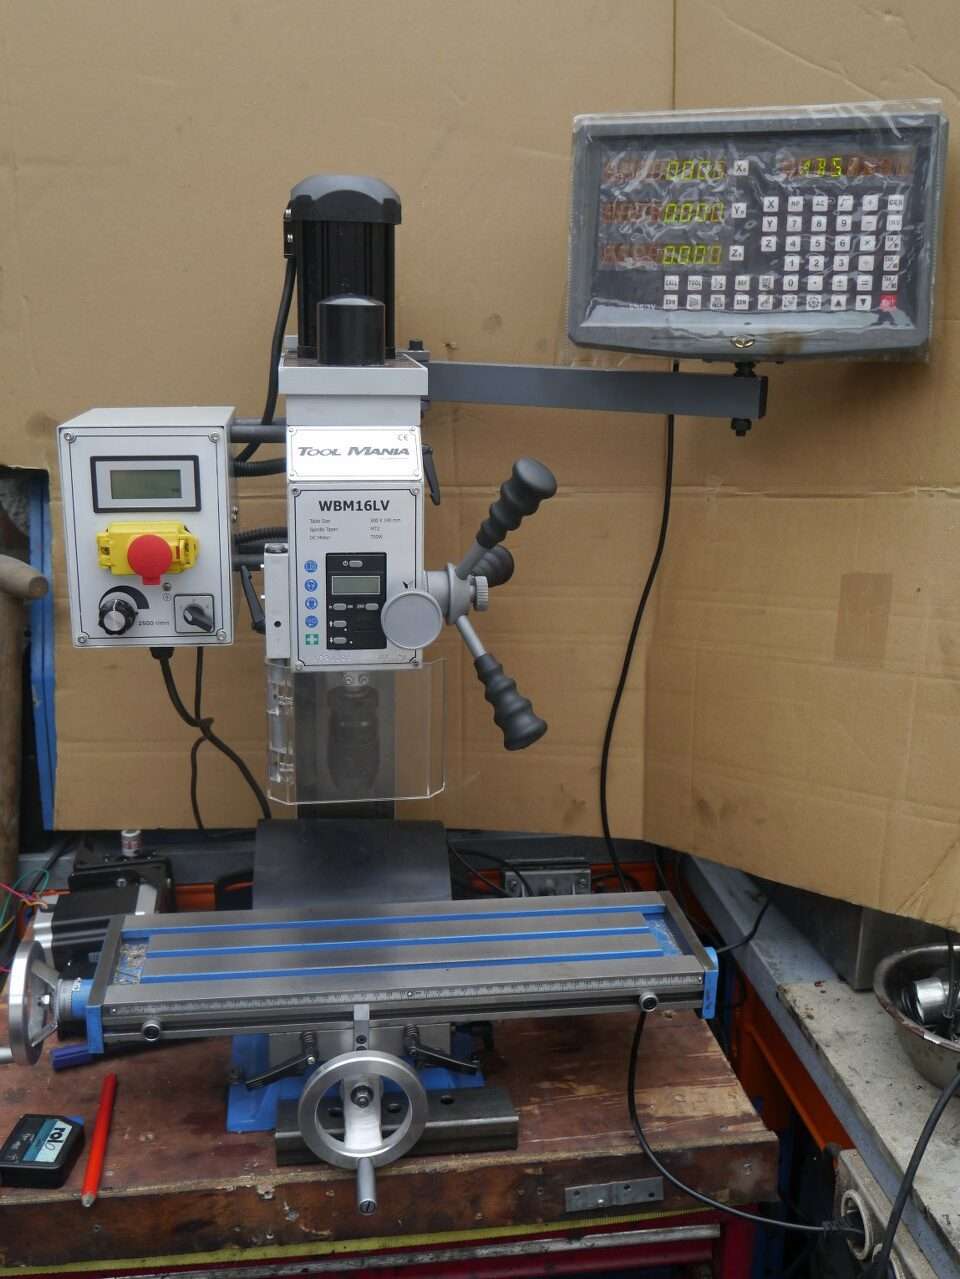
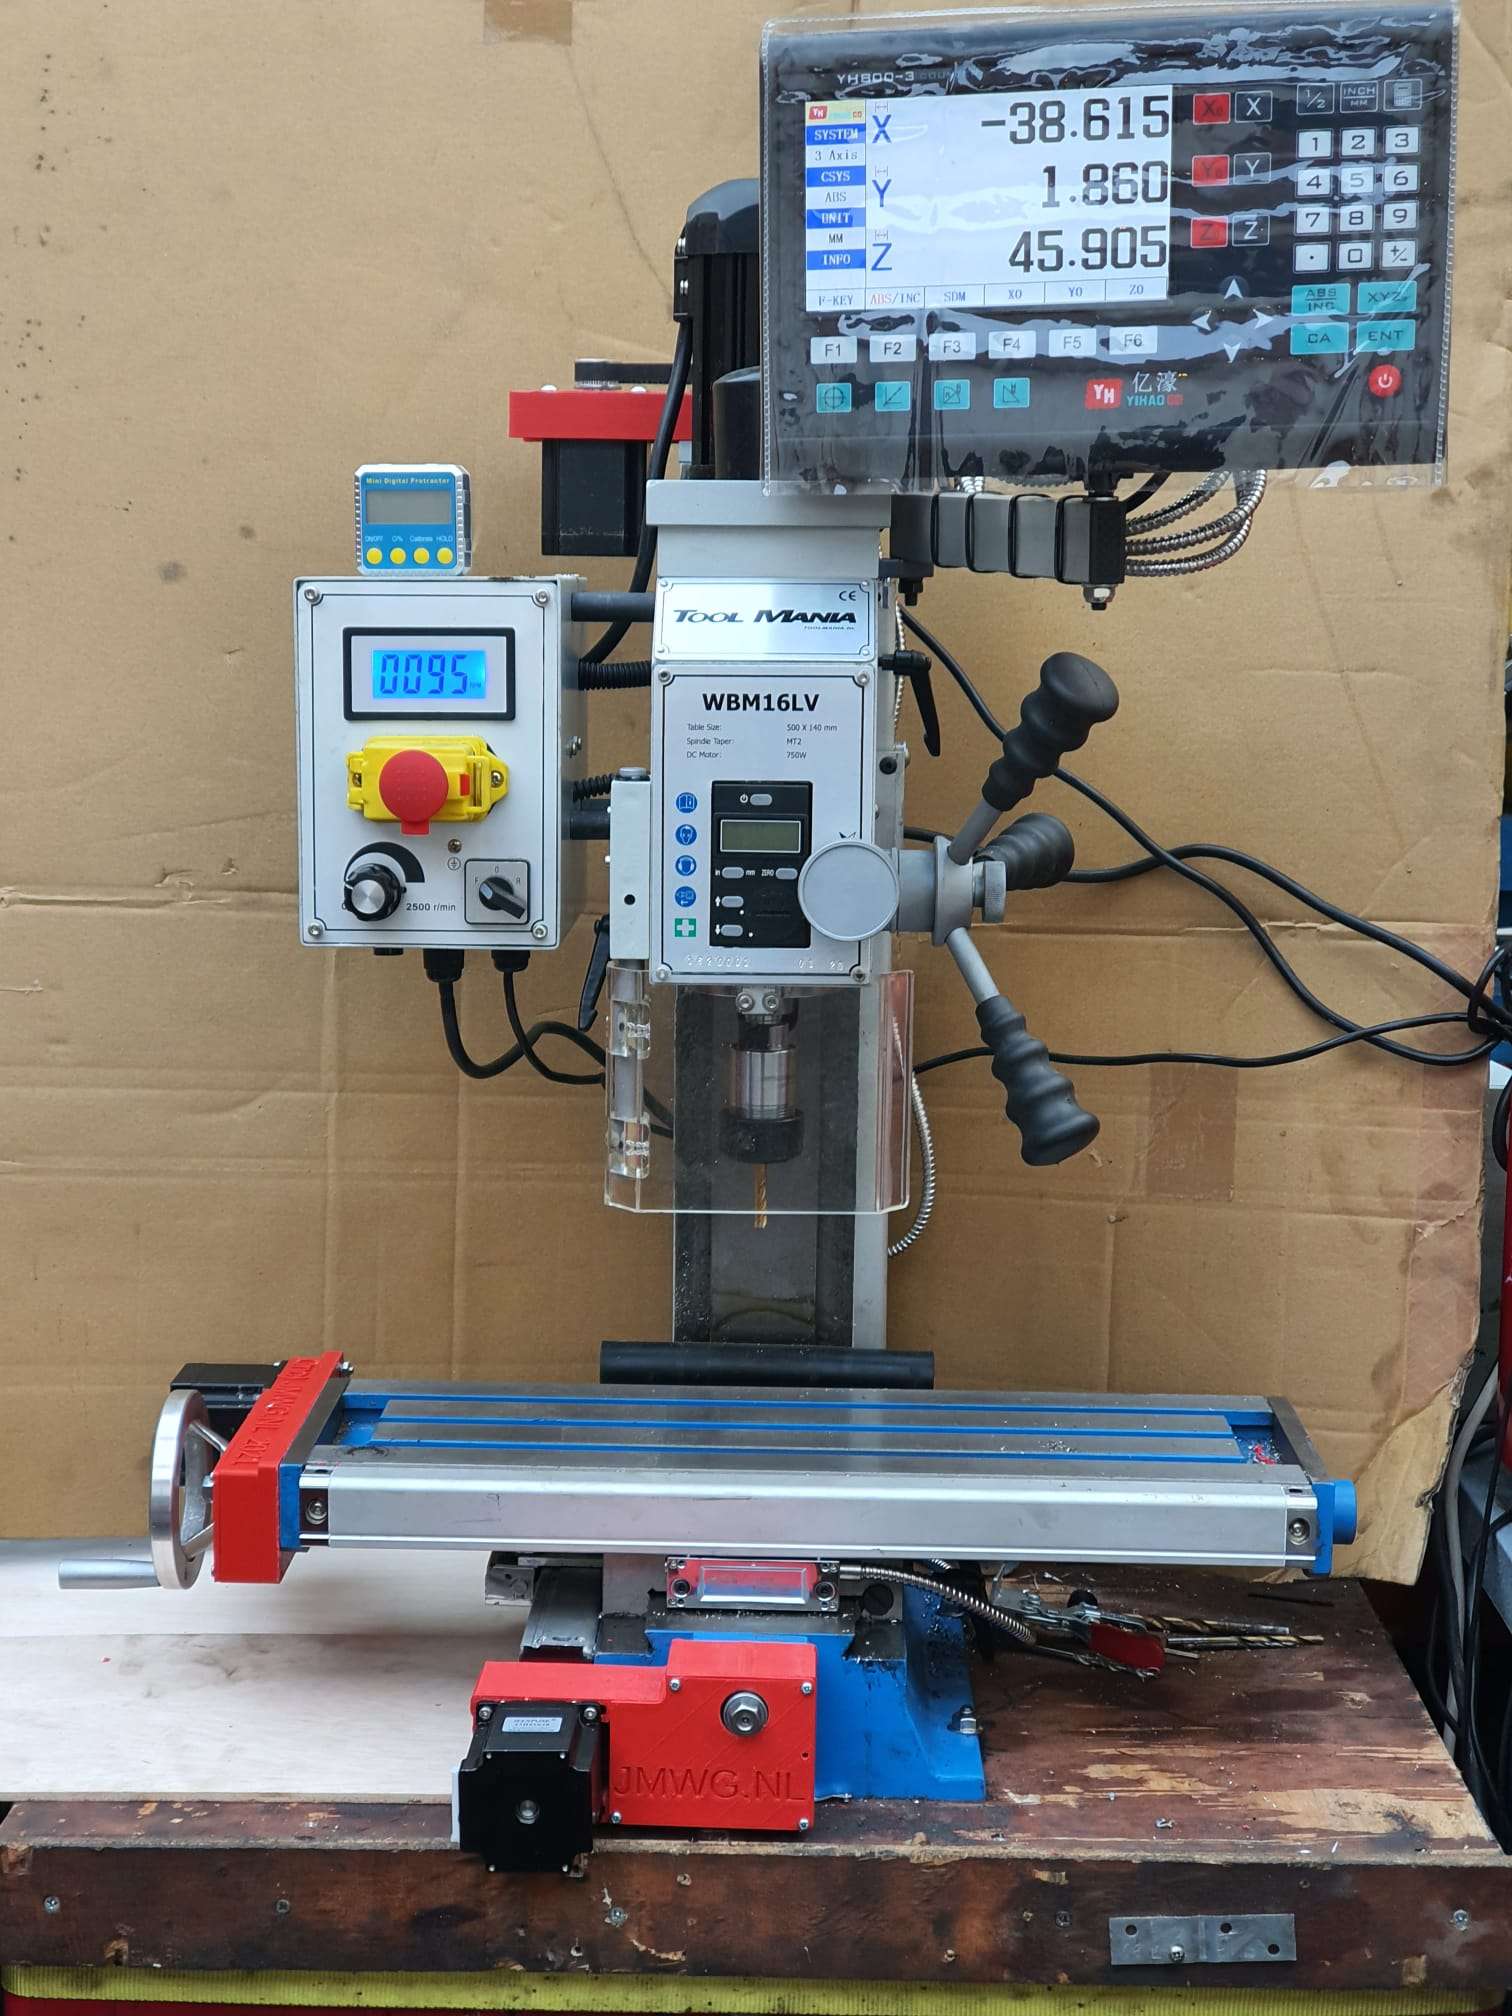
Na lang zoeken dus toch uiteindelijk mijn heeel oude kolomboormachine vervangen voor een klein model kolomfrees van Toolmania. Ik had de laatste die nog beschikbaar was van deze serie.
De oude kolomboormachine, gaat in de erfenis! -)
Het is een model WBM-16LV met een indirecte riem-aangedreven spindel met een vario motor van 750 Watt. Ook bij laag toerental zit er nog behoorlijk wat kracht op de motor.
Dit model is eigenlijk grotendeels een standaard model maar met een krachtiger motor, met een klein LCD voor de Z-beweging van de 50mm Z-handbediening en met een breder bed.
De werkruimte is bij deze kolomfrees: X:330mm , Y:140mm en Z:180 mm
De spindel heeft MC2 opname met een trek/schroef van 10mm. Daarmee valt een frees, boor of kop er tenminste nooit uit.
De standaard levering van Toolmania van de WBM16LV, in gebruik met een boor in de standaard geleverde boorkop en een stuk ijzer in de klemMet de twee schroeven stel je de speling. Niet te vast en net los genoeg om soepel te draaien zonder speling. Nastellen kan later altijd weer, wanneer het nodig is.
Naast de aanschaf van gereedschap merk ik altijd dat je minimaal de aanschafwaarde van je gereedschap nodig hebt aan verbruiksmateriaal en aanvullende hulpmiddelen. Zo ook bij de kolomfrees. Alleen al de glaslinealen, spantangen, frezen, CNC ombouw,, gasveer, houders voor op de tafel, indexer enzovoorts kosten samen veel meer dan de kosten van de aanschaf van de kolomfrees.
Ik heb de standaard meegeleverde tandkrans 1-16mm boorkop gelijk vervangen voor een standaard handmatig te openen boorkop van 1-13 mm. Maar eigenlijk werk ik alleen maar met de vaste spindelopnemers, spantangen en de vaste pasbussen voor zowel frezen als boren.
De bijbehorende spullen zoals een ER-25 spantanghouder met 15 spantangen, kotterfrees MC2 enzovoorts zijn van HBM.
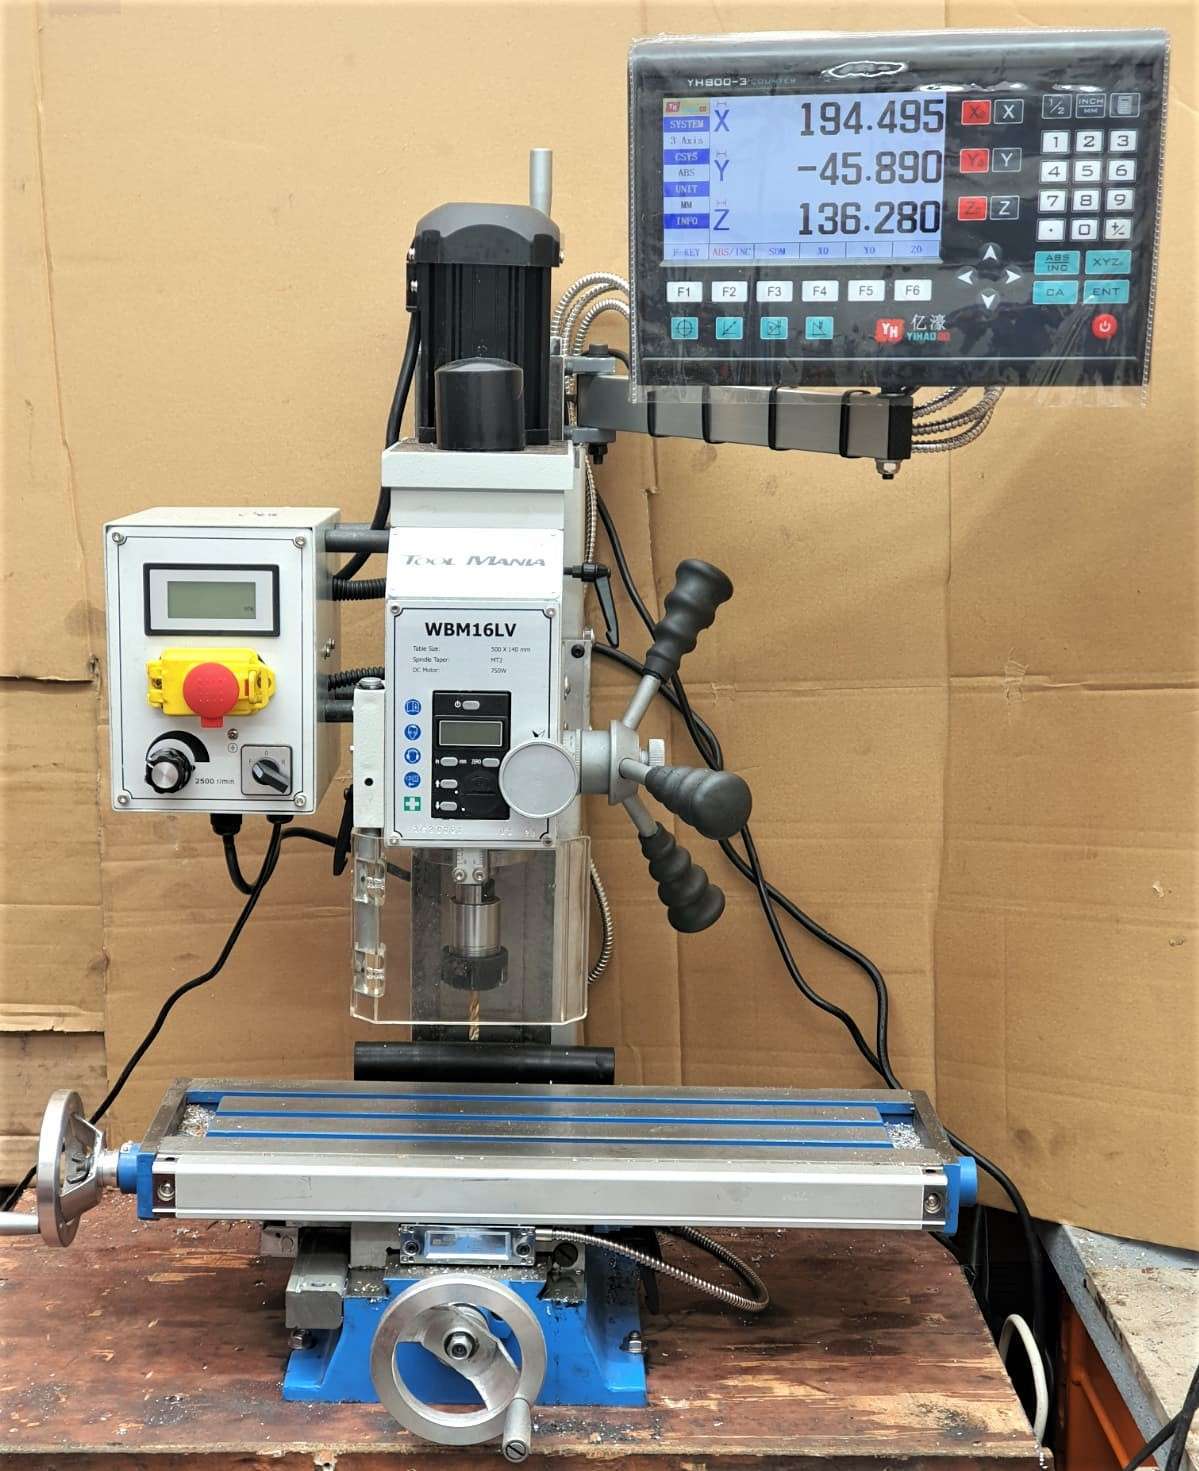
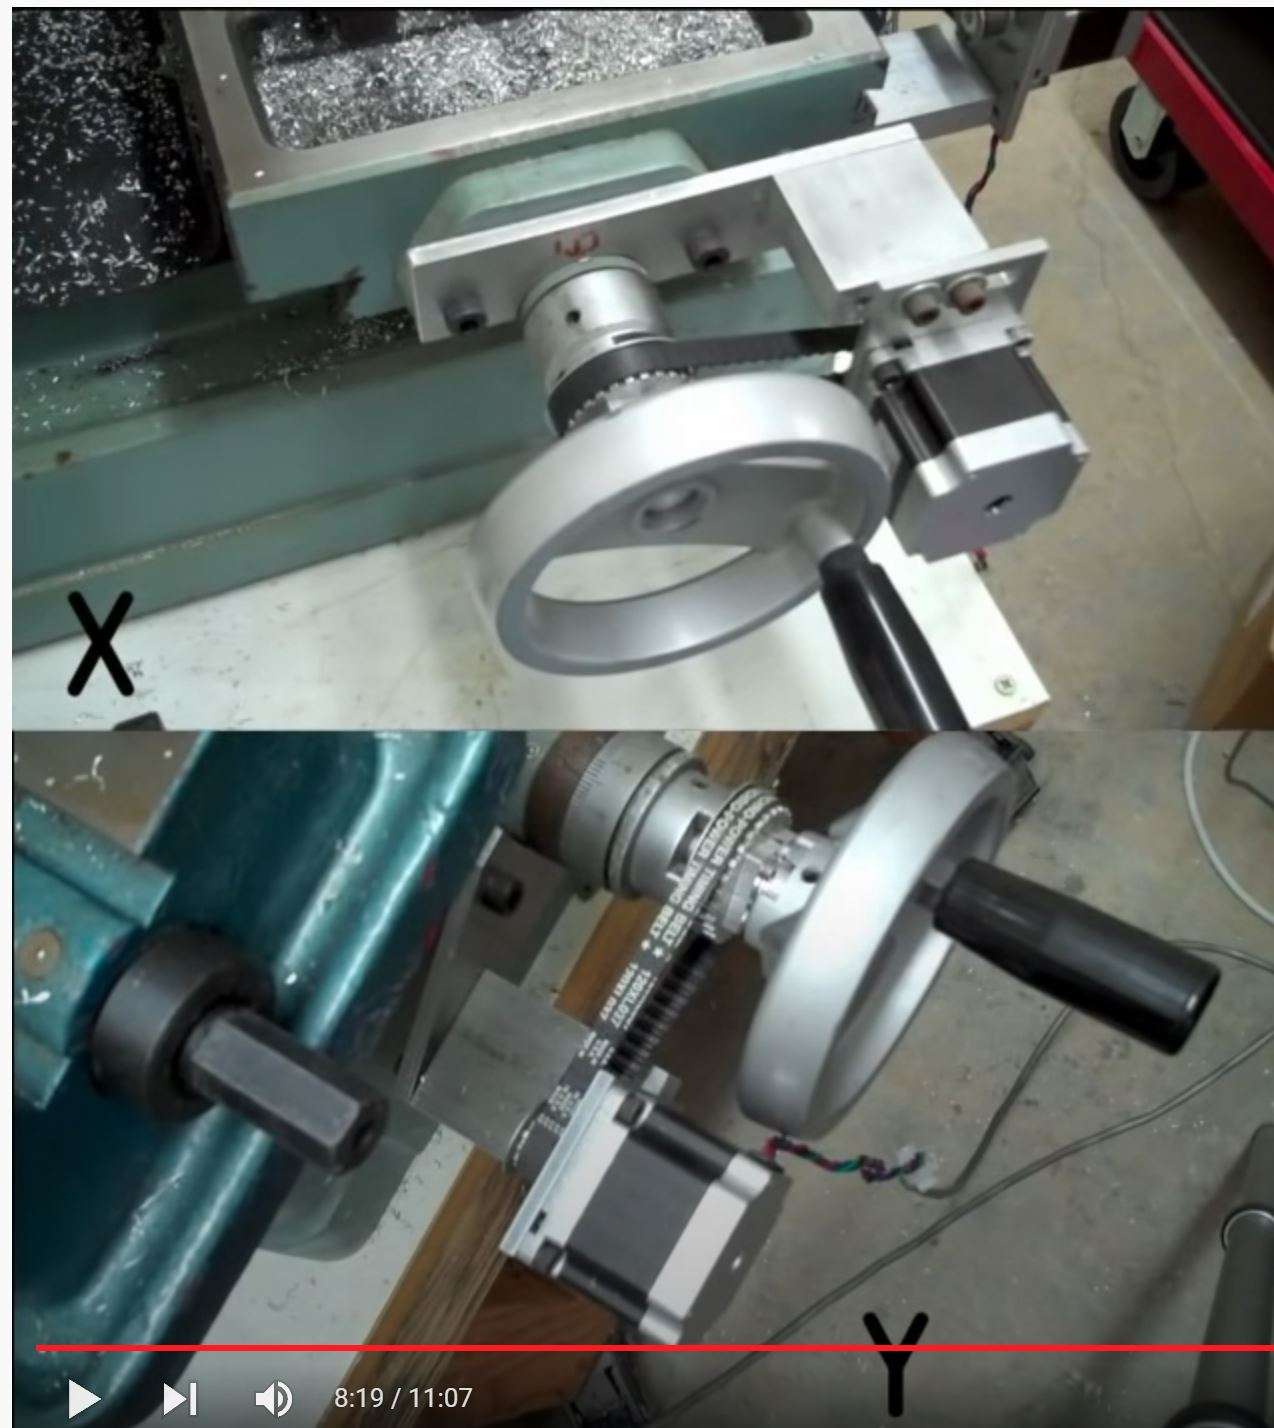
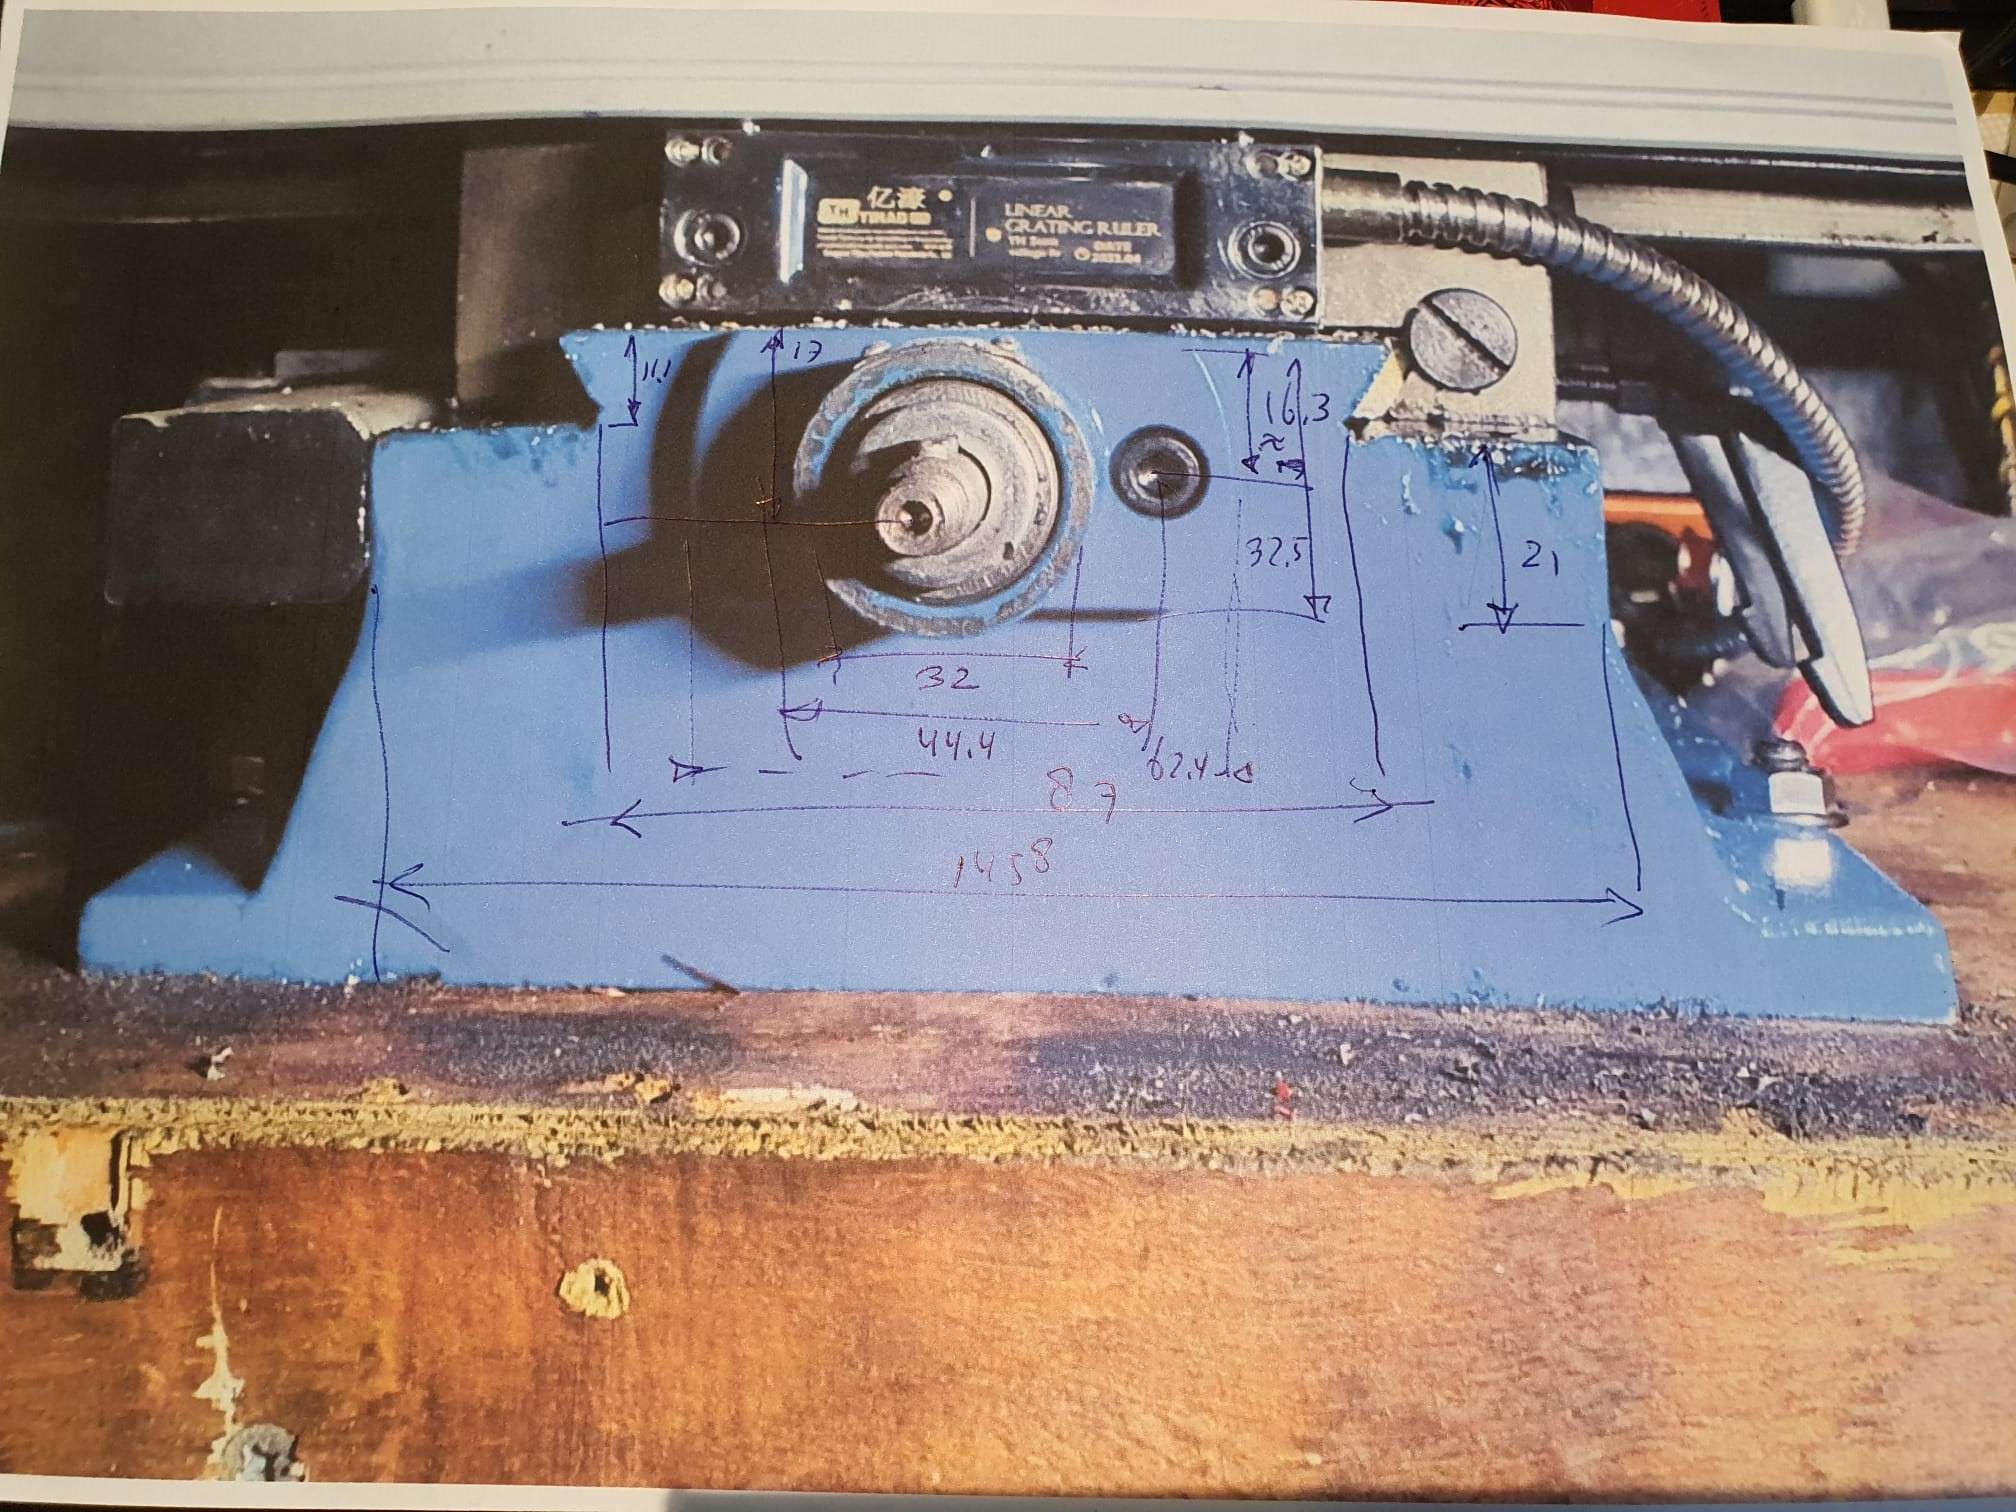
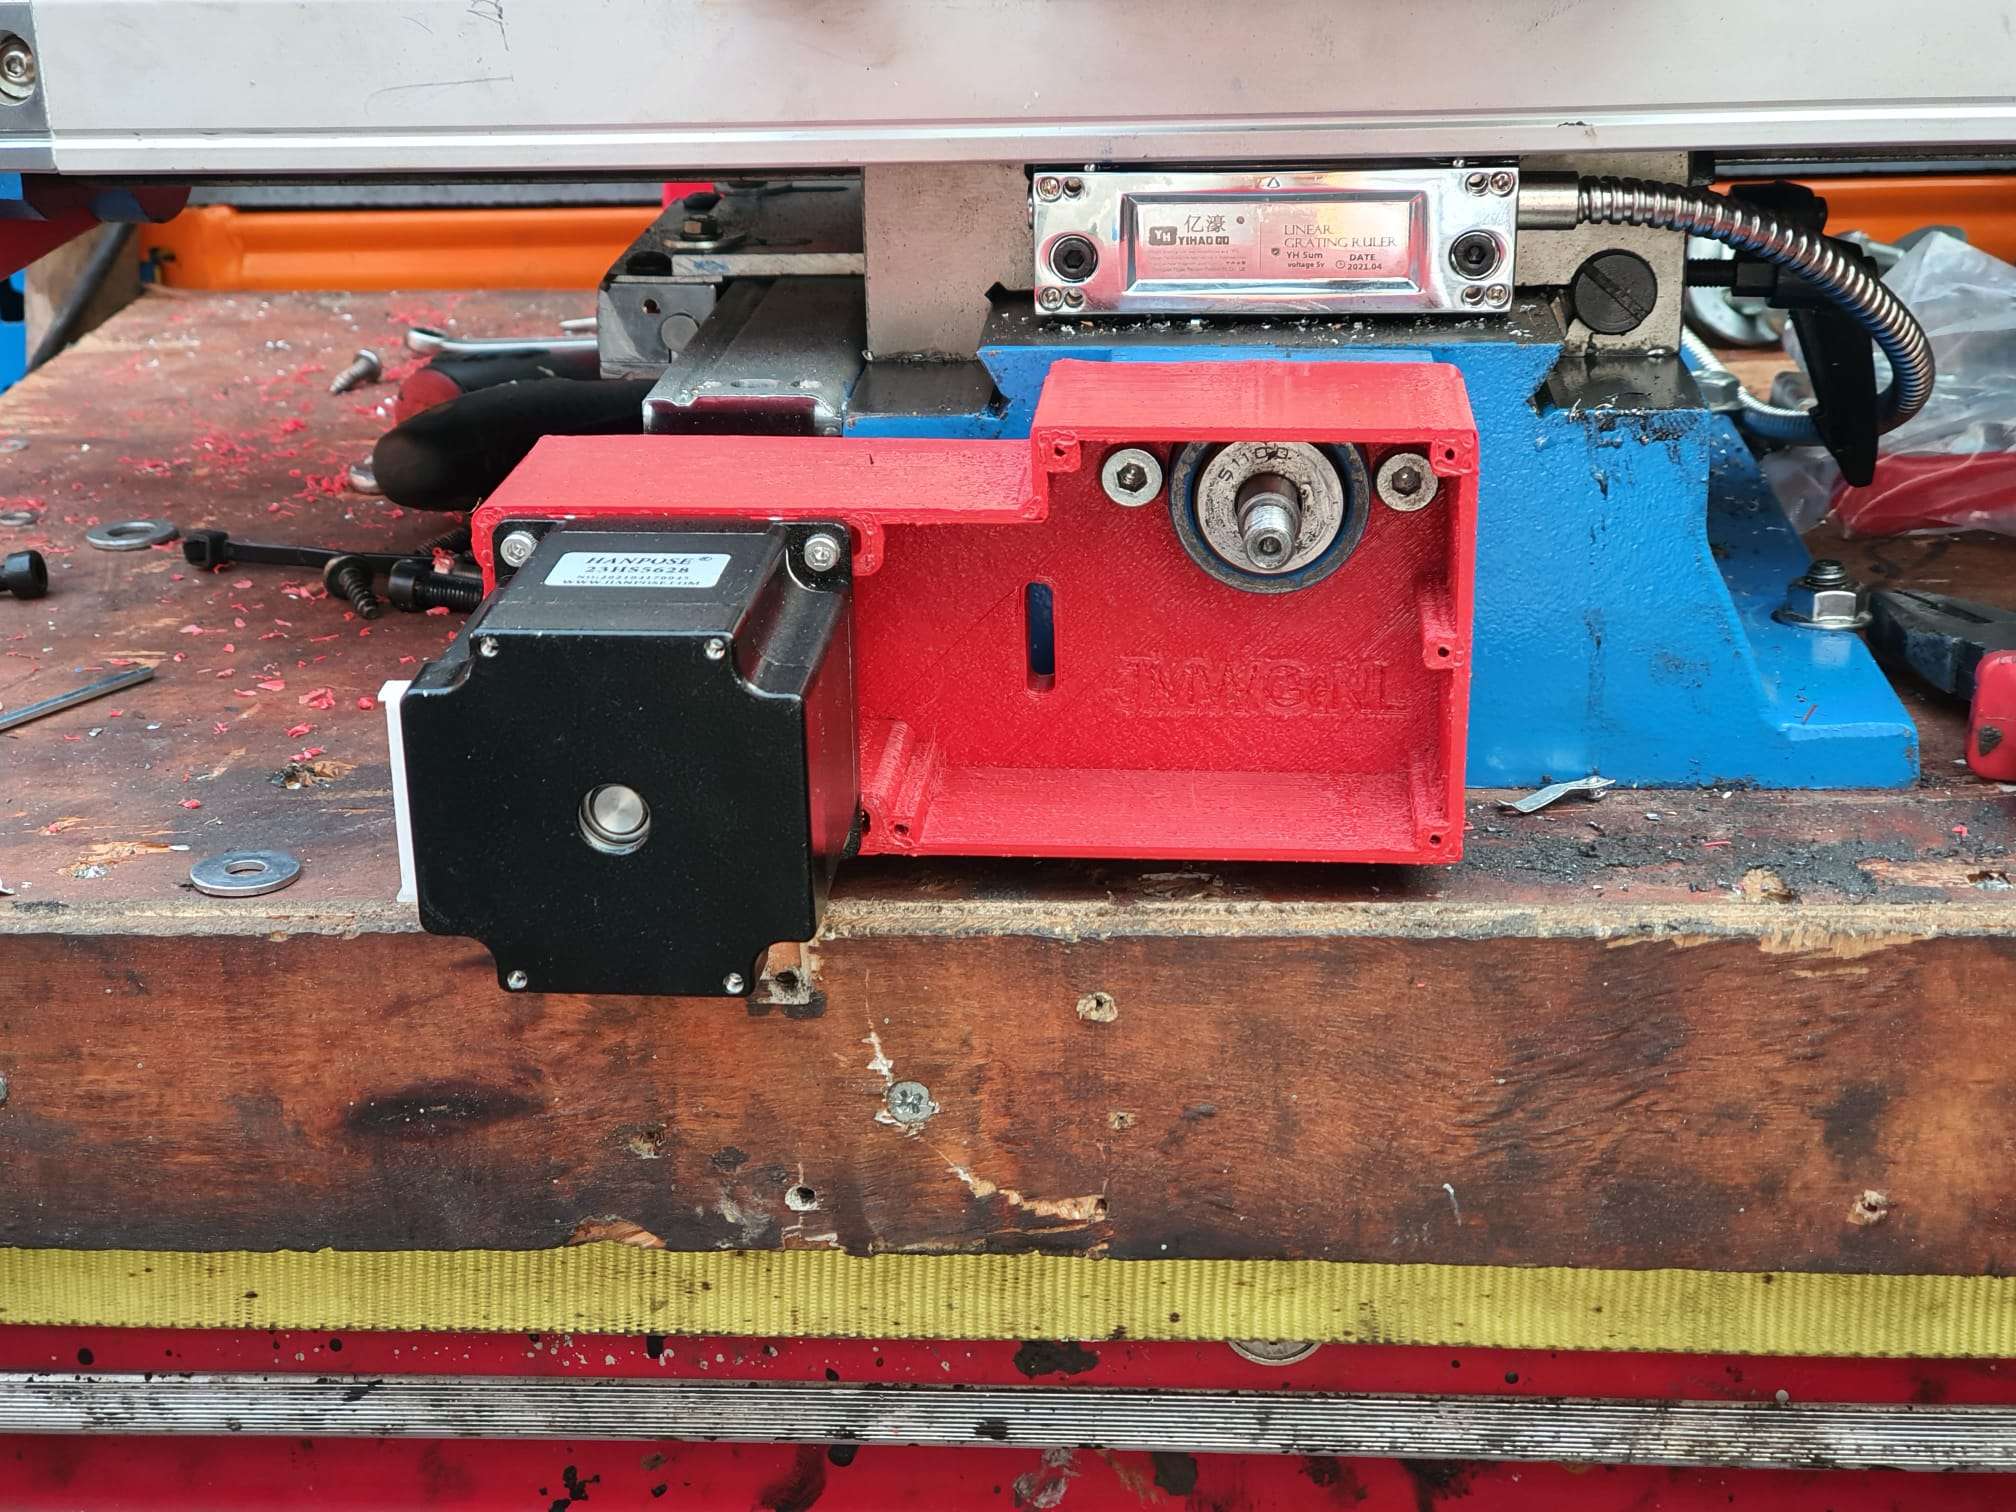
Ja kan hier mooi de X- glaslineaal zien, voor op de X-slede gemonteerd. De X-opnemer is op de Y-slede gemonteerd. Links onder het bed zie je de glaslineaal van de Y-as gemonteerd zitten op de voet van de kolomfrees. Links daarvan zit (buiten het zicht) de Y-opnemer die met een beugel aan de Y-slede is gemonteerd.
De tafel heb ik X en Y nagesteld en het wiel van rechts naar links verplaatst.
De verticale kolom heb ik ook nagesteld en weer heel goed vastgeschroefd.
Naast het ombouwen naar CNC heb ik 3 glaslinealen gemonteerd van resp. 170 (1x) en 370 (2x). Omdat mijn oude weergavemodule niet werkte met de bestelde glaslinealen heb ik een passende nieuwe module besteld en gemonteerd, deze werkt met een LCD.
De kolomfrees met de OUDE weergavemodule
Voor het ombouwen van de kolomfrees naar CNC heb ik alles al voorbereid en alle spullen die ik niet op voorraad heb zijn besteld.
De kolomfrees ga ik vooral gebruiken voor het frezen van spiebanen en af en toe wat freeswerk aan houders van kogellagers en dergelijke.
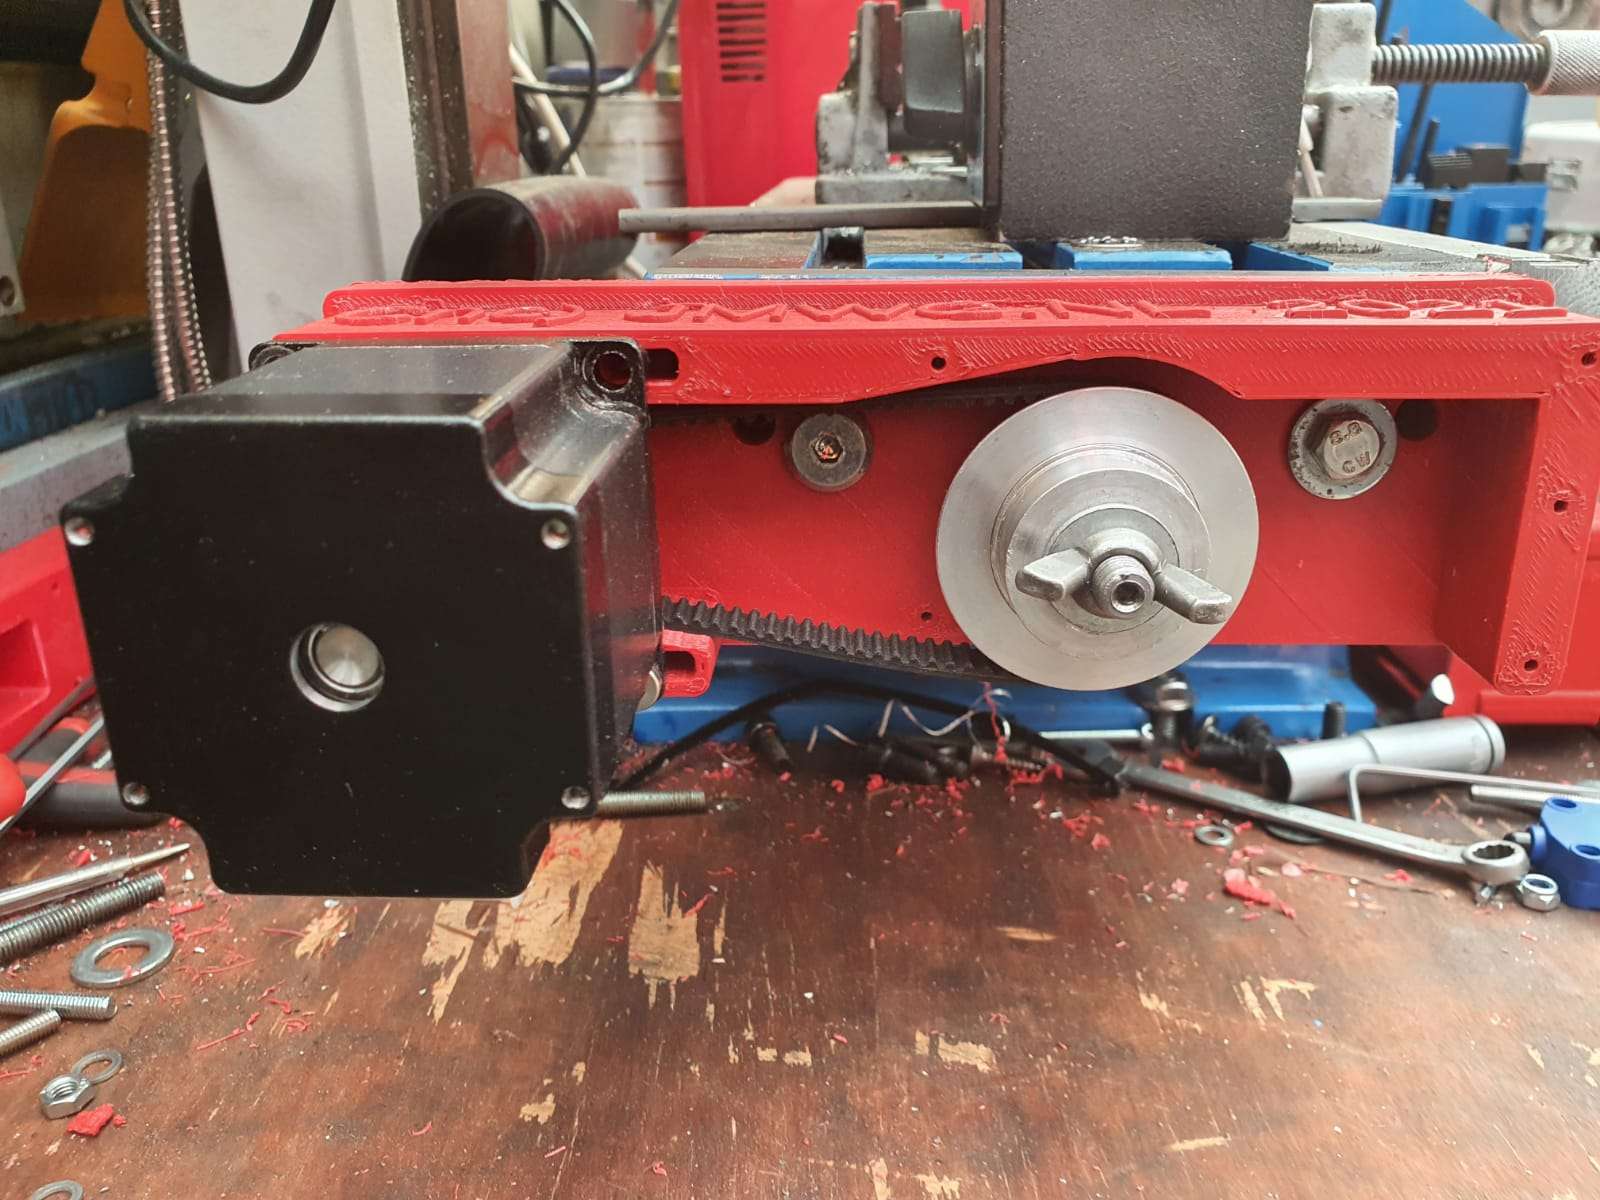
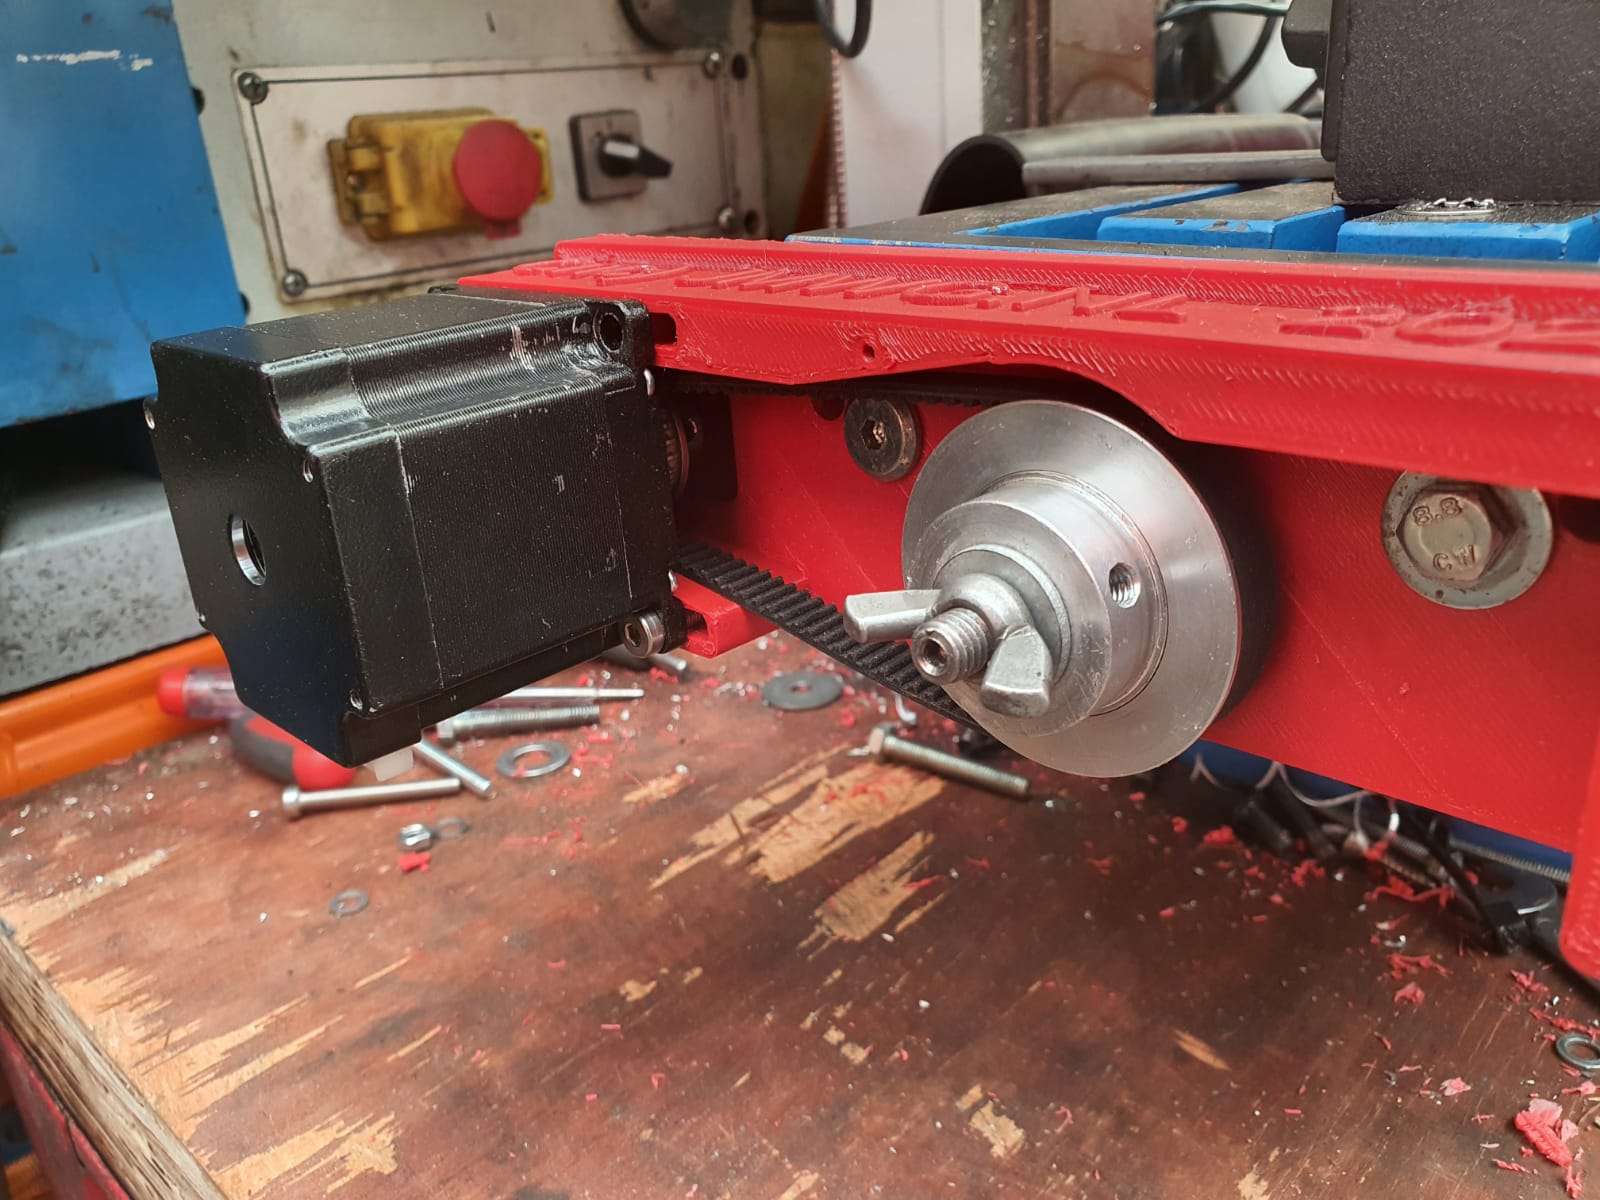
De kolomfrees zal daarnaast gebruikt worden voor boorwerk en af en toe voor aluminium freeswerk, en dan is een CNC setup wel weer handig. De CNC setup wordt identiek aan mijn Indymill. Er komen Nema23 steppermotoren op met 1:2 riemaandrijving voor X en Y en 1:3 aandrijving voor de Z-as. Ik ga proberen de handwielen samen te voegen met de tandwielen en daarna te hergebruiken zodat het mogelijk blijft handmatig te bedienen. De elektronica wordt weer wifi-based met Duet web-based controller en een cloned motherboard van Mellow (FLY) met 2209 stepper drivers.
De limit switches worden inductief: 2 stuks voor X, 2 stuks voor Y en 1 voor Z-top.
De Z-min (of Zero) wordt een tastermodule voor de toolbit, die op een vaste plek op de tafel kan worden gezet. Het zou mooi zijn wanneer de kolom elektrisch geïsoleerd kan worden van de spindel zodat je echt op je werkstuk de zero instelling kan doen. Dat ga ik nog uitzoeken.
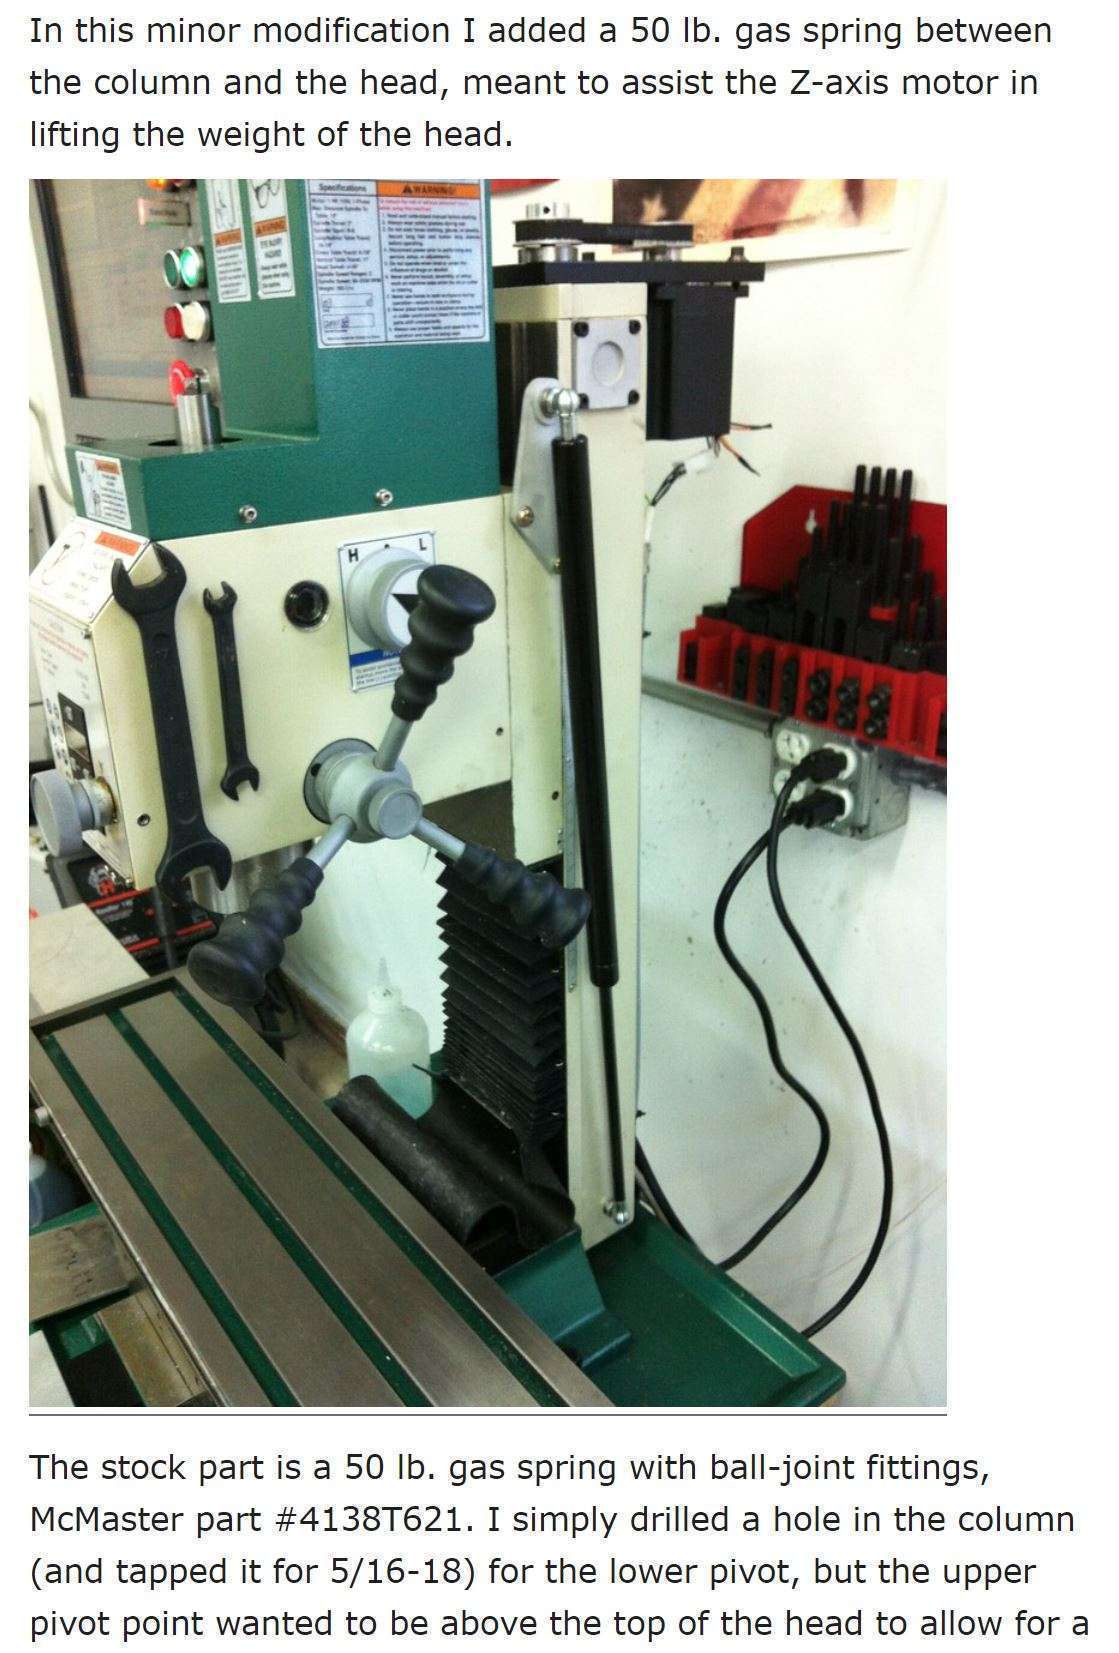
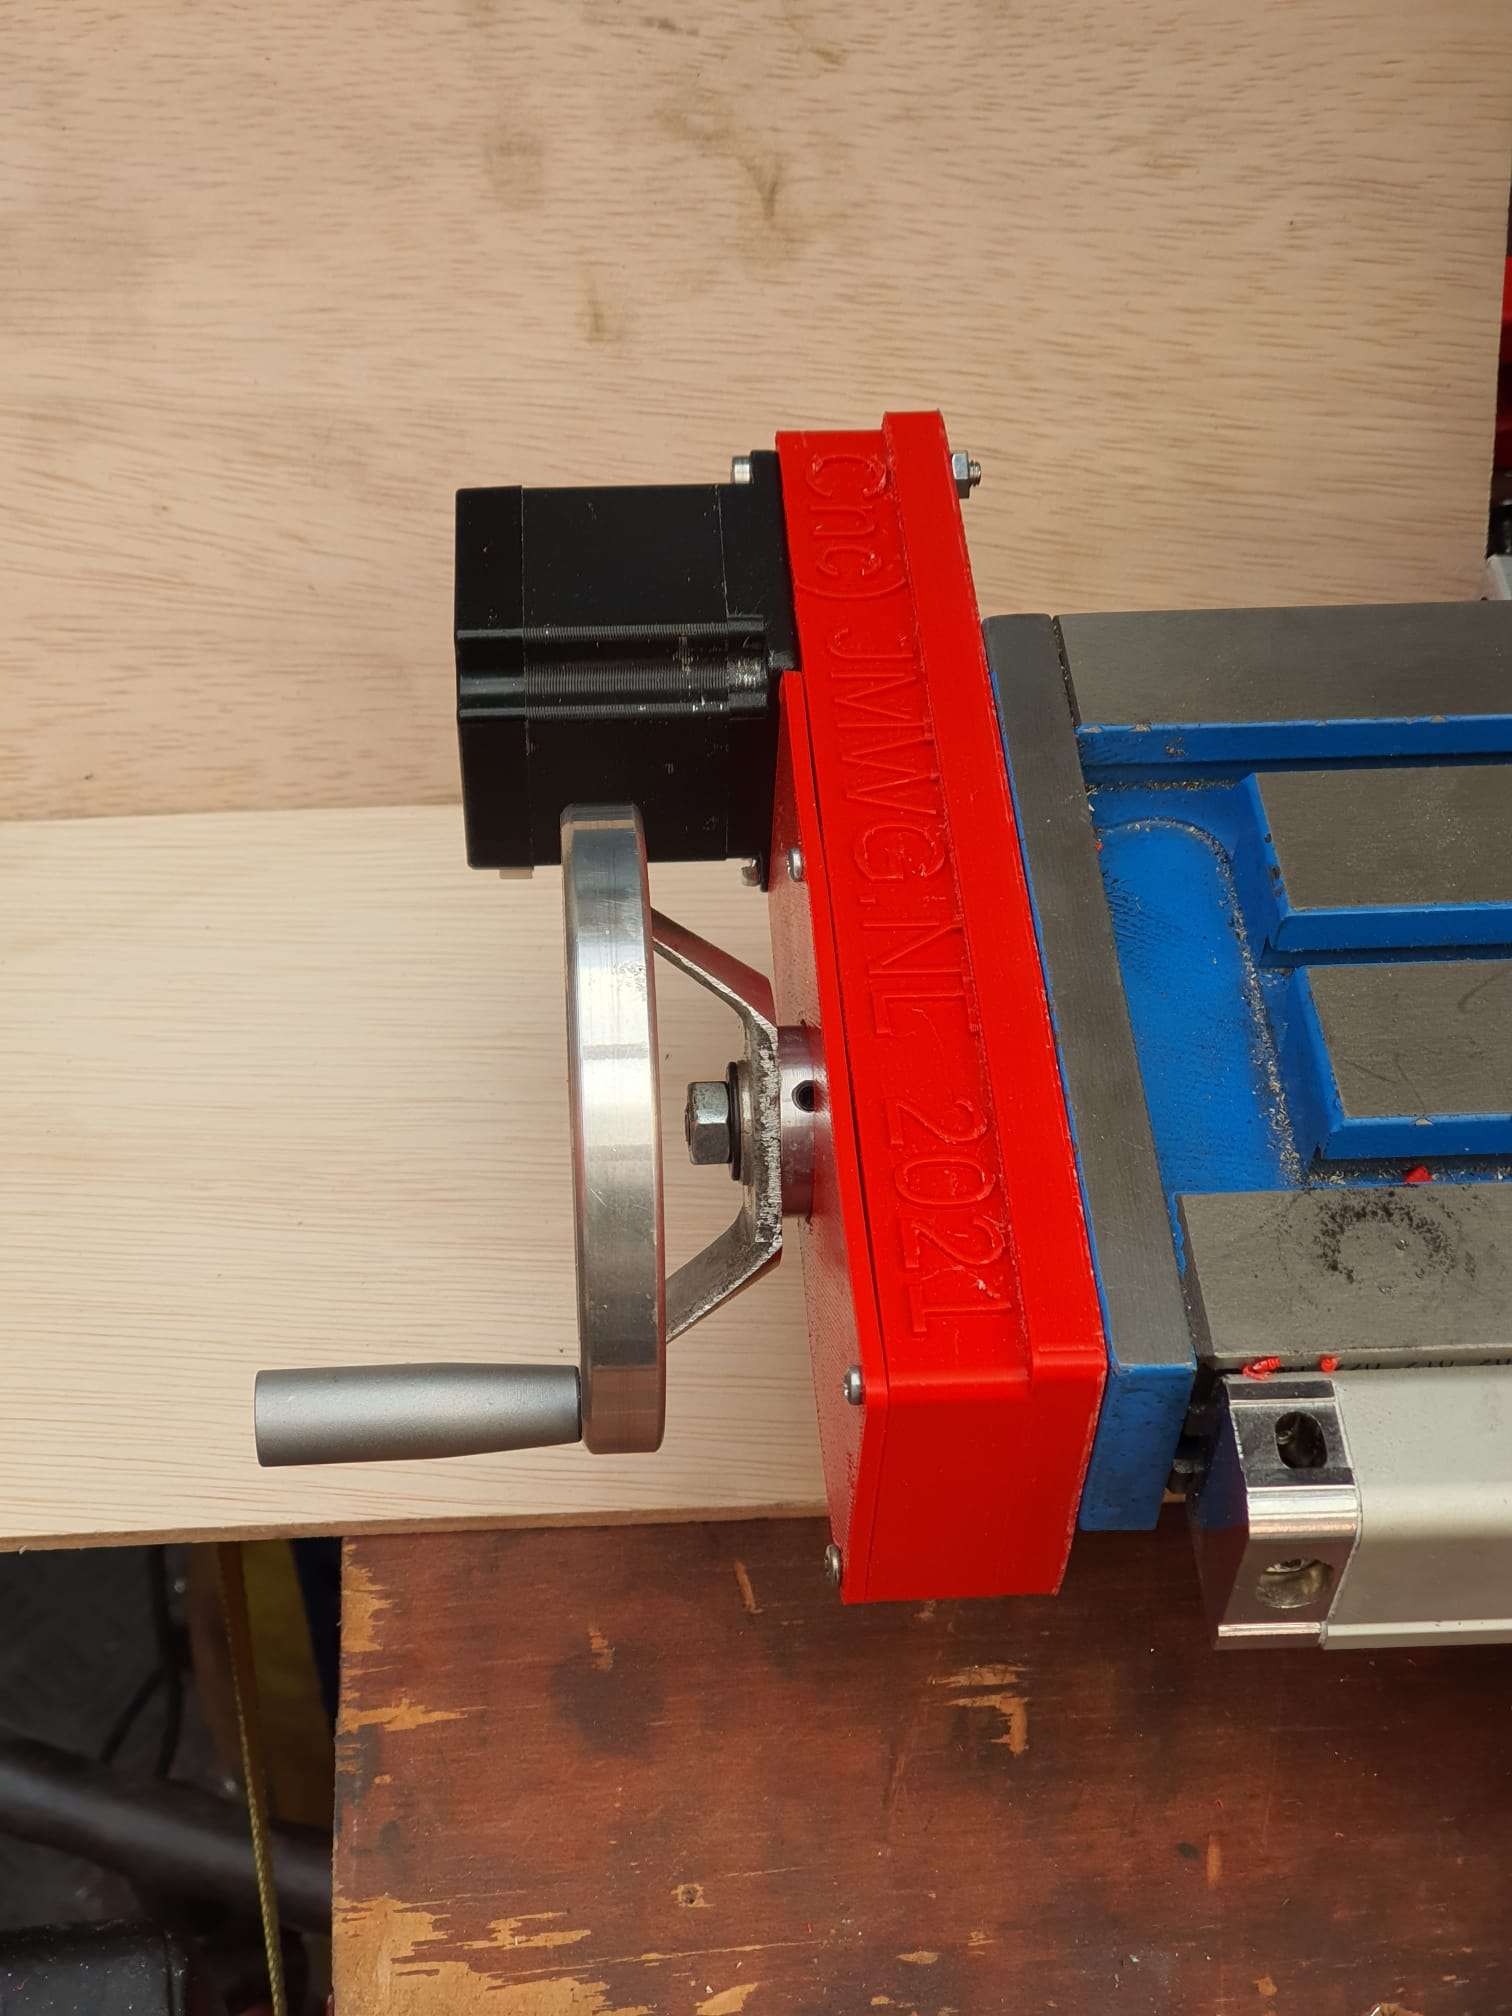
Voor de Z-as heb ik een 600mm lange gasveer besteld, met een werkingsslag van 250 millimeter zodat de kolom gemakkelijker kan bewegen.
Voorbeelden voor anderen voor mijn CNC ombouw:
Dit wordt ongeveer mijn eigen oplossing, alleen gebruik ik 10mm basisplaat aluminium. En ik ga voor Nema23 motors. De setup wordt verder identiek aan dit voorbeeld voor X en Y.Dit wordt mijn Z-setup. Een gasveer om de druk op motor en spindle te verkleinen en een vlakke plaat op de top van de kolom met een rieaandrijving en de Nem23 motor. . Ik ga voor 1:3 (72 tands op de spindle en 24 tands M3 op de steppermotor.). Als het allemaal past komt het handwiel weer bovenop.Voorbeeld van de basisplaten met 10mm aluminium.
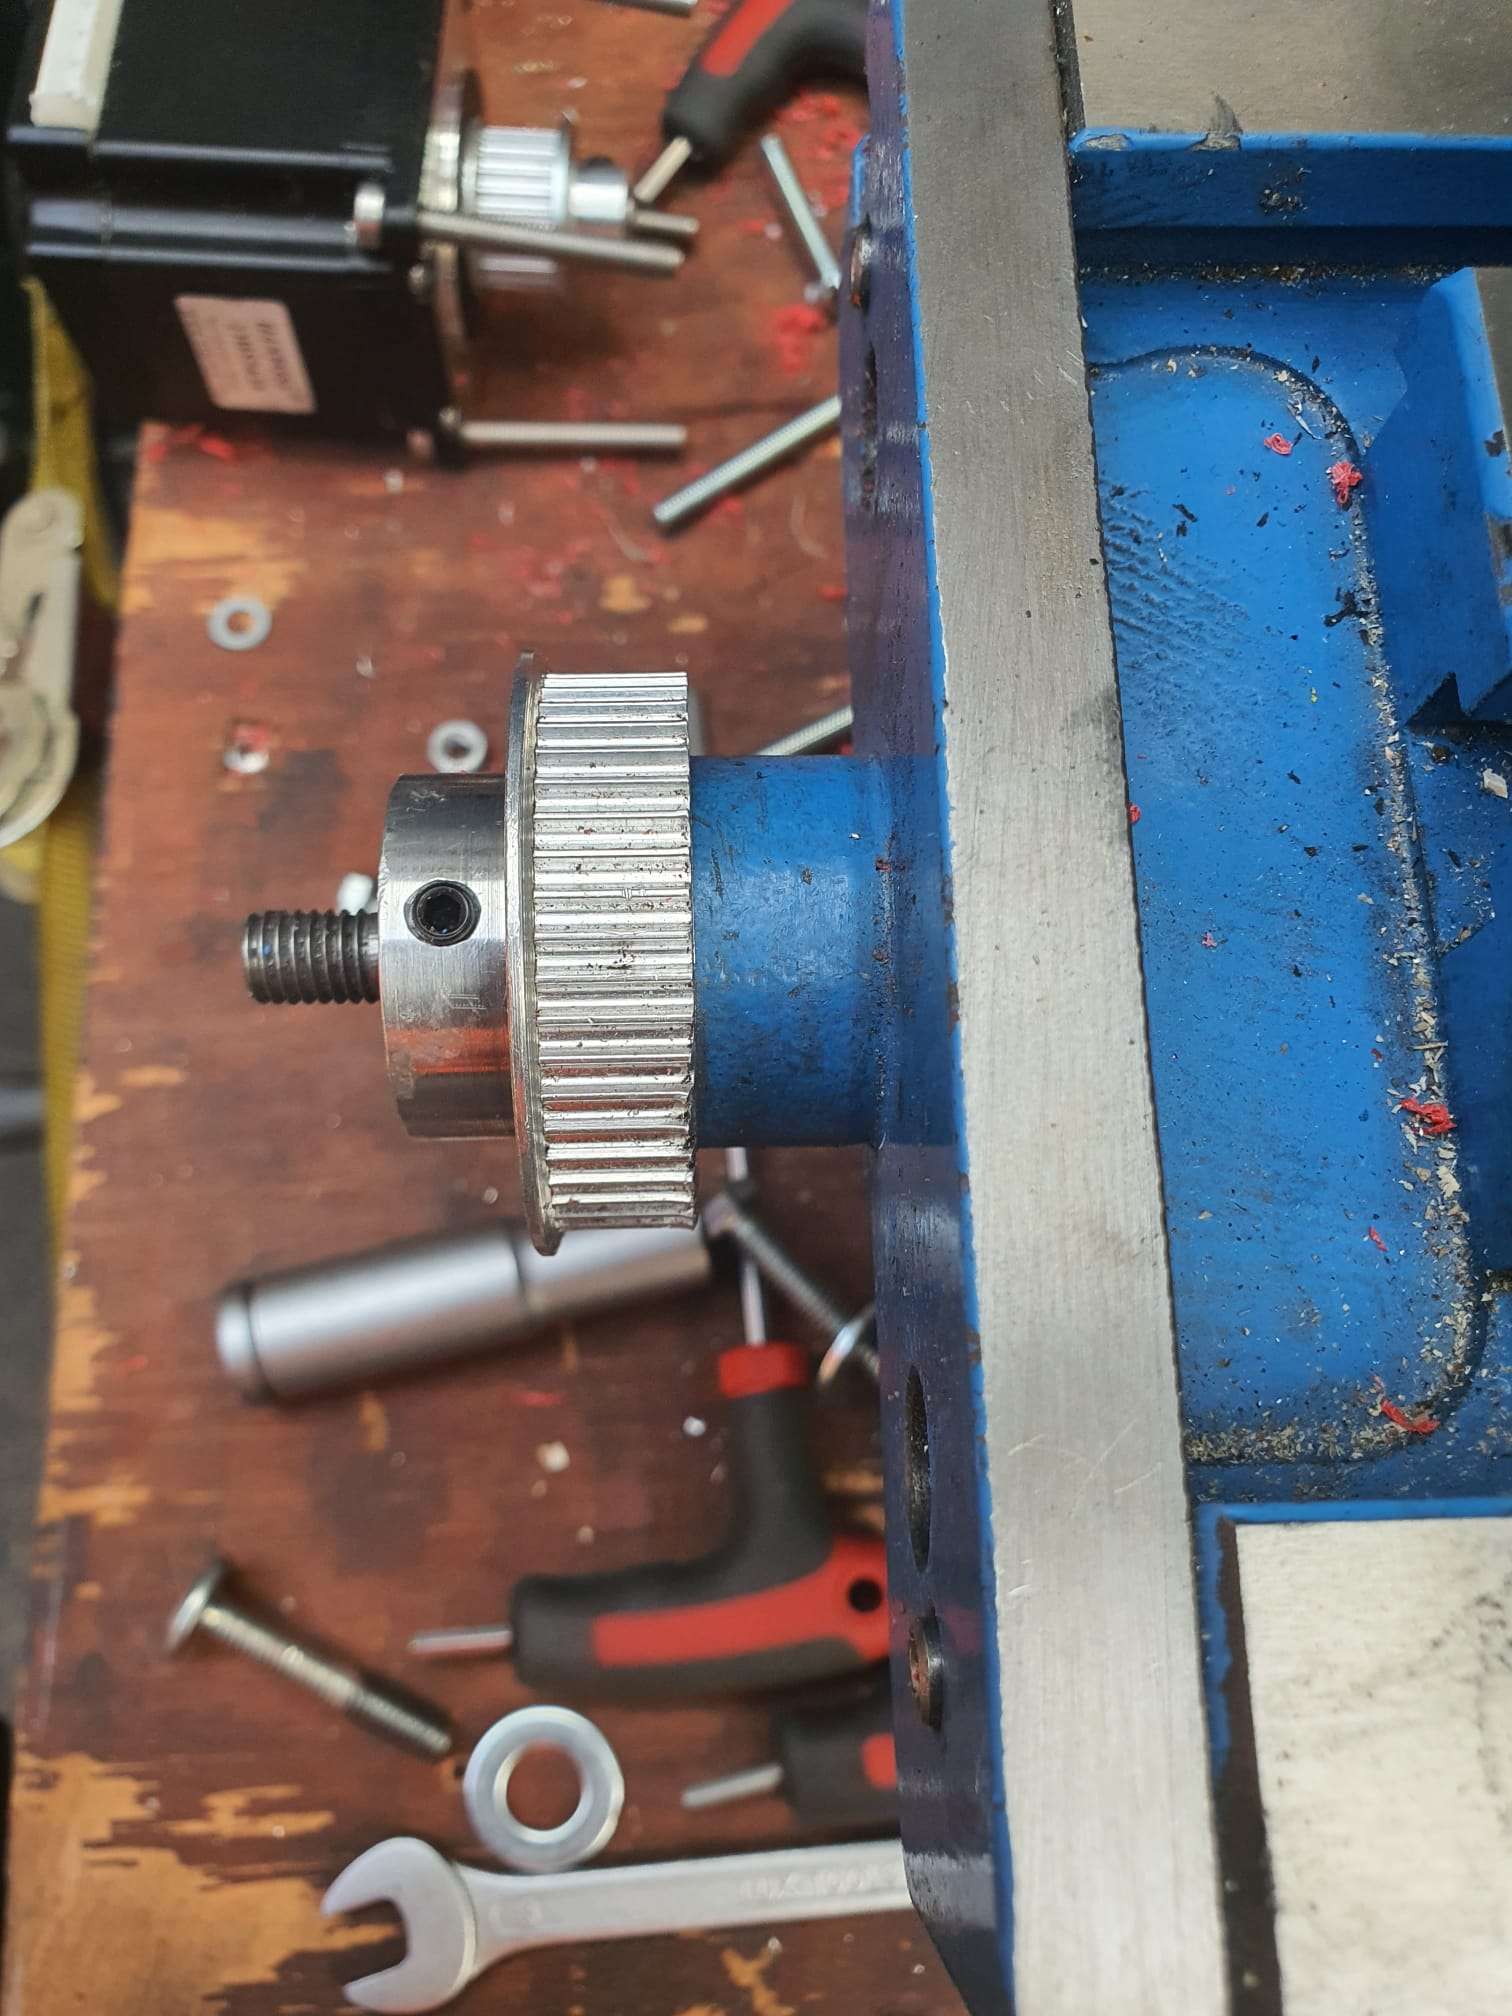
De bevestiging op de Z-kolom moest OMHOOG zodat het NEMA23 tandwiel op dezelfde hoogte komt als het wiel dat op de draadspil is gemonteerd.
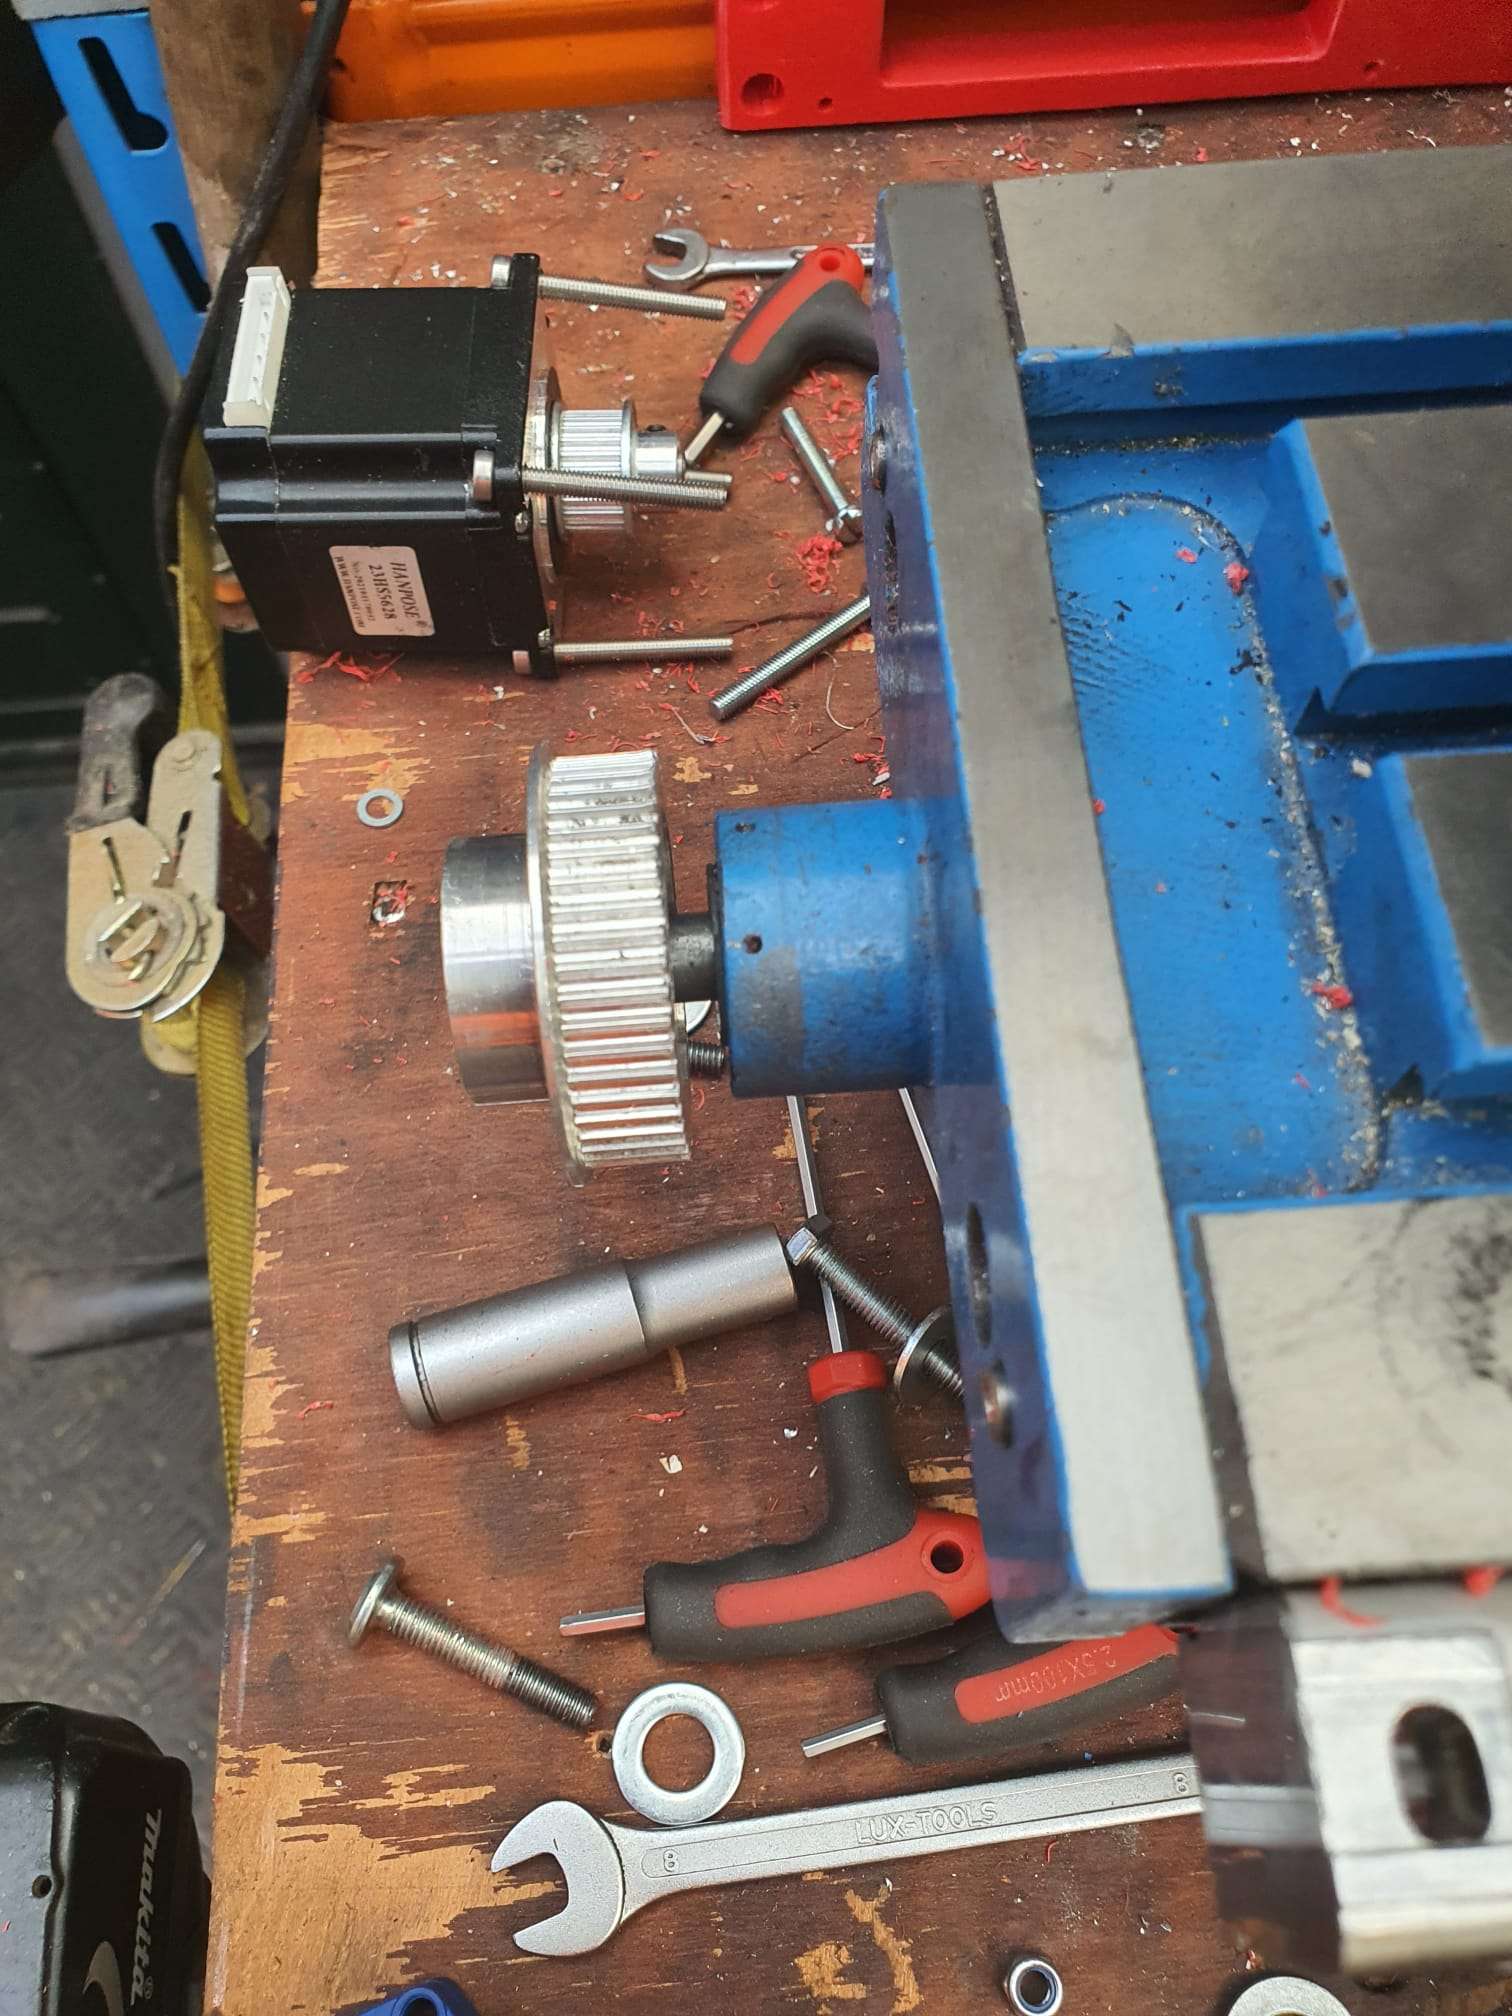
Benodigde hardware:
3d geprinte Z-as adapter
Nema23 stepper 76 mm lengte met voldoende koppel, 8mm as diameter
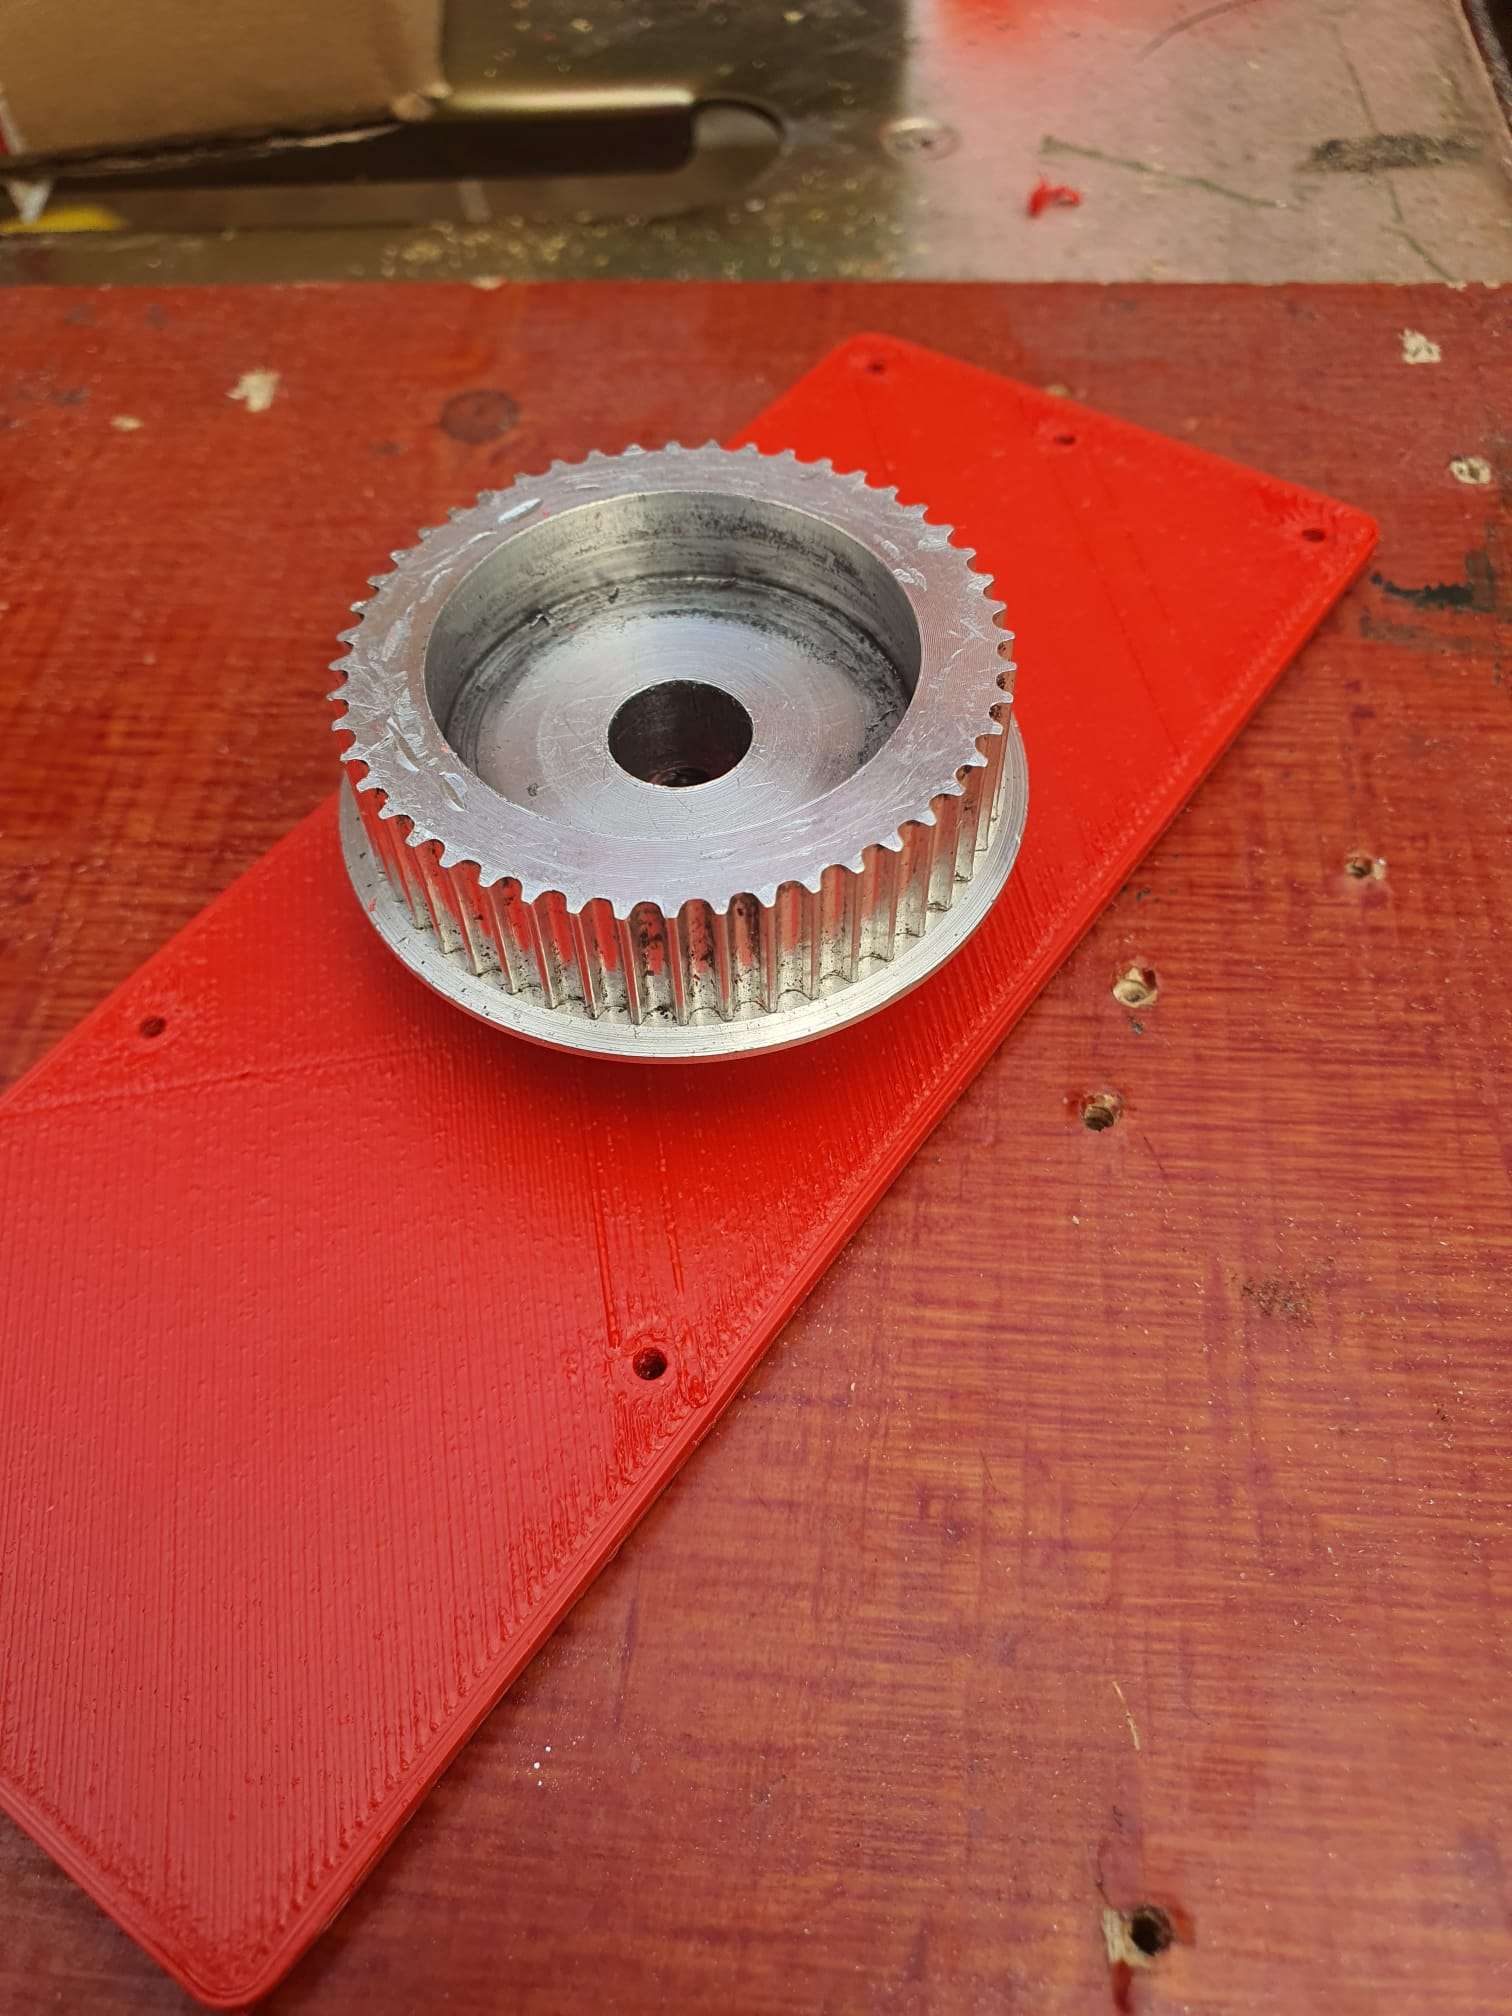
48 tanden M3 tandwiel van 11mm breed, 10mm gat met kraag voor de draadspil
24 tanden M3 tandwiel van 11mm breedte, 8mm gat met kraag voor de Nema23 stappenmotor
nieuwe M6 bouten 40mm lengte flathead voor de top verbinding met de Z kolom
4 bouten en moeren M5 voor montage van de Nema 23 stappenmotor
tandriem 300mm M3 (100 tanden) 9 of 10mm
OF, gebruik het 72 tandwiel op de aandrijfschroef en verkrijg een grotere lengte riem van (ik schat) 330-350 mm
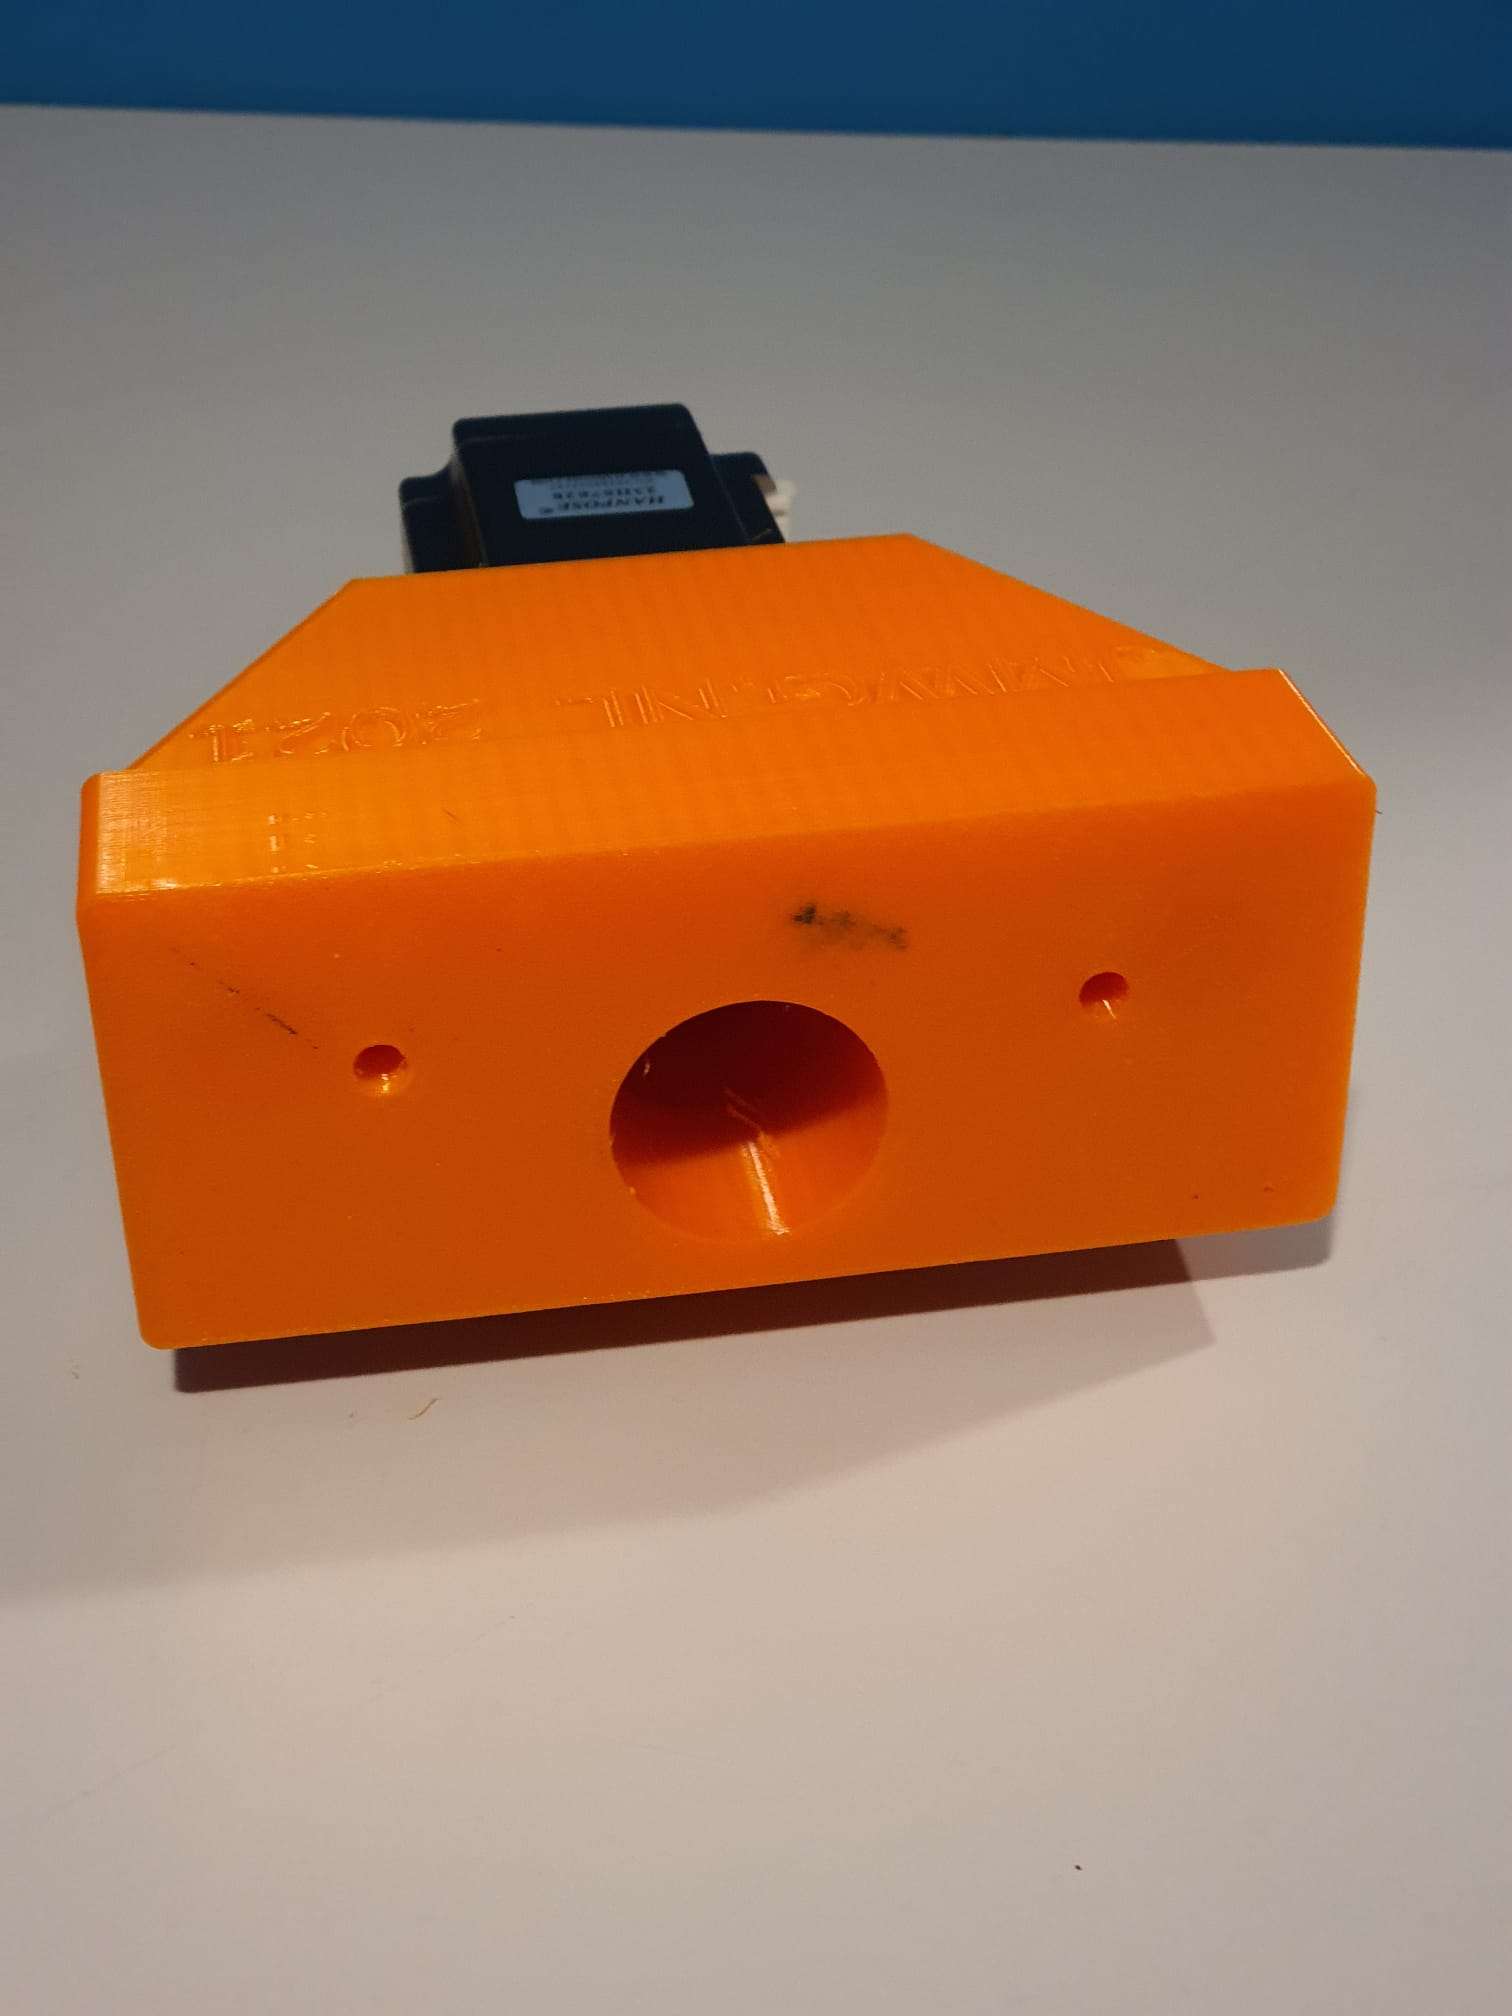
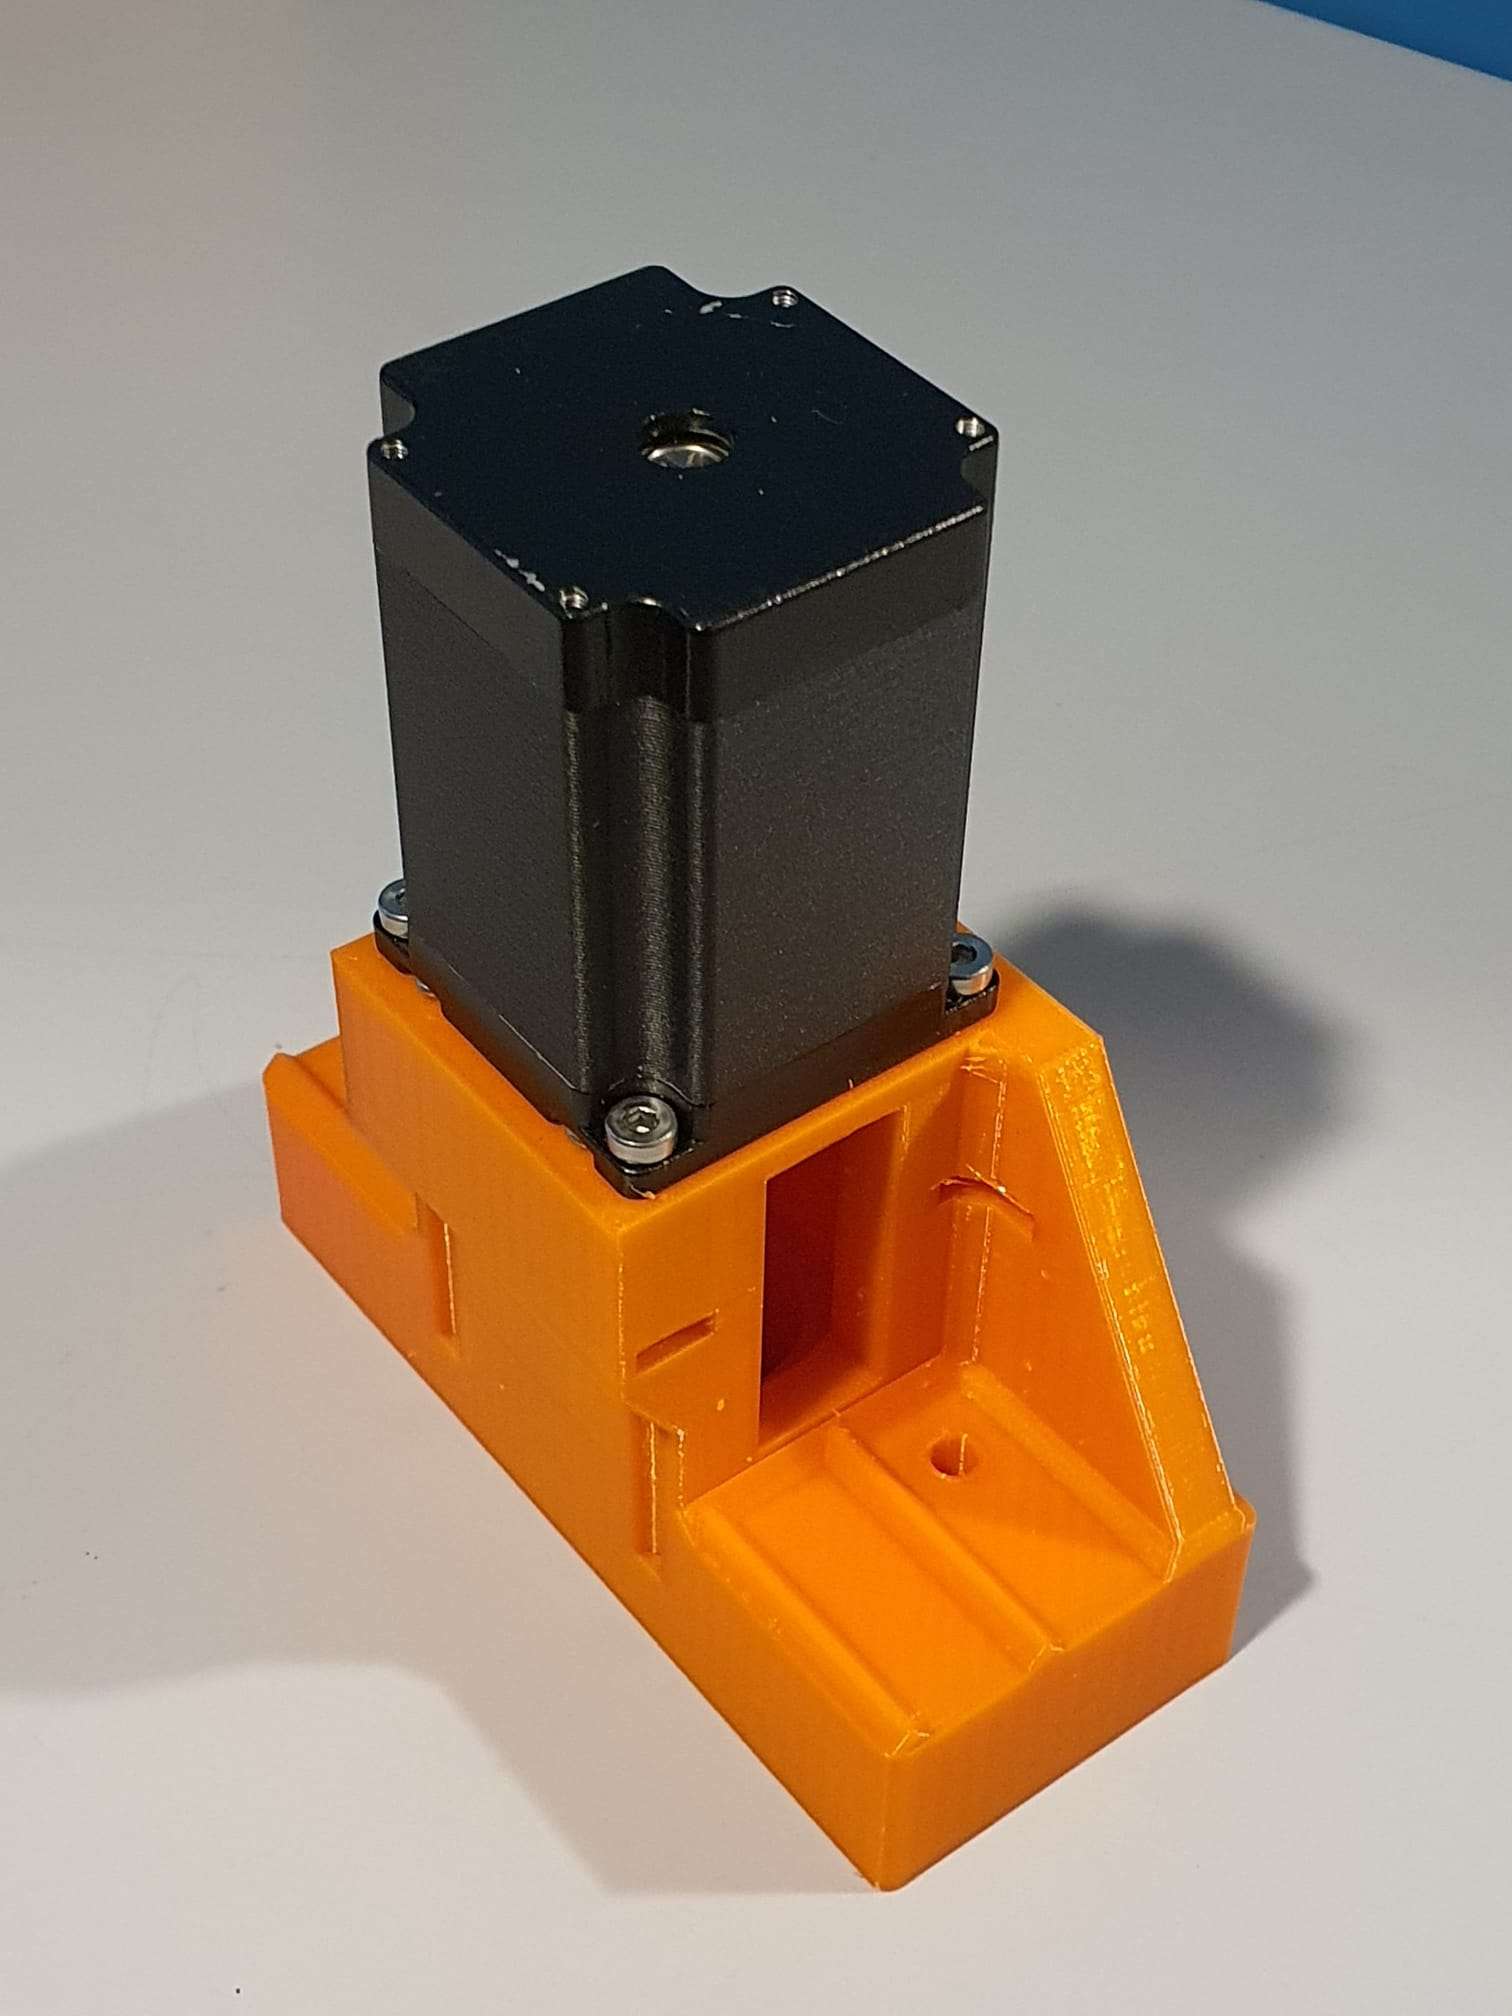
OF… een andere manier om de Nema23stepper te monteren is aan de achterkant van de Z-kolom, MAAR ik wil niet dat hij aan de achterkant uitsteekt, daarom heb ik besloten de stepper links van de Z-kolom te monteren…
Dit is het 72 tanden 11 mm brede tandwiel dat ik waarschijnlijk zal gebruiken voor de uiteindelijke bevestiging op de Z-assen. Maar niet met deze beugel aan de achterkant. Helaas past deze beugel niet gemakkelijk aan de linker- of rechterkant van de Z-kolom. Misschien maak ik wel een passtuk om hem aan de linkerkant te monteren. We zullen zien hoe goed de 3D geprinte onderdelen zullen presteren en als het nodig is zal de Z-as het gemakkelijkst te gebruiken zijn met een standaard beugel om de stappenmotor te monteren zoals hierboven getoond.
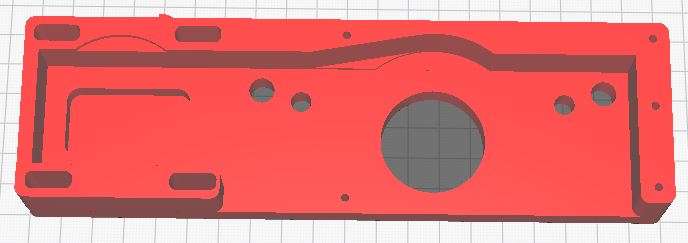
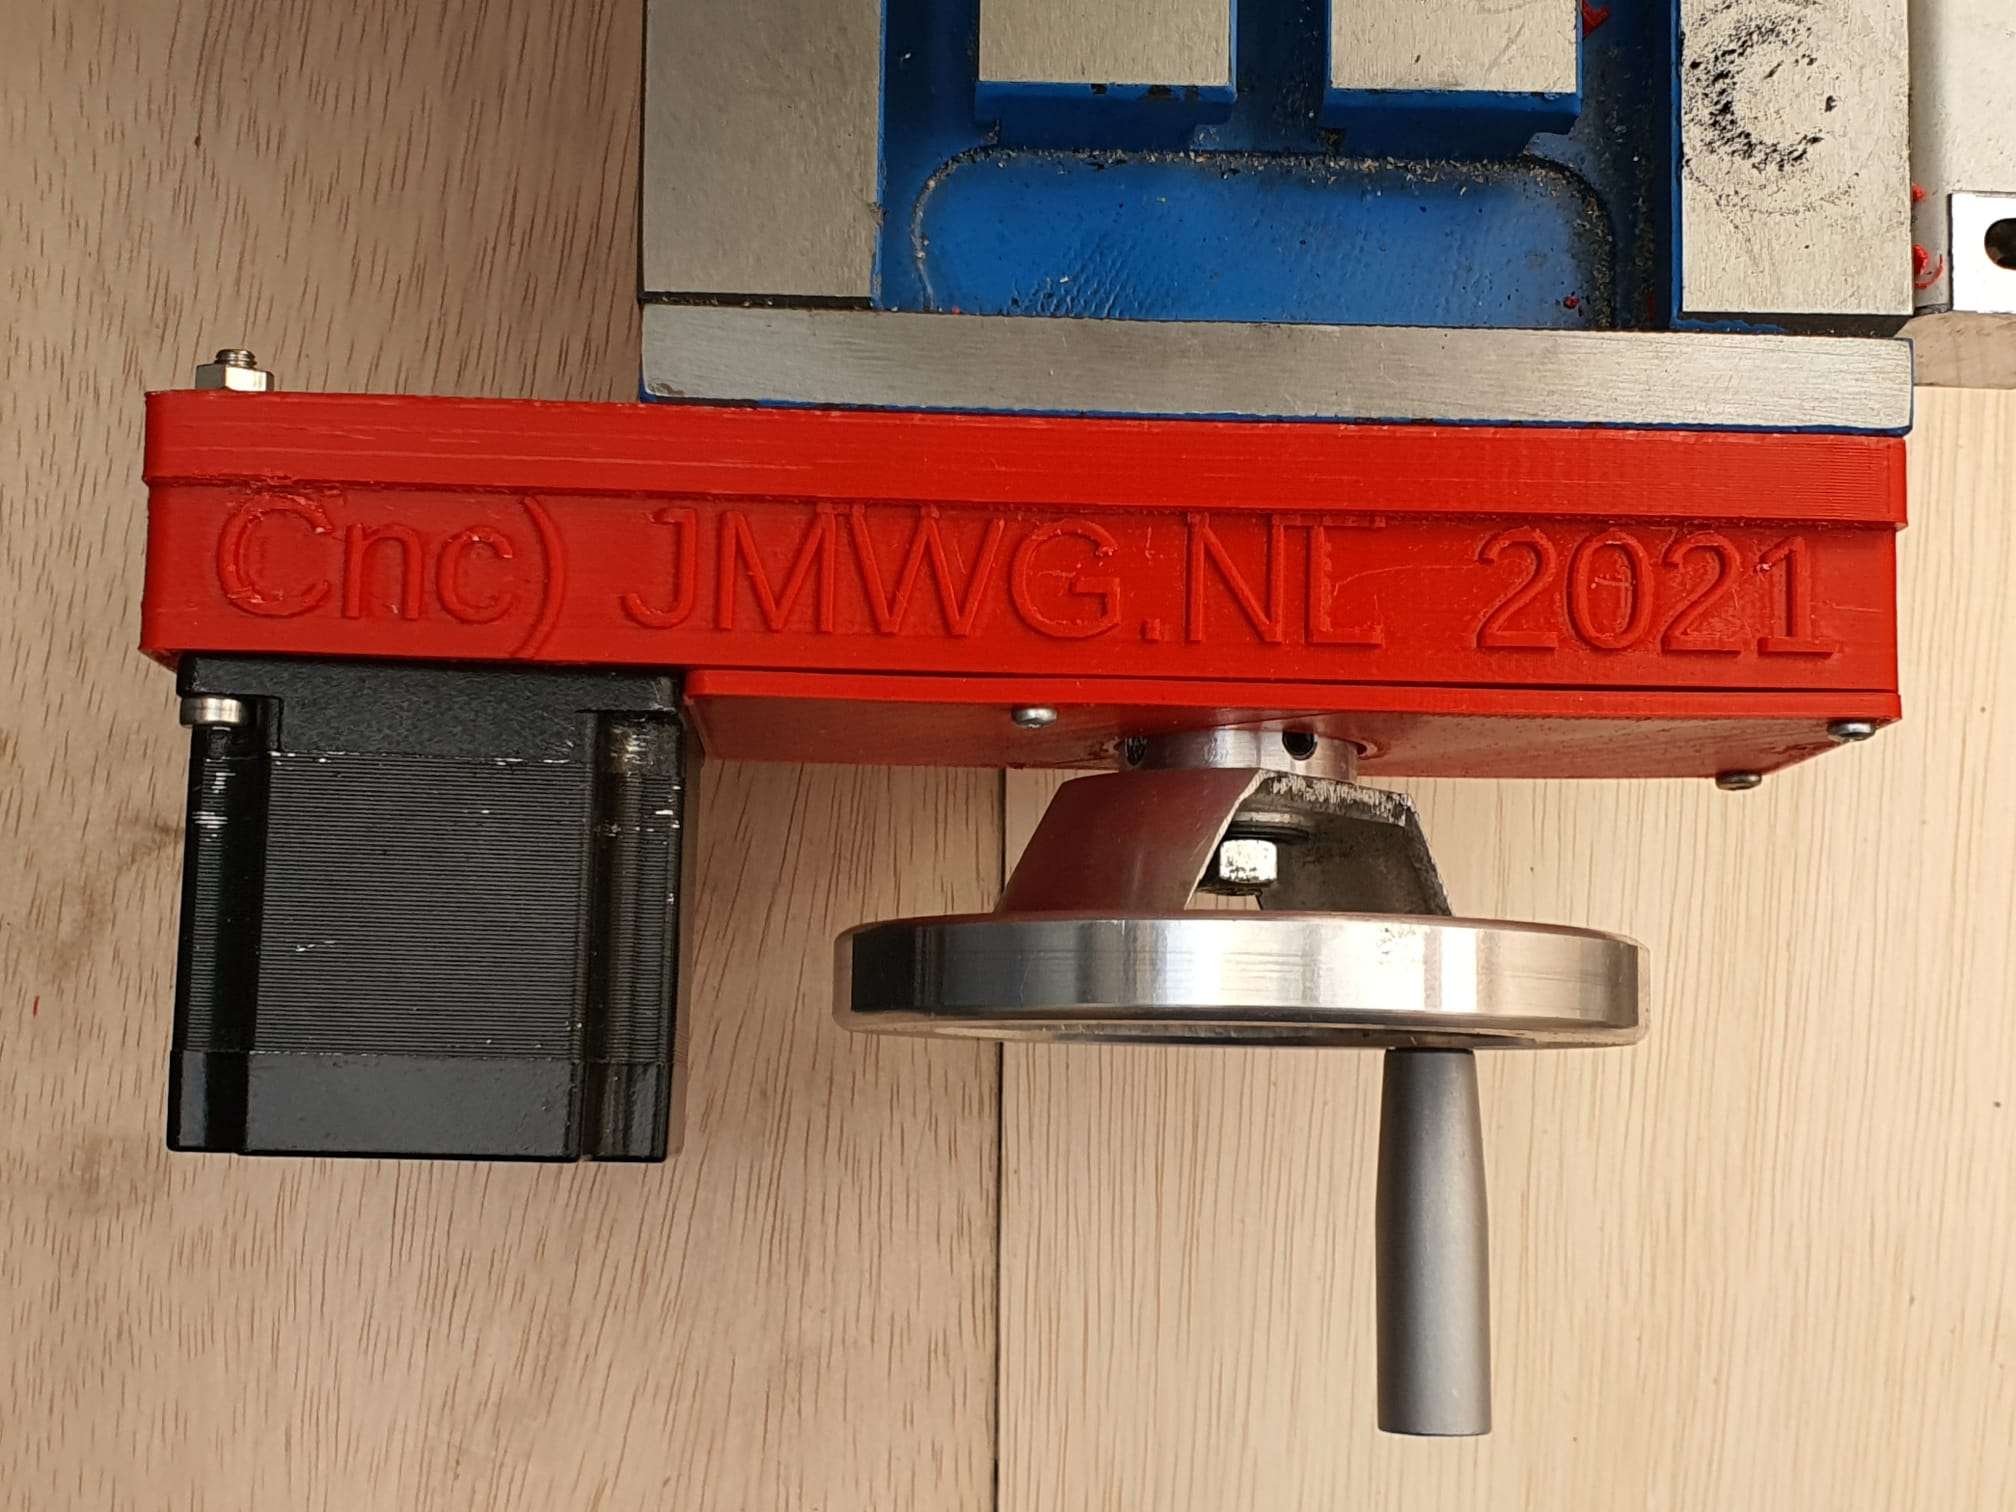
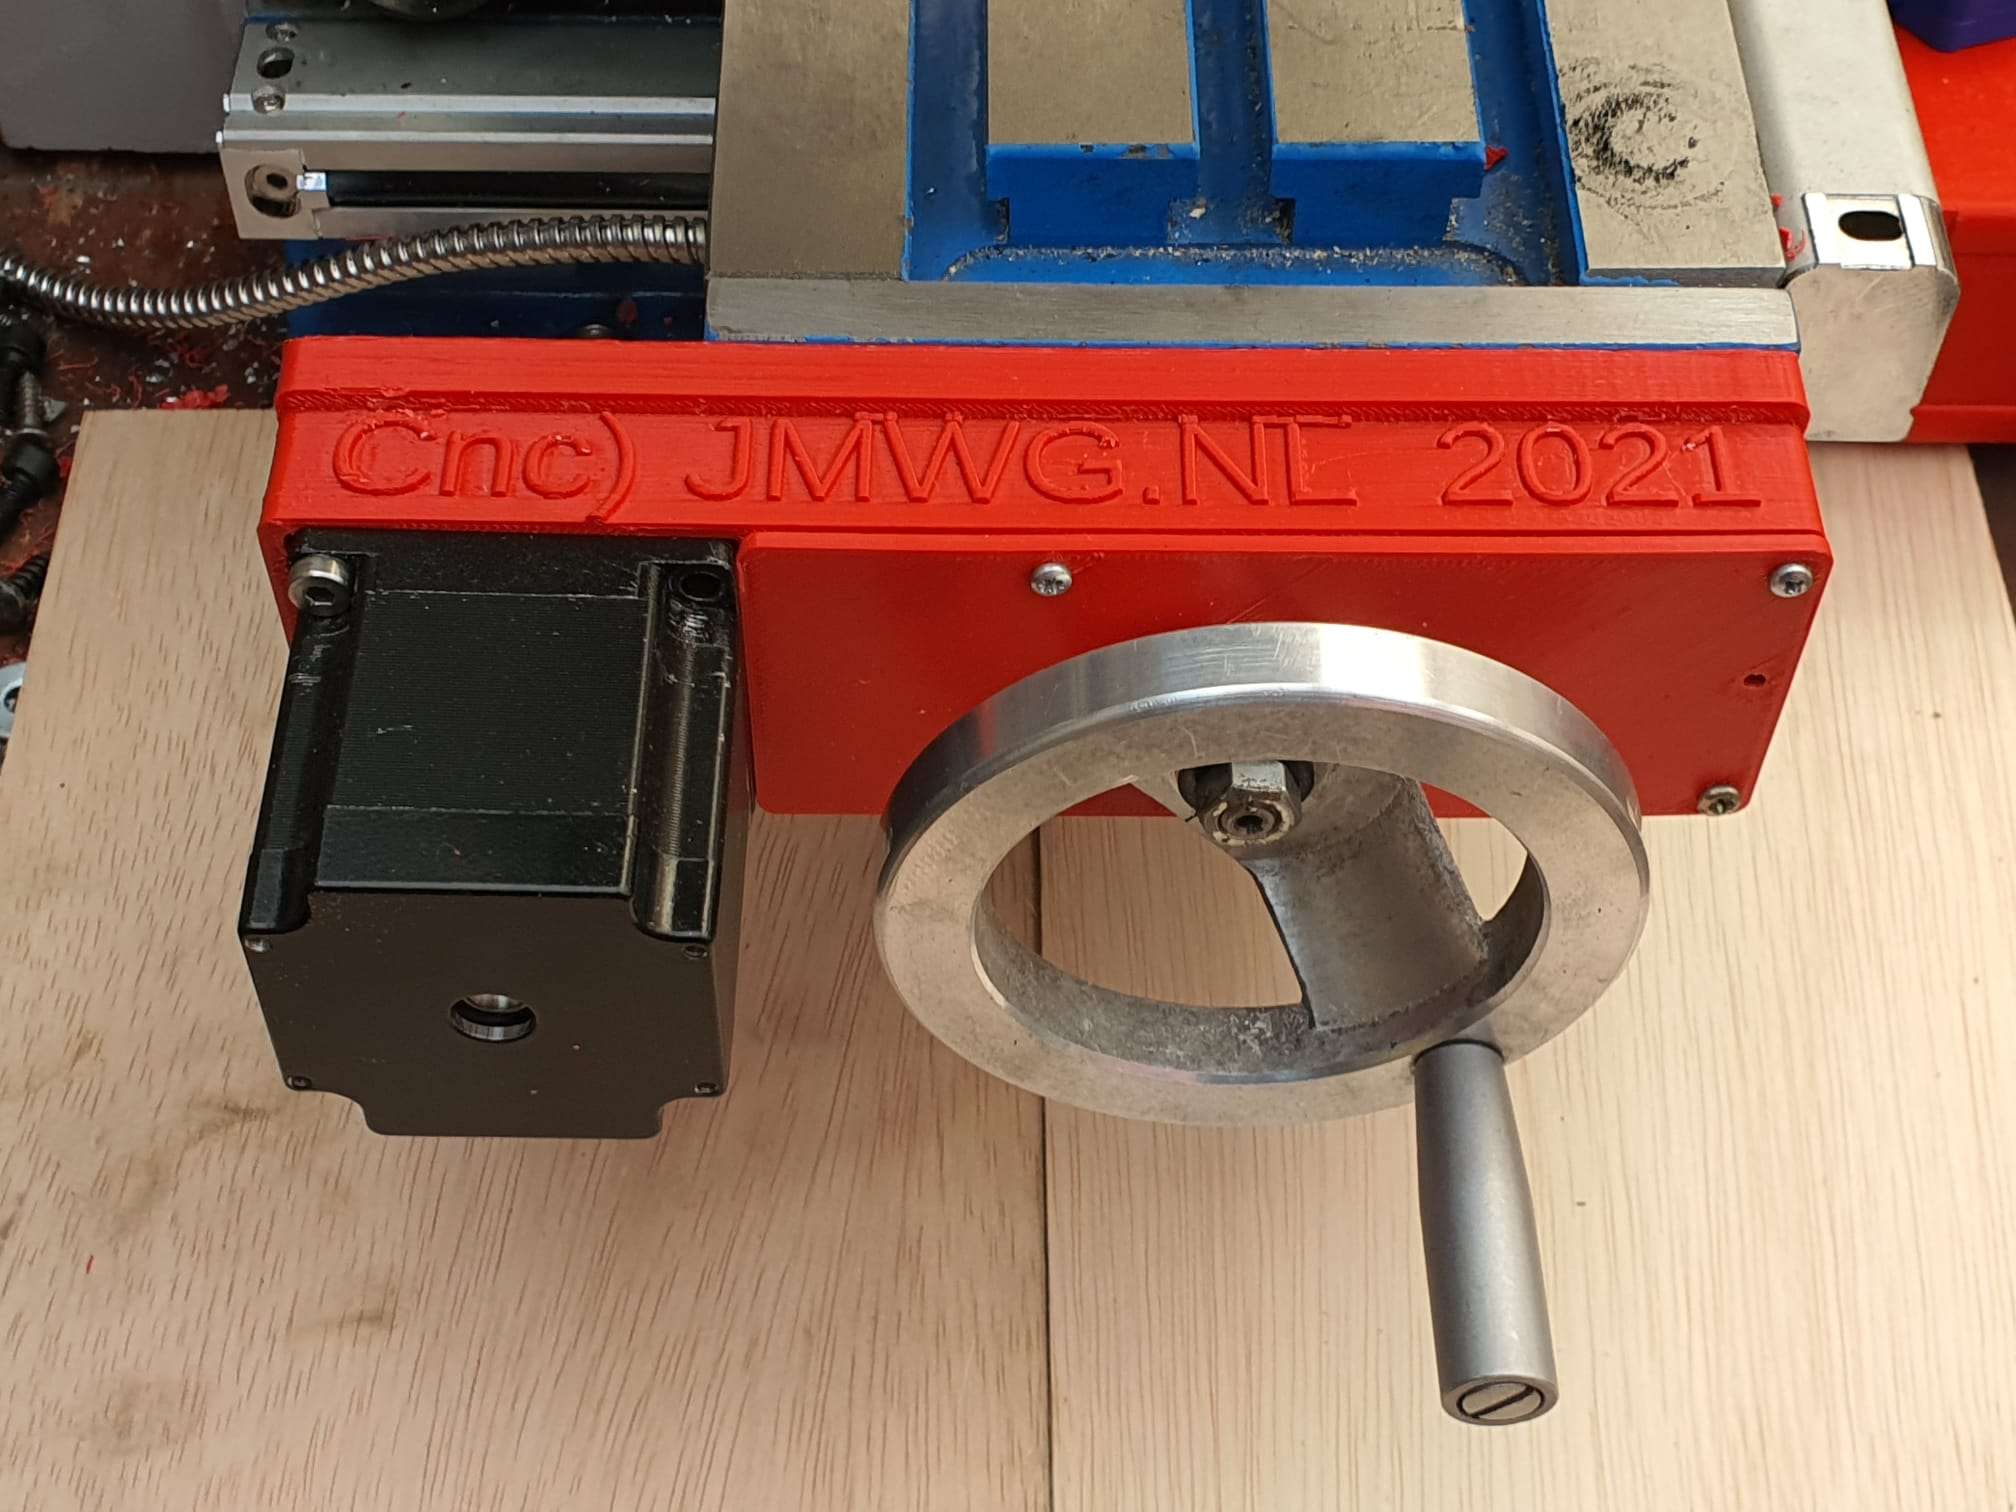
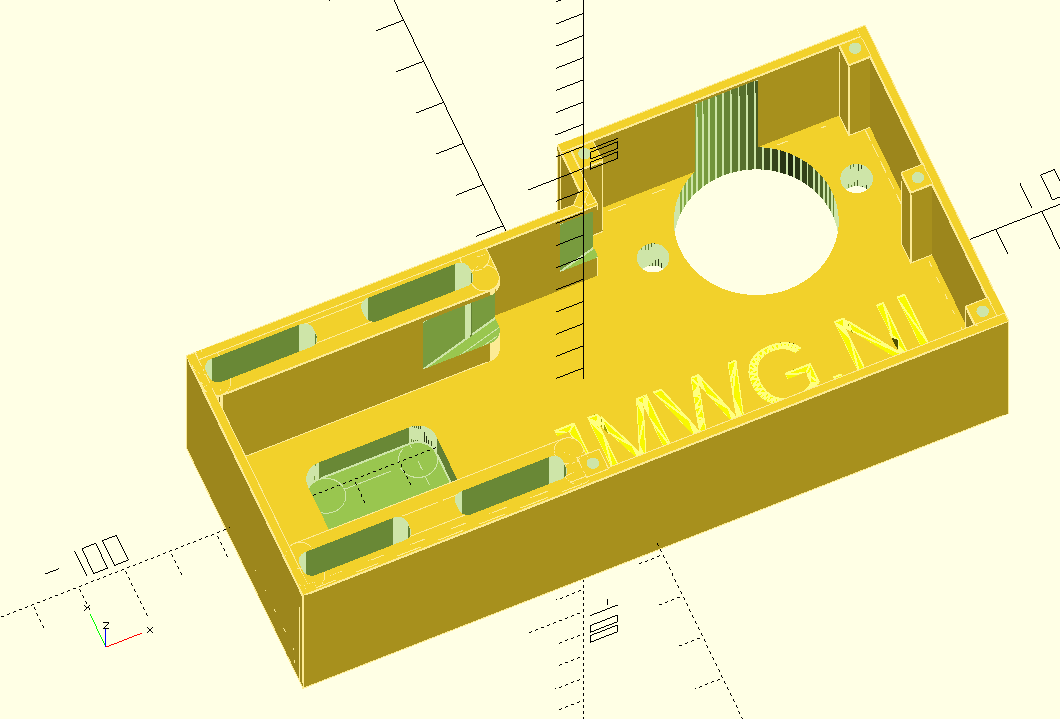
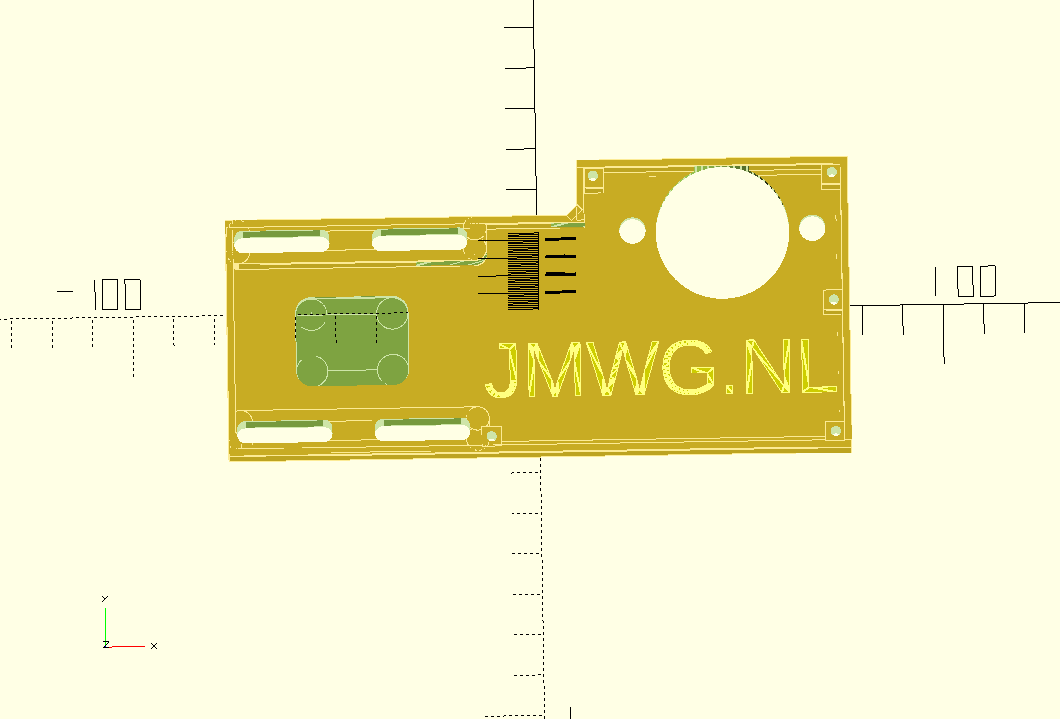
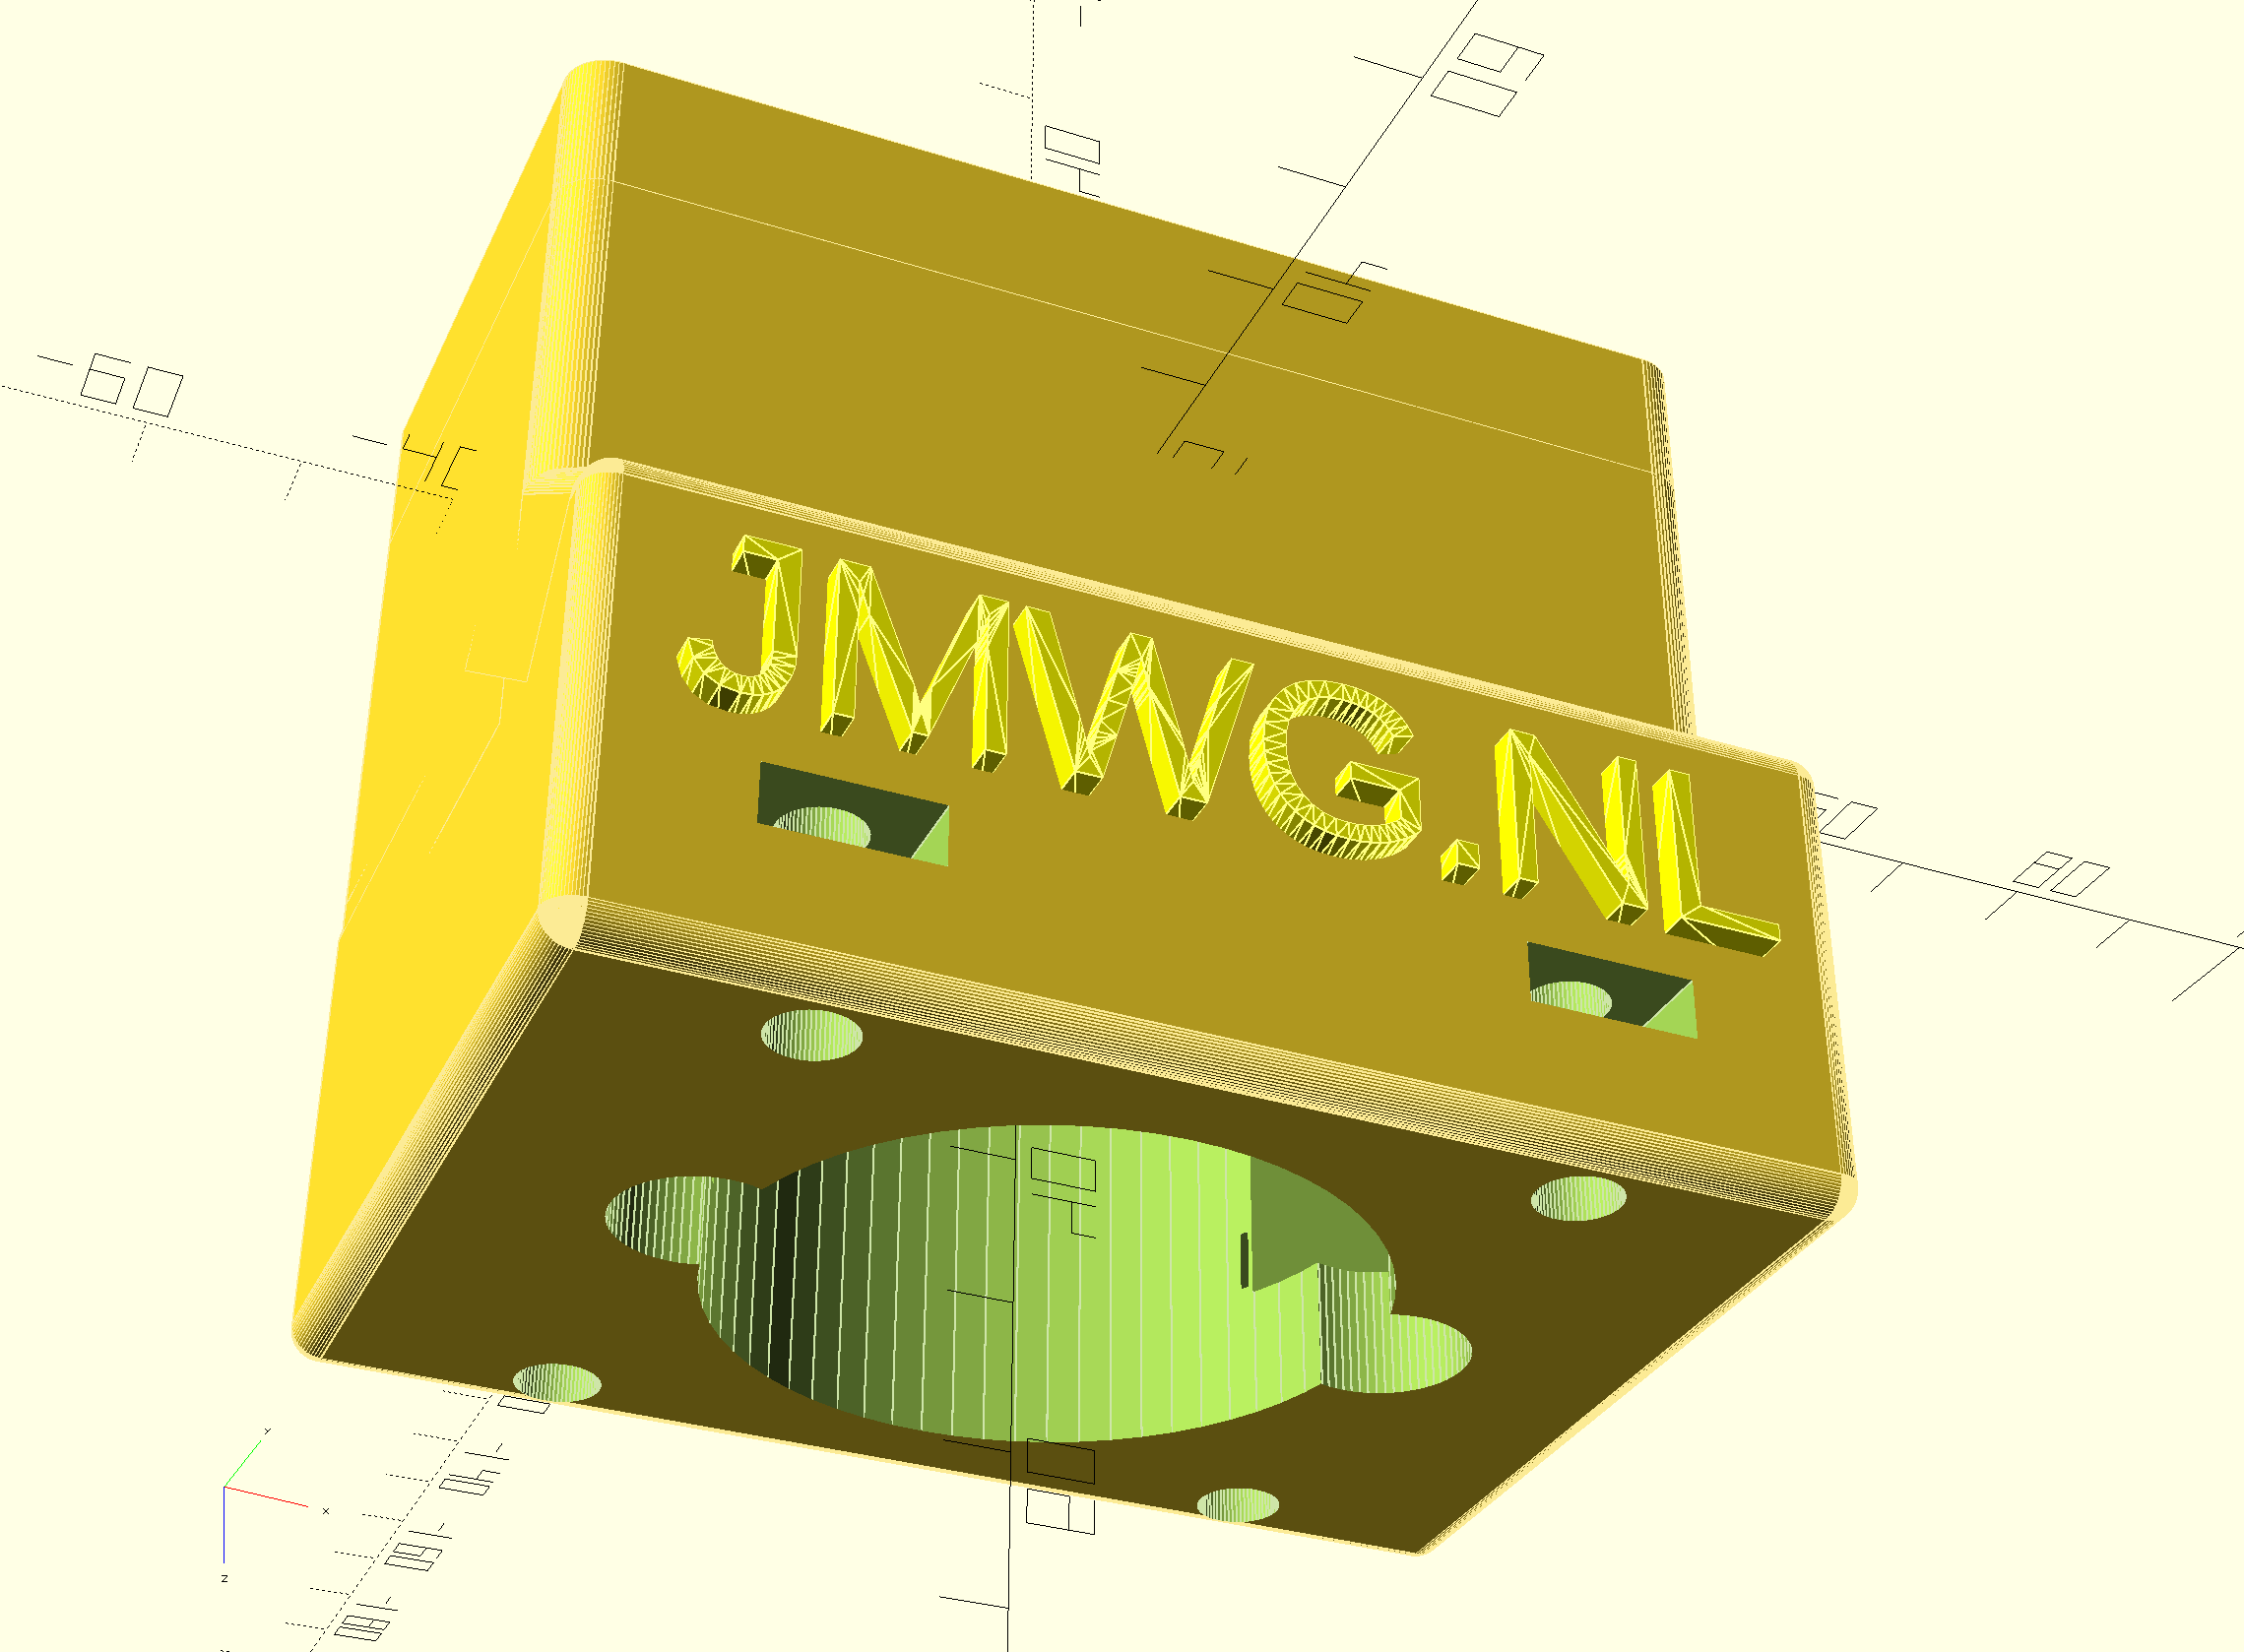
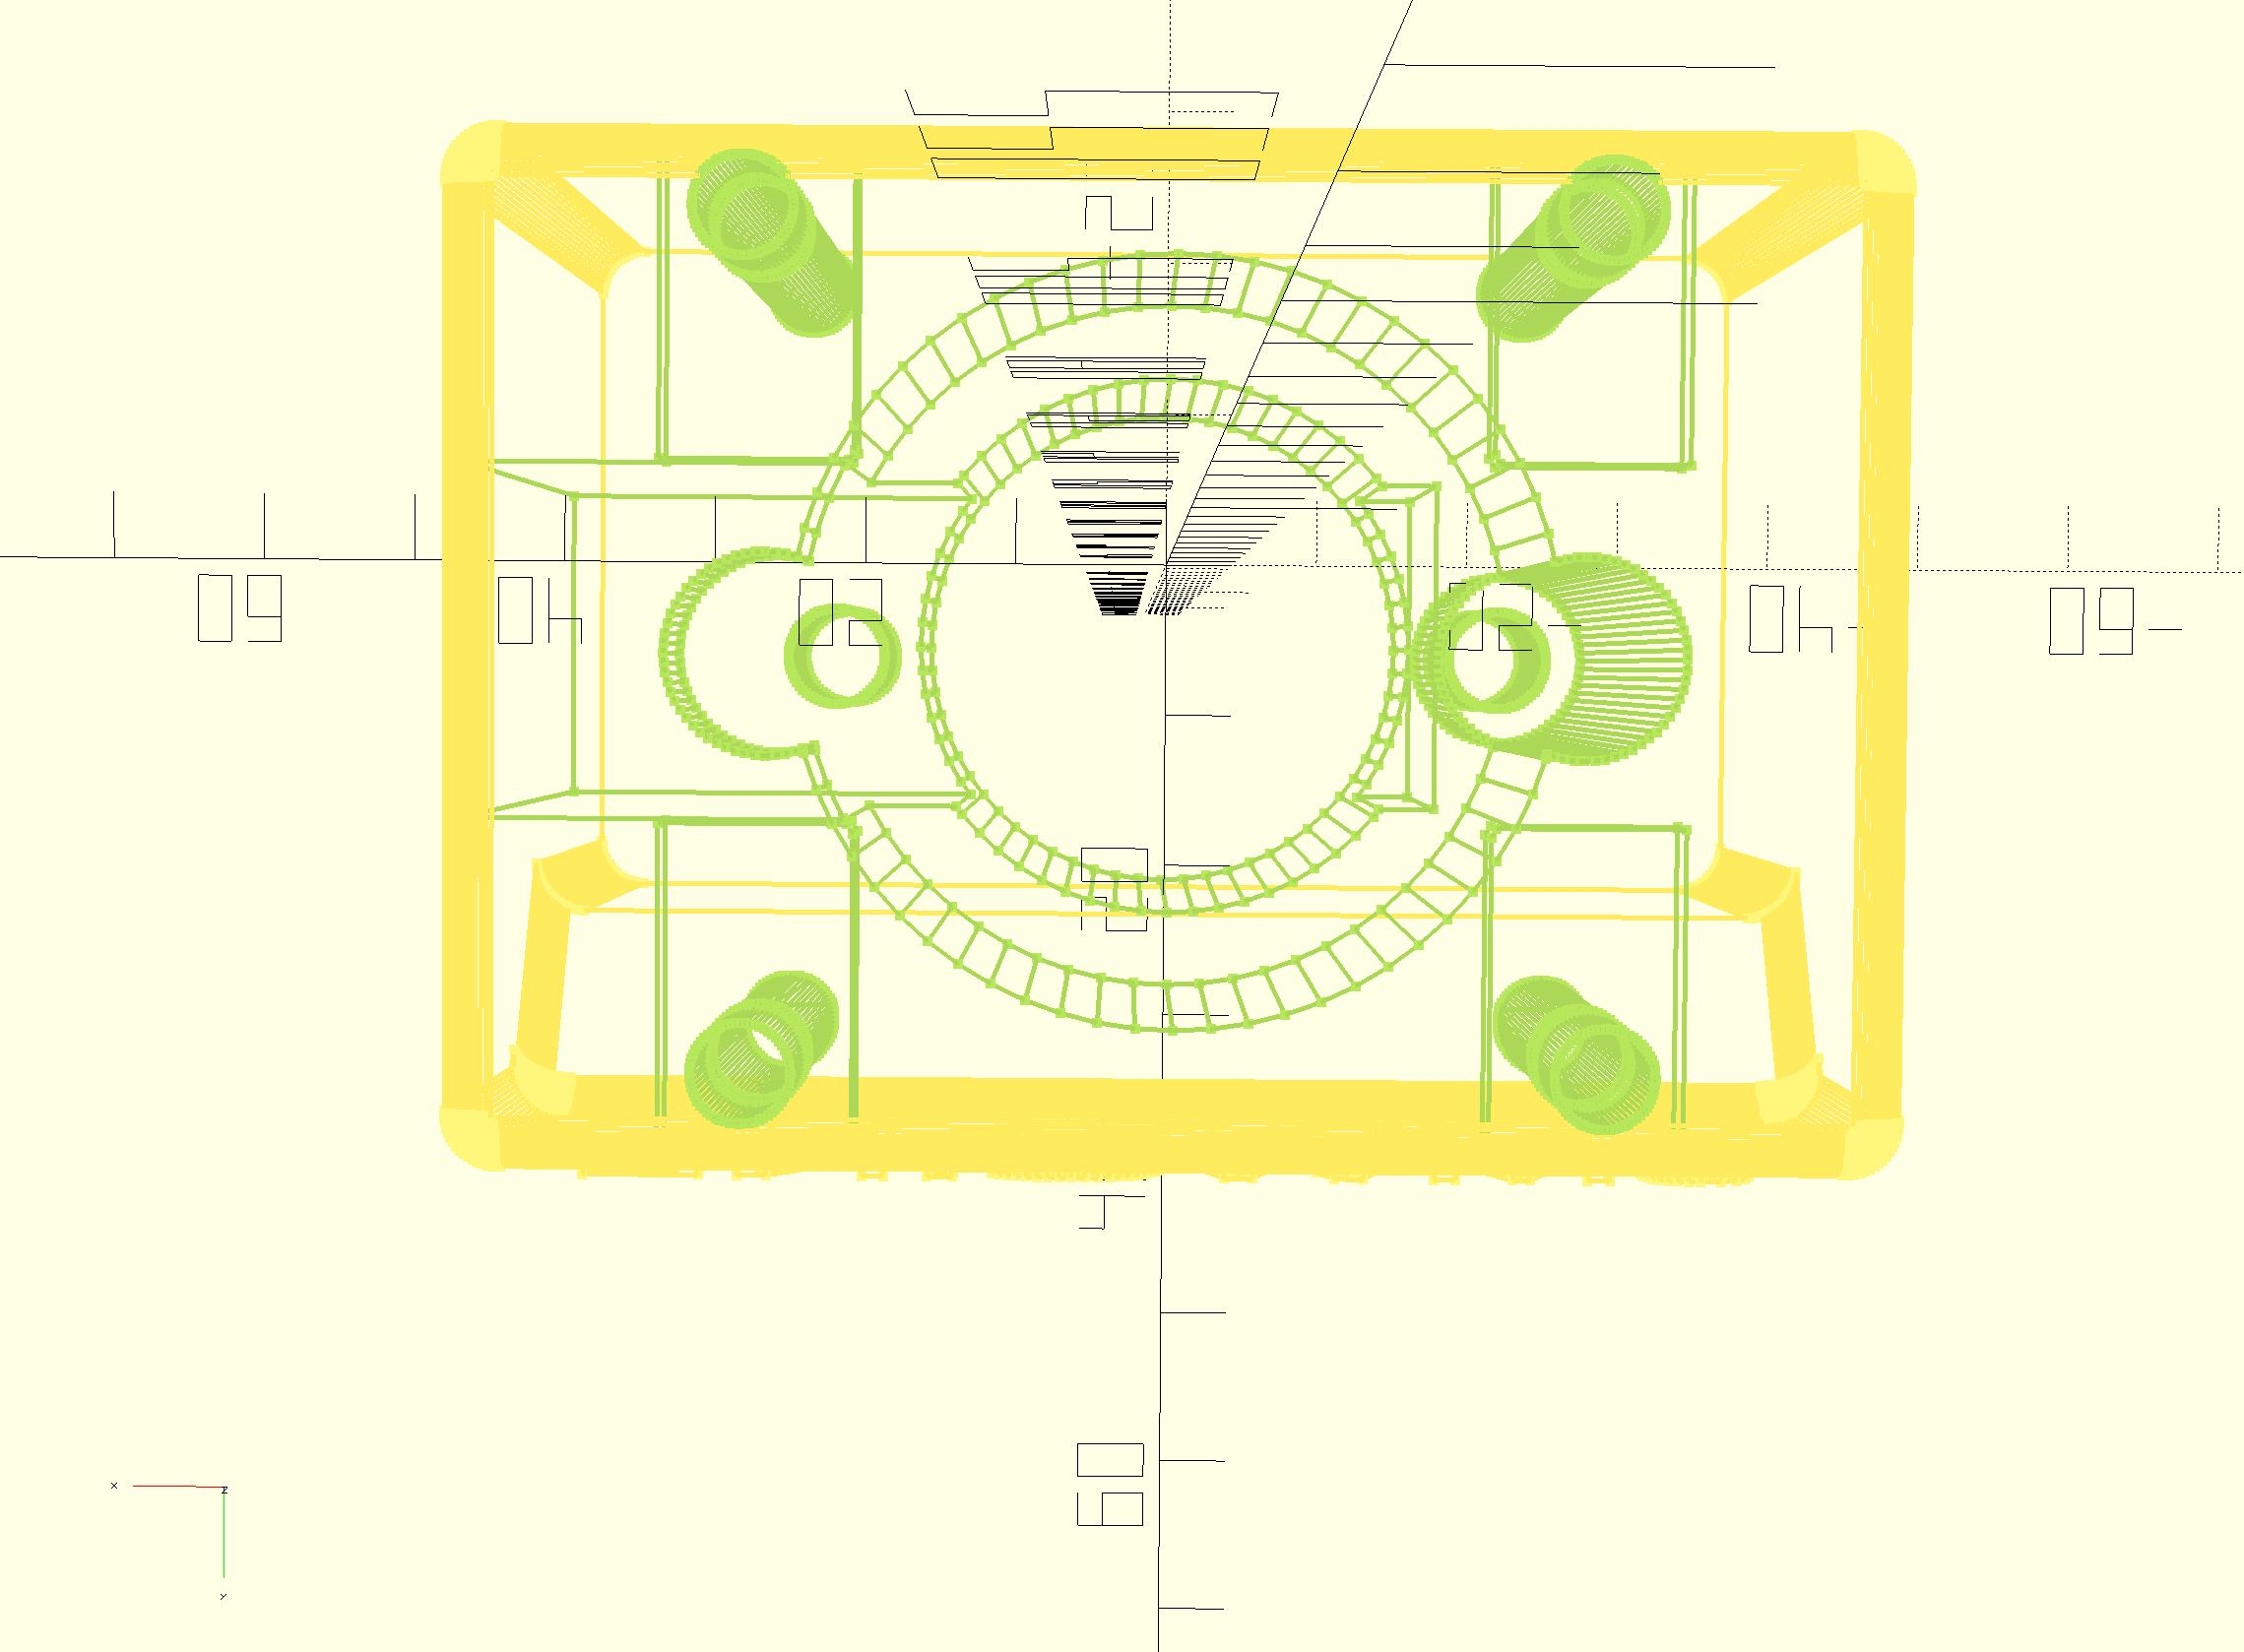
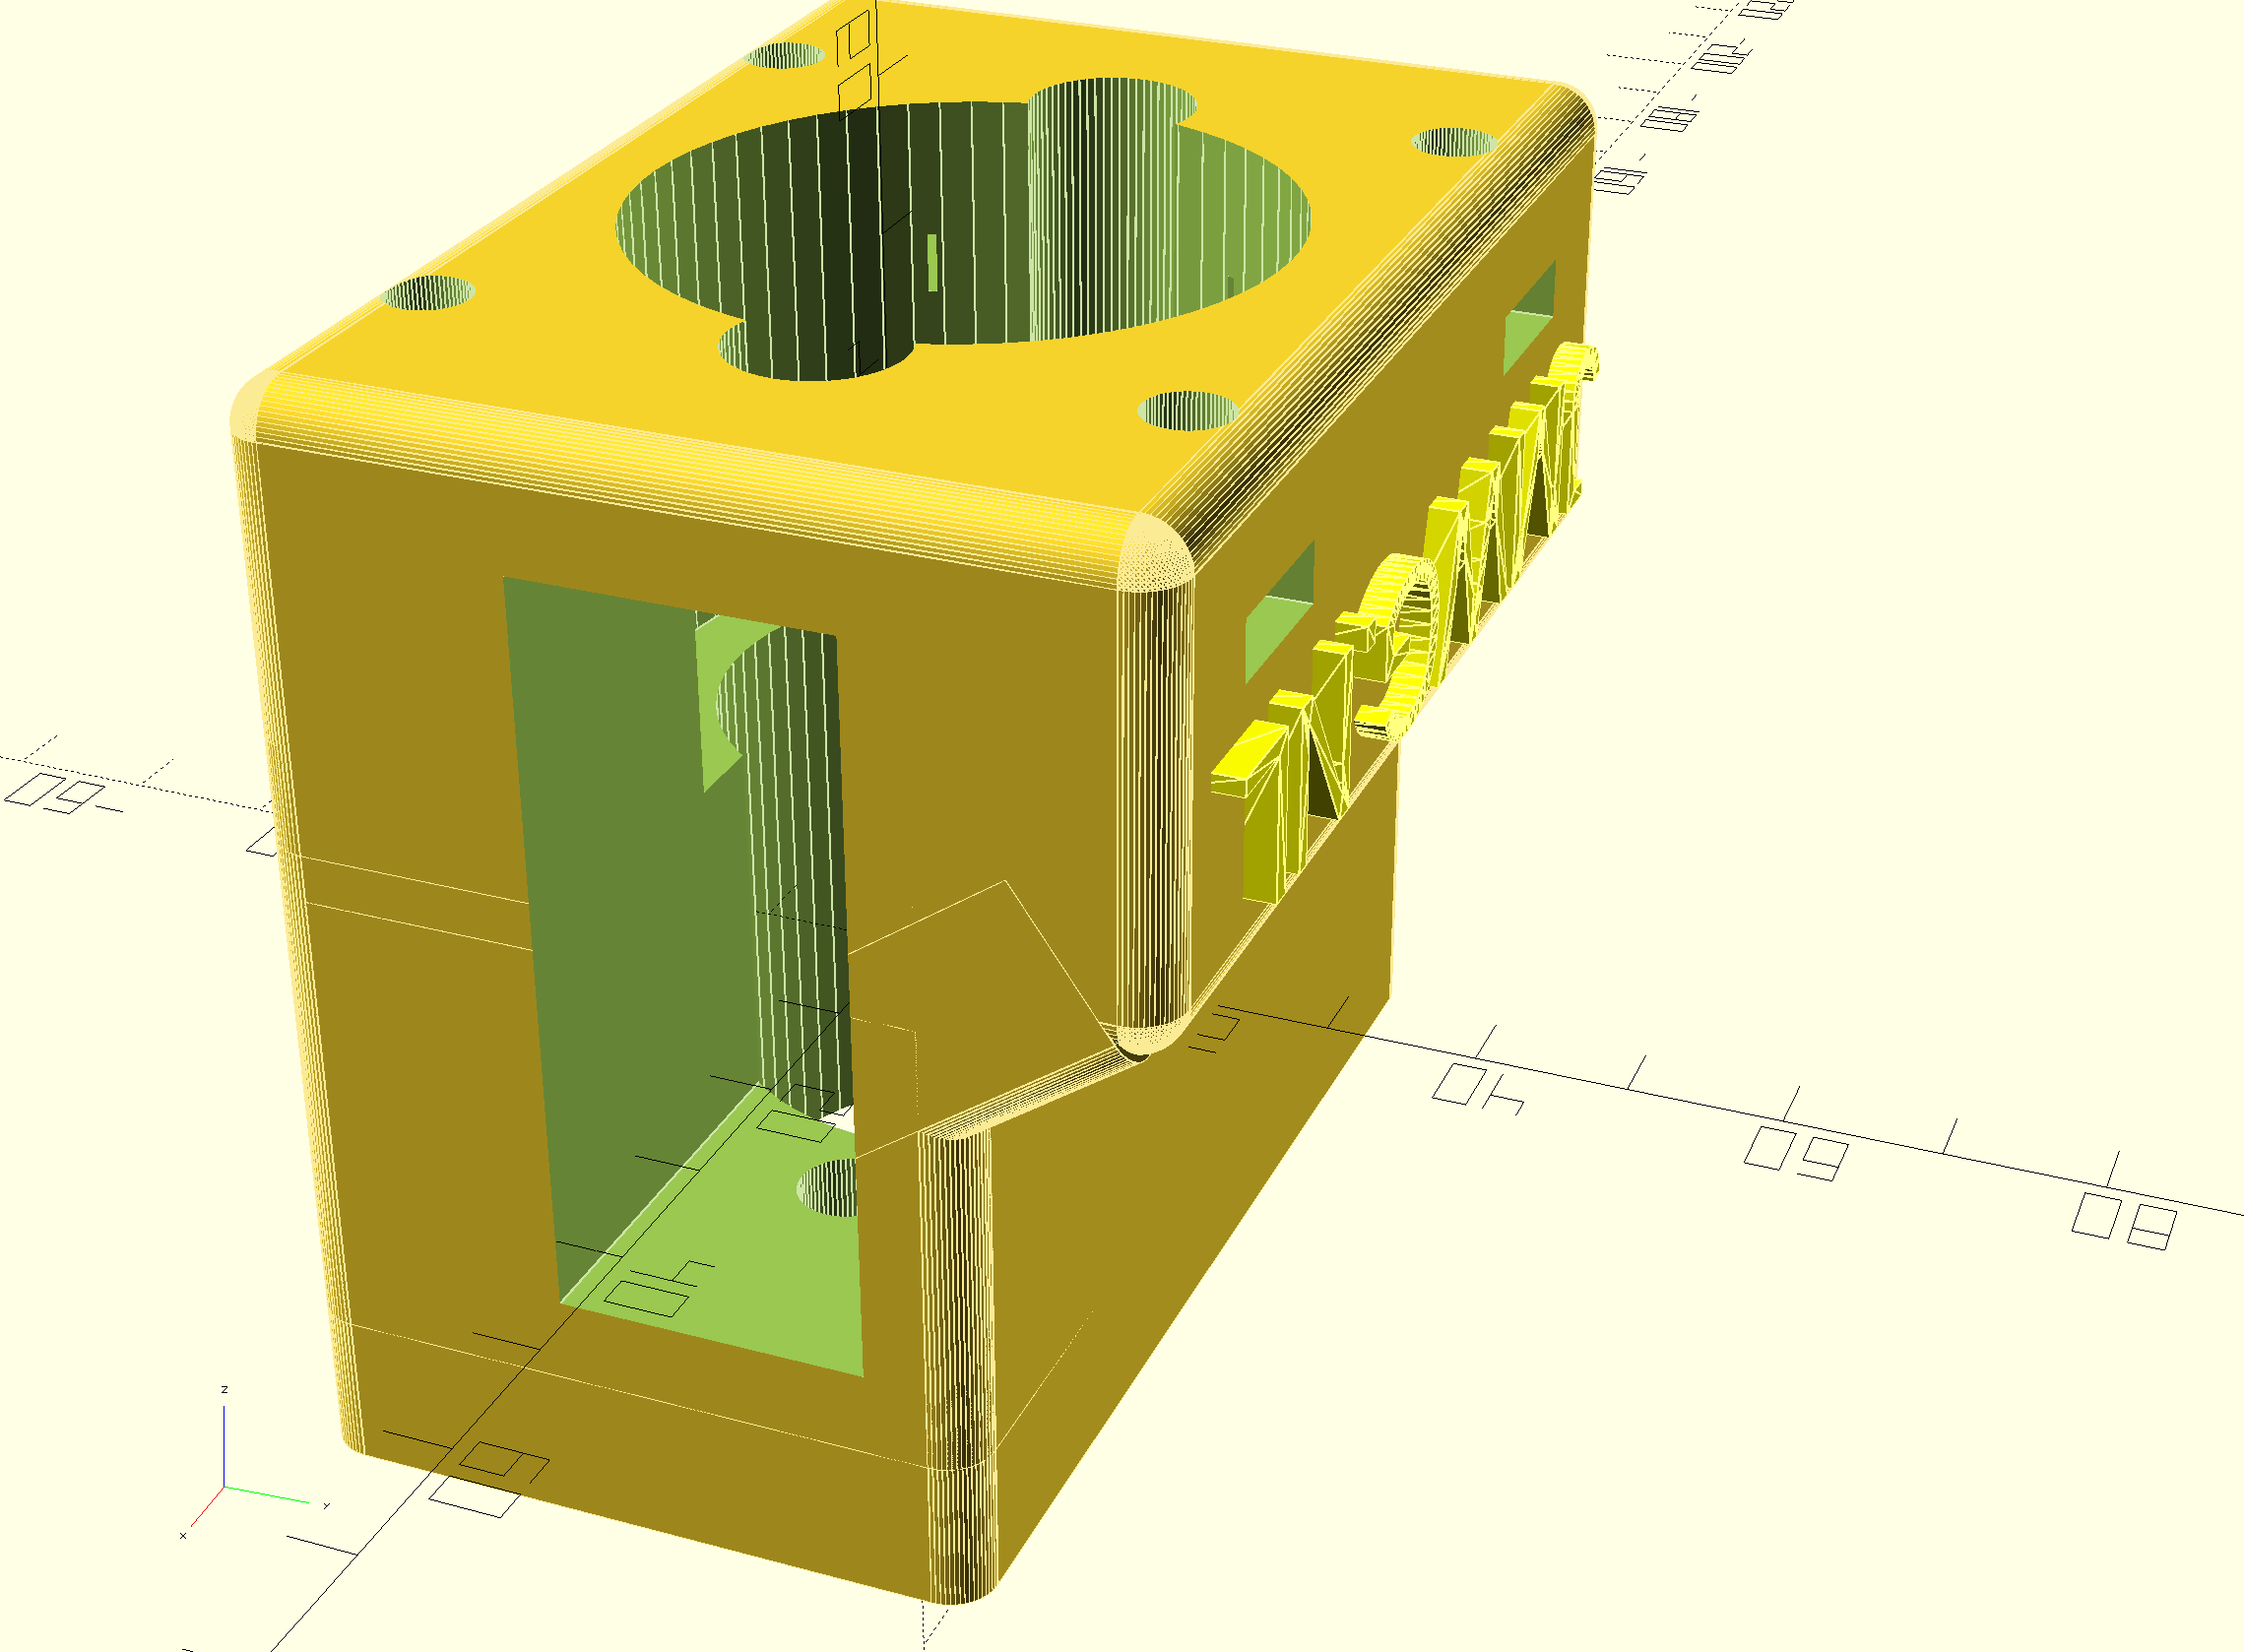
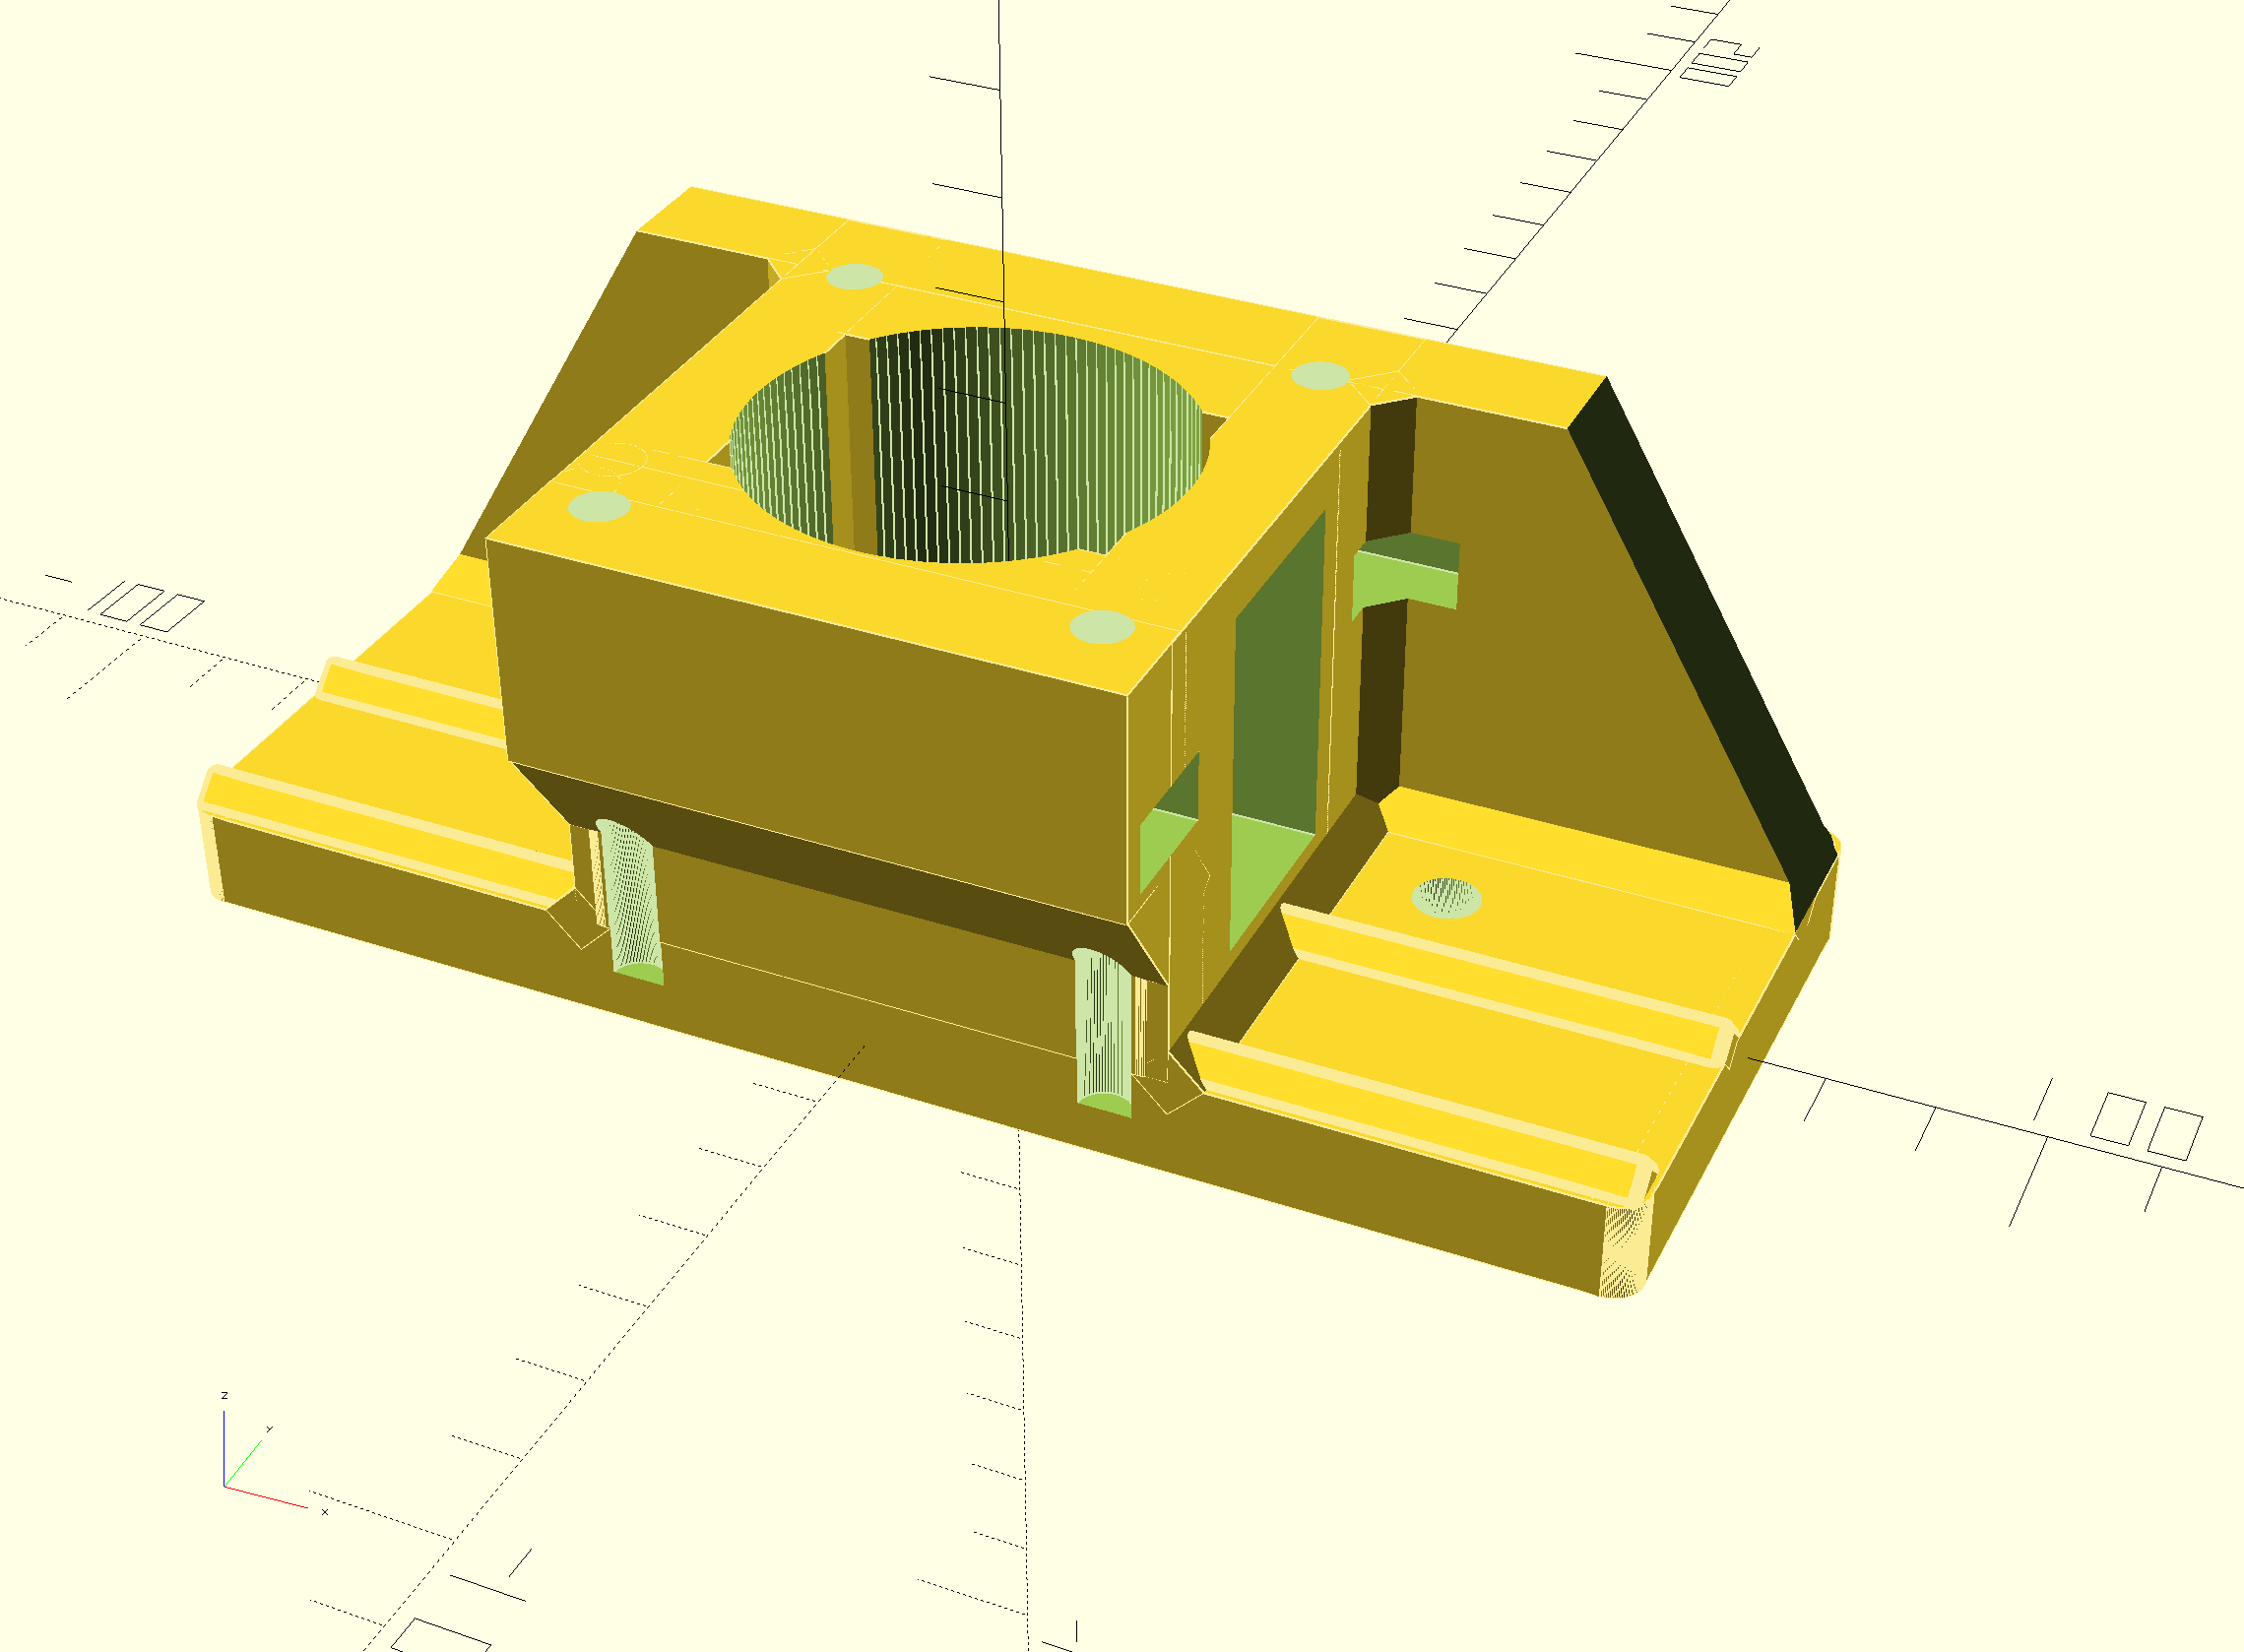
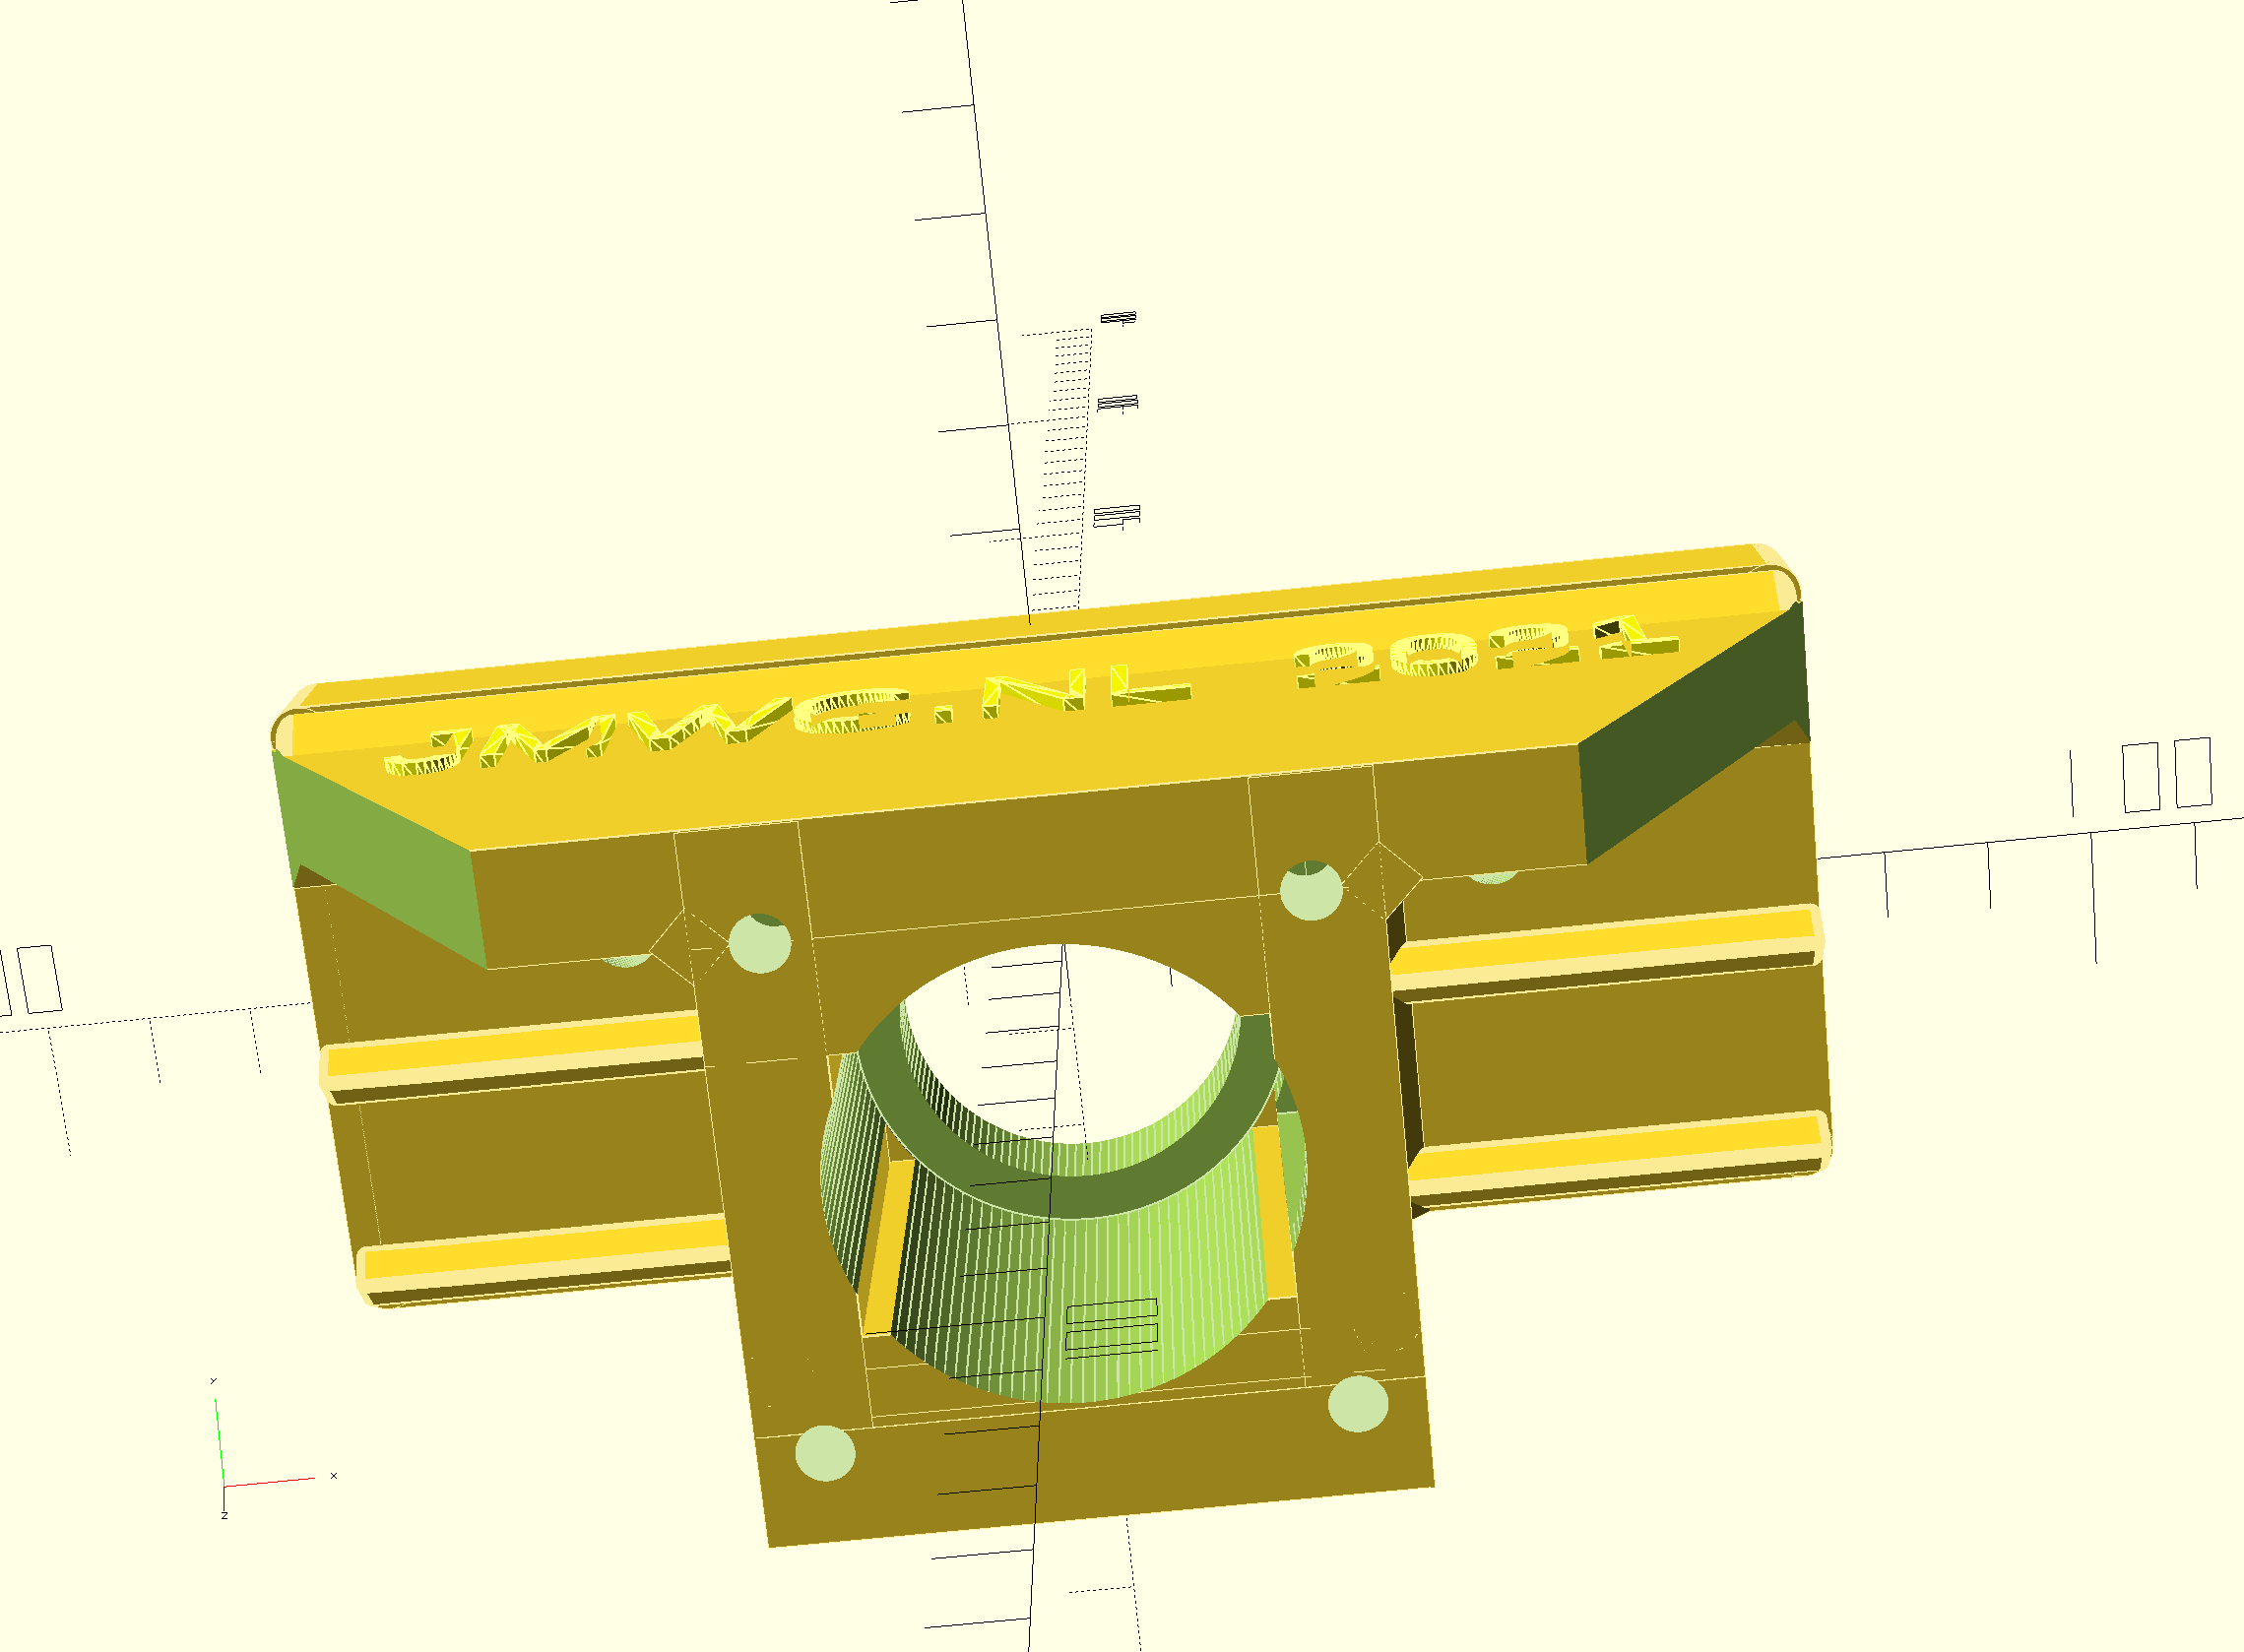
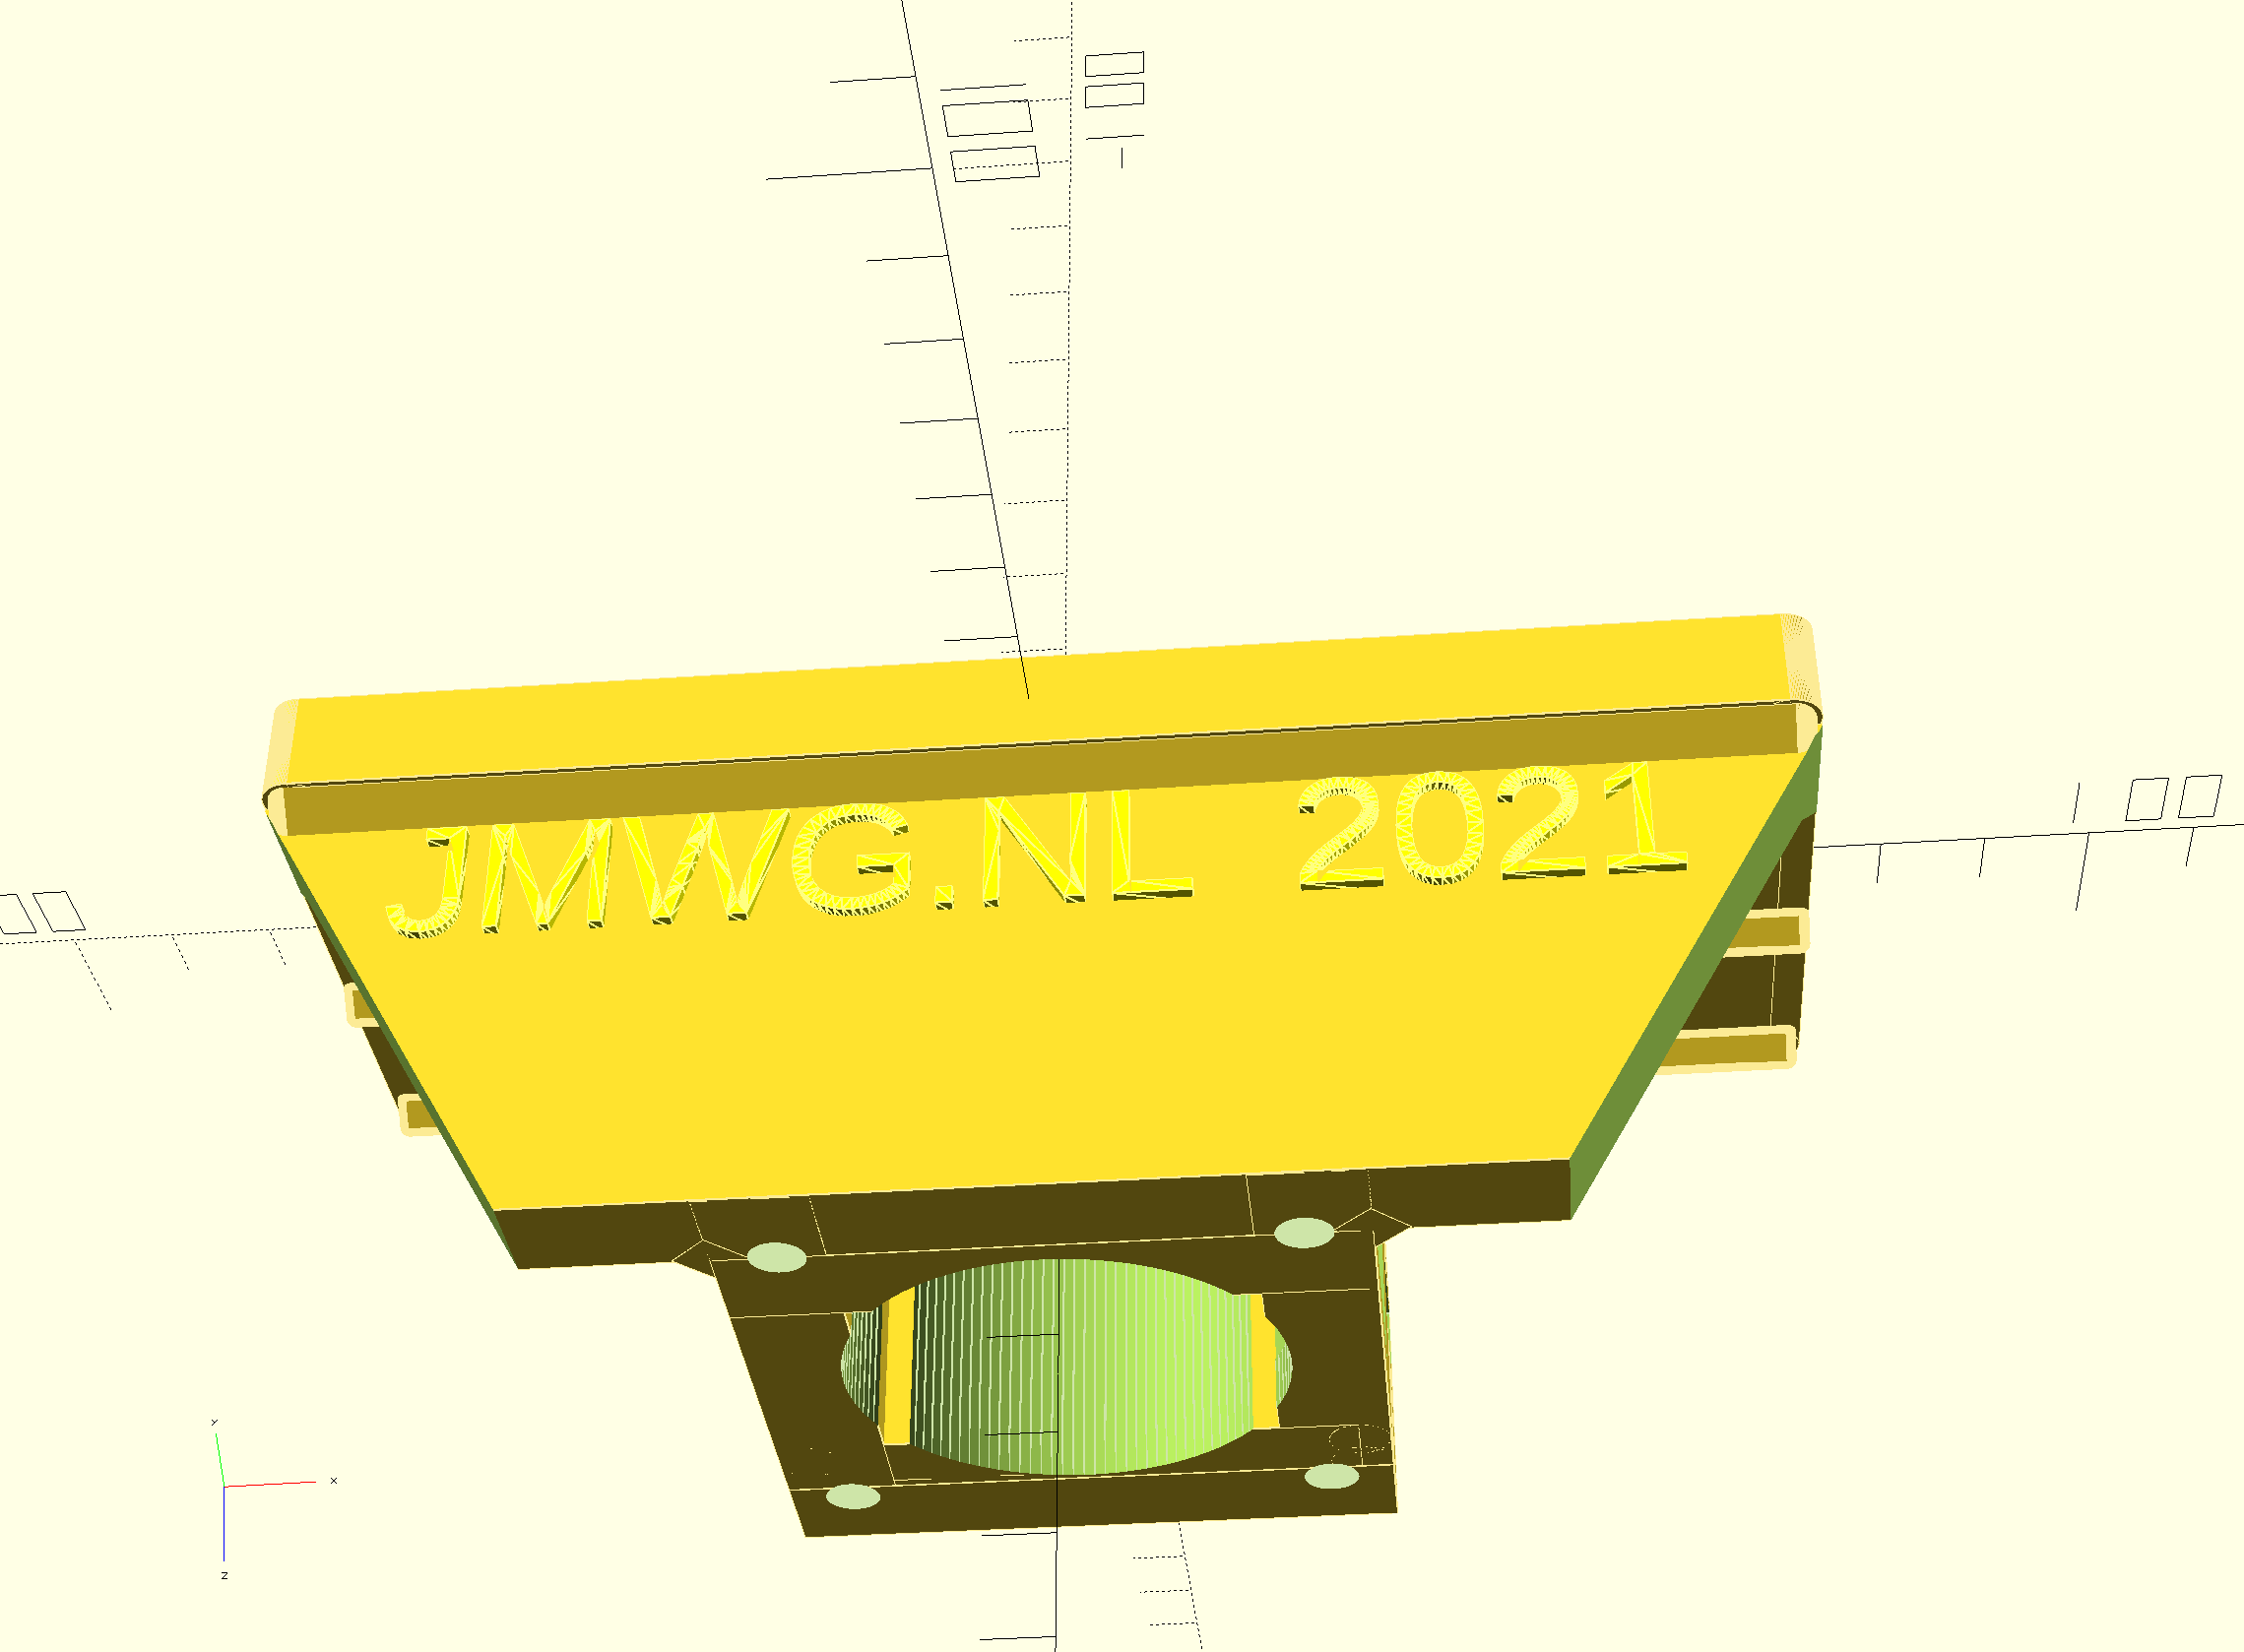
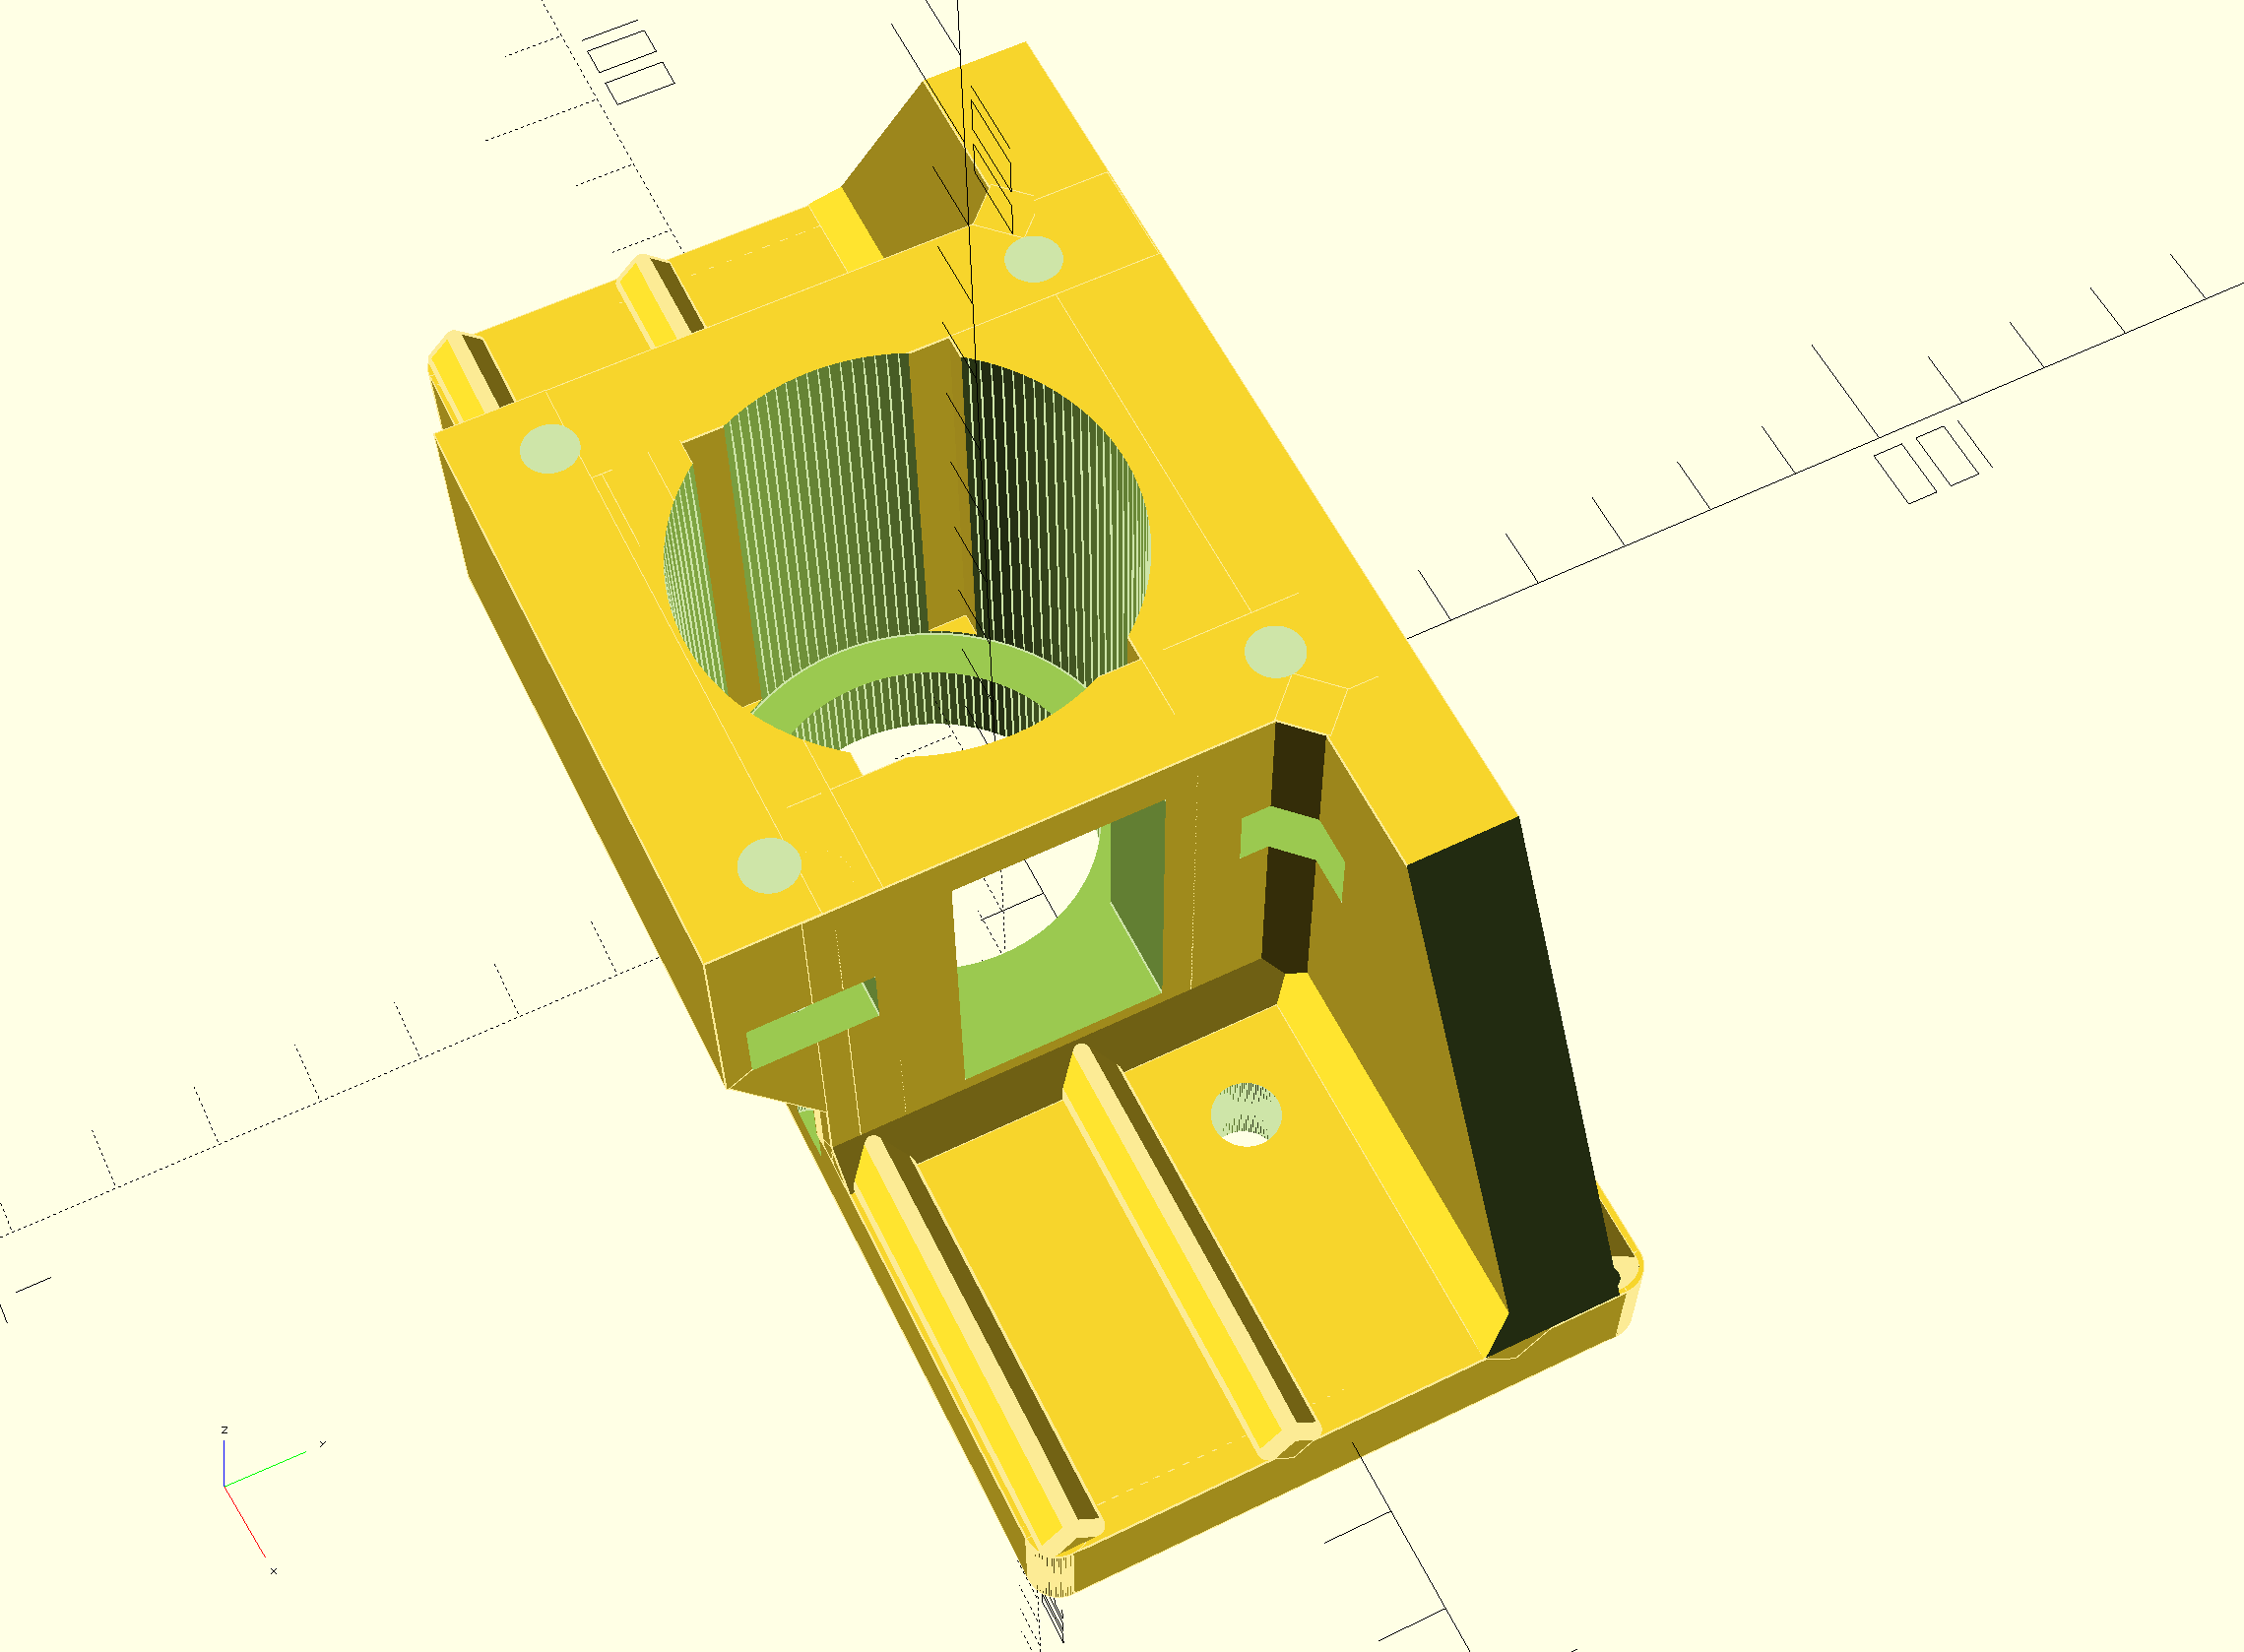
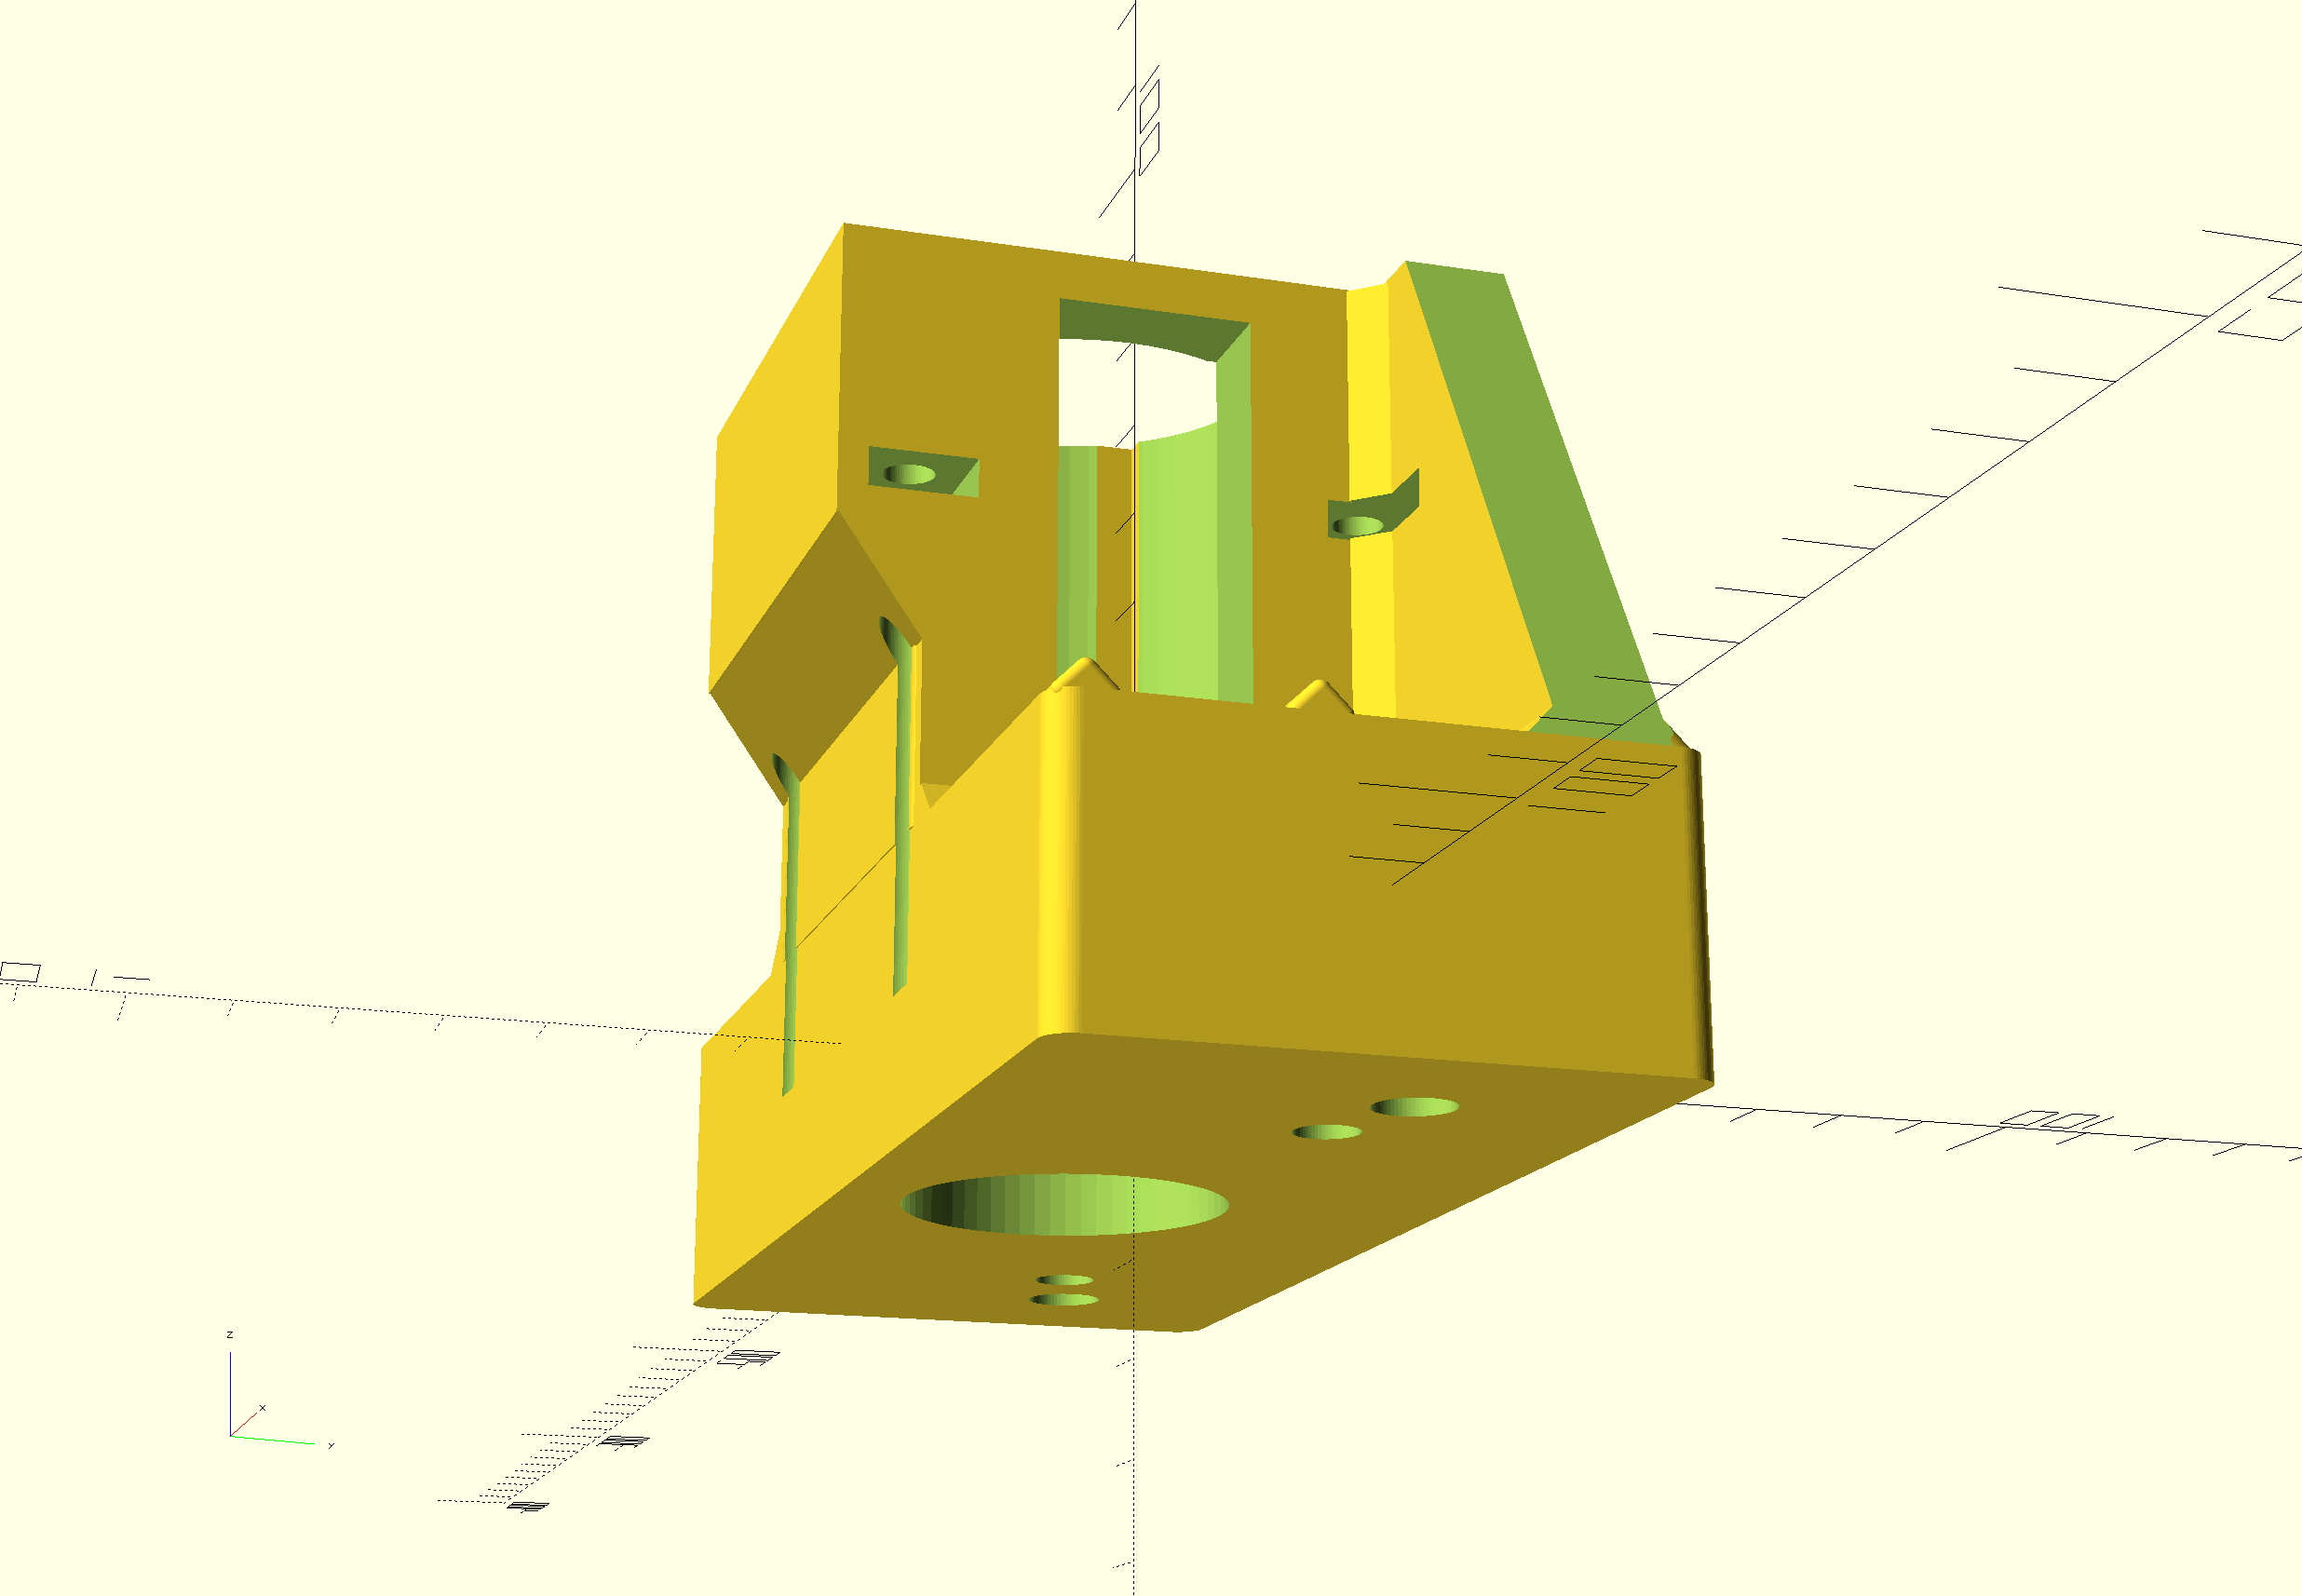
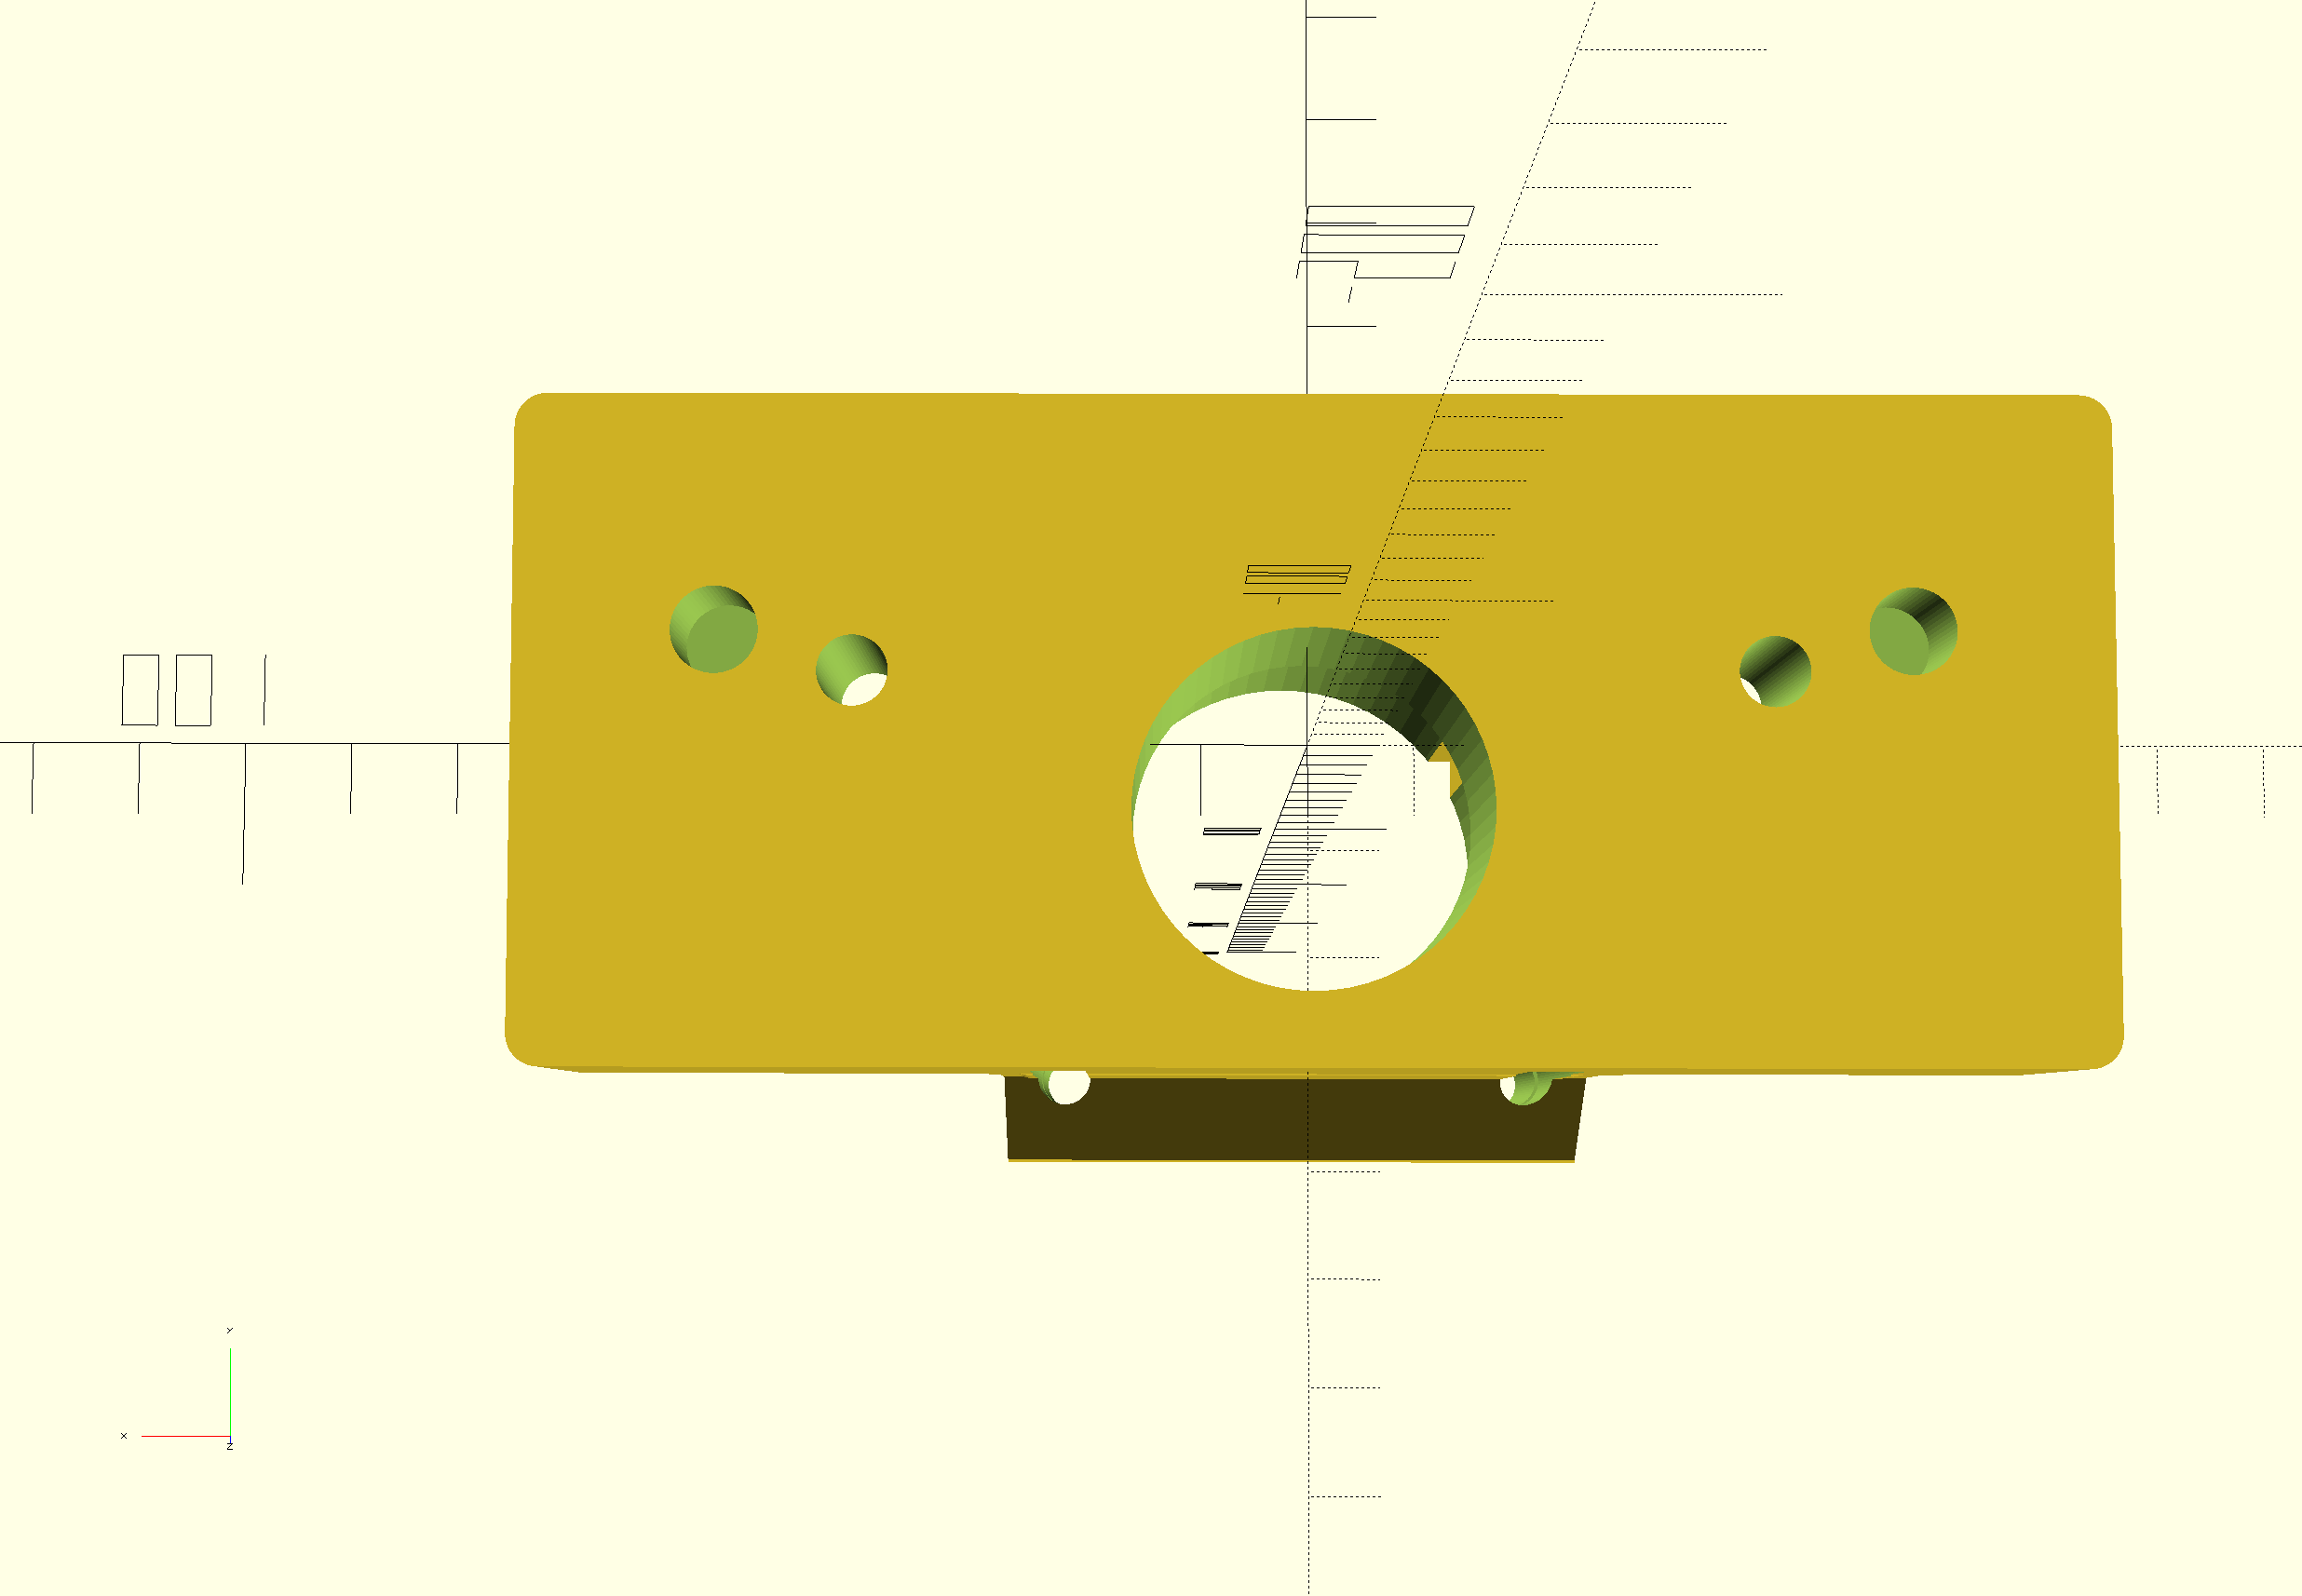
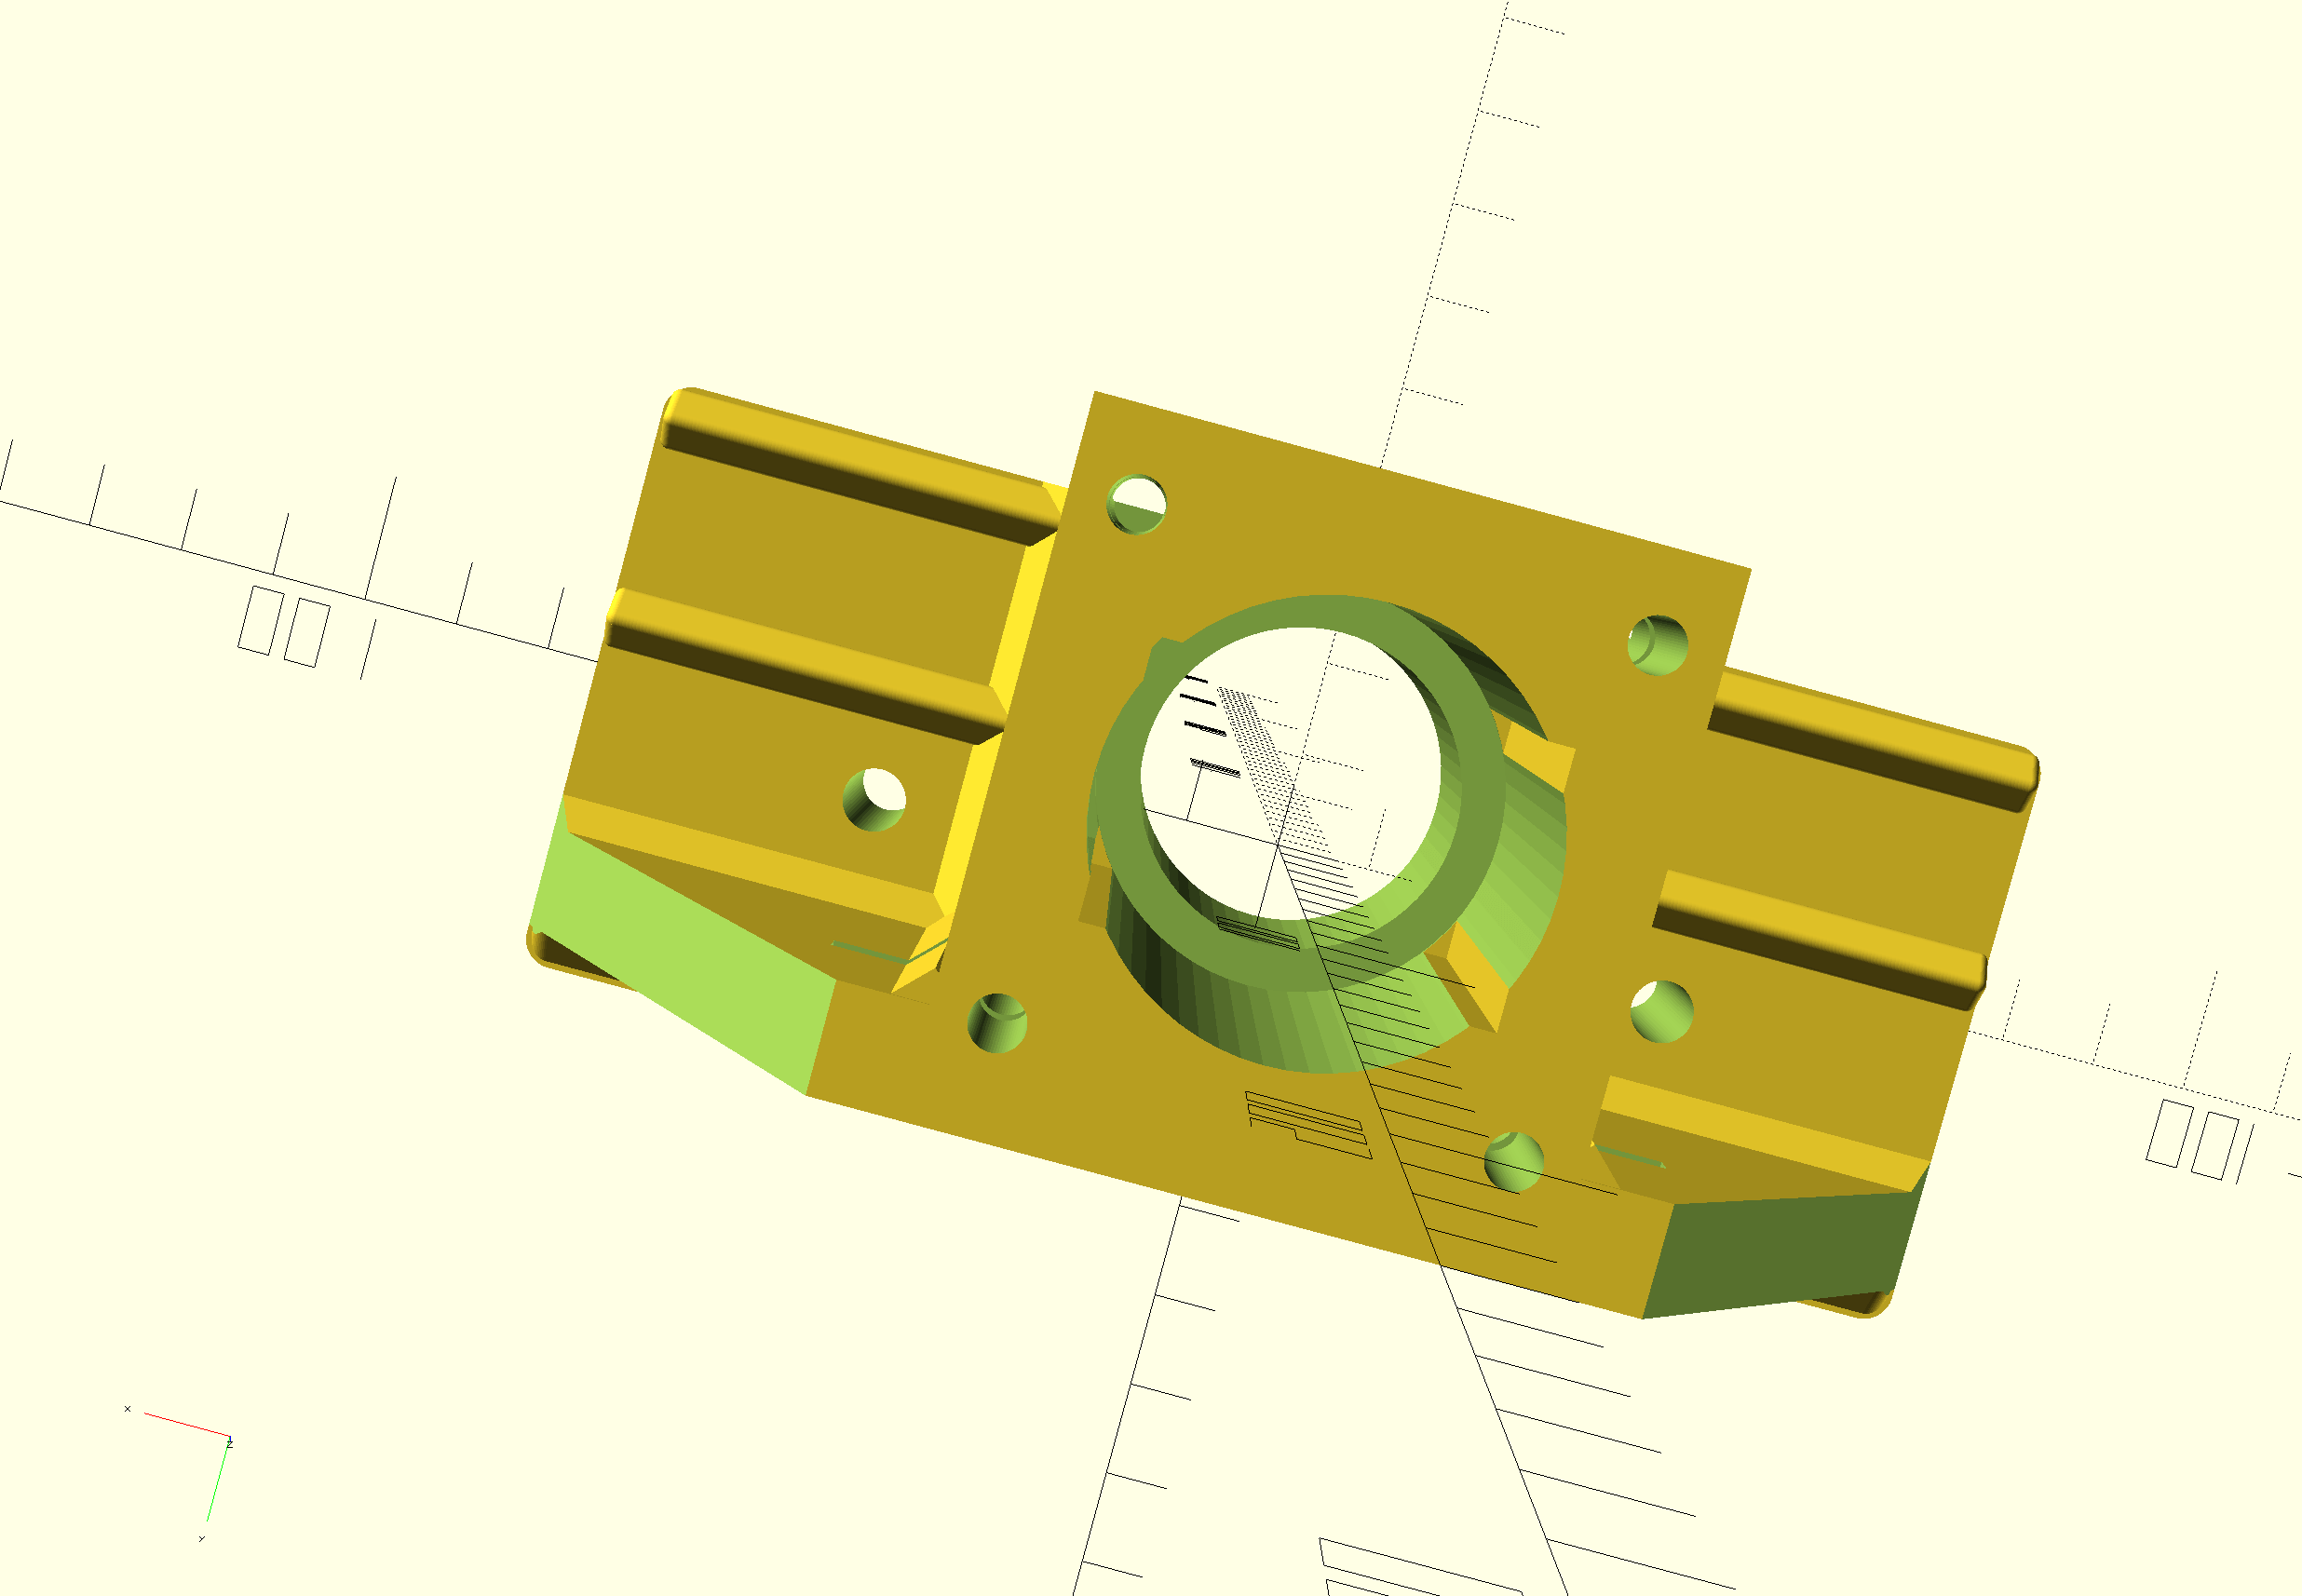
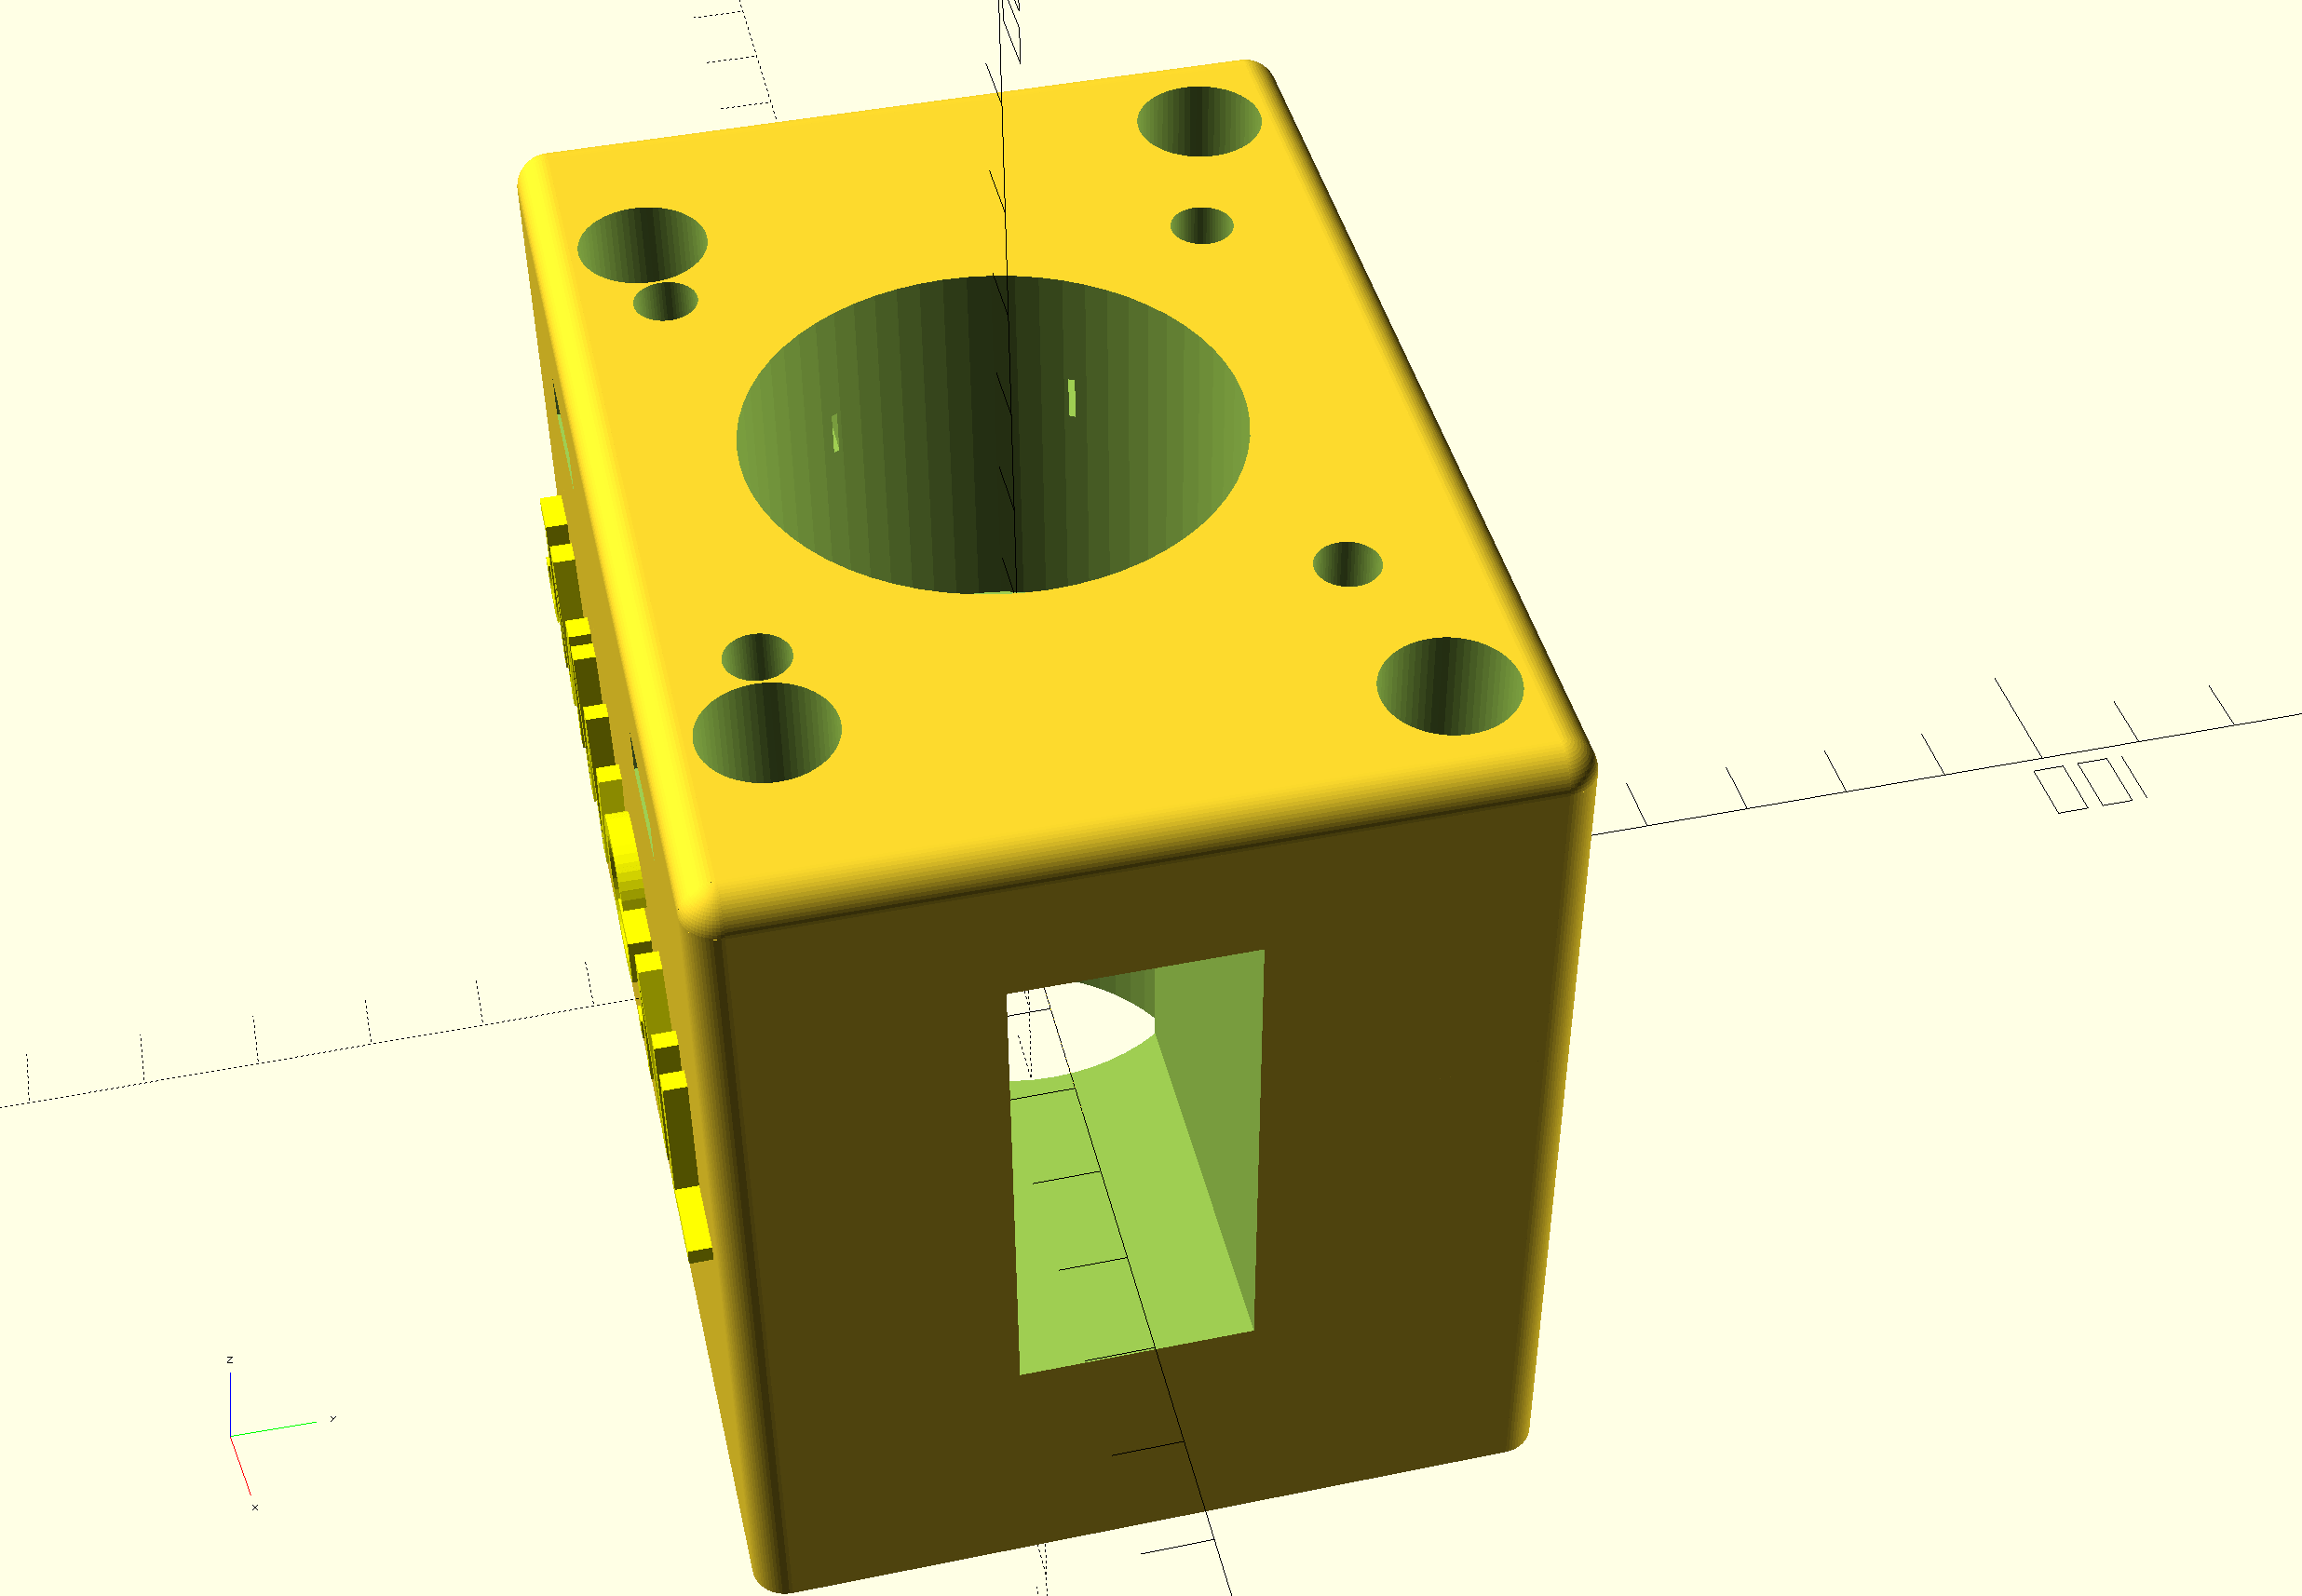
Het ontwerp voor de Y-as montageplaat voor de Nema23 stepper is hieronder te zien en kan 3dprinted worden of, zoals ik ga doen nadat het geprinte deel goed blijkt te passen, CNC in aluminium op mijn CNC Indymill router.
De Y-as adapter bleek het moeilijkste ontwerp te zijn. Het kostte me 15 proefprints voordat ik alles volledig geoptimaliseerd had. En ik wilde ook een debree scherm hebben met een verwijderbaar deksel, wat wat energie kostte om dit te testen. Ook moet de riem een schone route hebben waar hij tussen het wiel zit.
De fysieke gegevens voor deze opstelling:
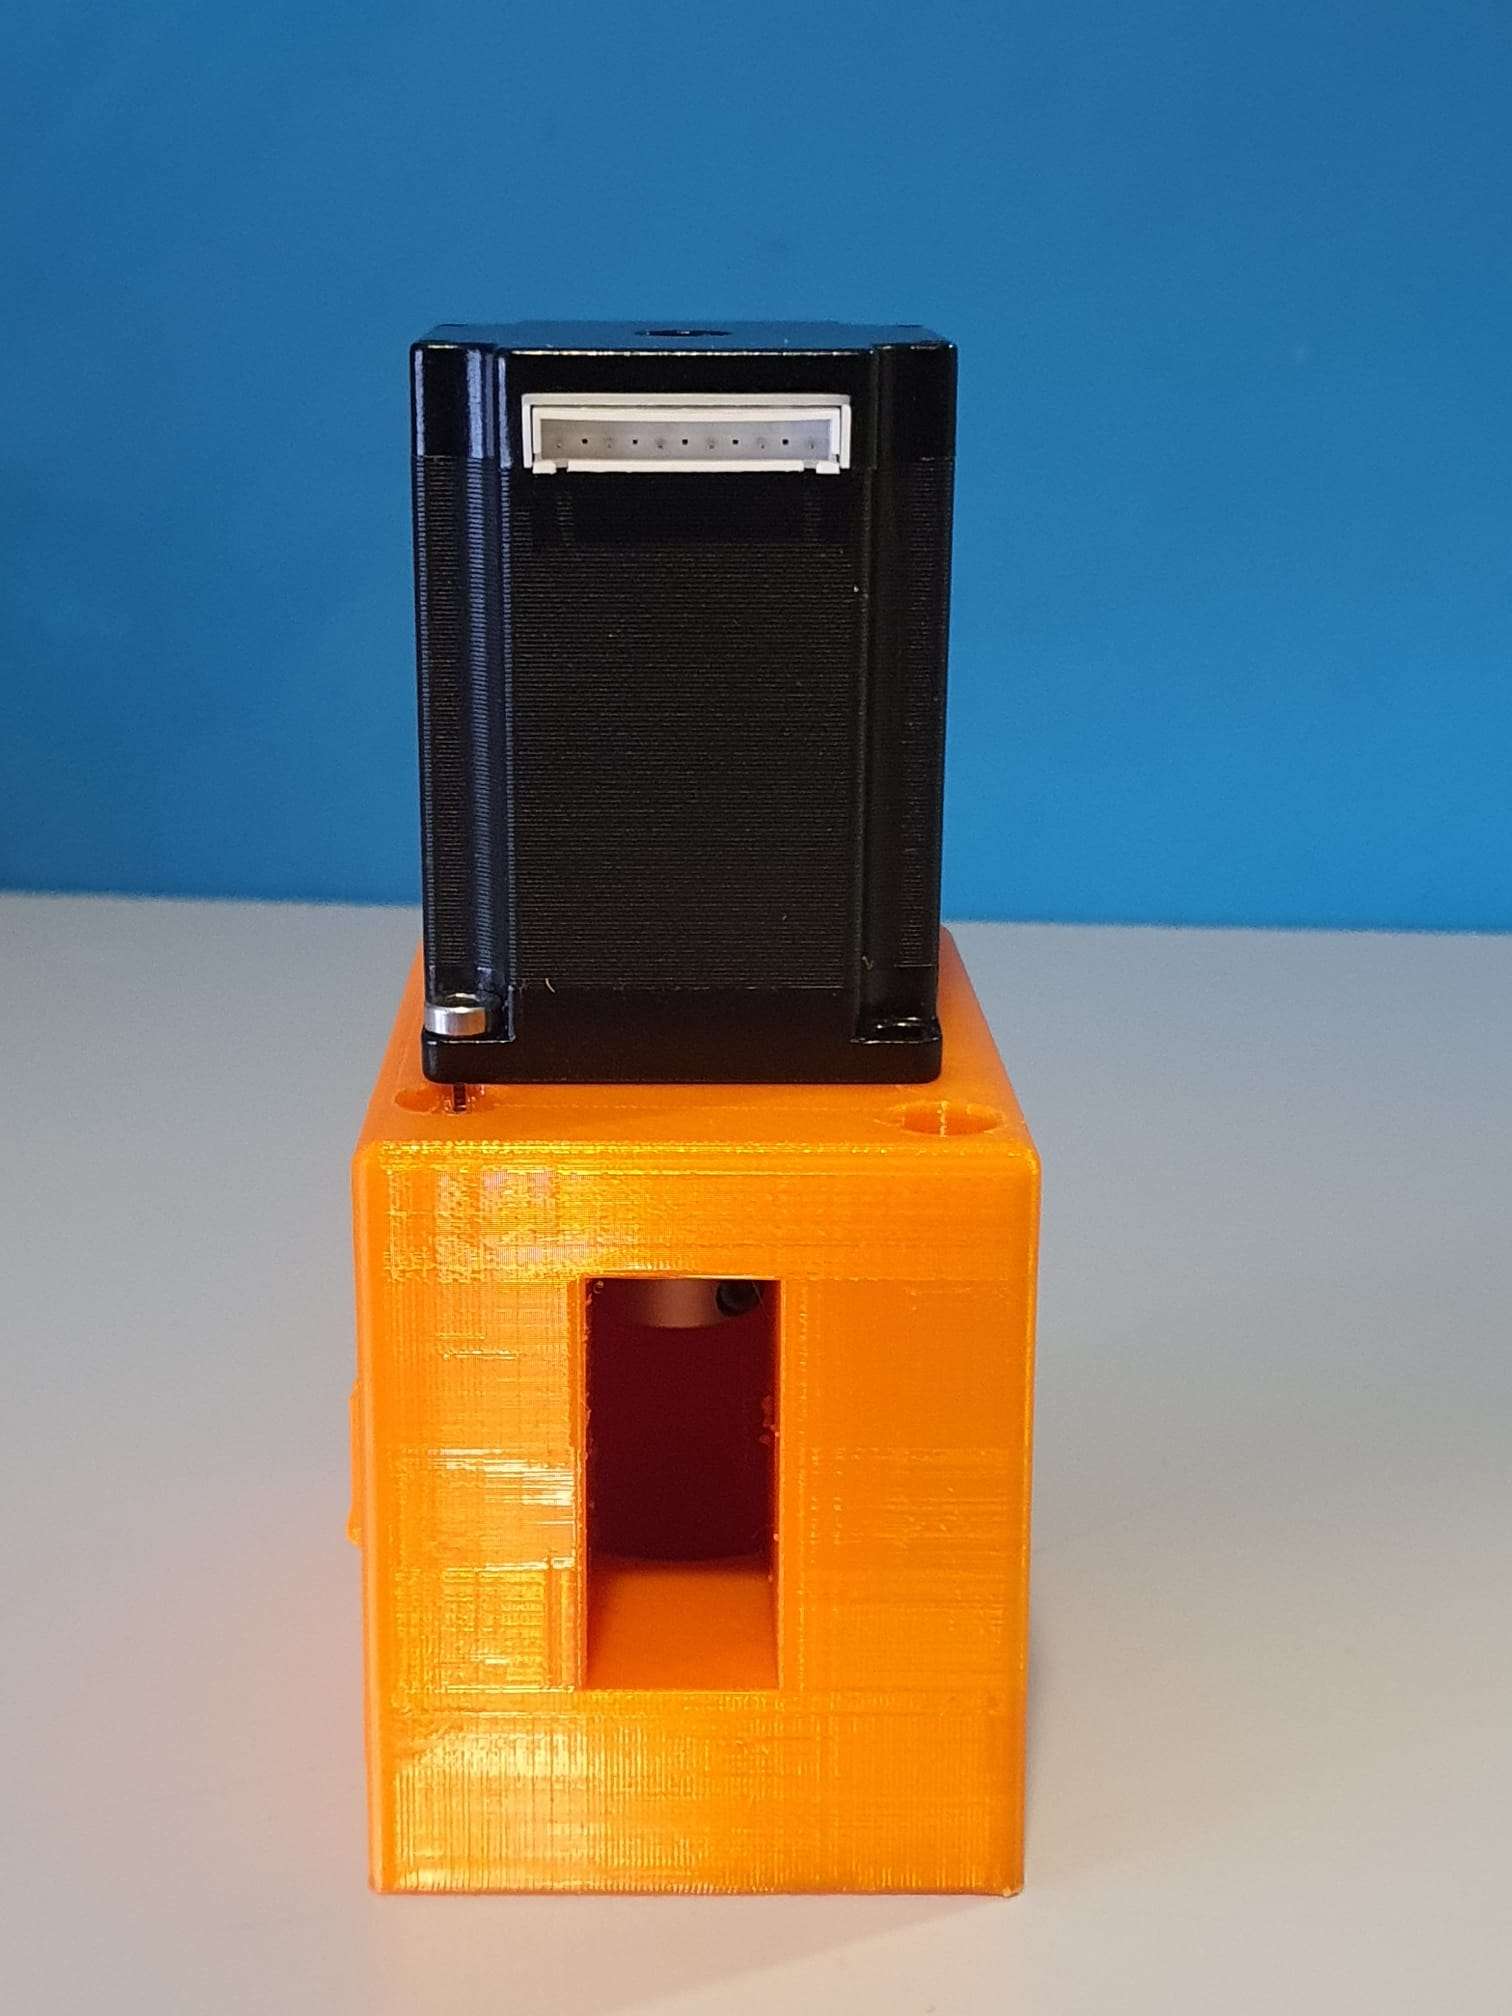
Nema23 stappenmotor
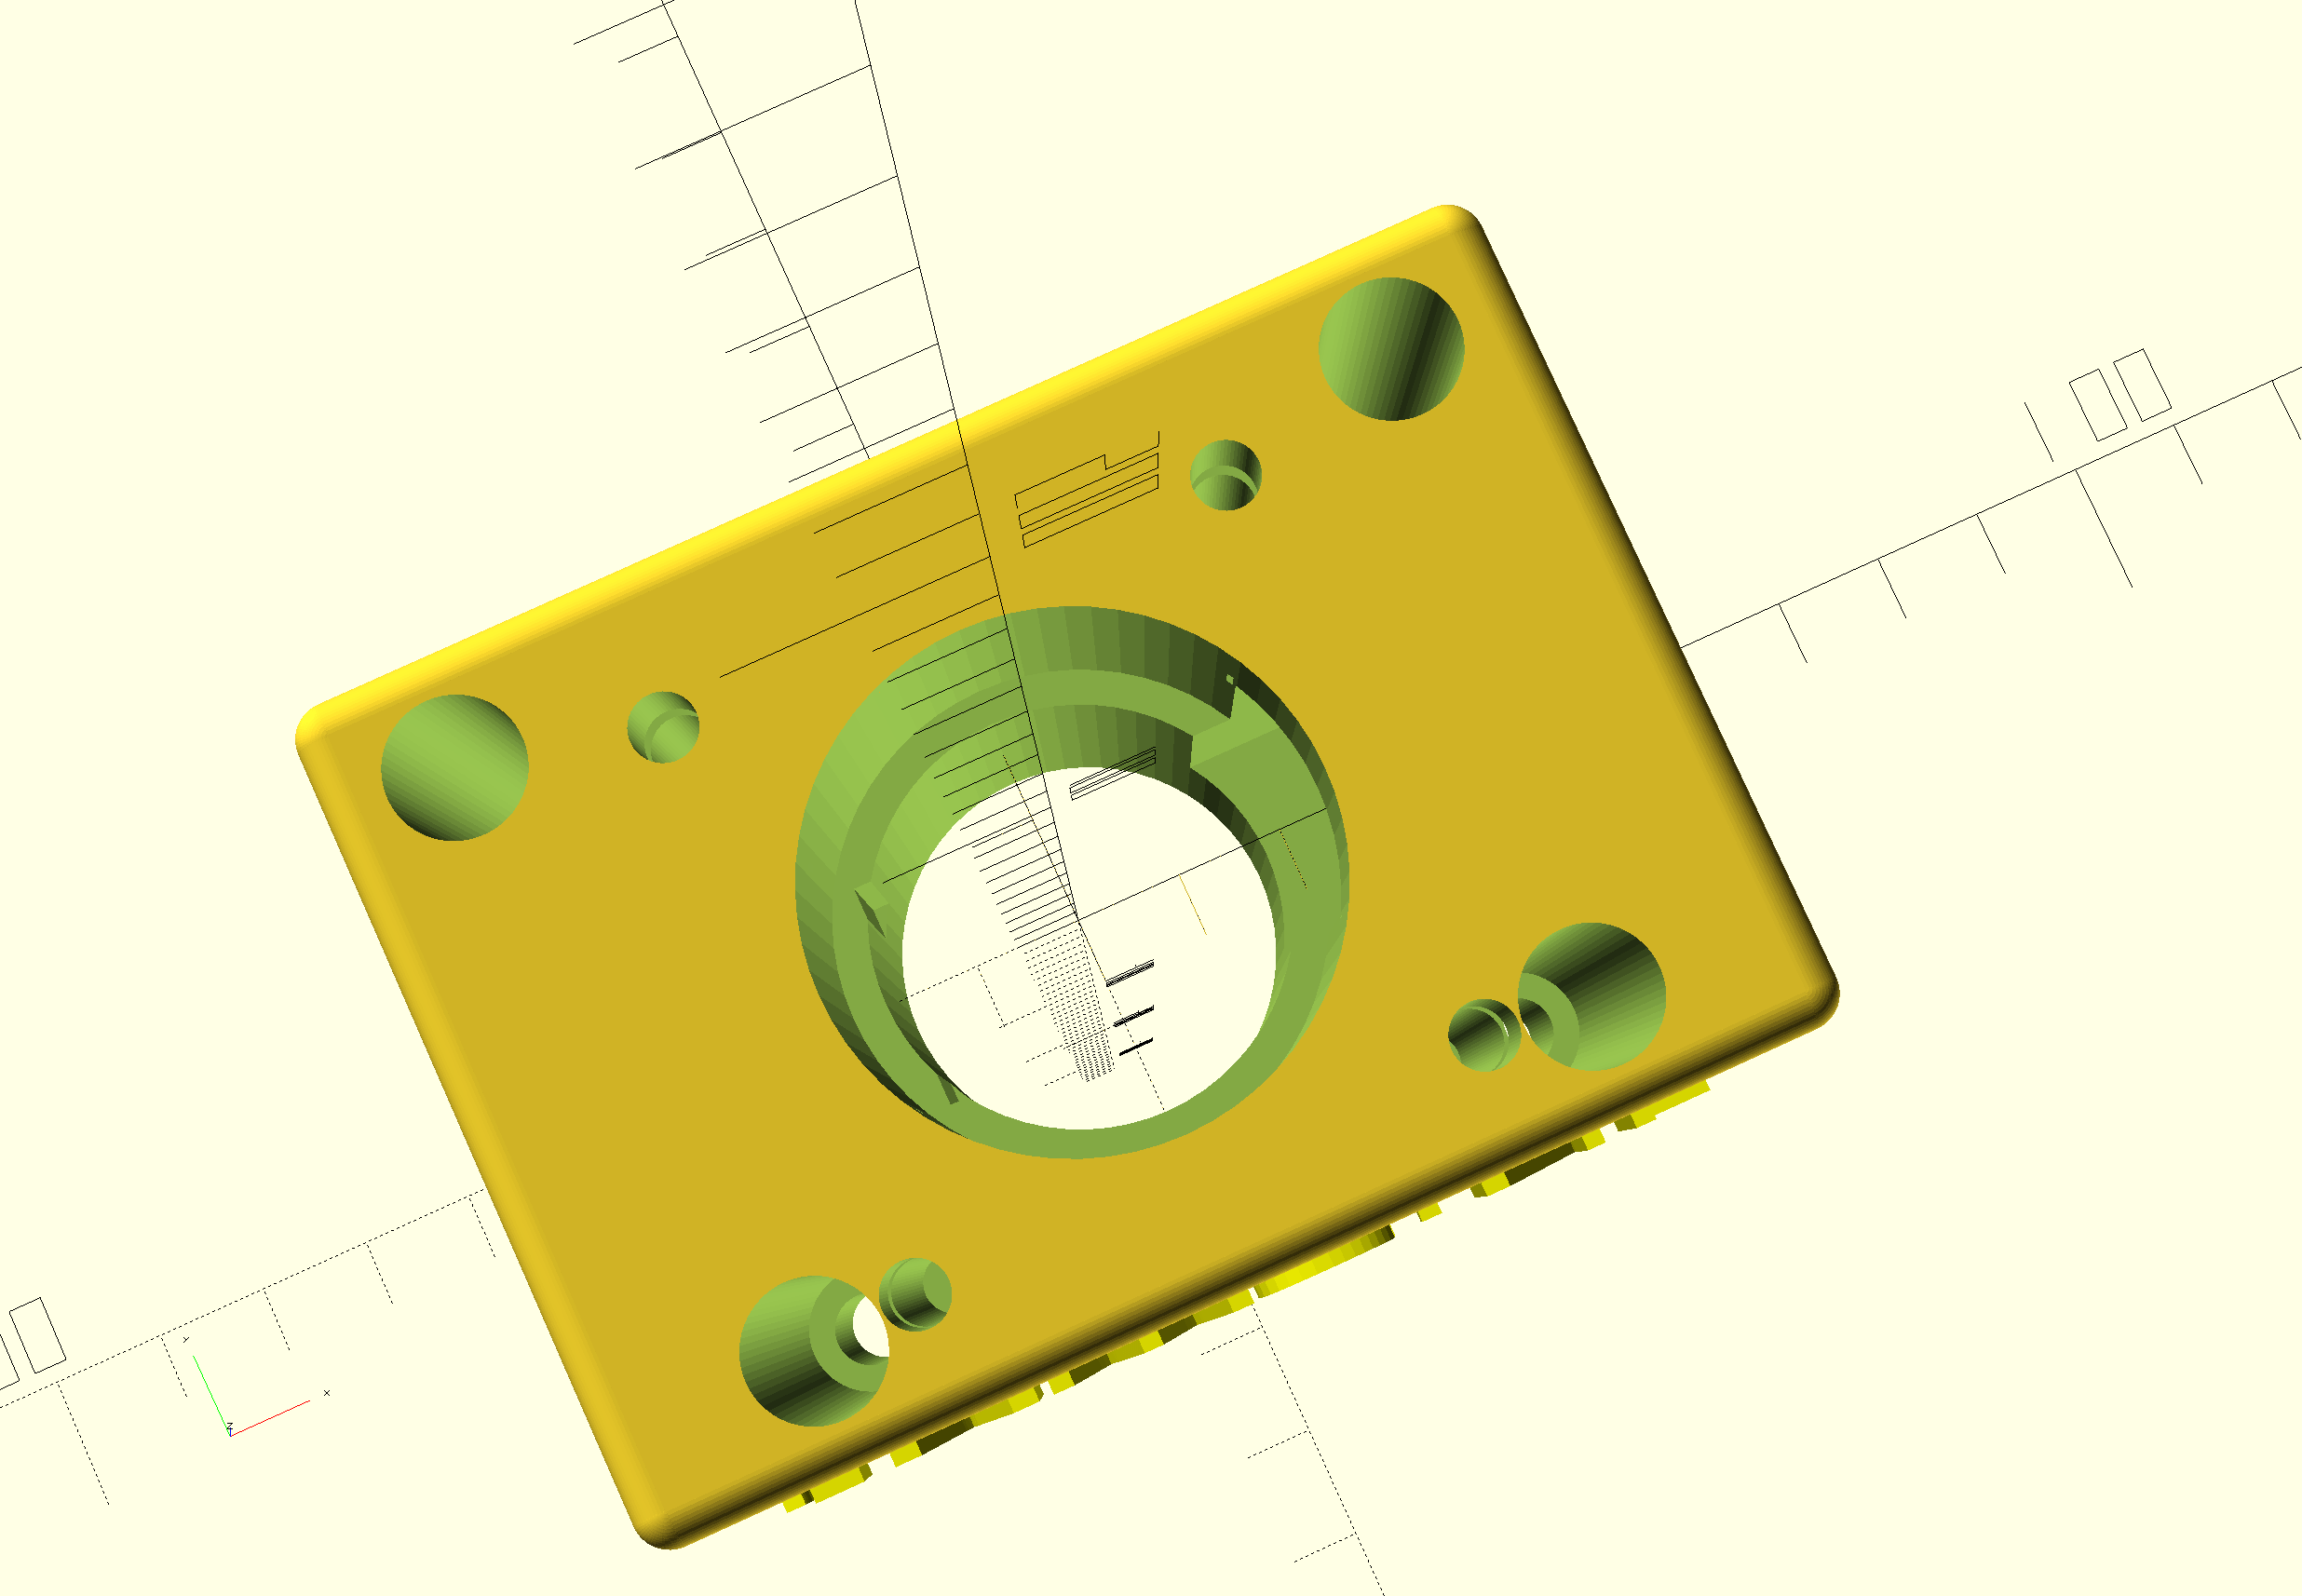
3D geprinte onderdelen:
a: Baseplate inclusief stijgprofielen voor de motorbevestiging en afscherming;
b: deksel
Tandwiel voor de Nema23 8mm as: 10mm breed, 24 tanden M3 met borst
Tandwiel voor de loodspil 10mm as: 10mm breed: 48 tanden M3 met borst, gefreesd op de getande binnenkant 9mm diepte met een breedte van 33 mm diameter om te passen in de borst van de loodspil lagerhouder
De tandriem is 9mm breed, 300 mm lang en heeft 100 tanden (M3)
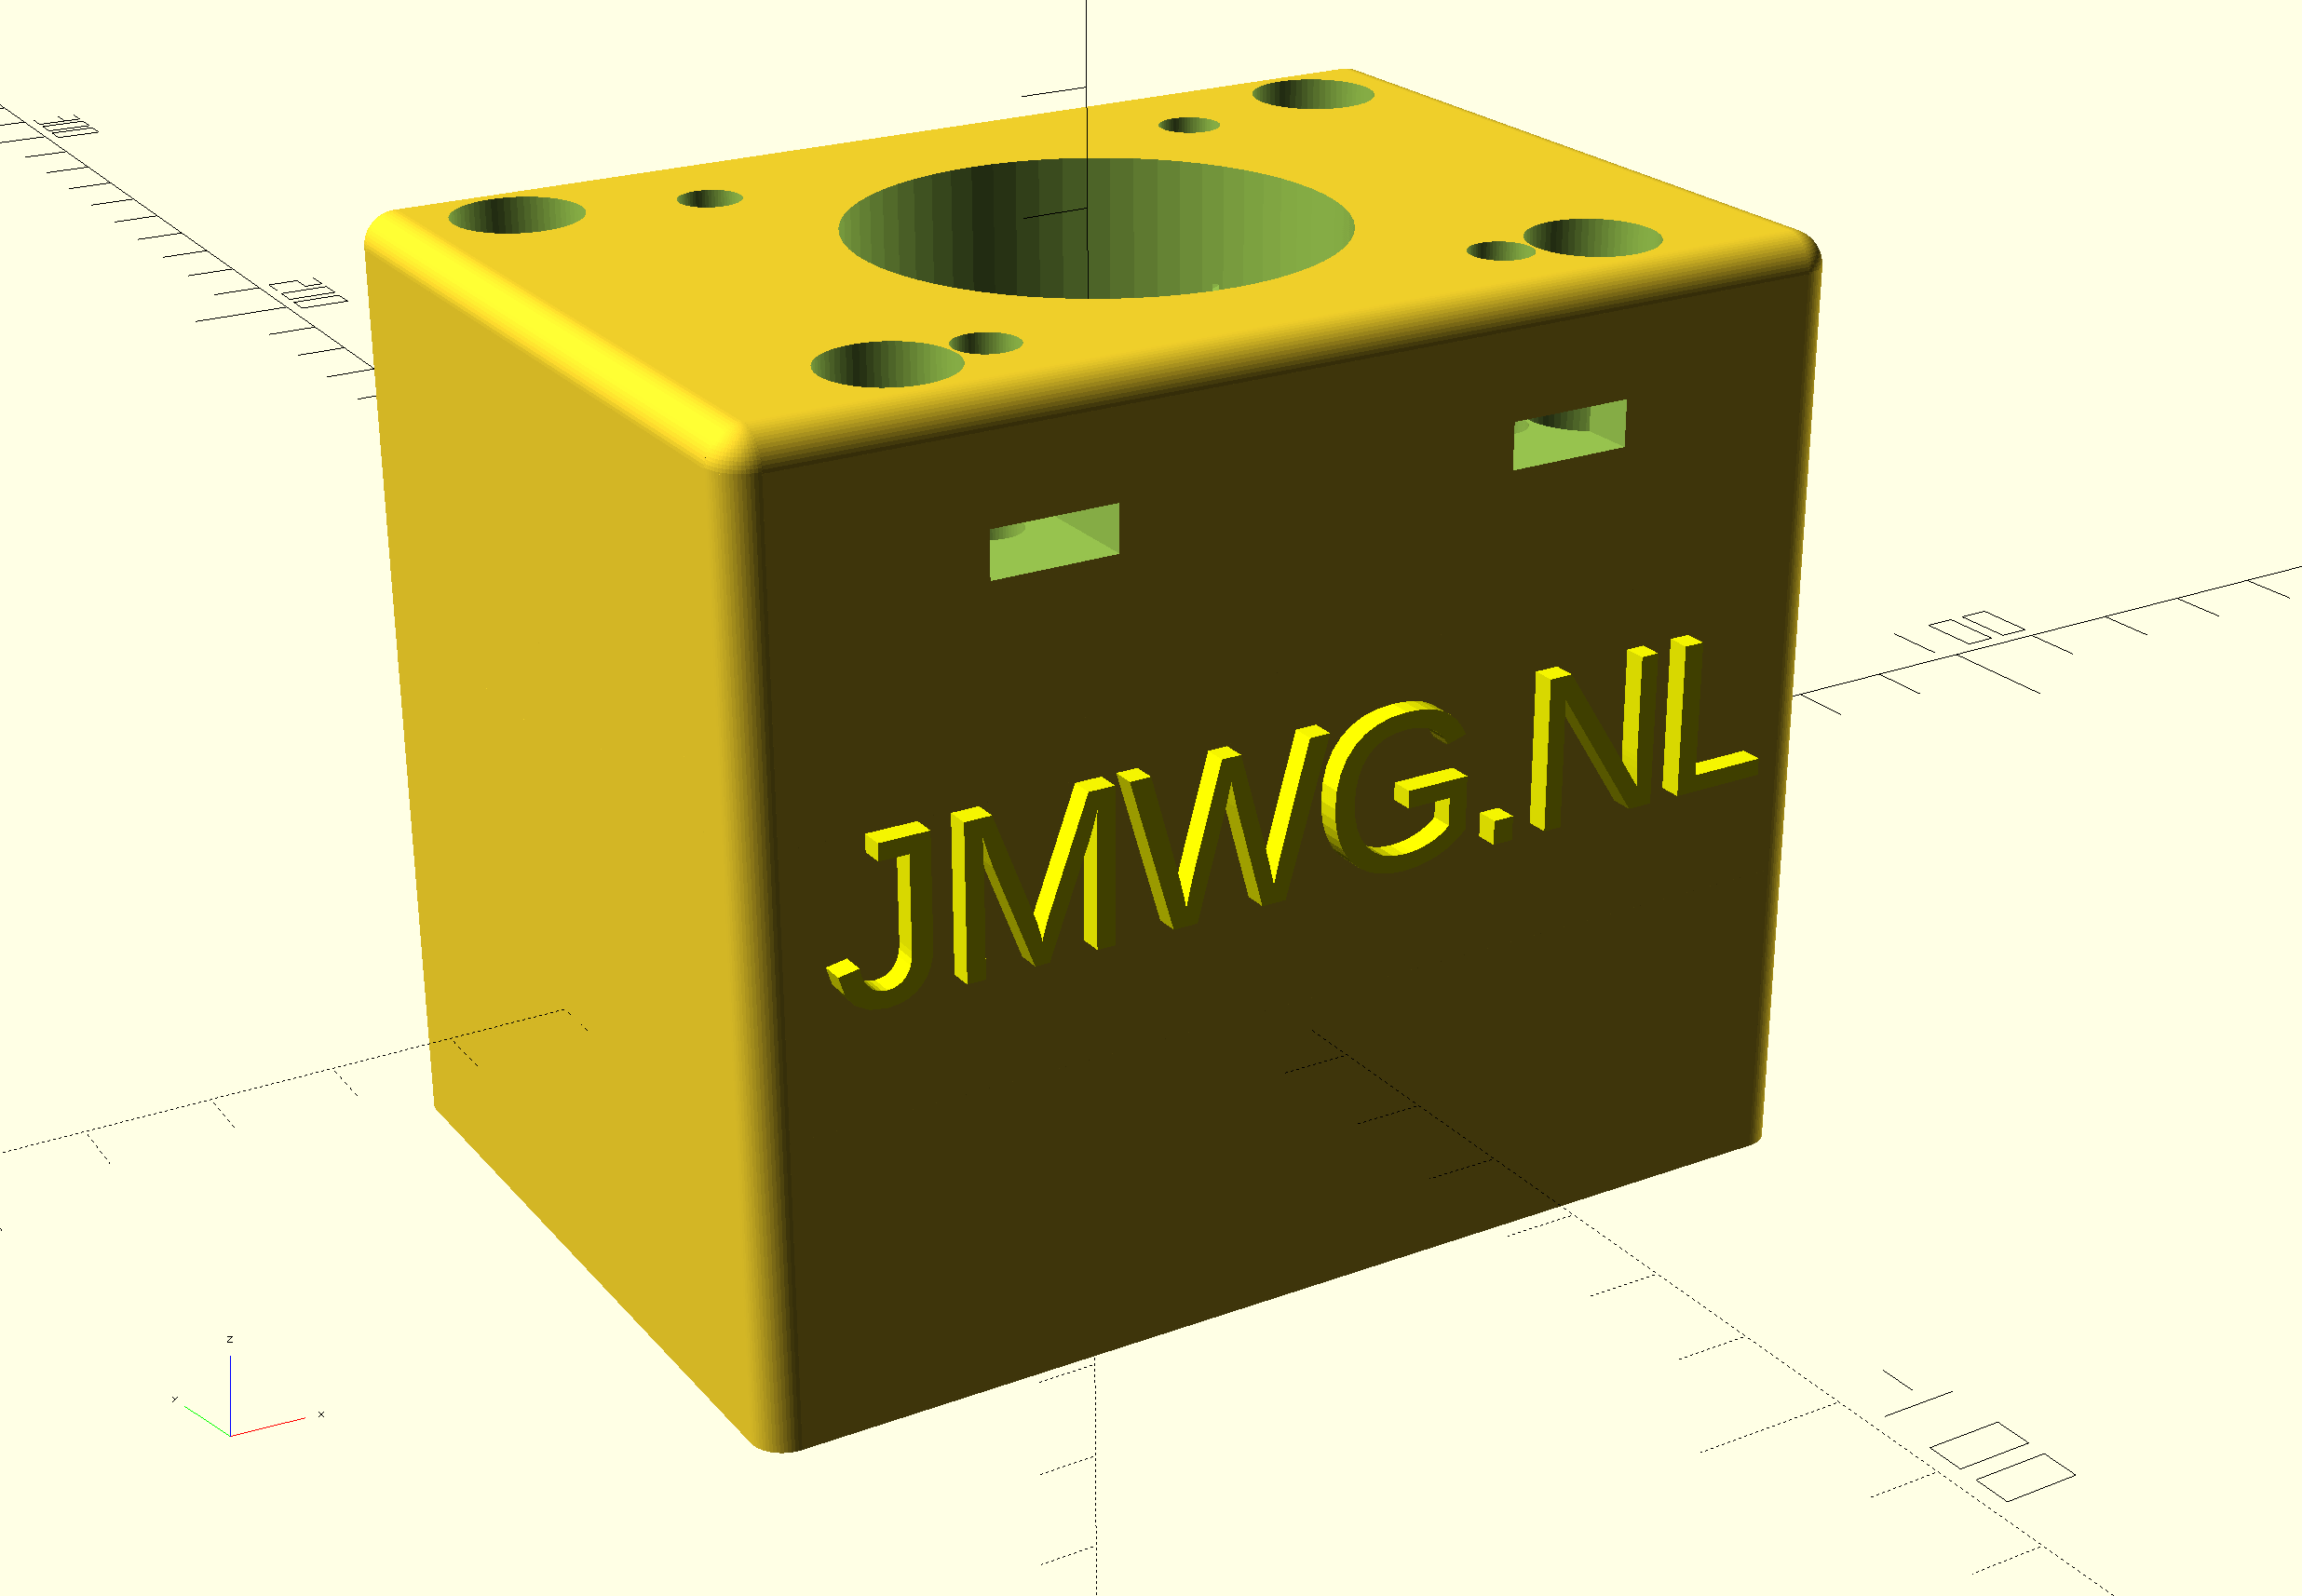
Uiteindelijke ONTWERP:
Het binnenste deel op de draaibank gefreesd zodat het ongeveer 9 mm over de lagerhouder van de Y-as kan schuiven
En nu kan het wiel over de lagerhouder naar rechtsDit bespaart 9 mm inbouwruimte en nu kan het bewerkte handwiel worden vervangen, indien gewenst. Maar het handwiel moet eerst worden bewerkt, om de aanduidingsring eraf te krijgen.
de kleine gaatjes kunnen worden gebruikt om het deksel op het spatscherm te plaatsen met kleine schroeven van 2,5 mm dia Of, je kunt het deksel eraf laten en er een wiel op zetten zoals ik heb gedaan op de Z-as. Je moet de draaiknop van het wiel affrezen zodat hij dun genoeg wordt om op het overgebleven M8 draadeind te monteren. Een klein stukje van de 10mm as zal bij mijn methode uitsteken om het handwiel gecentreerd te houden.
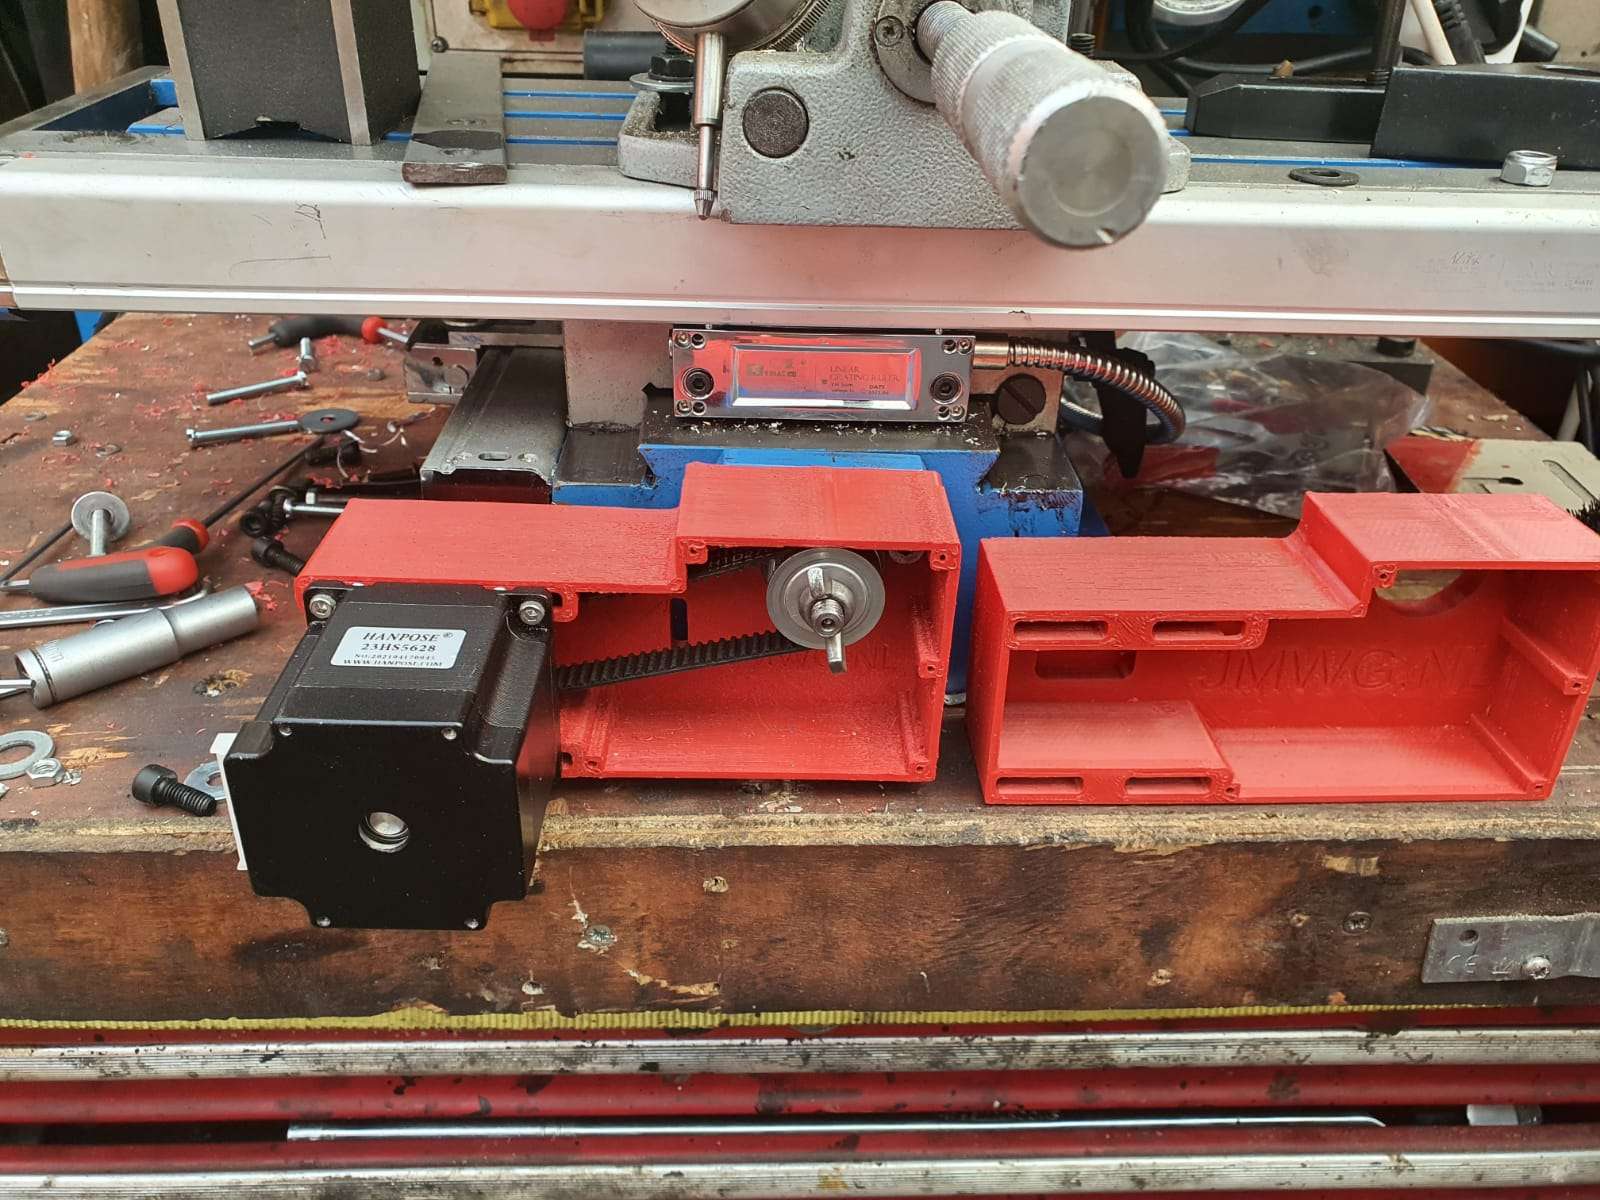
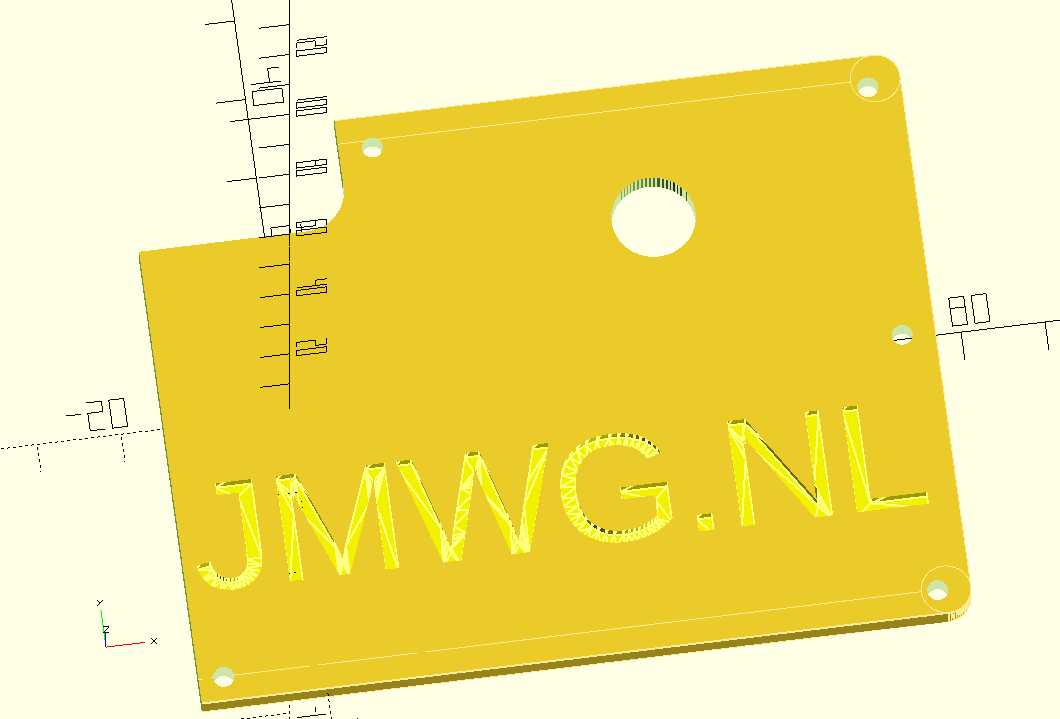
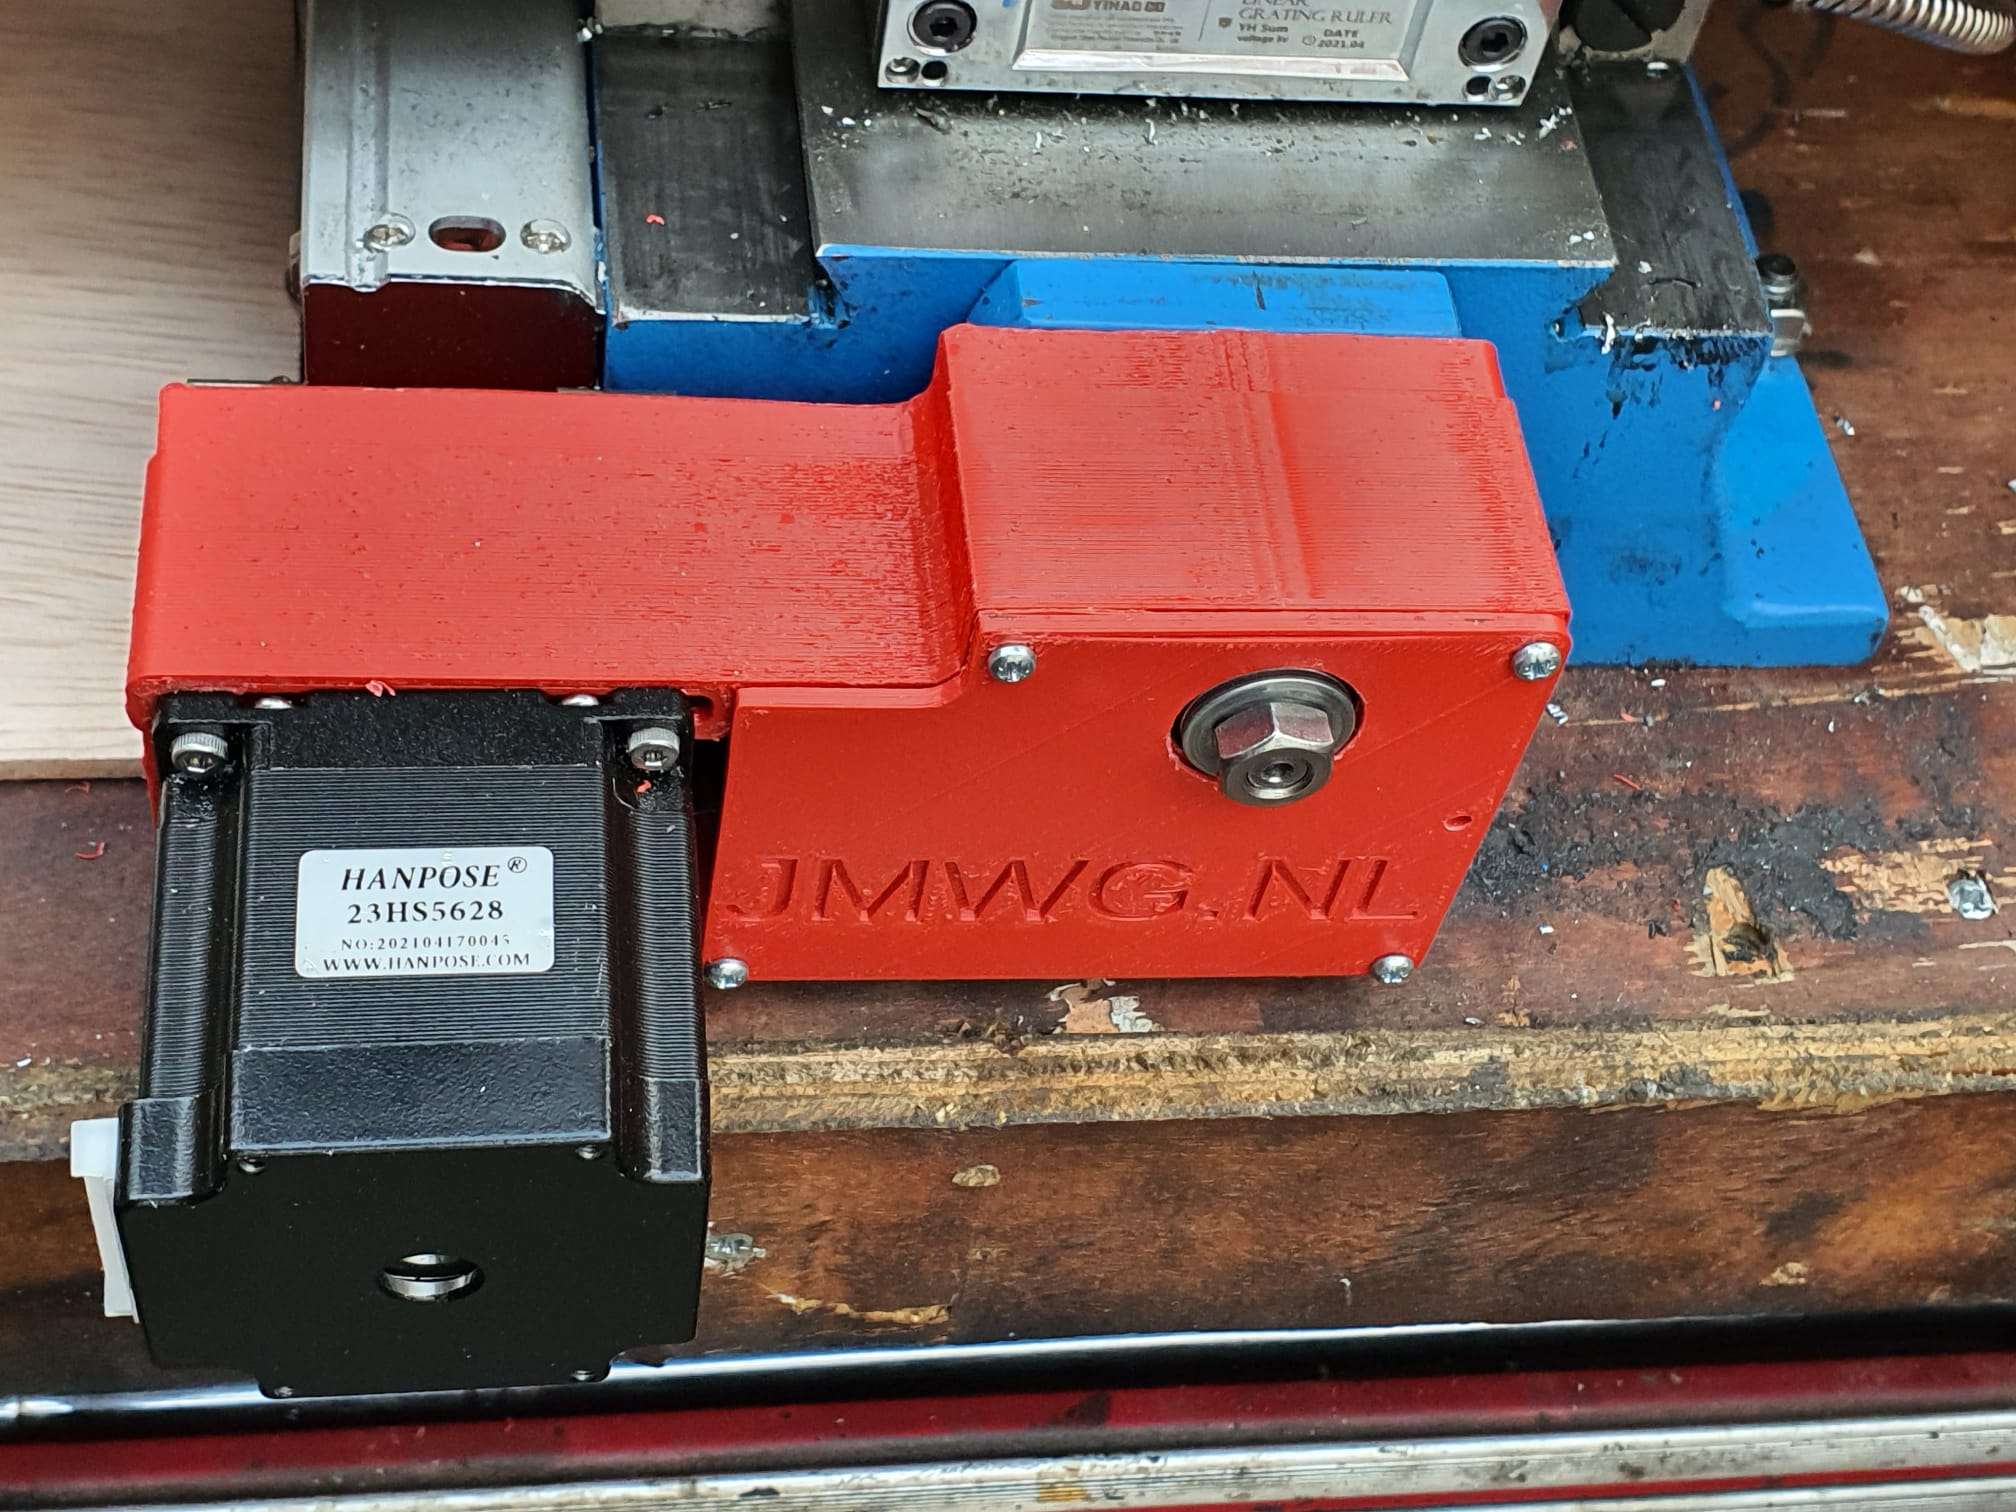
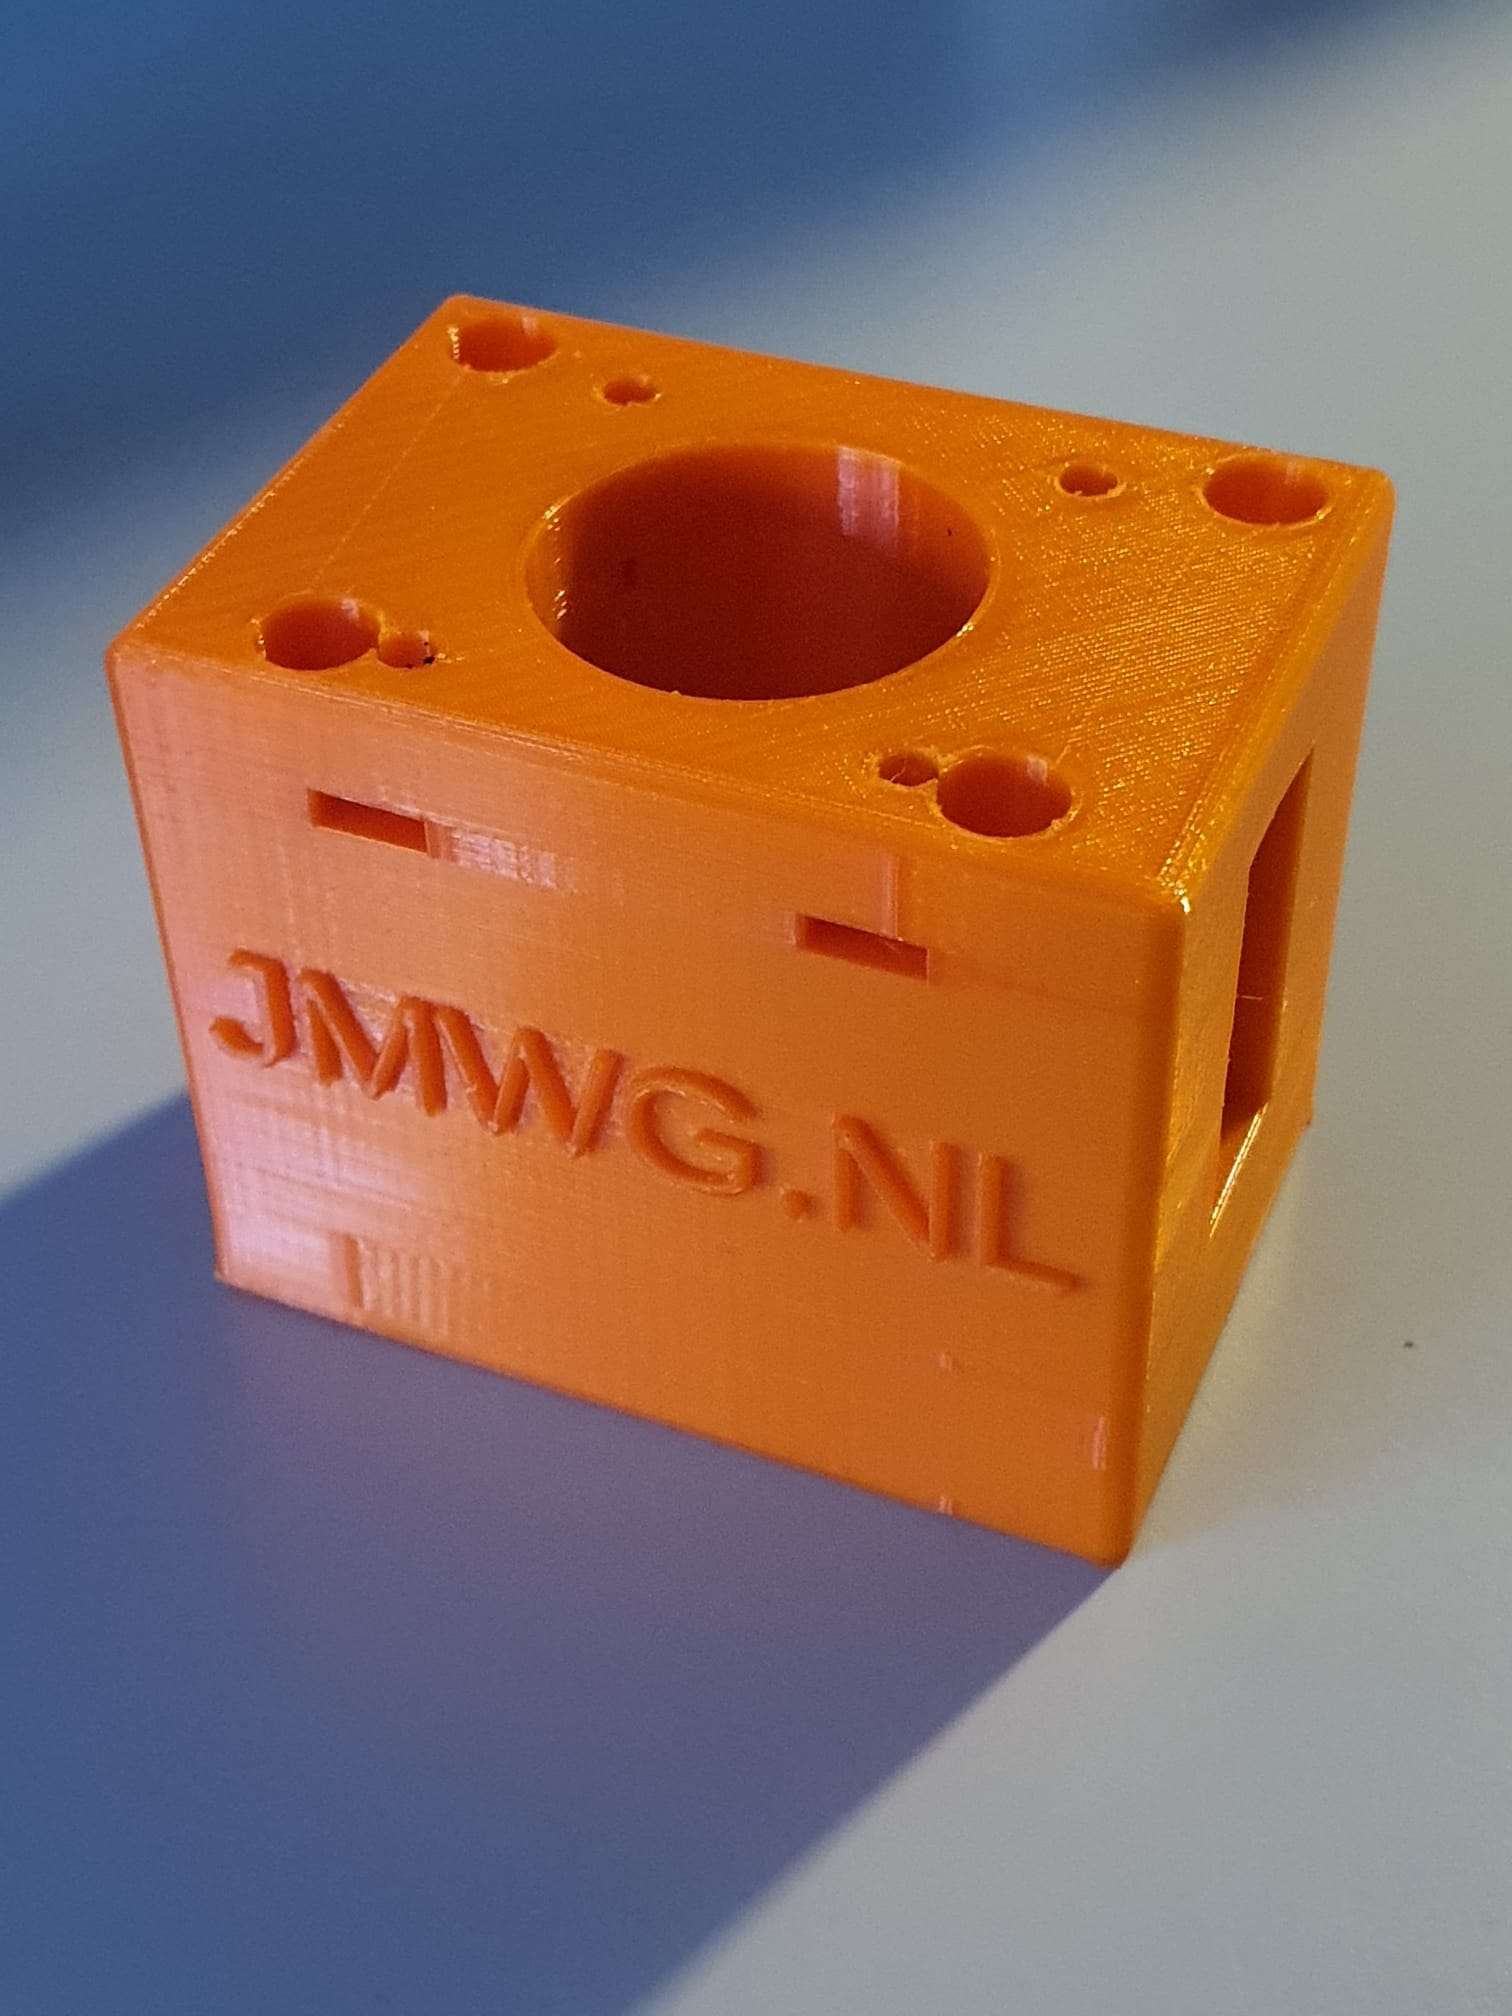
Je kunt de hele bodem en de beschermkap met de bevestigingskolommen voor de stappenmotor in één keer 3dprinten, zoals ik heb gedaan in rood ABS bij 270 graden C
Voor deze opstelling heb je nodig
1 stuks Nema23 stappenmotor met 56 lengte en 6.35 mm as
1 wiel met 12 tandjes M3 met kraag, gat-ø 6.35 mm, 11 mm breed
1 wiel met 24 tandjes M3 met GEEN kraag, gat-ø 10 mm, 11 mm breed
Getande M3 riem, 9 mm breed en lengte 255 of 275 mm (moet dit controleren)
3D geprinte onderdelen
M8 ringen en moer
Hier wordt de verbinding getoond op de X-as / loodspil lagerhouder met 2 M6 schroeven
Deksel:
En het freesontwerp voor de bodemplaat voor CNC-bewerking in aluminium mocht je dit liever hebben.
Het 3D-printbestand voor het deksel en de profielen voor de stappenmotor, te plaatsen op de aluminium gefreesde grondplaat:
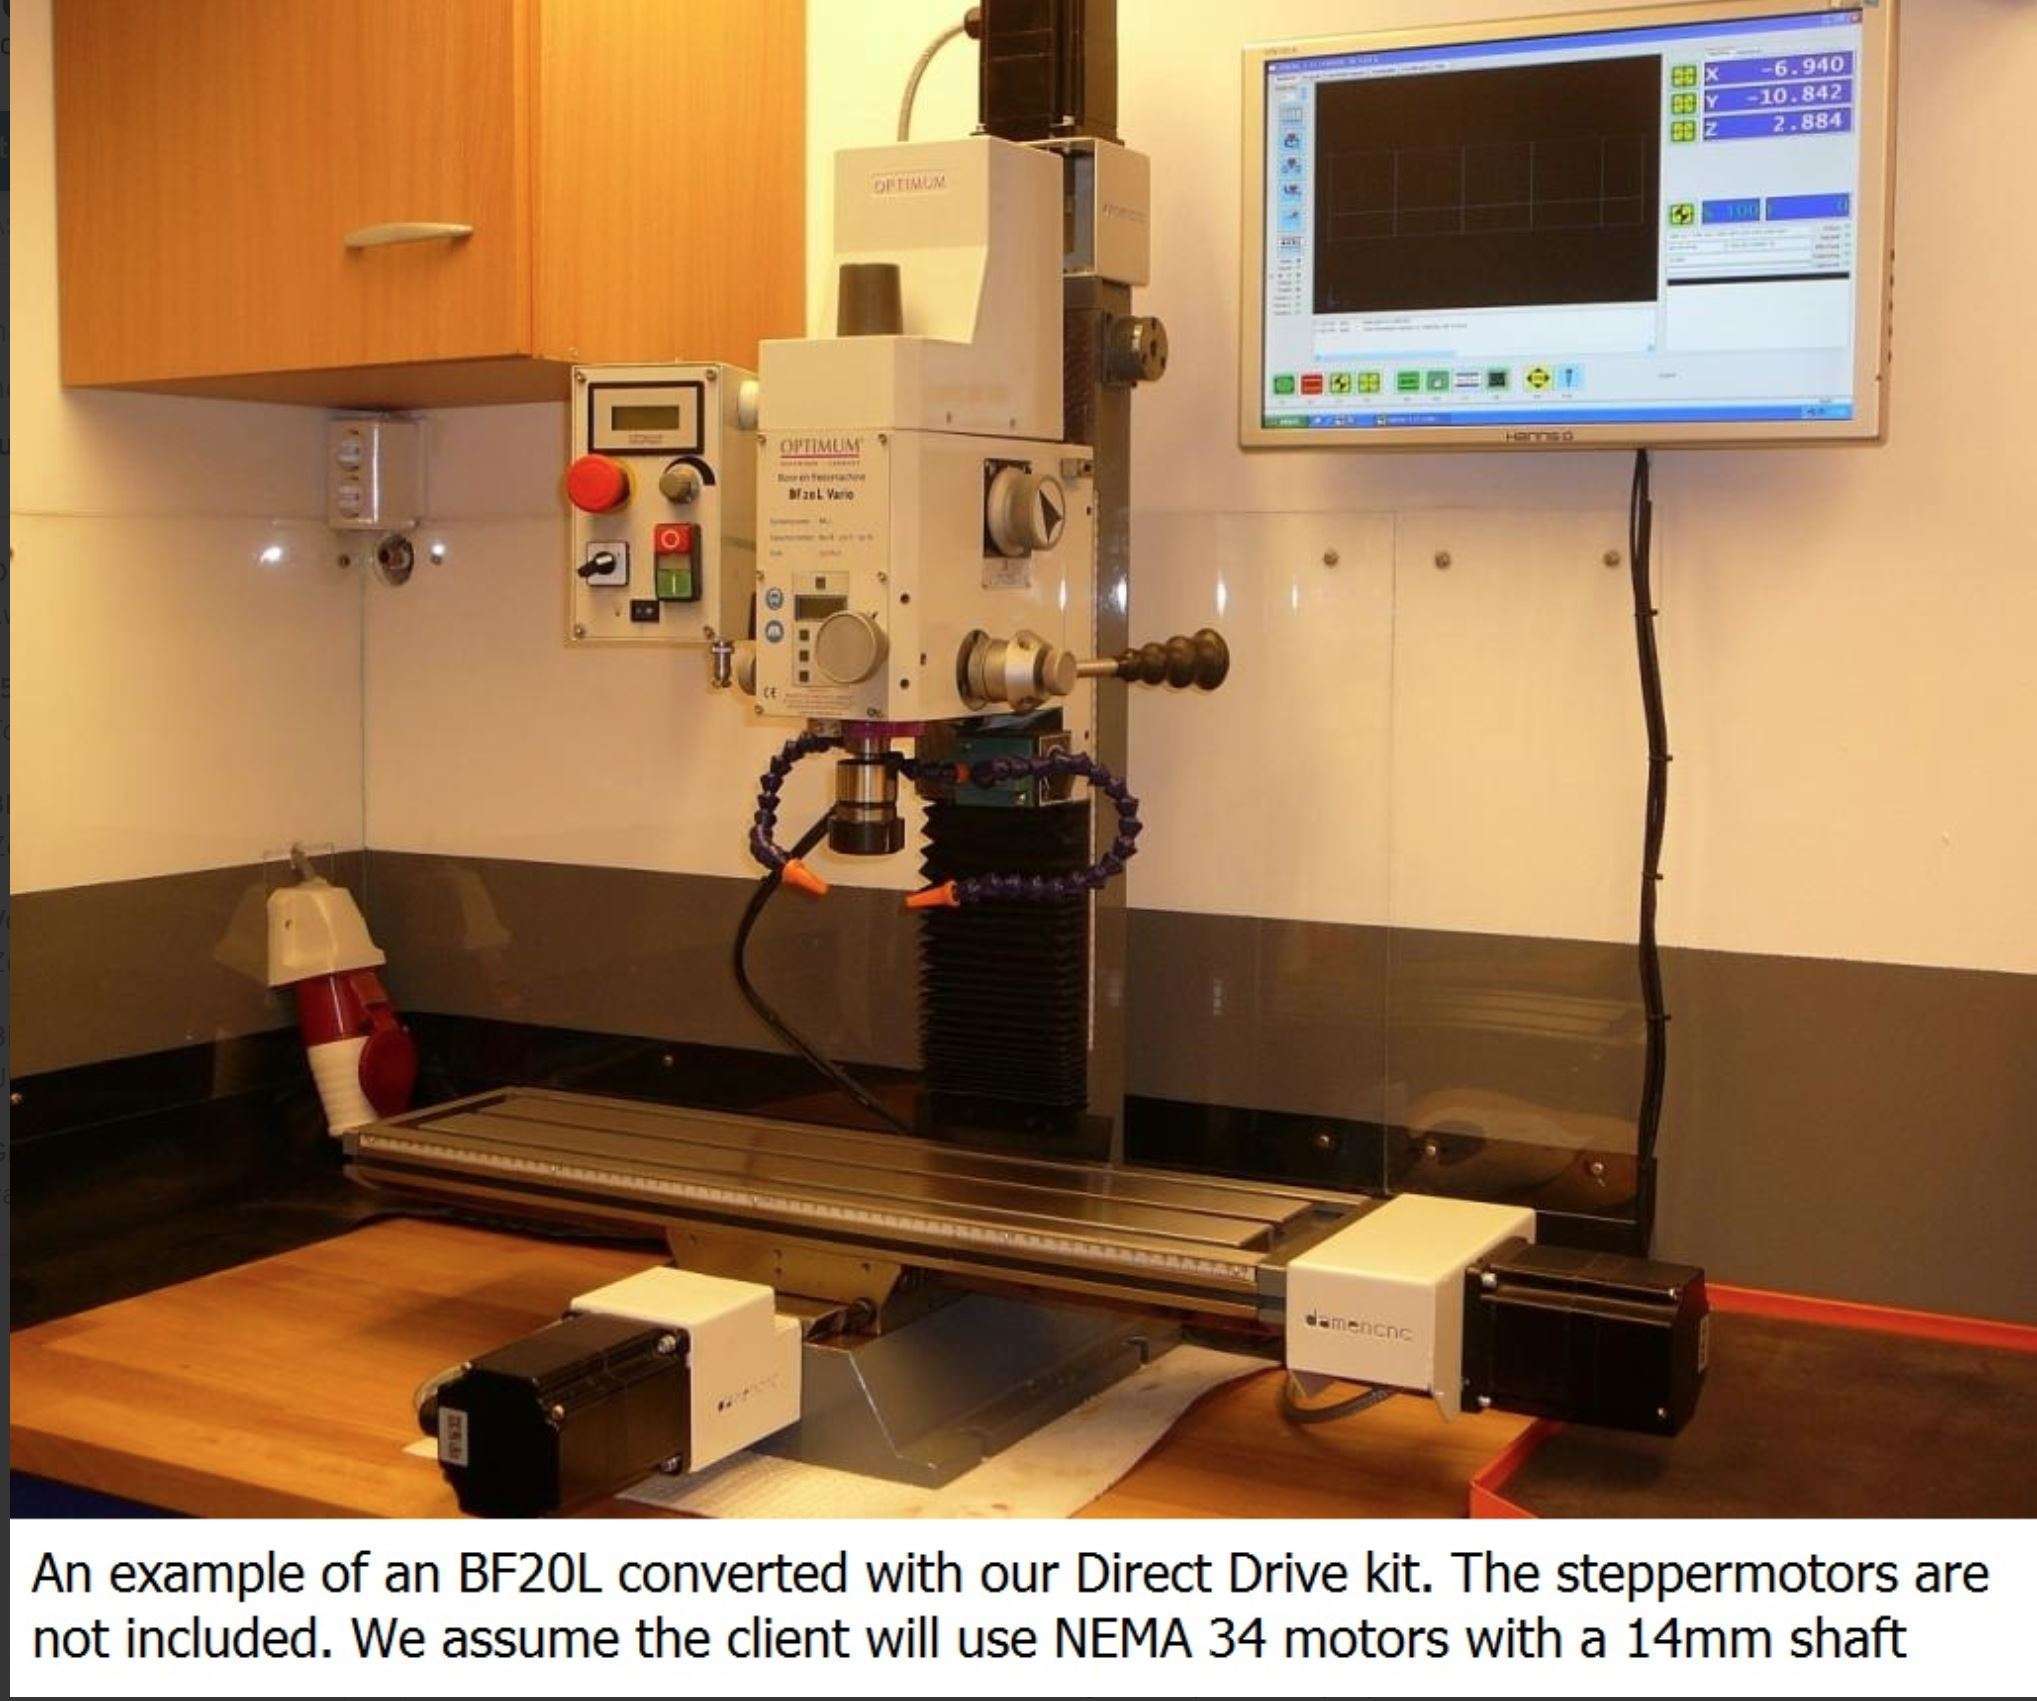
Al voordat ik mijn Toolmania WBM16LV kolomfrees had aangeschaft, had ik plannen voor de ombouw naar volledige CNC bediening.
Omdat ik al wat ervaring heb met 3d printers en al 2 CNC routers in bedrijf heb, is de ombouw van de kolomfrees naar CNC technisch niet ingewikkeld.
Wat het wel lastig maakt is de te maken keuze: Ga ik gelijk de spindels vervangen met ball bearing spindels of niet? Voorlopig nog maar even niet, eerst alles maar eens op CNC maken en dan zie ik daarna wel hoe verder.
De kolomfrees is wel alvast voorzien van glaslinealen met digitale uitlezing. Verder wordt er nog een gasveer gemonteerd op de Z-kolom zodat niet steeds al het gewicht als het ware in de weg zit bij heen en weer bewegen. Ook een automatisch smeersysteem voor de glij-sledes van X- Y en Z-as wordt nog gemonteerd.
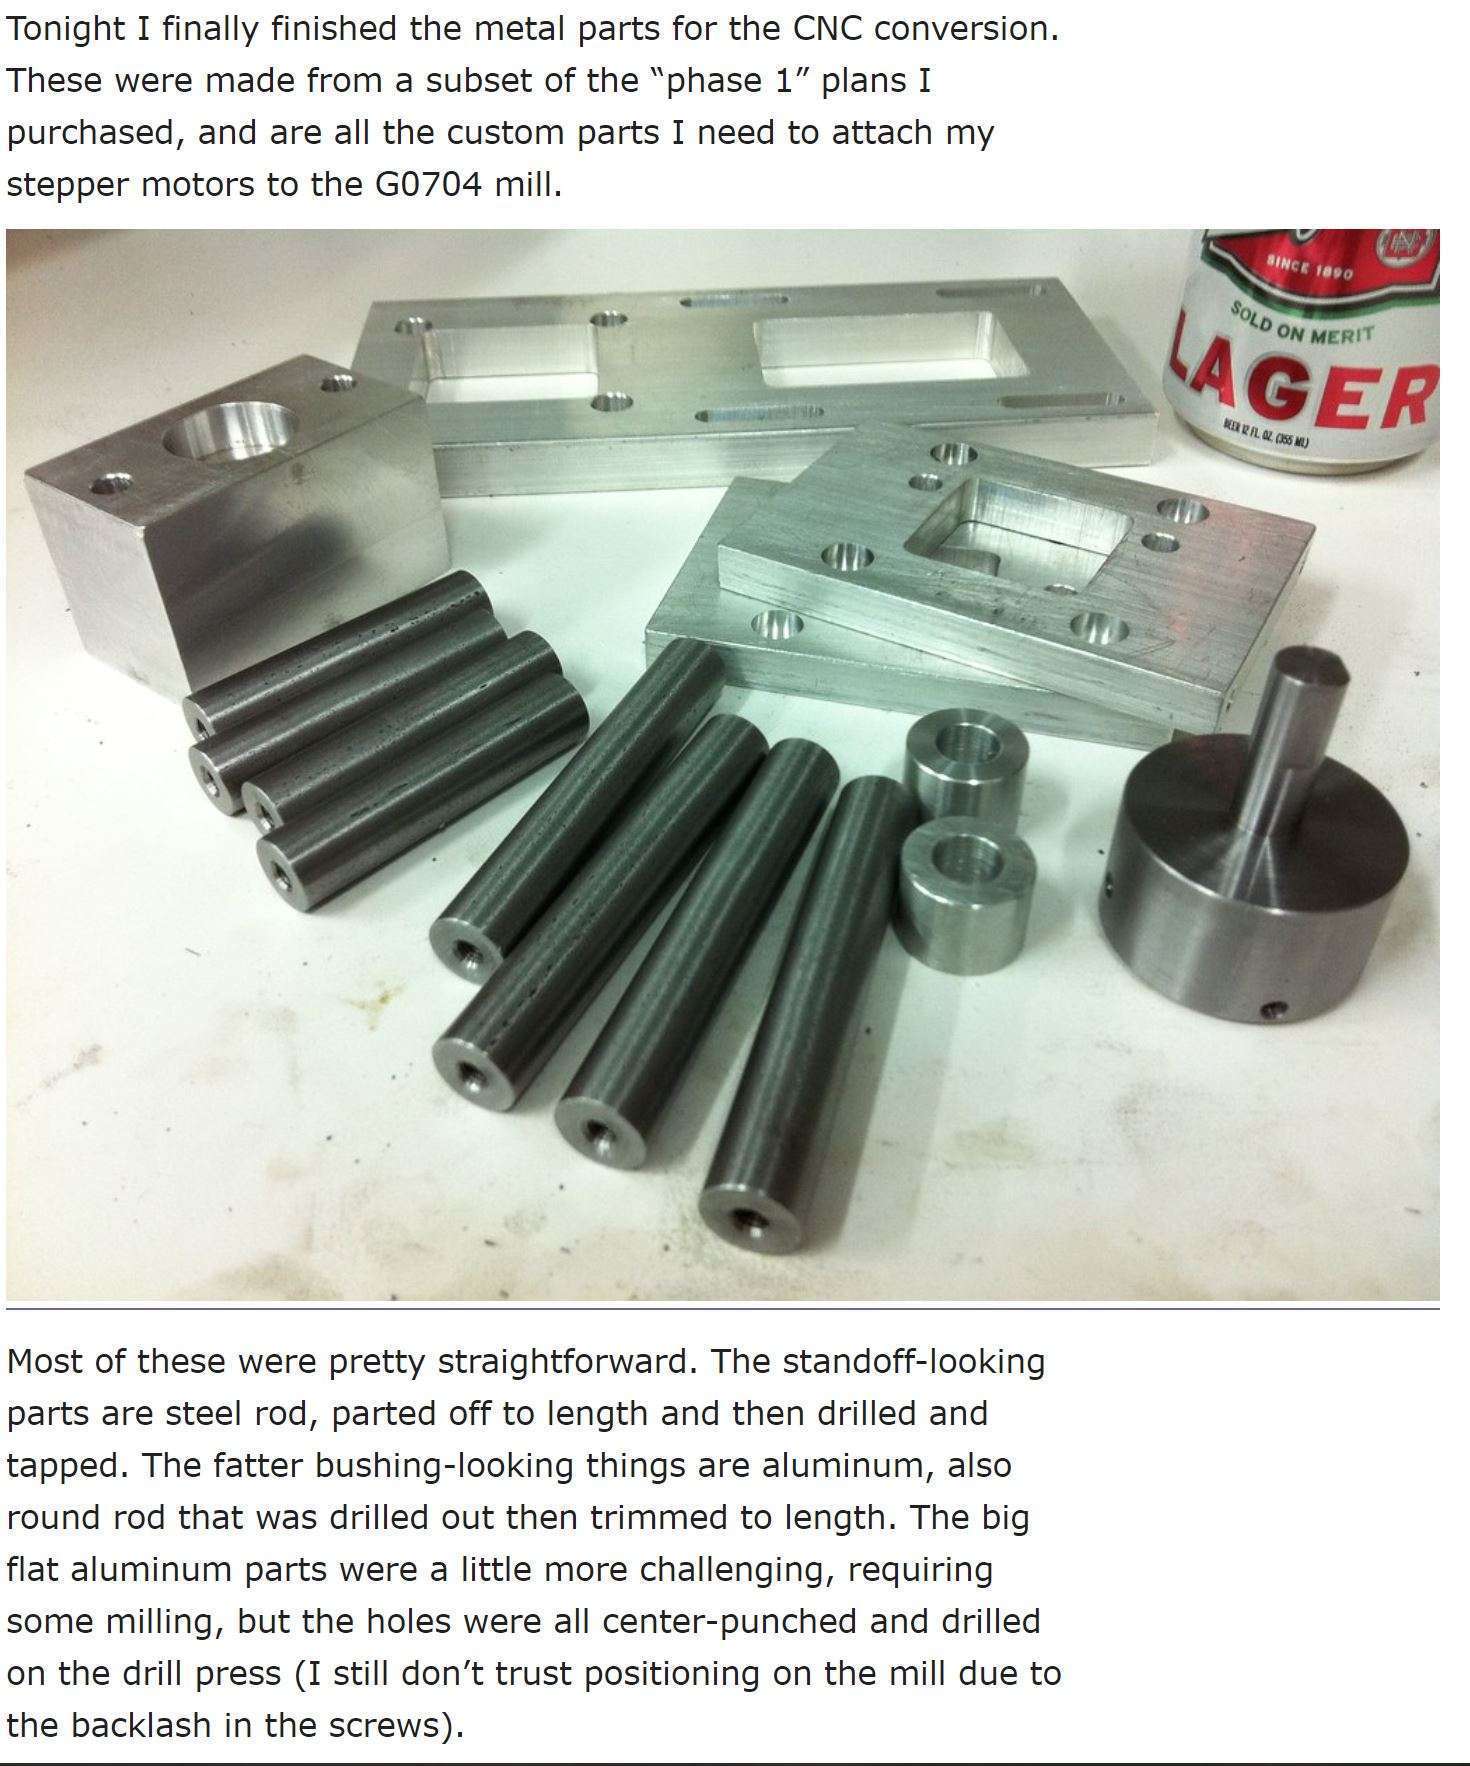
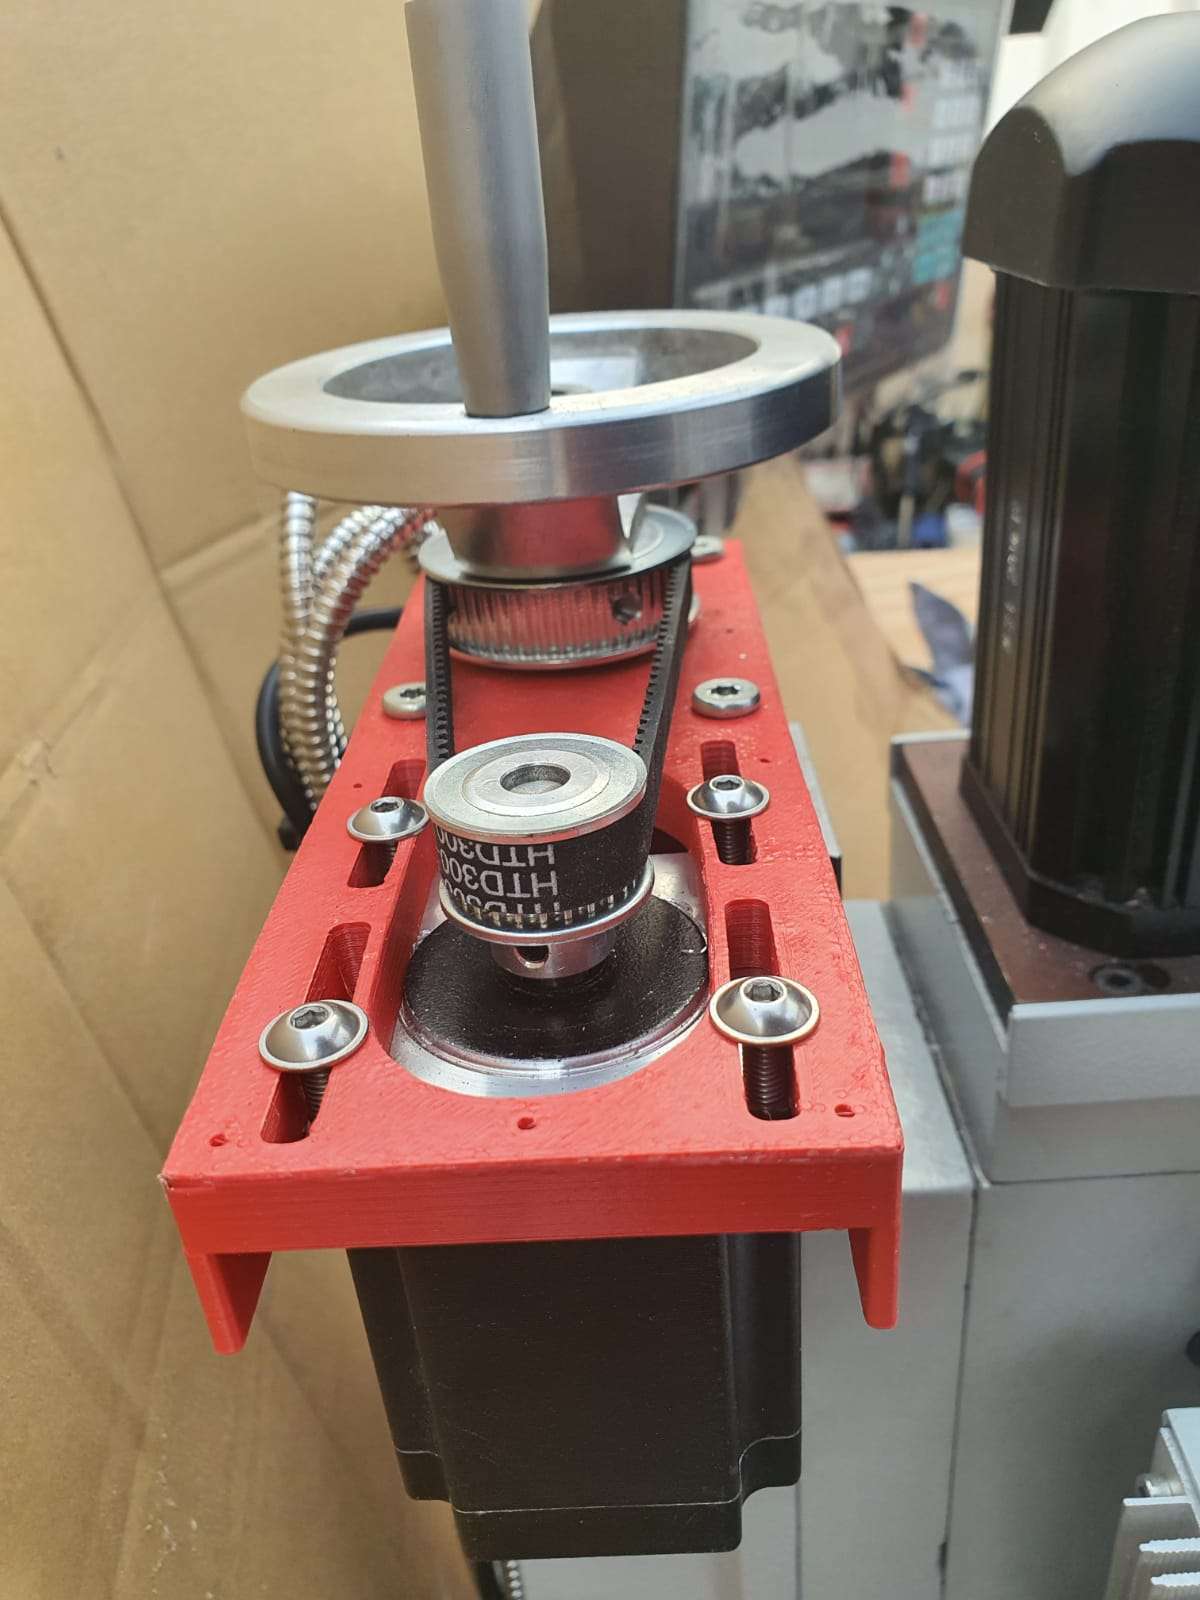
Terwijl ik mijn CNC adapterplaten met tandwielen en riemen aan het maken was, ontdekte ik dat er niet veel kant-en-klaar bestaat voor deze conversies.
Daarom ben ik ook adapteronderdelen voor directe aandrijving aan het maken, om dit uit te proberen.
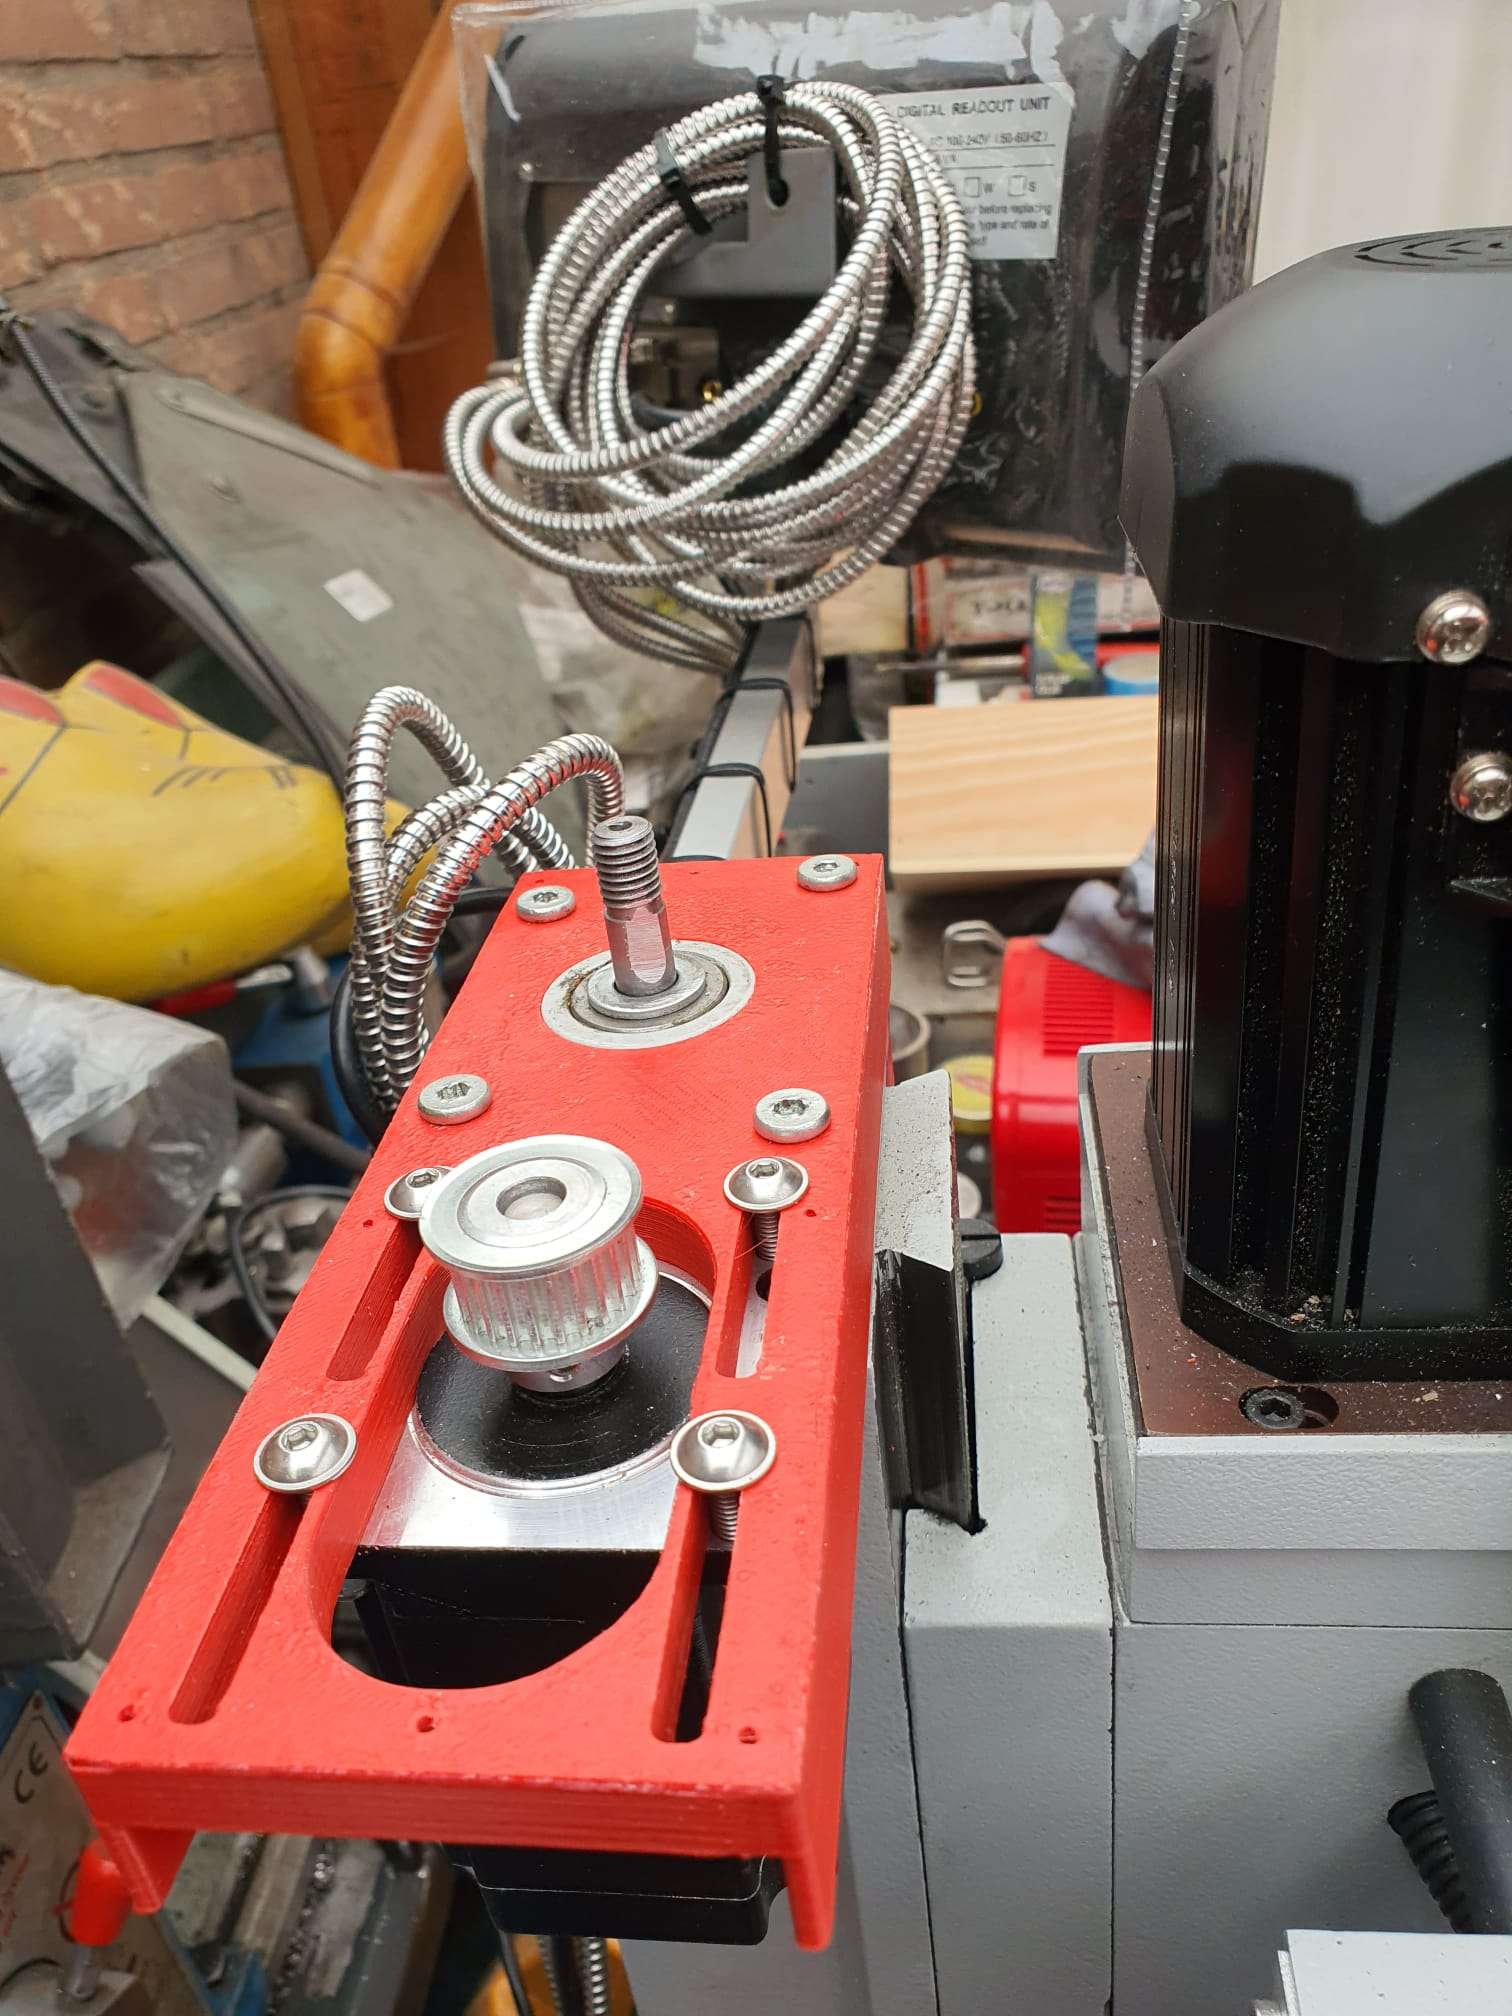
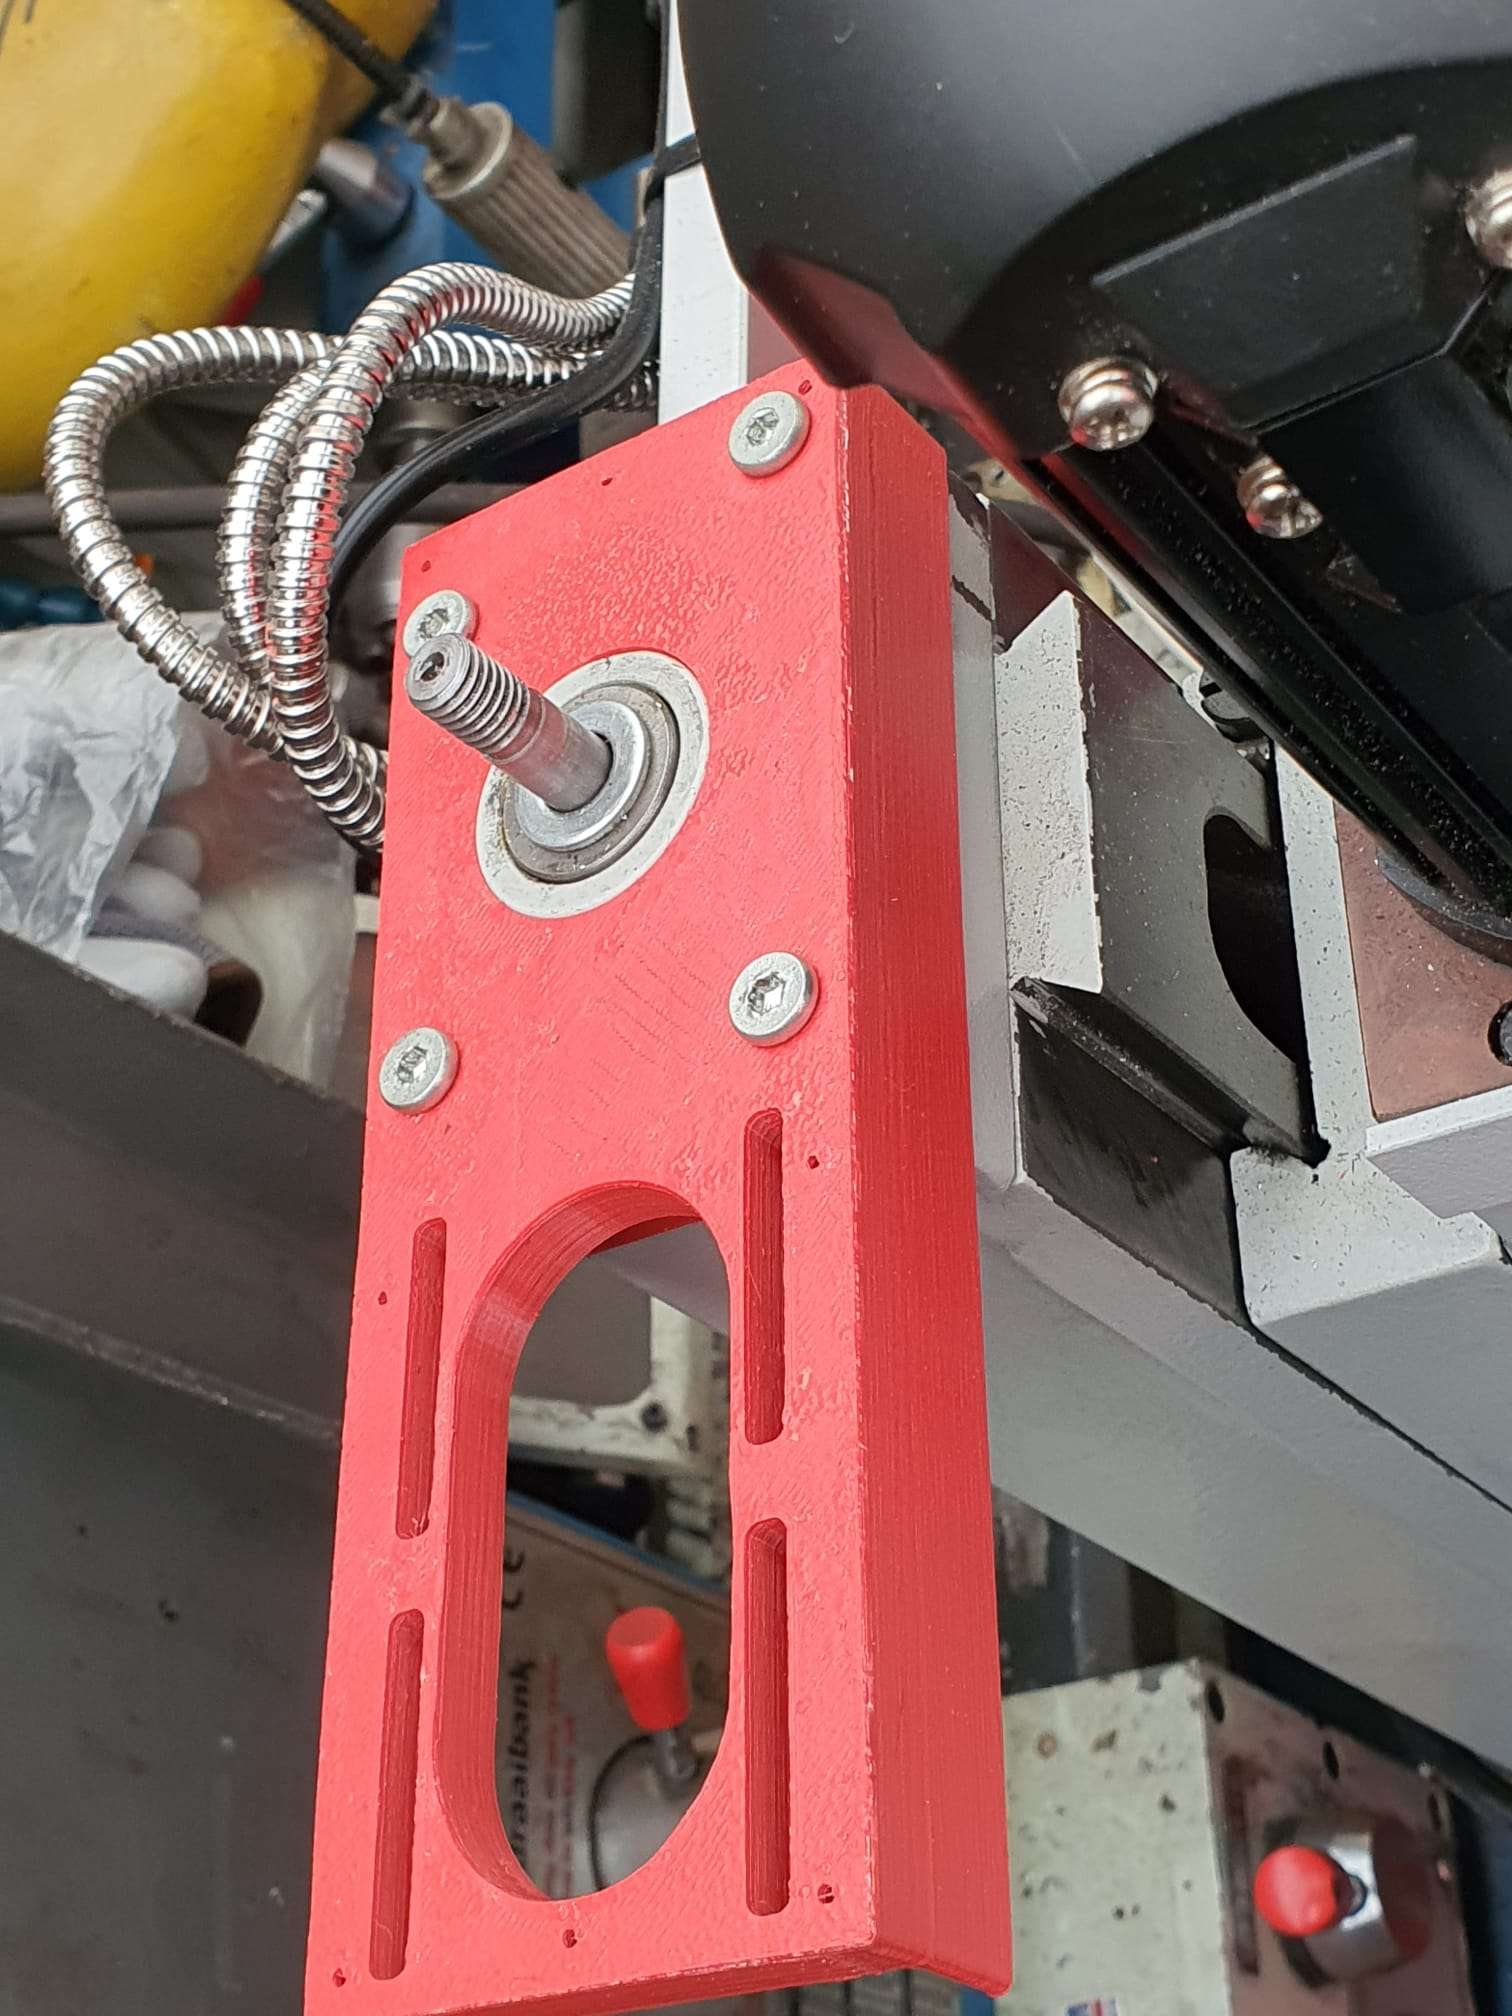
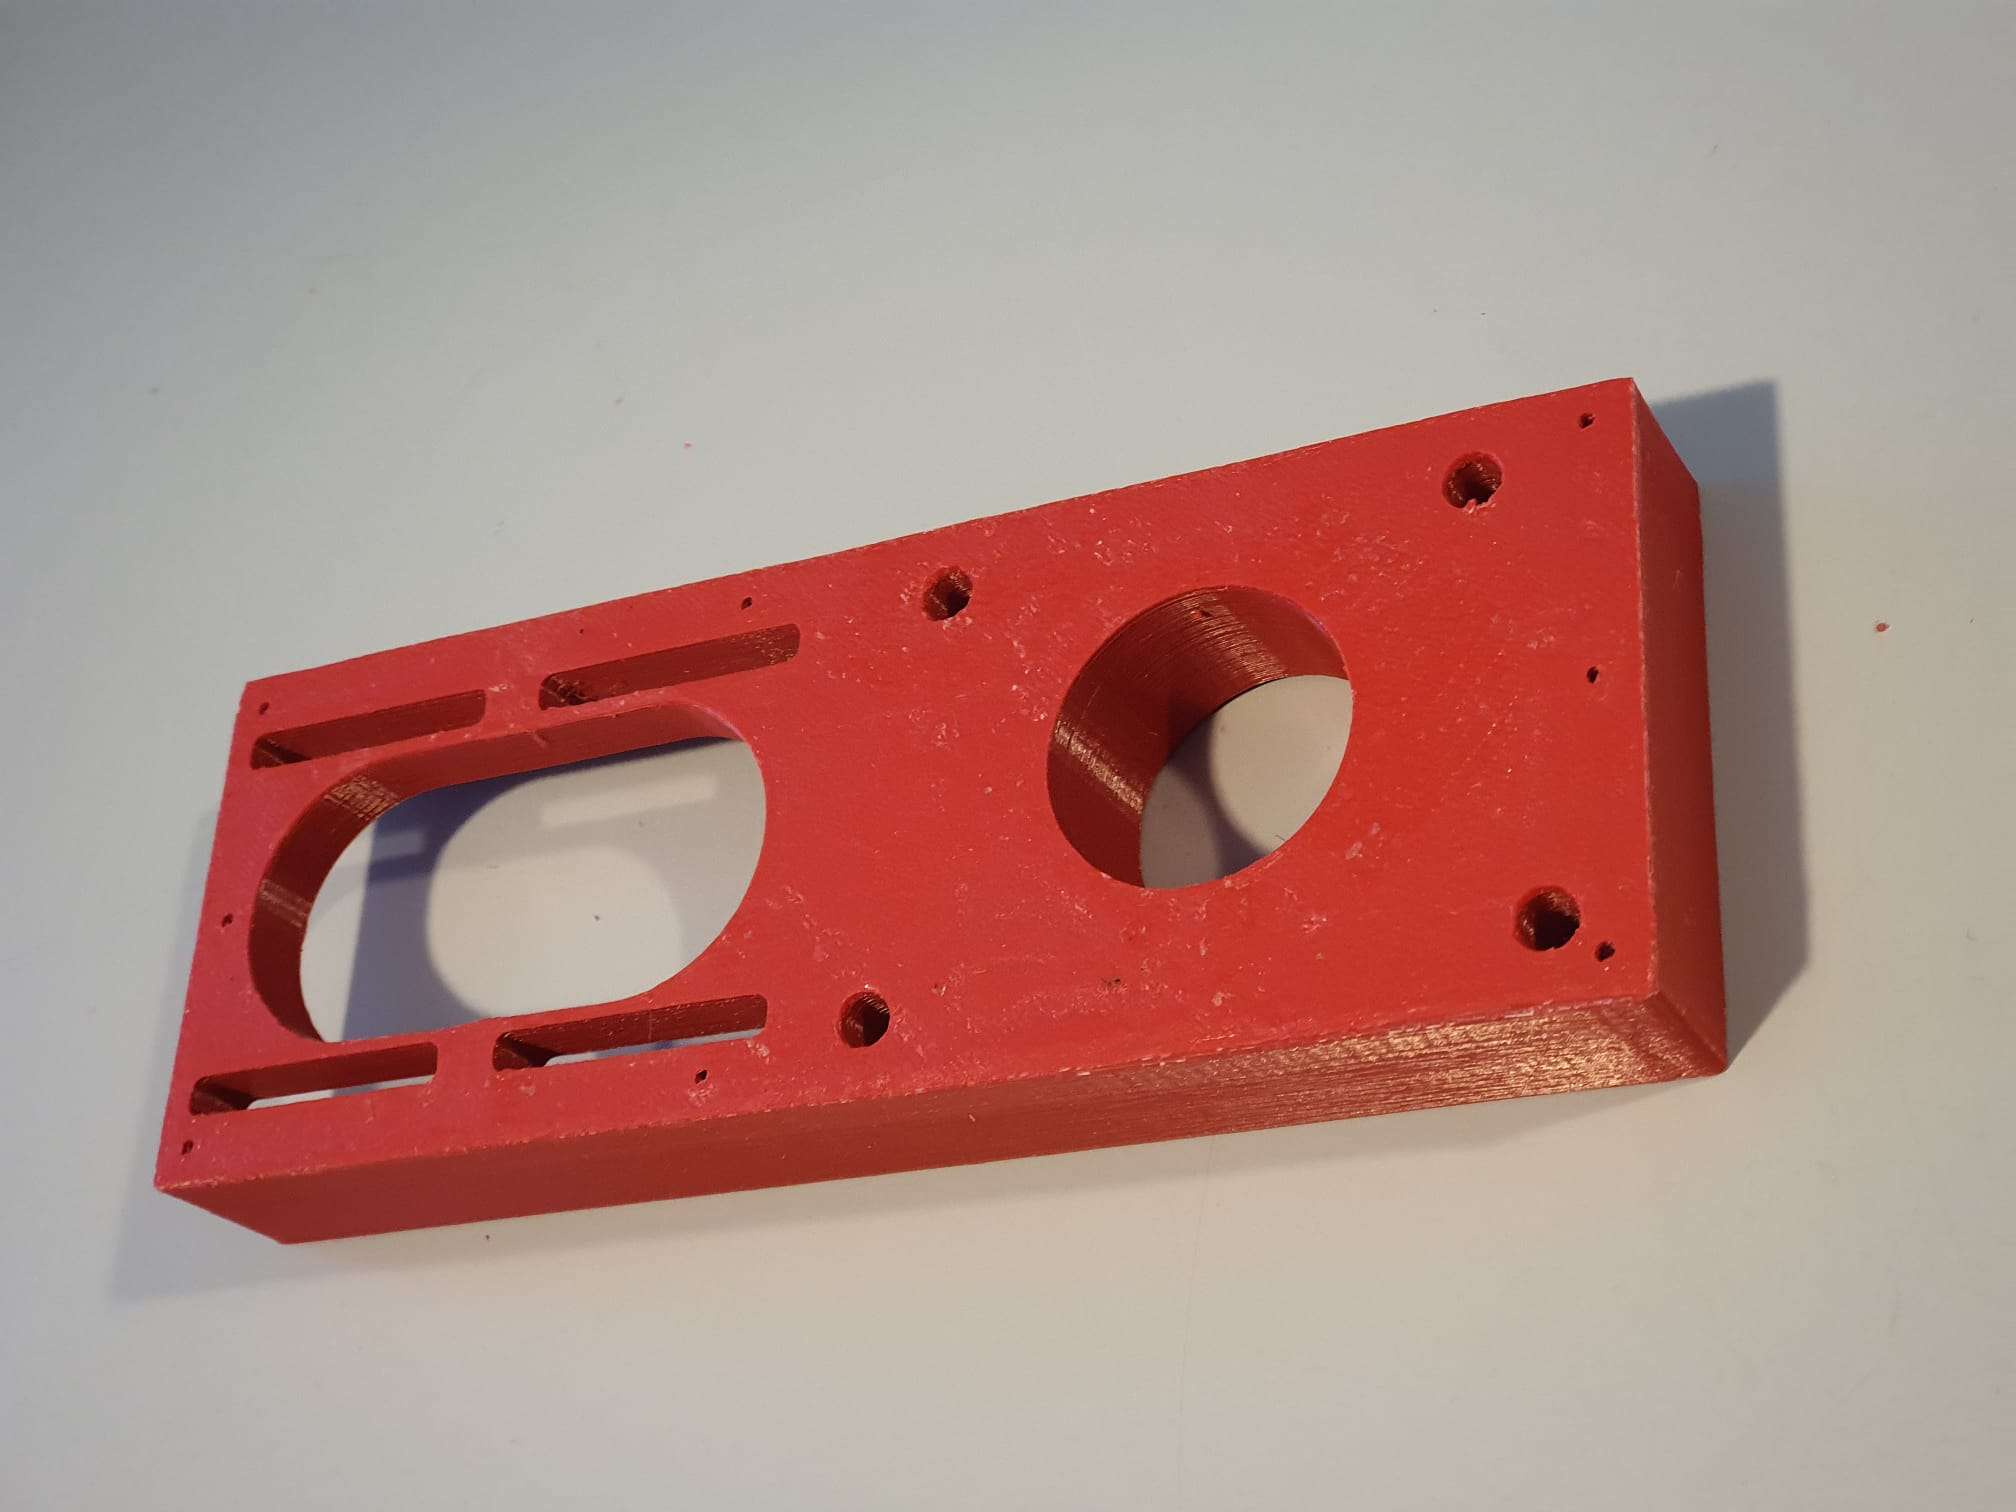
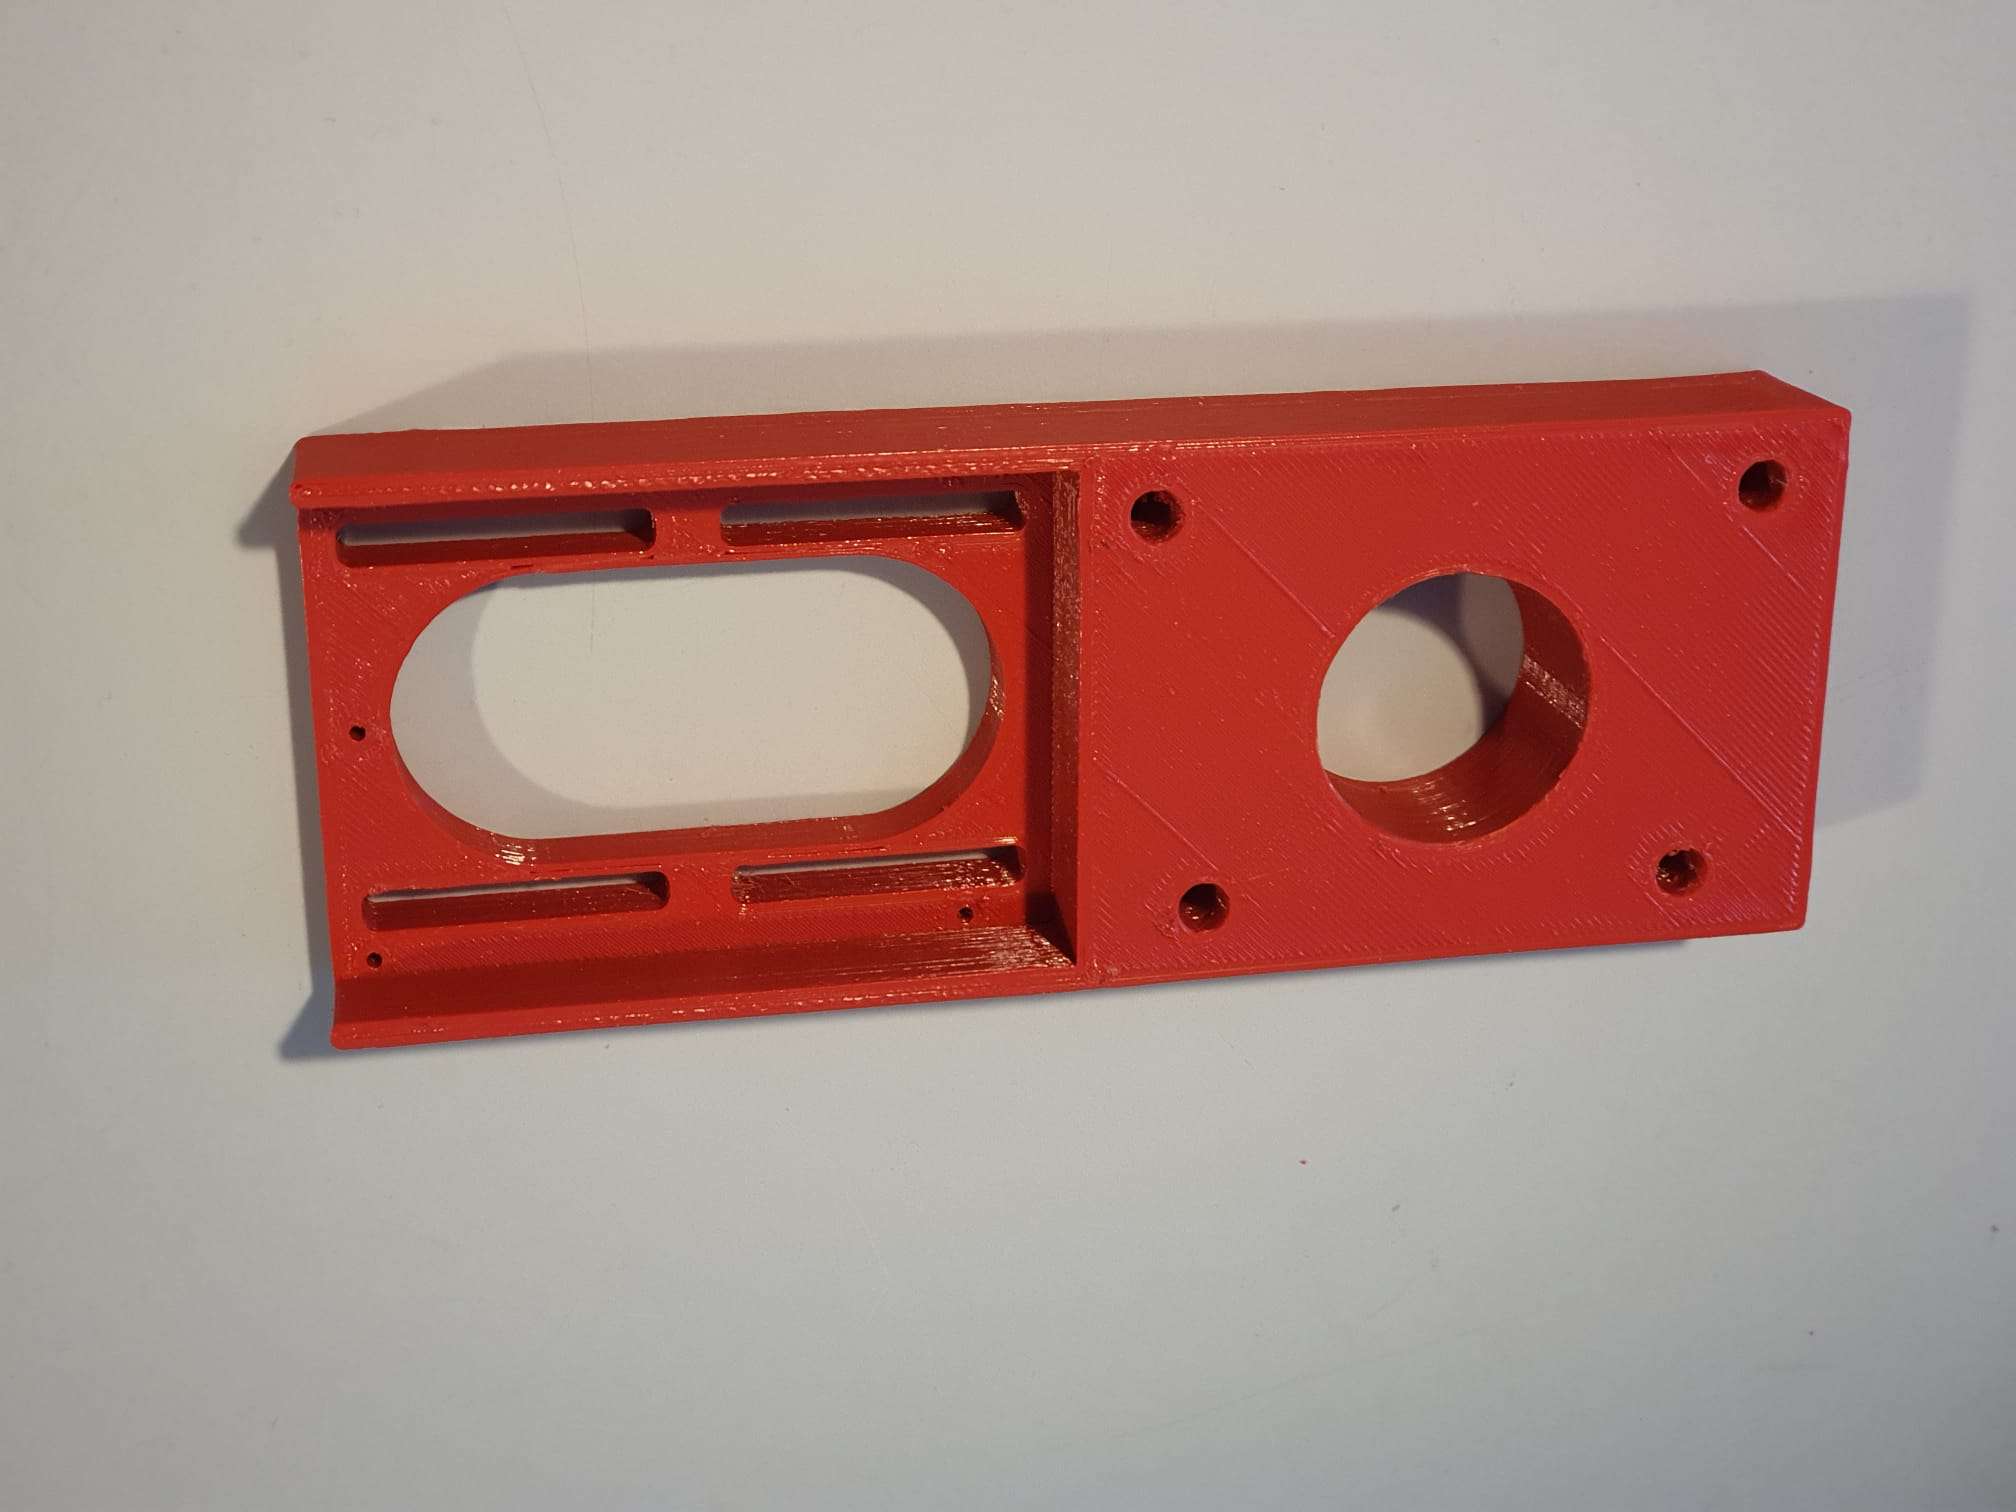
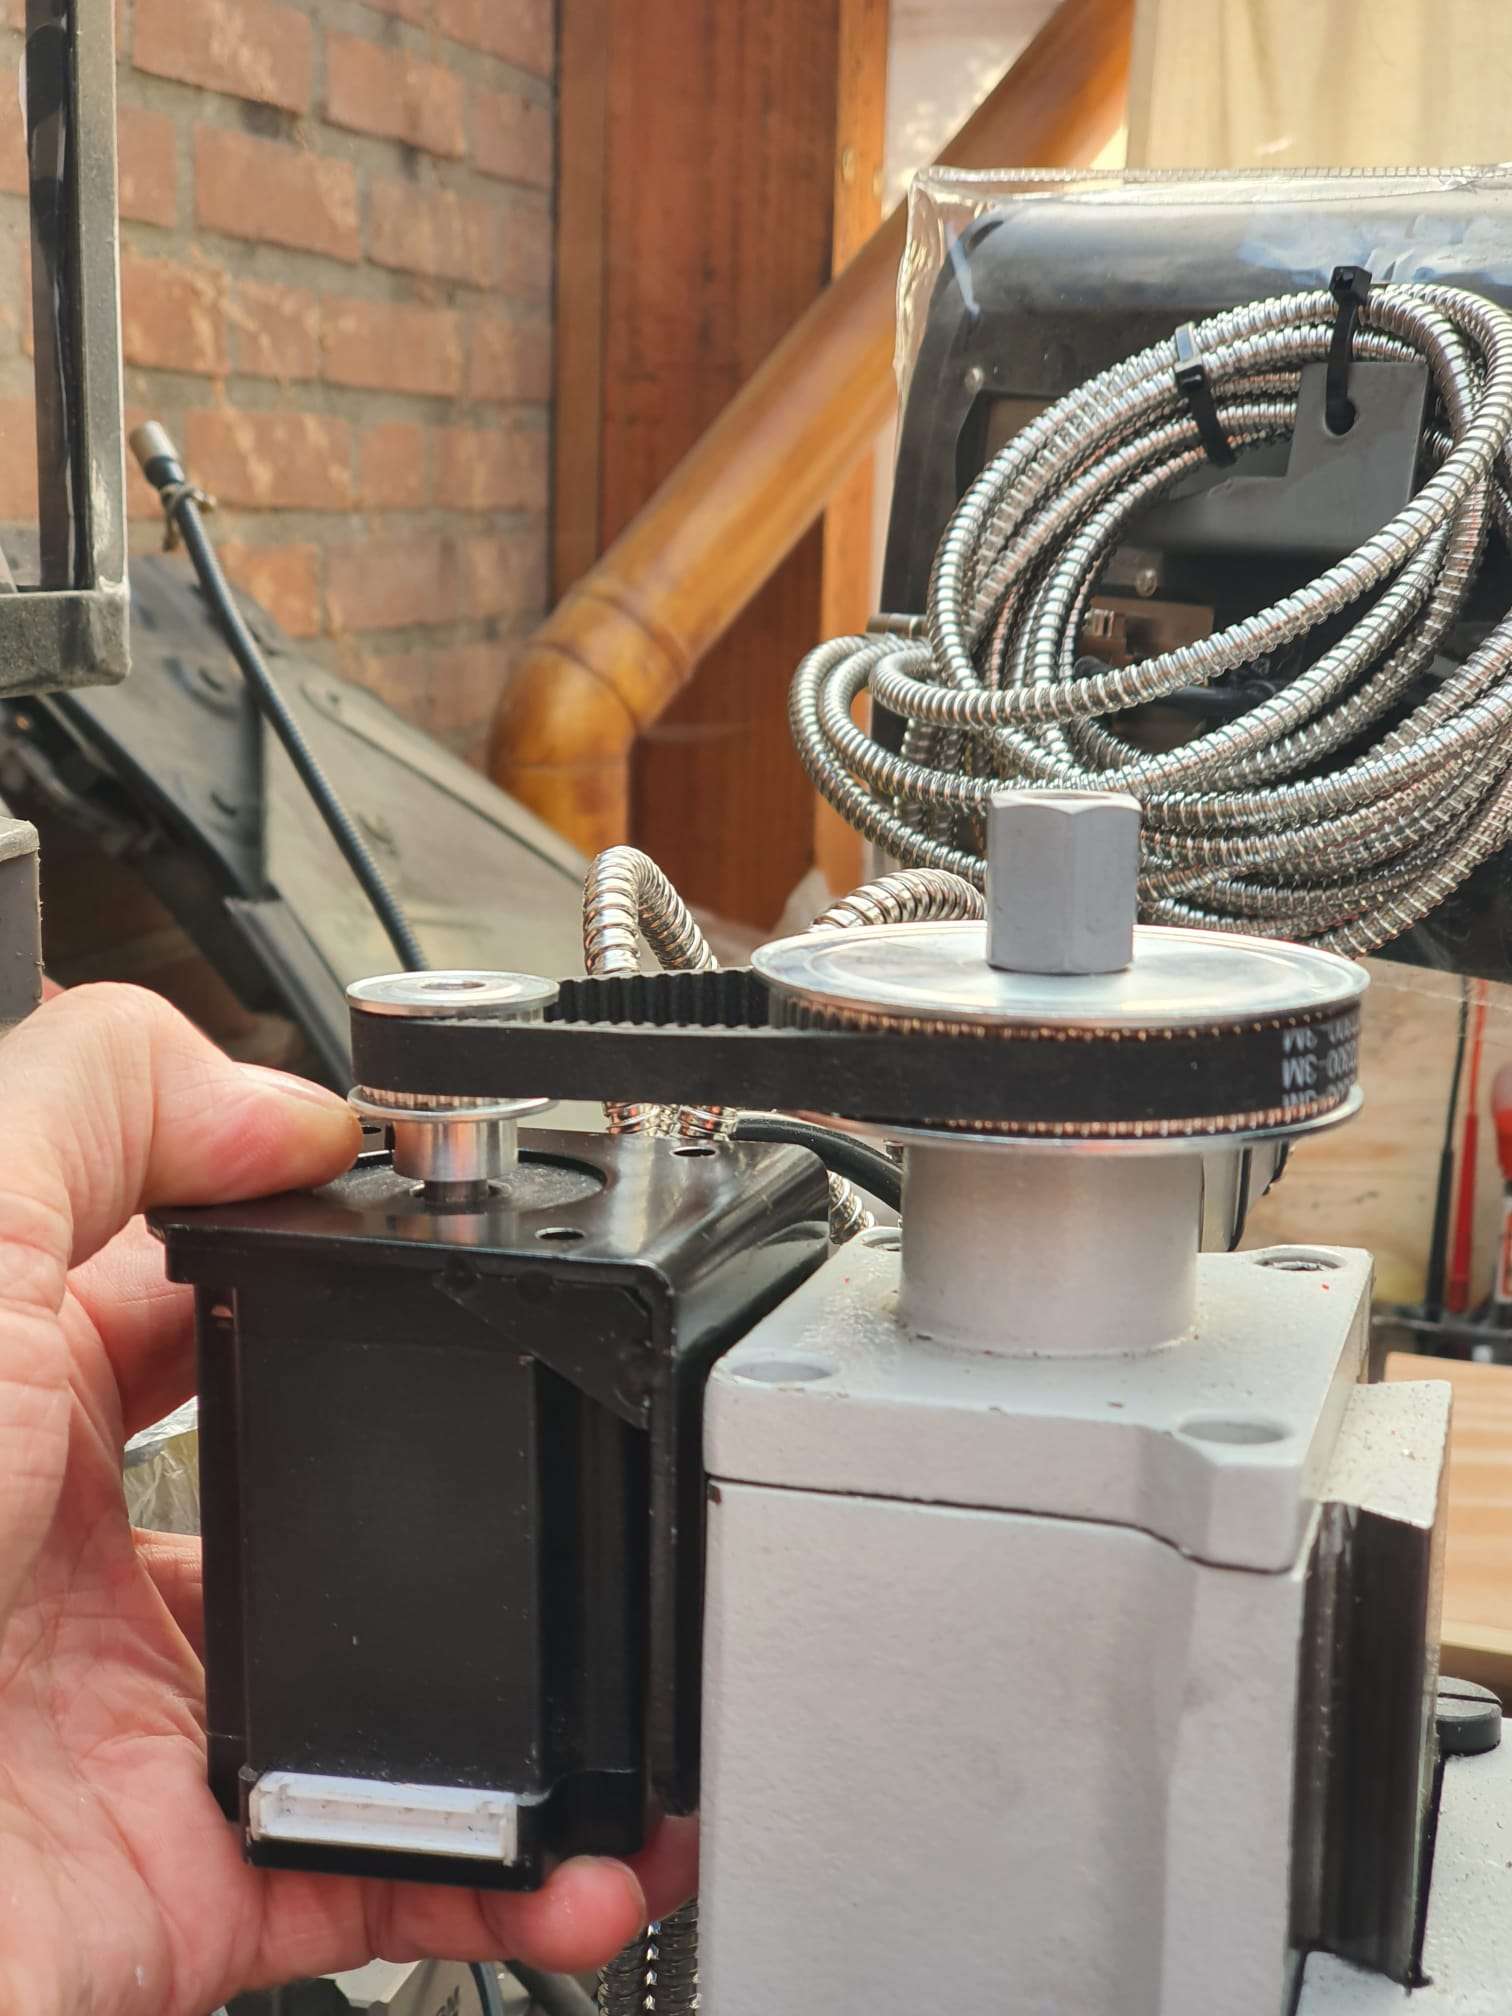
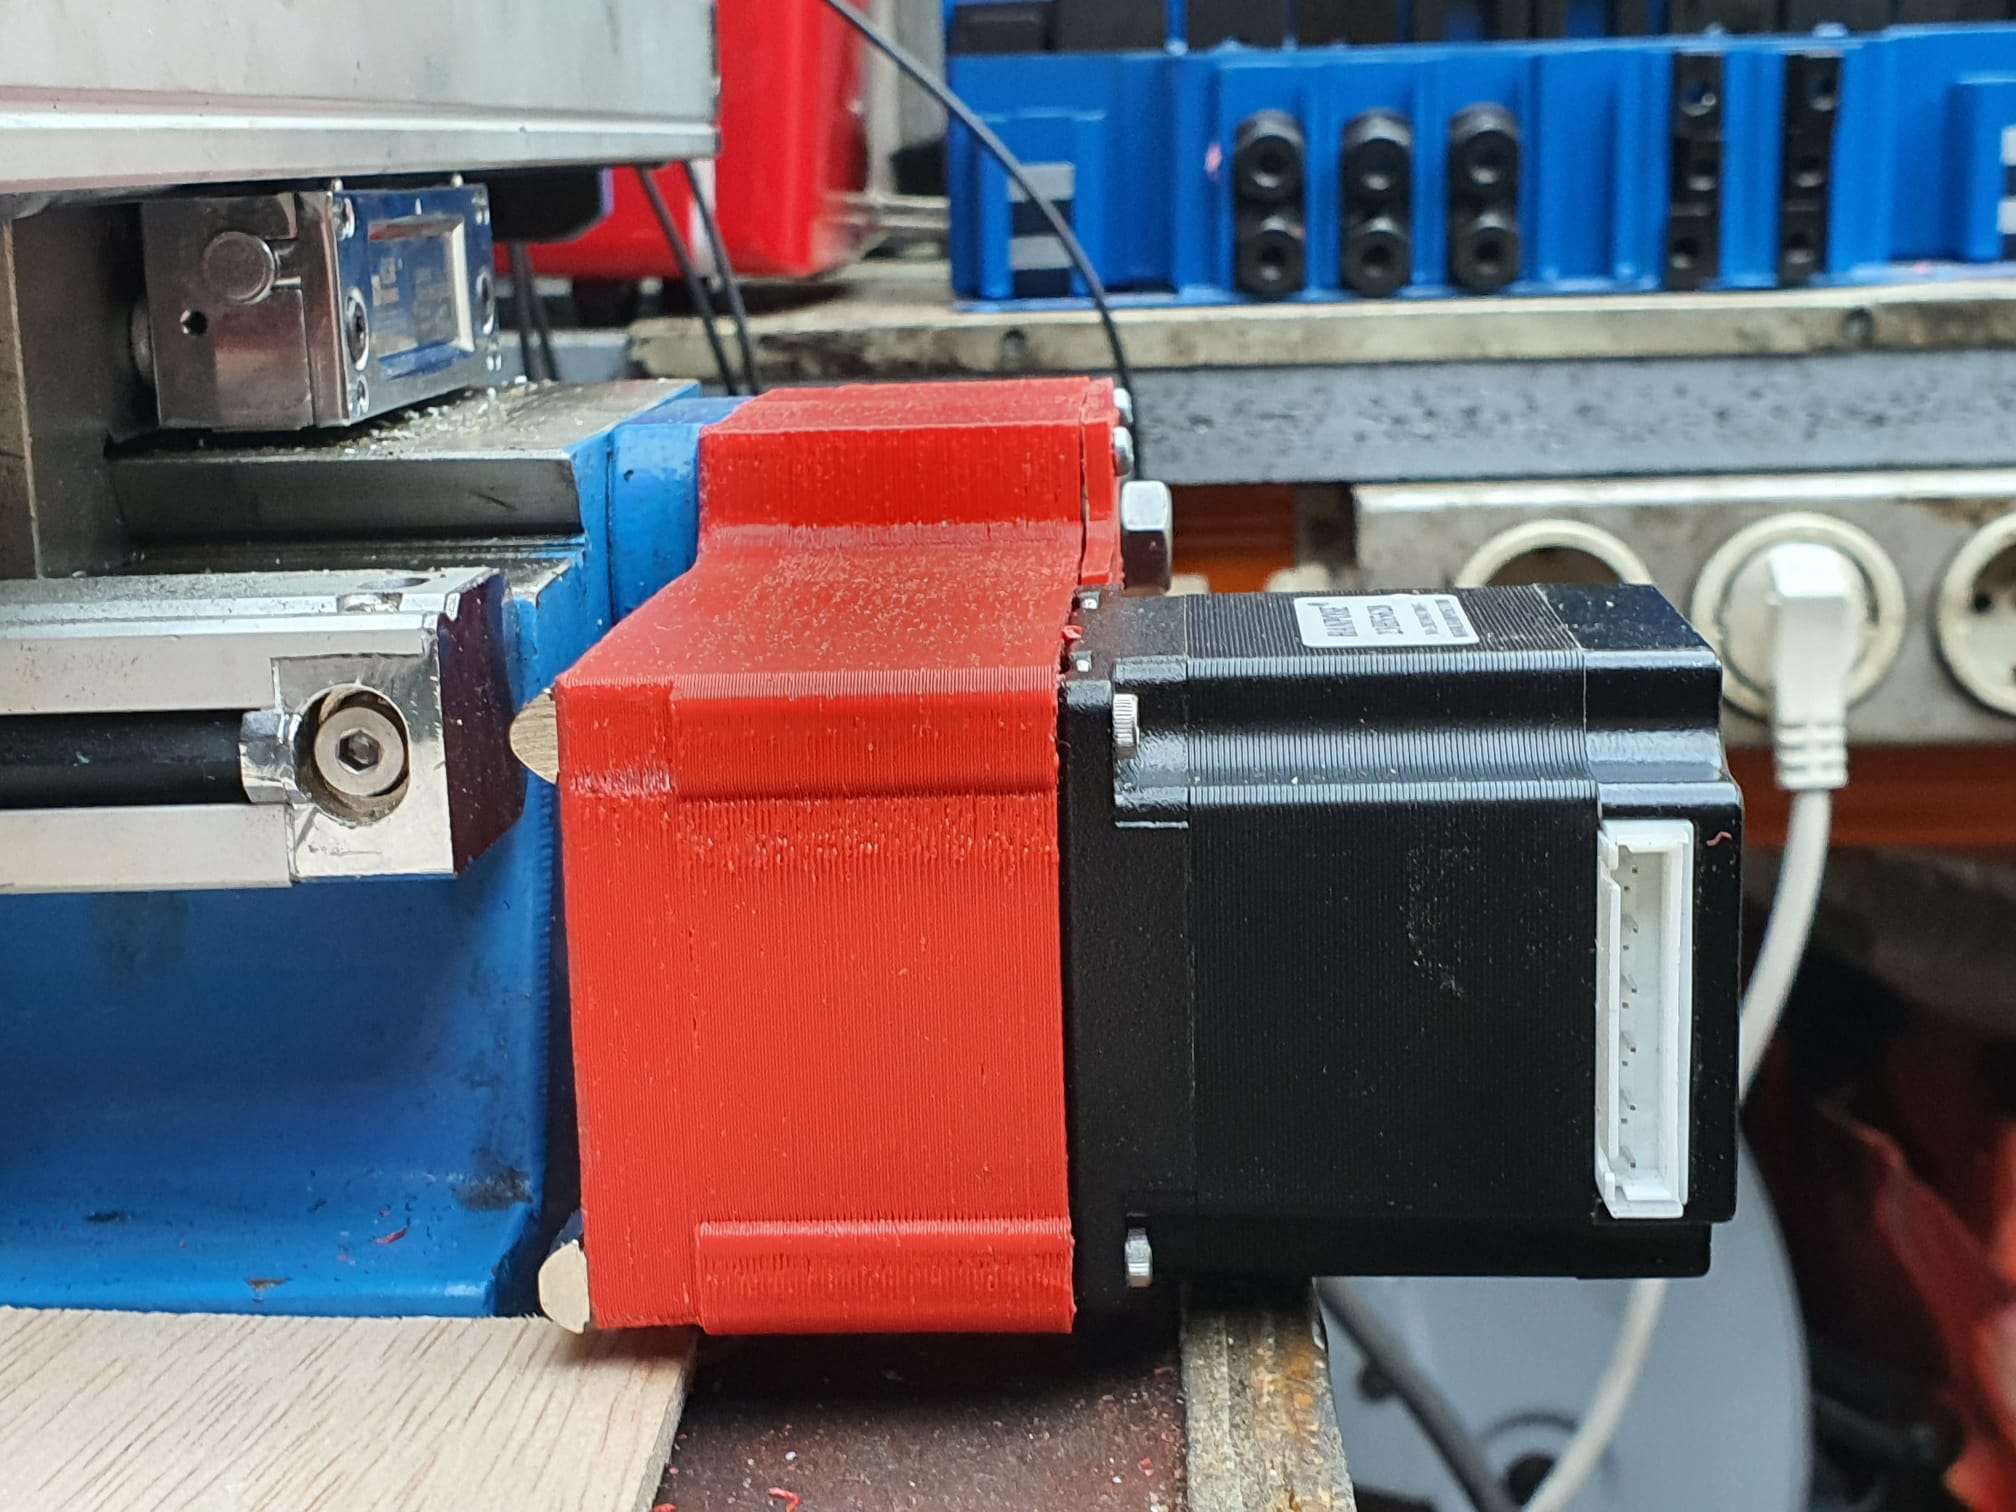
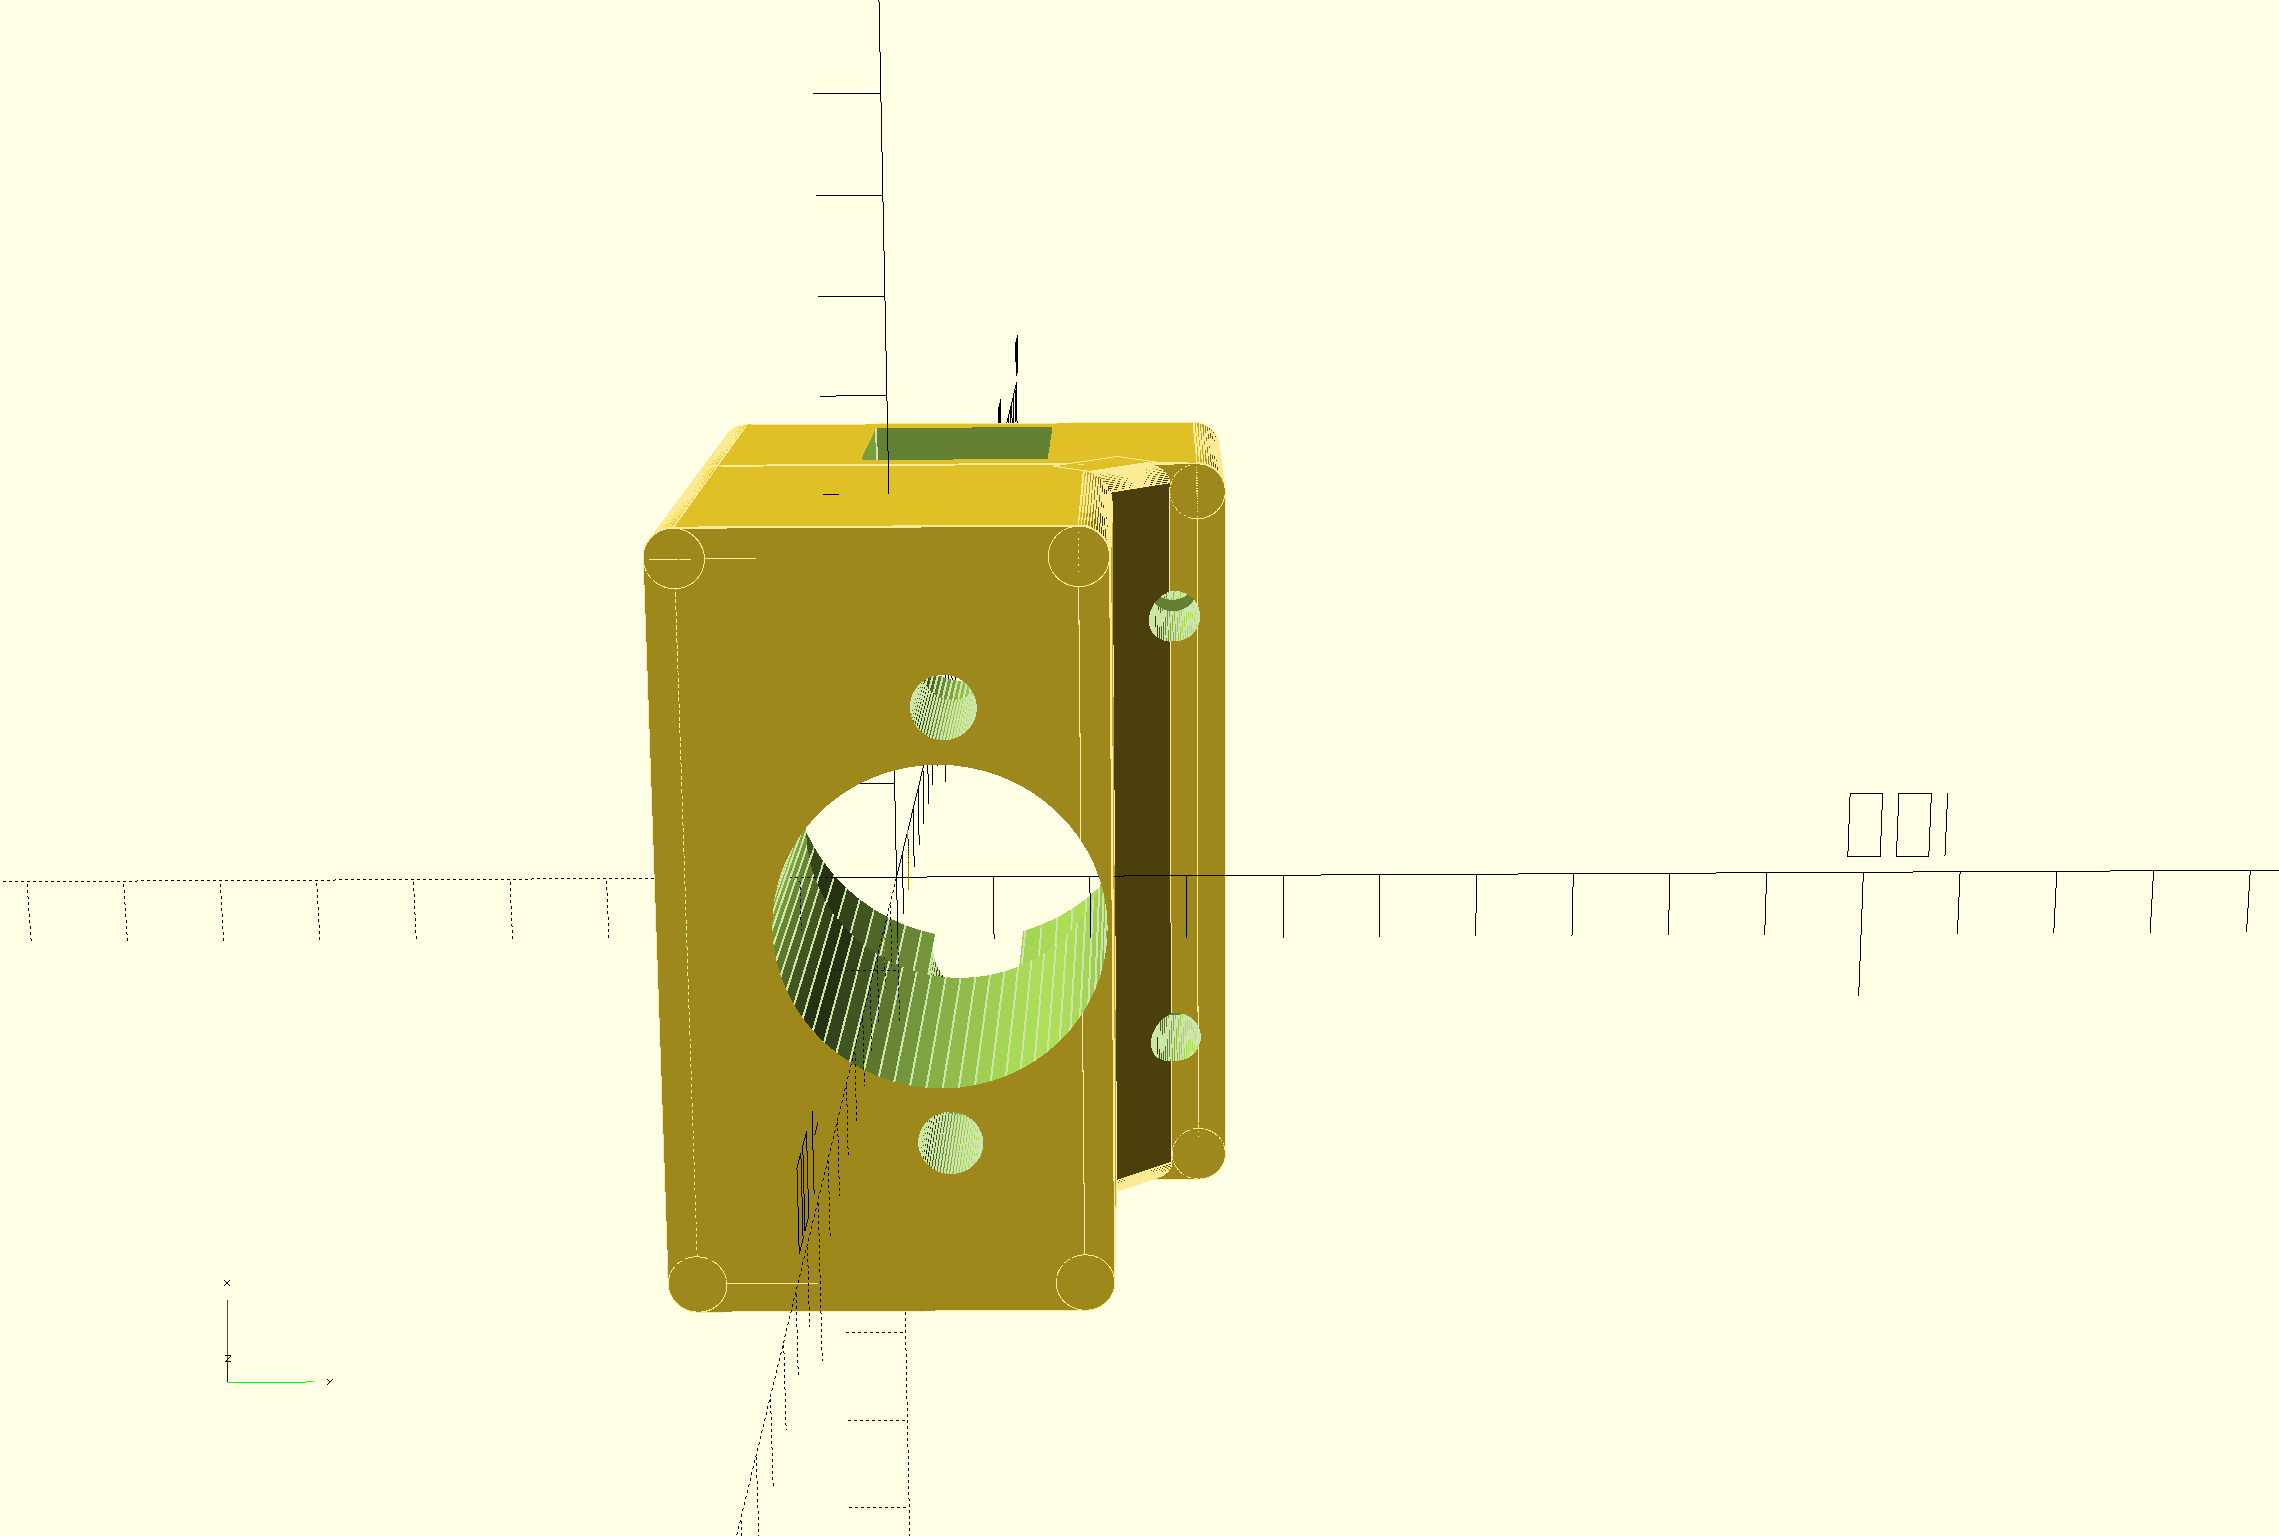
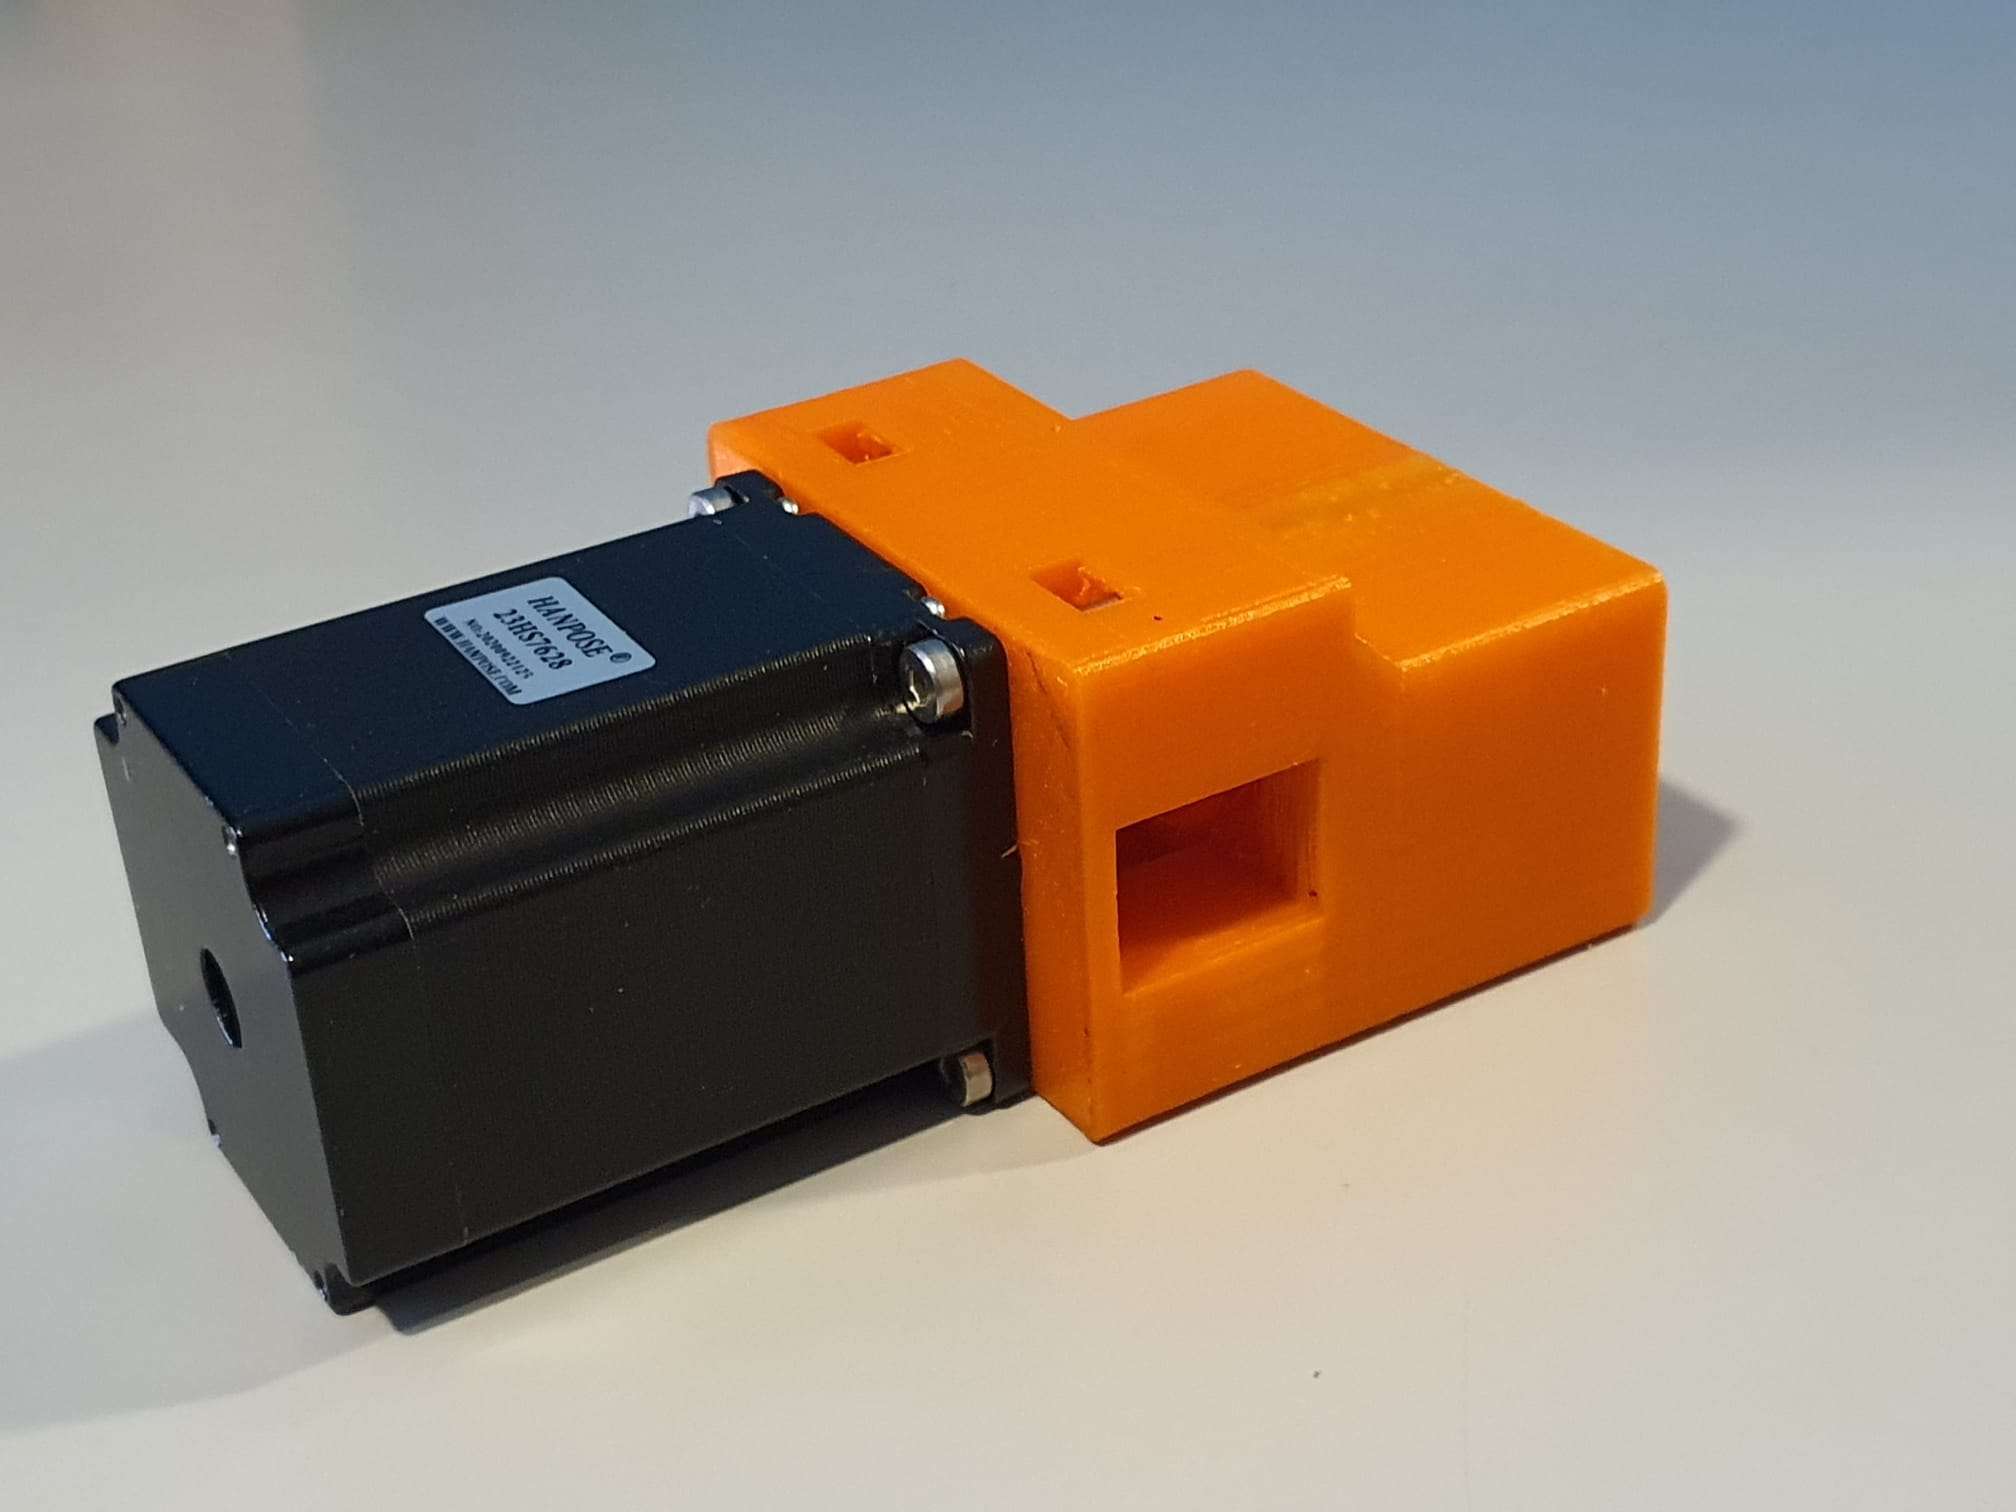
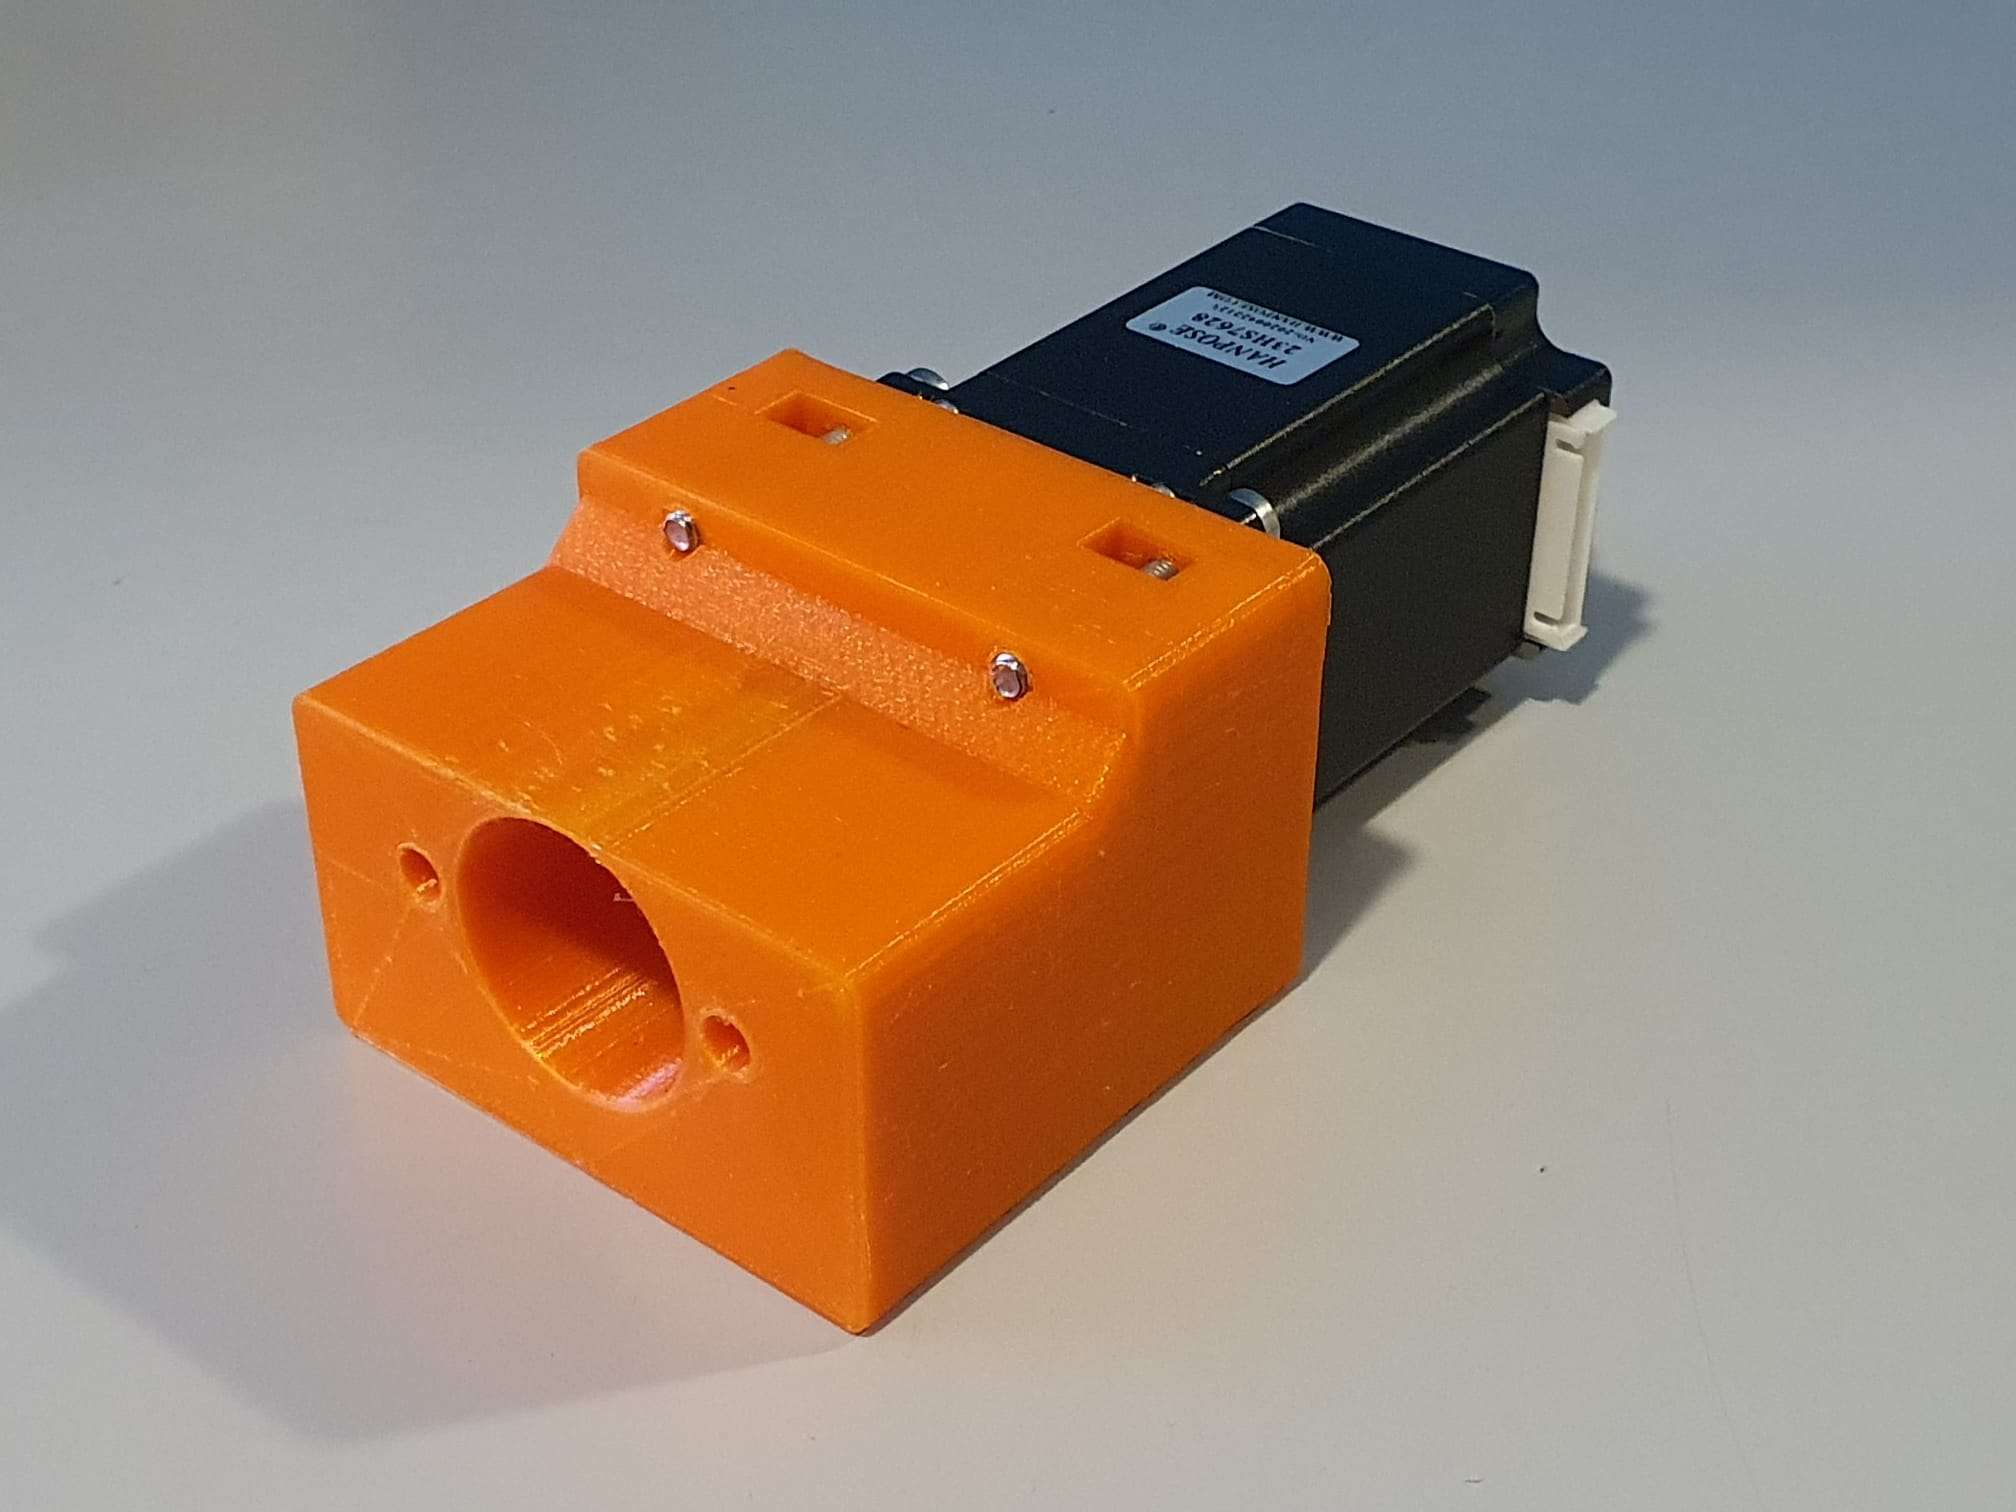
Dit is het tweede adapter onderdeel dat ik heb gemaakt, voor de X-as.
De lead schroef heeft een buitendeel voor het handwiel dat we gaan gebruiken voor CNC dat 10mm is, en wat schroefdraad 8mm. De schroefdraad is nodig om de hoeklagers (niet bedoeld voor zijdelingse torsie) met wat torsie aan de lagerhouder te bouten.
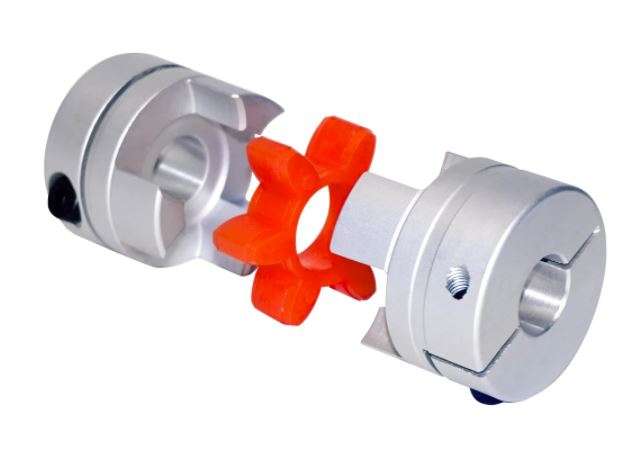
Als je direct drive doet, heb je een speciaal koppelstuk nodig dat in 2 kan worden gesplitst. Dan monteer je eerst één deel op de loodspil met wat ringen tussen de molen en het koppelstuk zodat de moer in het koppelstuk kan worden geplaatst. Als de schroefdraad te lang is, slijp je er wat af.
Plaats vervolgens het rubber (met middengat) terug in het gemonteerde deel van de koppeling en duw het andere deel in het rubber, zodat de koppeling compleet is.
Monteer vervolgens de geprinte adapter met reeds gemonteerde Nema23 motor op de Y-as en duw de Nema as in de koppeling. Gebruik het rechter werkvenster van de adapter om het koppelstuk op de Nema-as aan te draaien en klaar is kees!
Er kan ook een handwiel op maar dan moet je een stepper kopen met een as die zowel aan de voor- als aan de achterzijde zit (dit heet ‘dubbele as’ maar is eigenlijk gewoon een langere as.
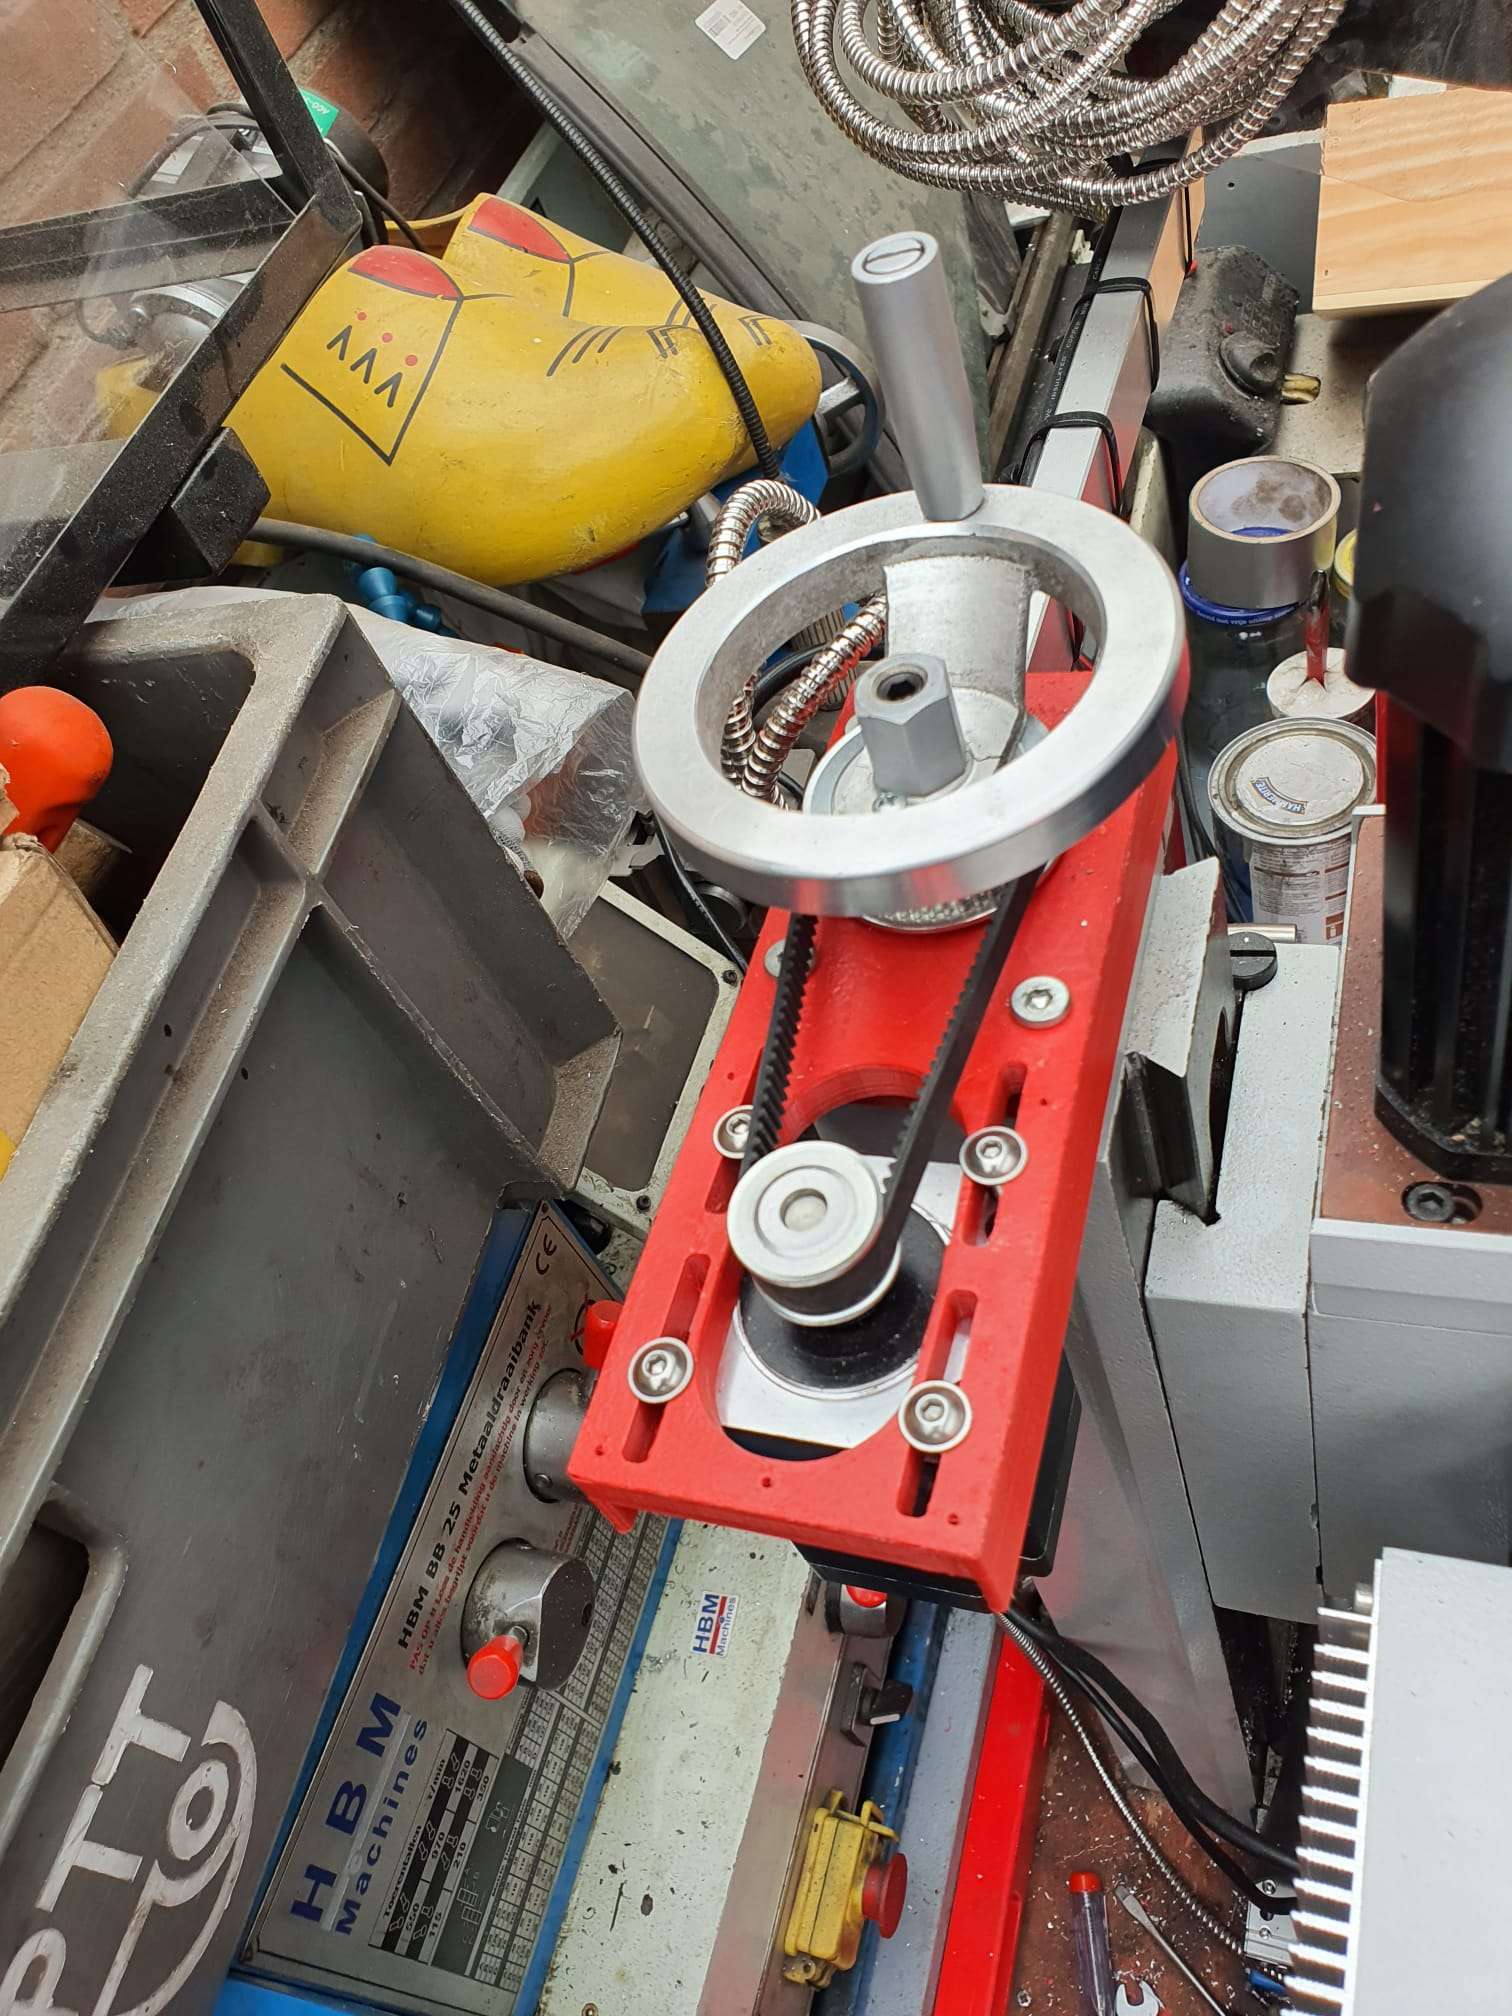
Terwijl ik mijn CNC adapterplaten met tandwielen en riemen aan het maken was, ontdekte ik dat er niet veel kant-en-klaar bestaat voor deze conversies.
Daarom ben ik ook adapteronderdelen voor directe aandrijving aan het maken, om dit uit te proberen.
Dit is de eerste, te beginnen met de moeilijkste. De rest zal spoedig worden toegevoegd.
Versie 1.2 die 15 mm korter is en veel robuuster:
De lead schroef heeft een buitendeel voor het handwiel dat we gaan gebruiken voor CNC dat 10mm is, en wat schroefdraad 8mm. De schroefdraad is nodig om de hoeklagers (niet bedoeld voor zijdelingse torsie) met wat torsie aan de lagerhouder te bouten.
Als je directe aandrijving doet, heb je een speciaal koppelstuk nodig dat in 2 kan worden gesplitst. Dan monteer je eerst een deel op de loodspil met wat ringen tussen de molen en het koppelstuk zodat de moer in het koppelstuk kan worden geplaatst. Als de schroefdraad te lang is, slijp je er wat af.
Plaats vervolgens het rubber (met middengat) terug in het gemonteerde deel van de koppeling en duw het andere deel in het rubber, zodat de koppeling compleet is.
Monteer vervolgens de geprinte adapter met reeds gemonteerde Nema23 motor op de Y-as en duw de Nema as in de koppeling. Gebruik het rechter werkvenster van de adapter om het koppelstuk op de Nema-as aan te draaien en klaar is kees!
Mocht je ook een handwiel willen hebben, dan zul je een stepper moeten kopen met een as die zowel voor als achter zit. (dit heet ‘dubbele as’ maar is eigenlijk een langere as, uiteraard.
OF- mijn laatste ontwerp werkt een beetje anders: zet eerst een paar 10mm ringen op de 10mm as van de leadcrew, en schroef dan een RVS buis met schroefdraad met een buitendiameter van 12mm, 25 mm lang en inwendige 8mm schroefdraad op de as. Dit gaat in een 12 naar 8mm coupler en deze coupler wordt aangesloten op een NEMA23 stappenmotor met een 8 mm as. Het wordt wel een beetje langdradig maar het werkt heel goed. Gewoon de RVS schroefdraadbuis aan het 8mm draadeind van de leadcrew vastschroeven en het loopt prima!
Dit is de laatste versie, gebaseerd op de bovenstaande opstelling:
Terwijl ik mijn CNC adapterplaten met tandwielen en riemen aan het maken was, ontdekte ik dat er niet veel kant-en-klaar bestaat voor deze conversies.
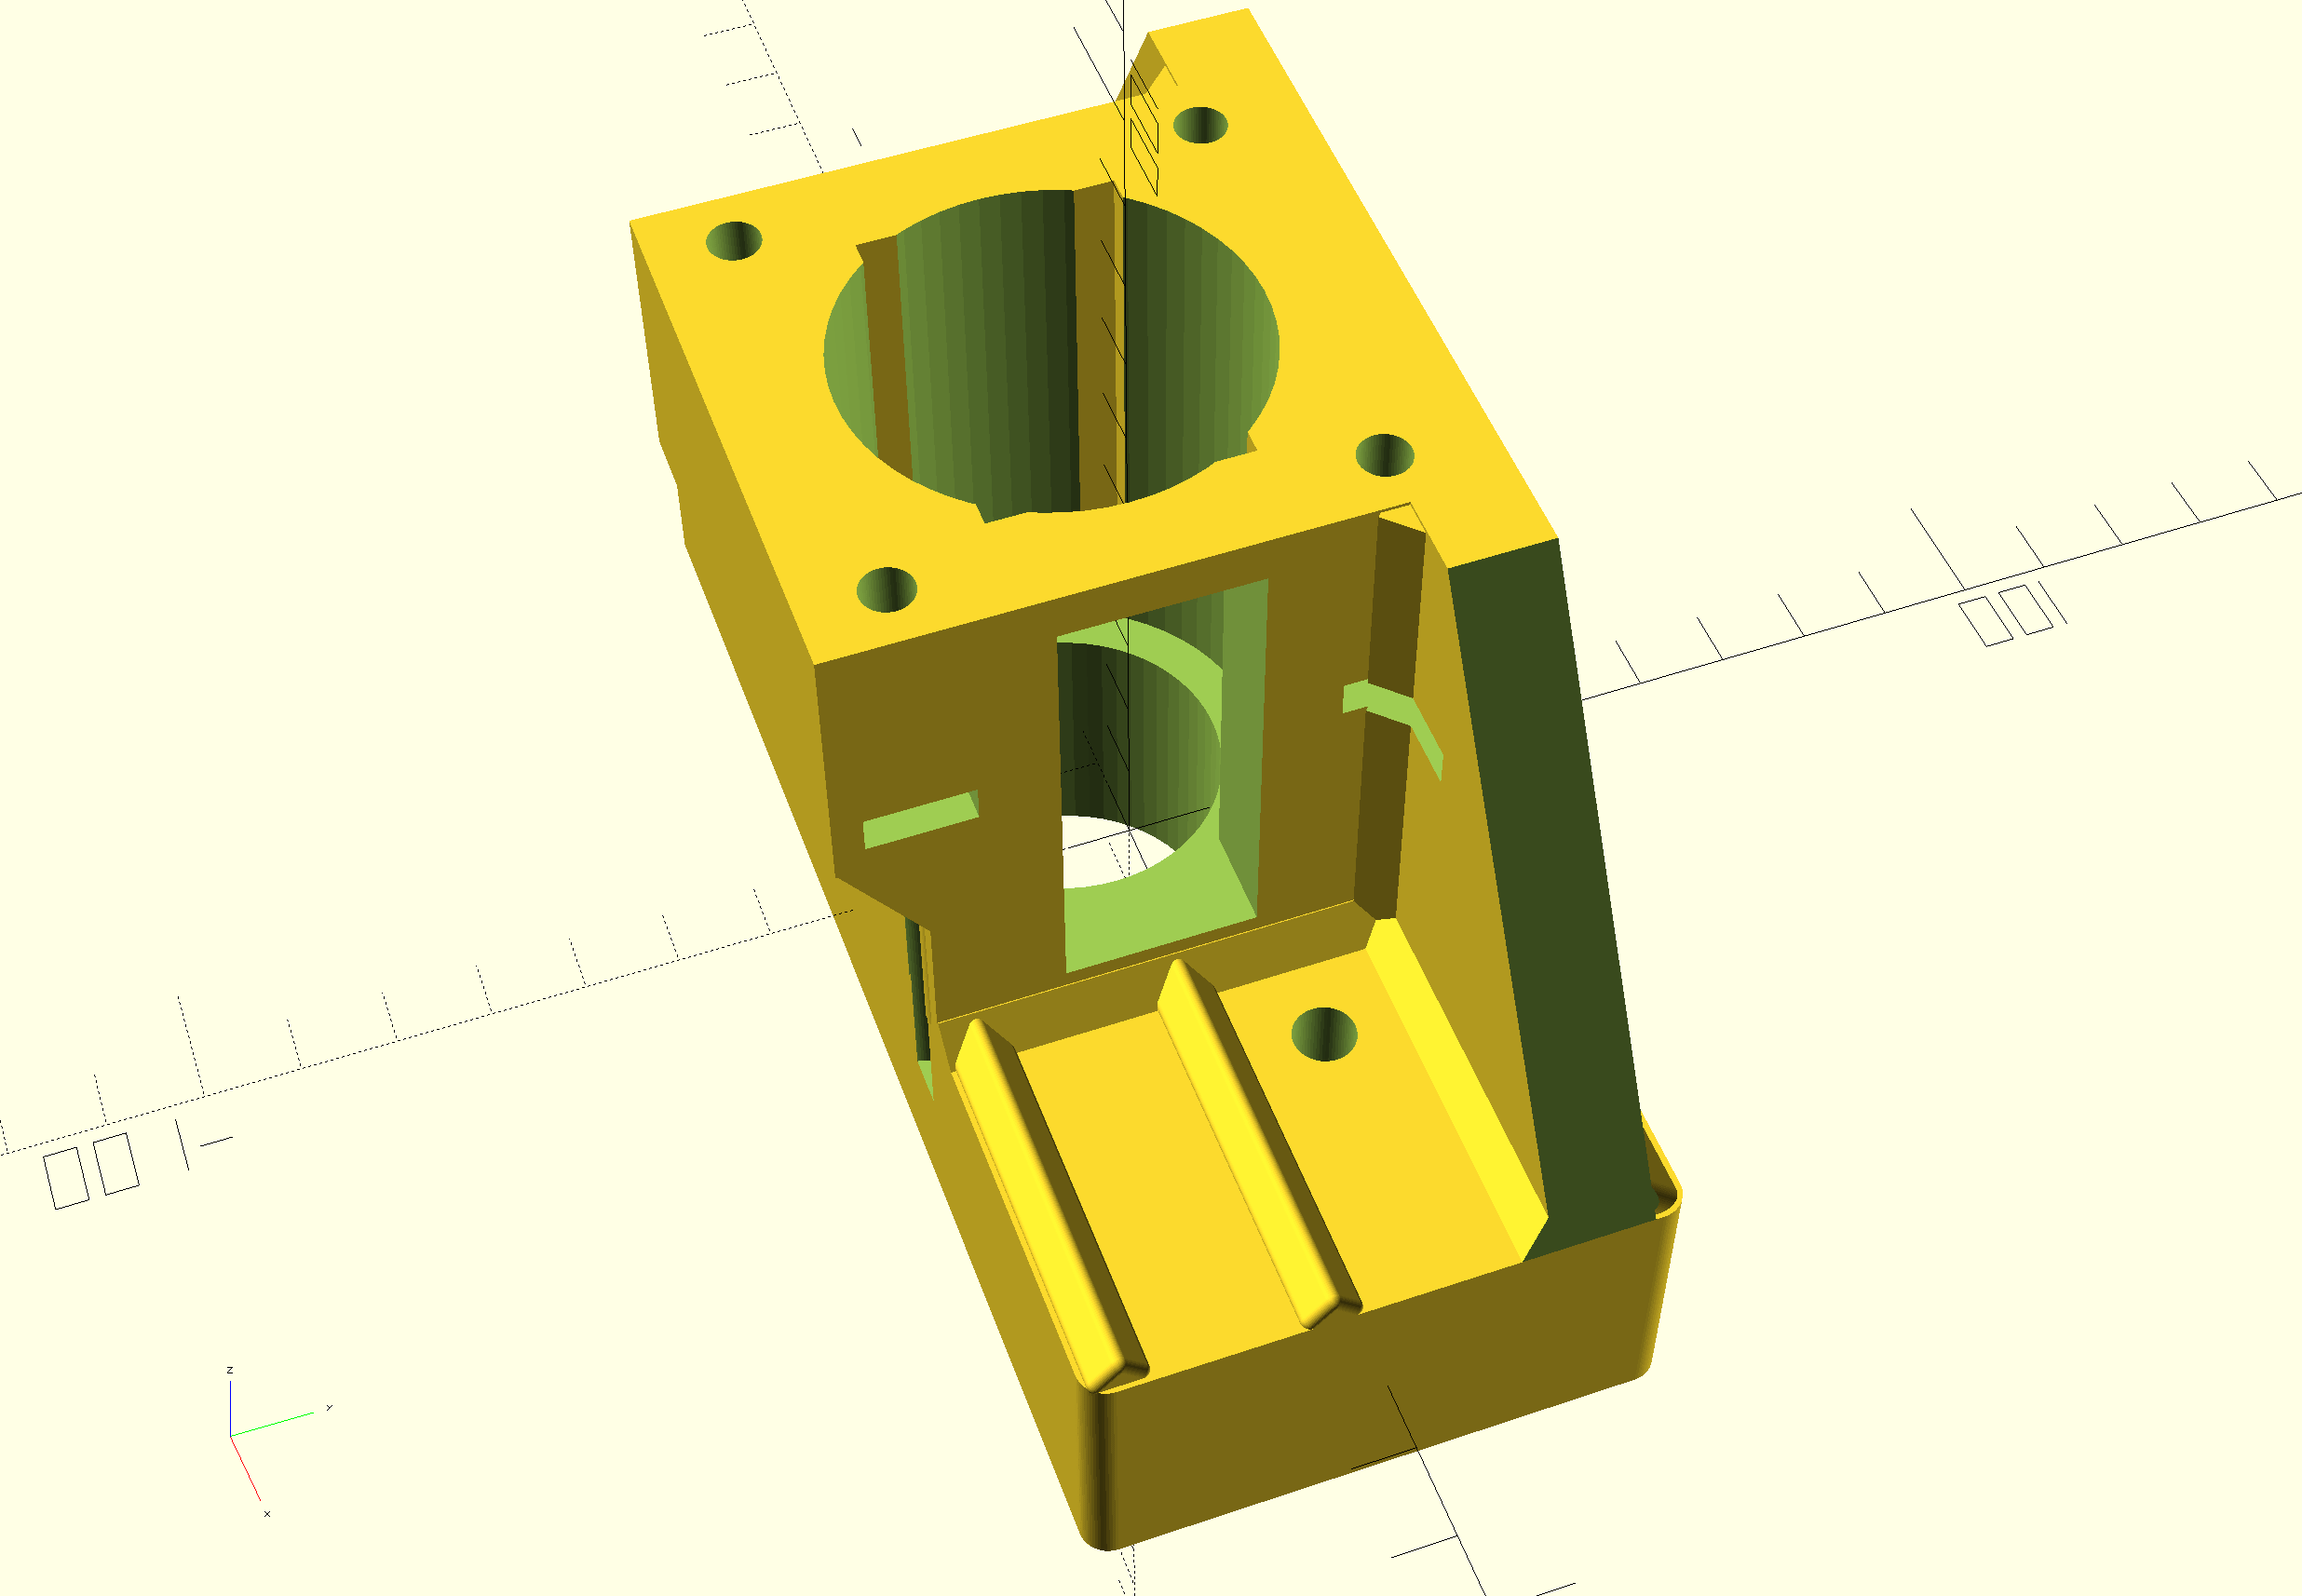
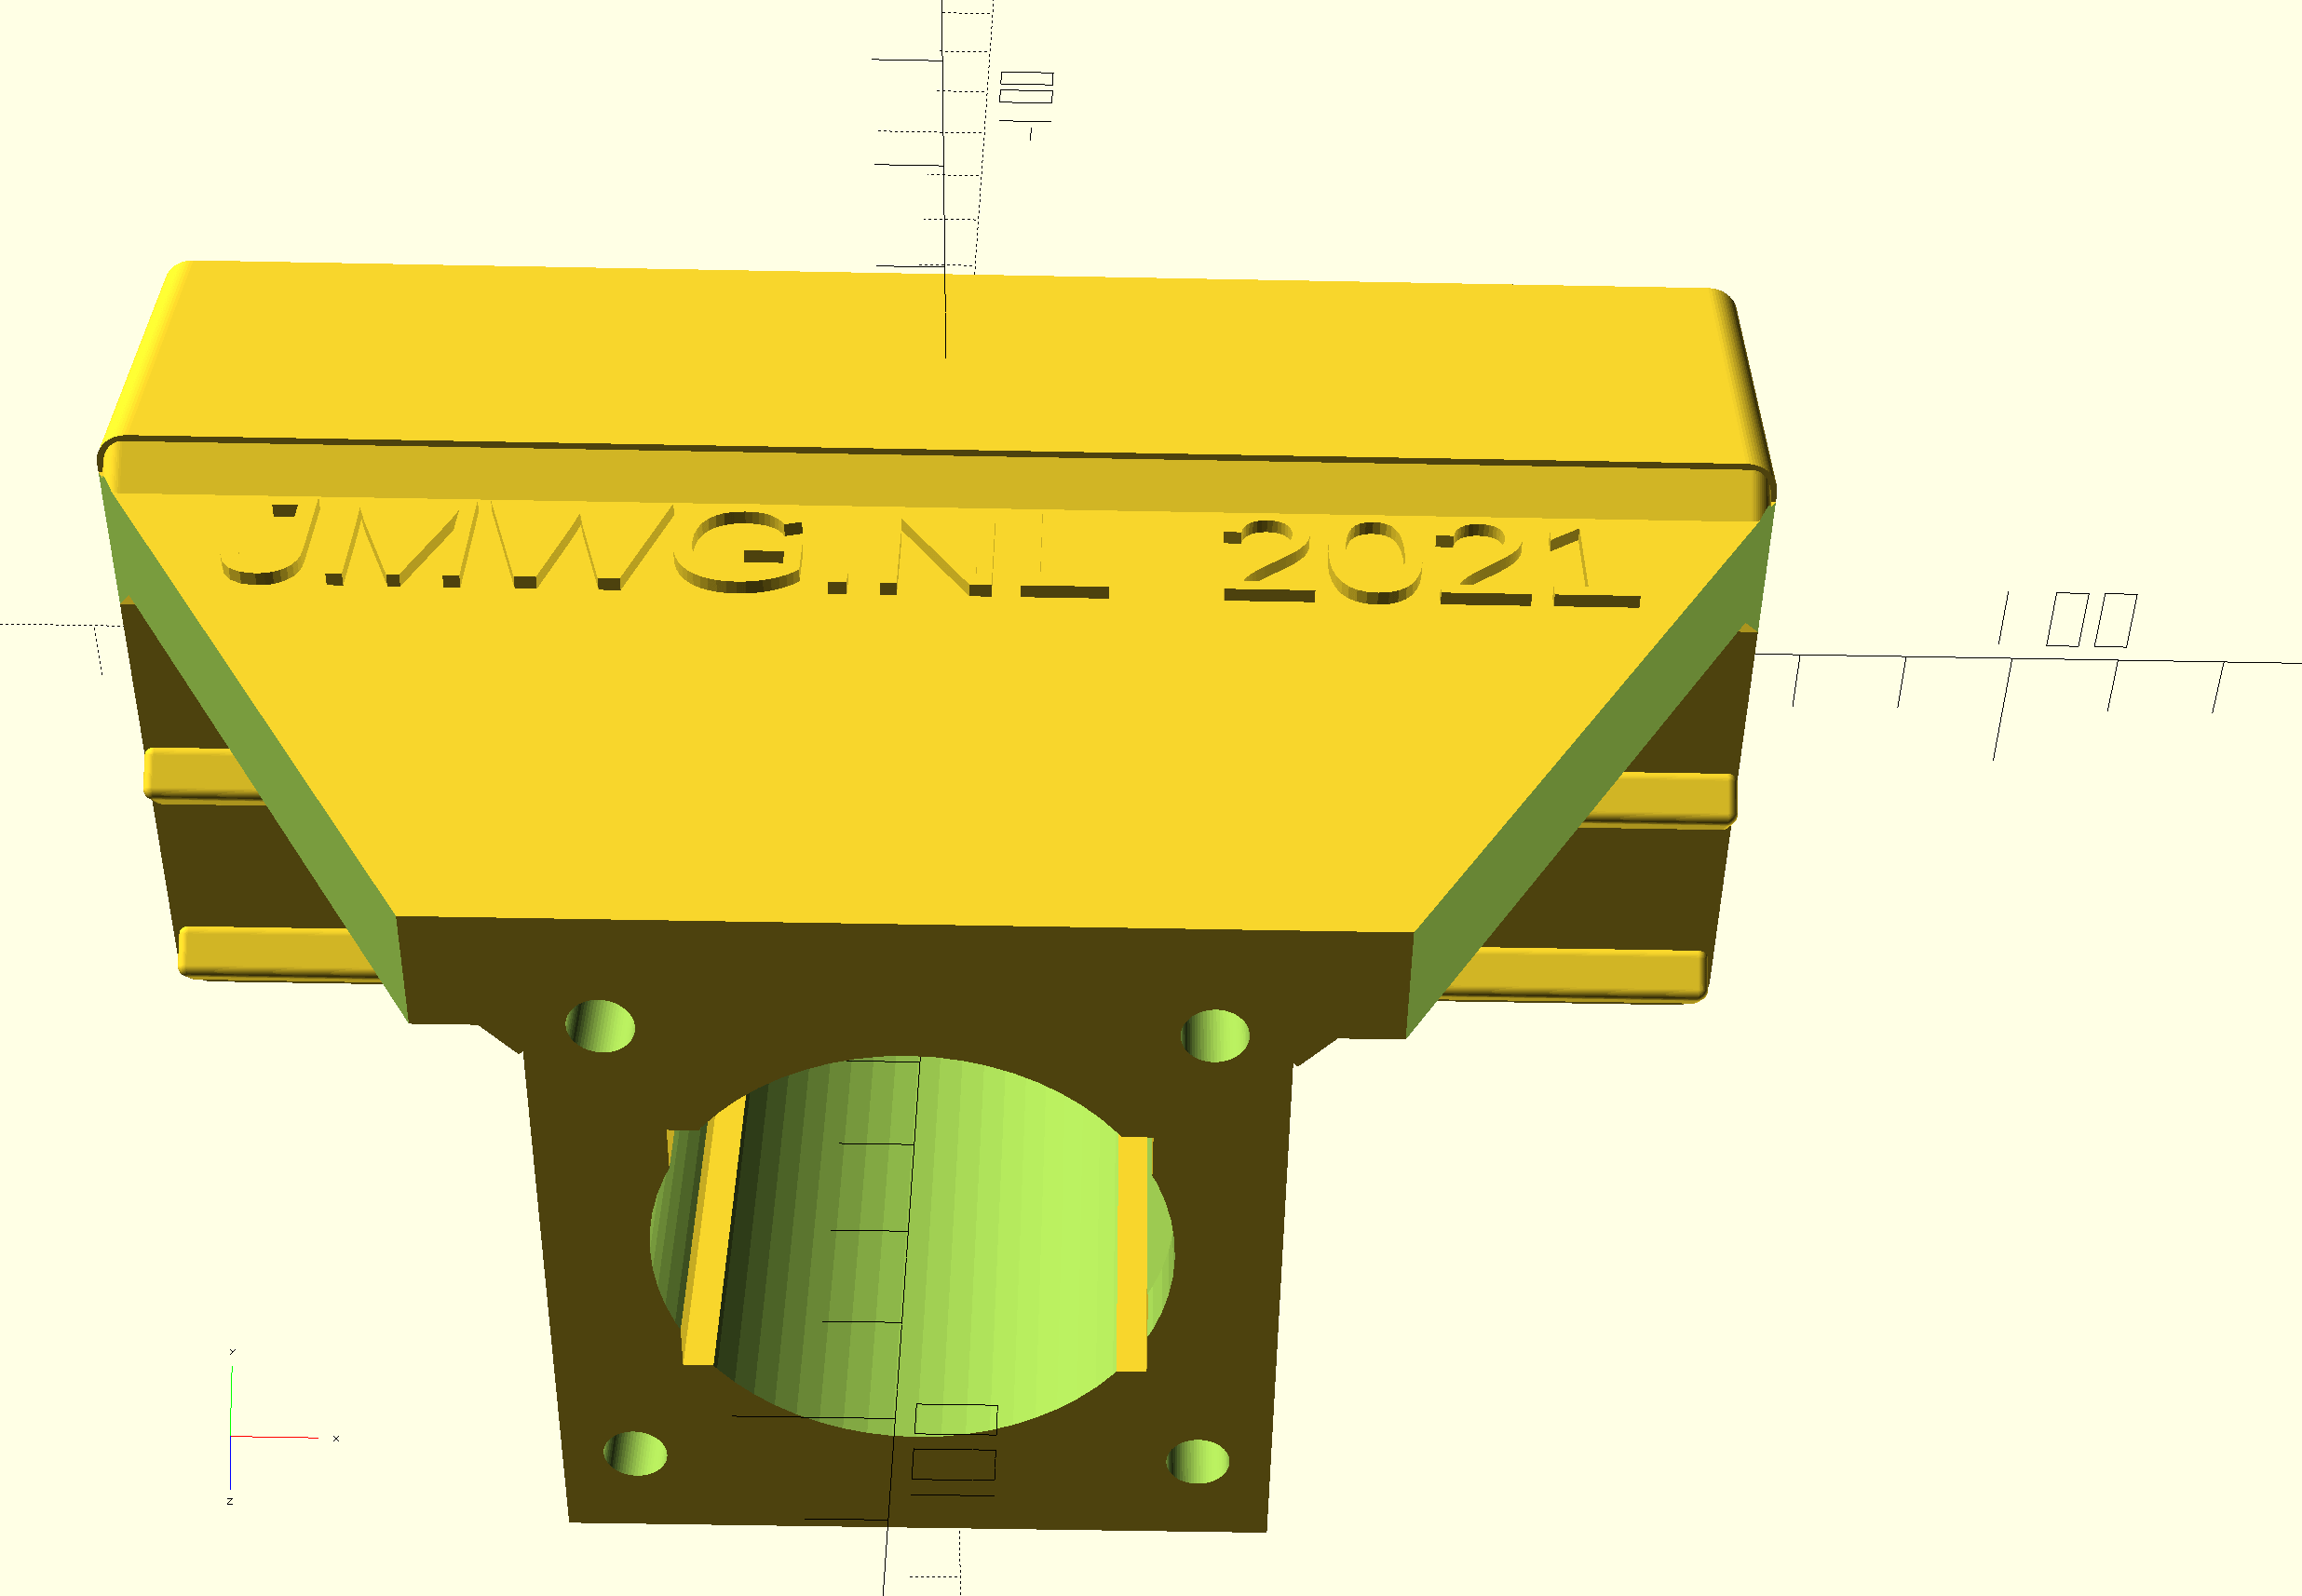
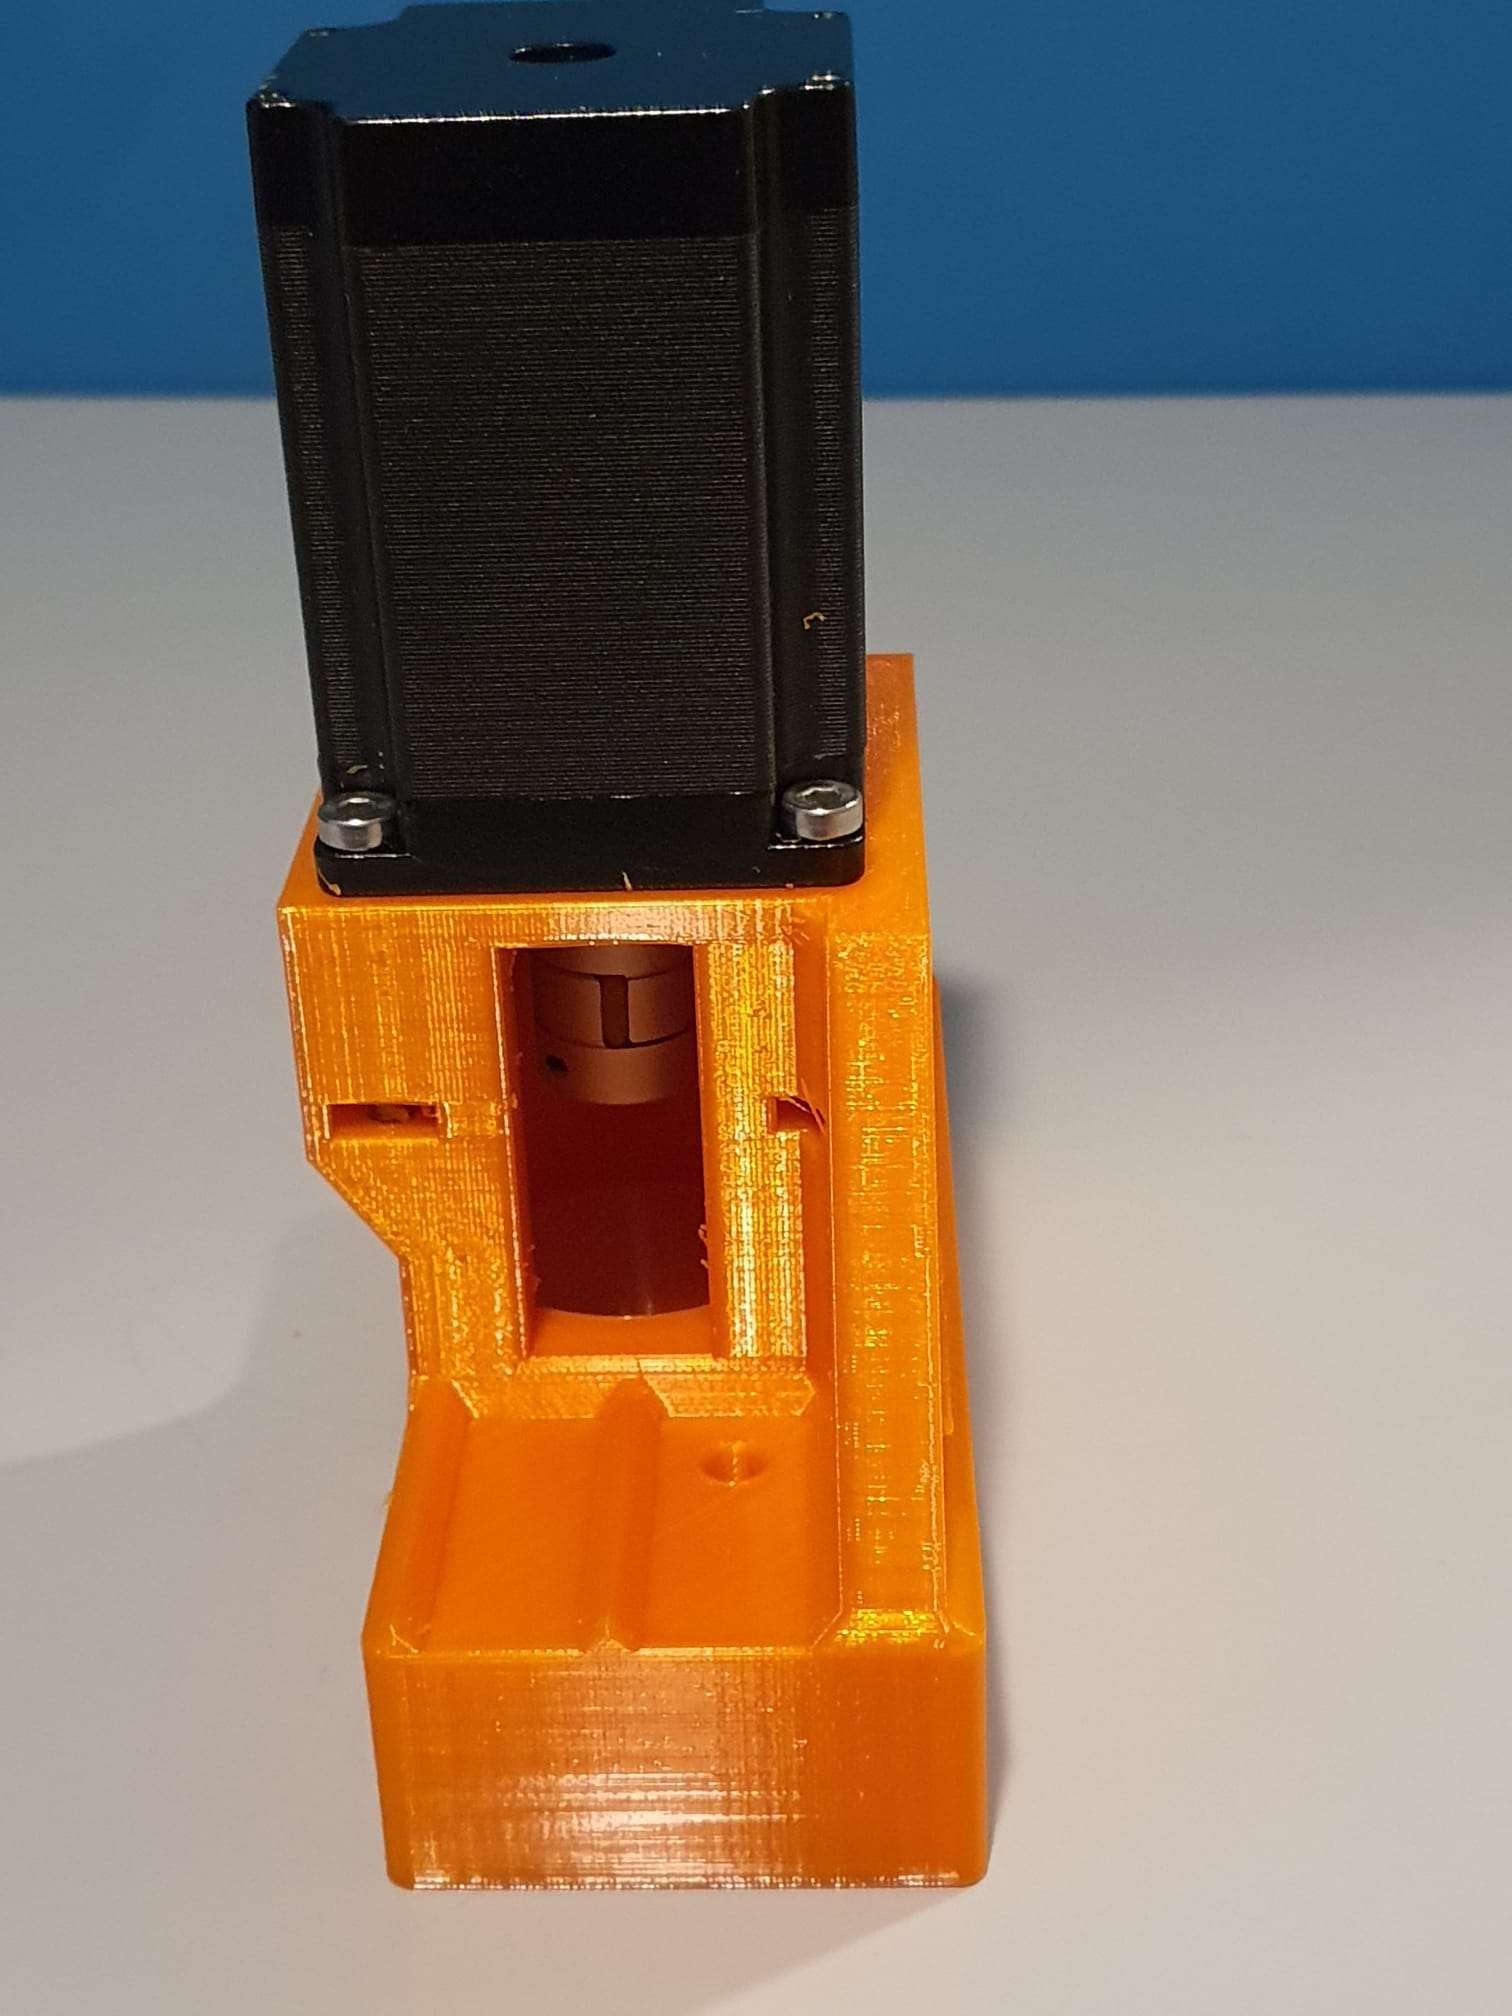
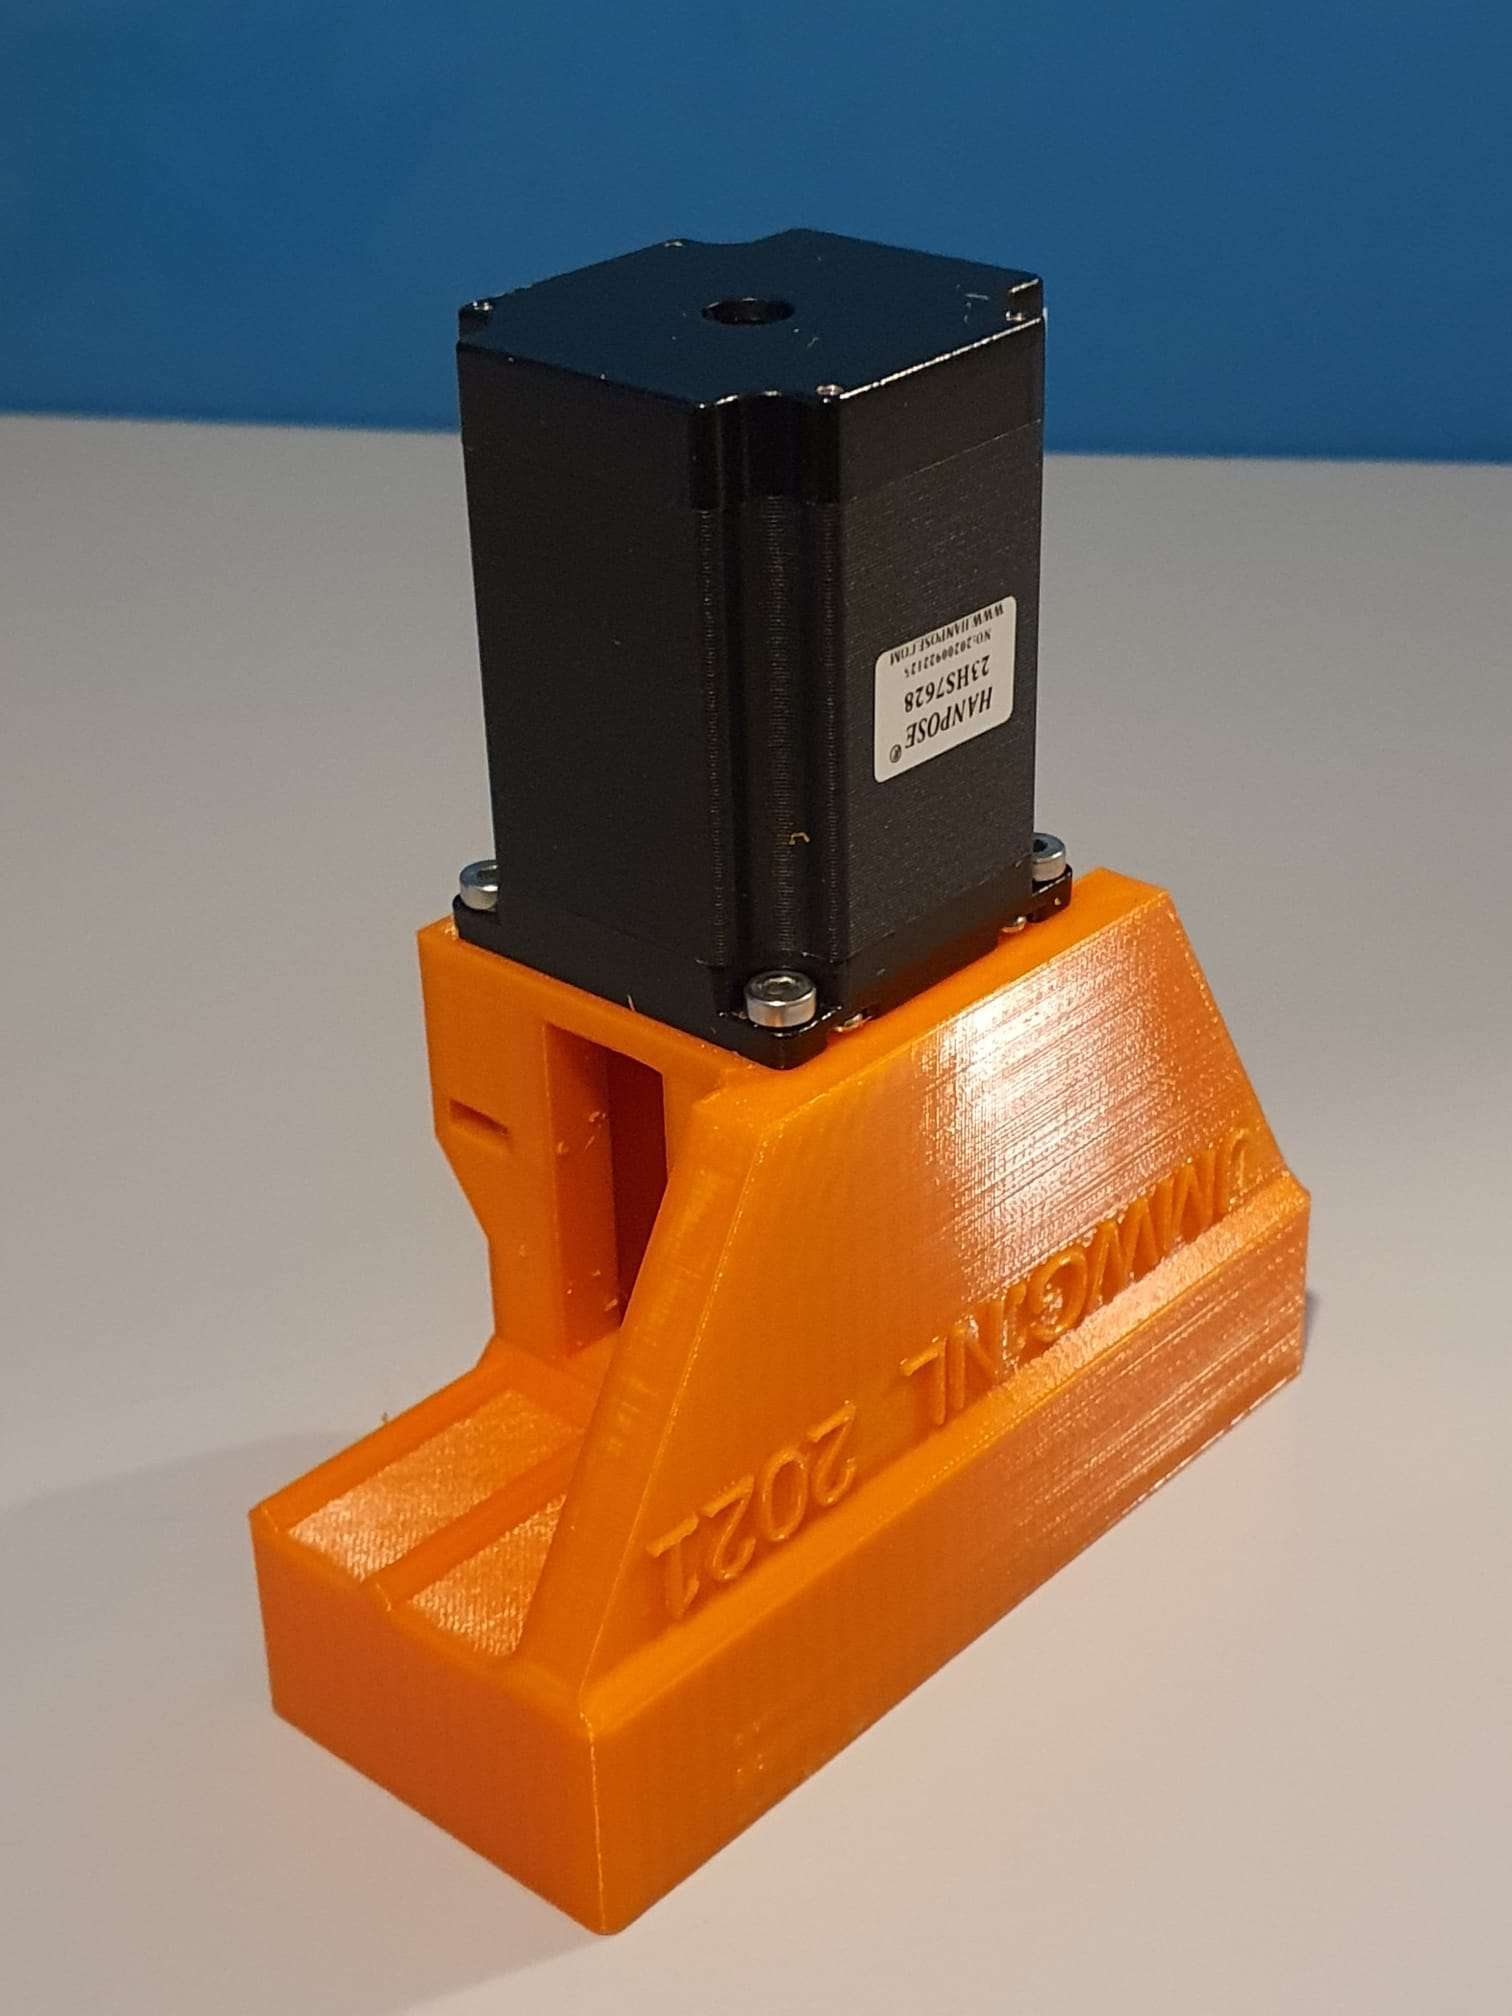
Daarom ben ik ook adapteronderdelen voor direct drive aan het maken, om dit uit te proberen. Ik heb er sterkere NEMA23 motoren voor aangeschaft.
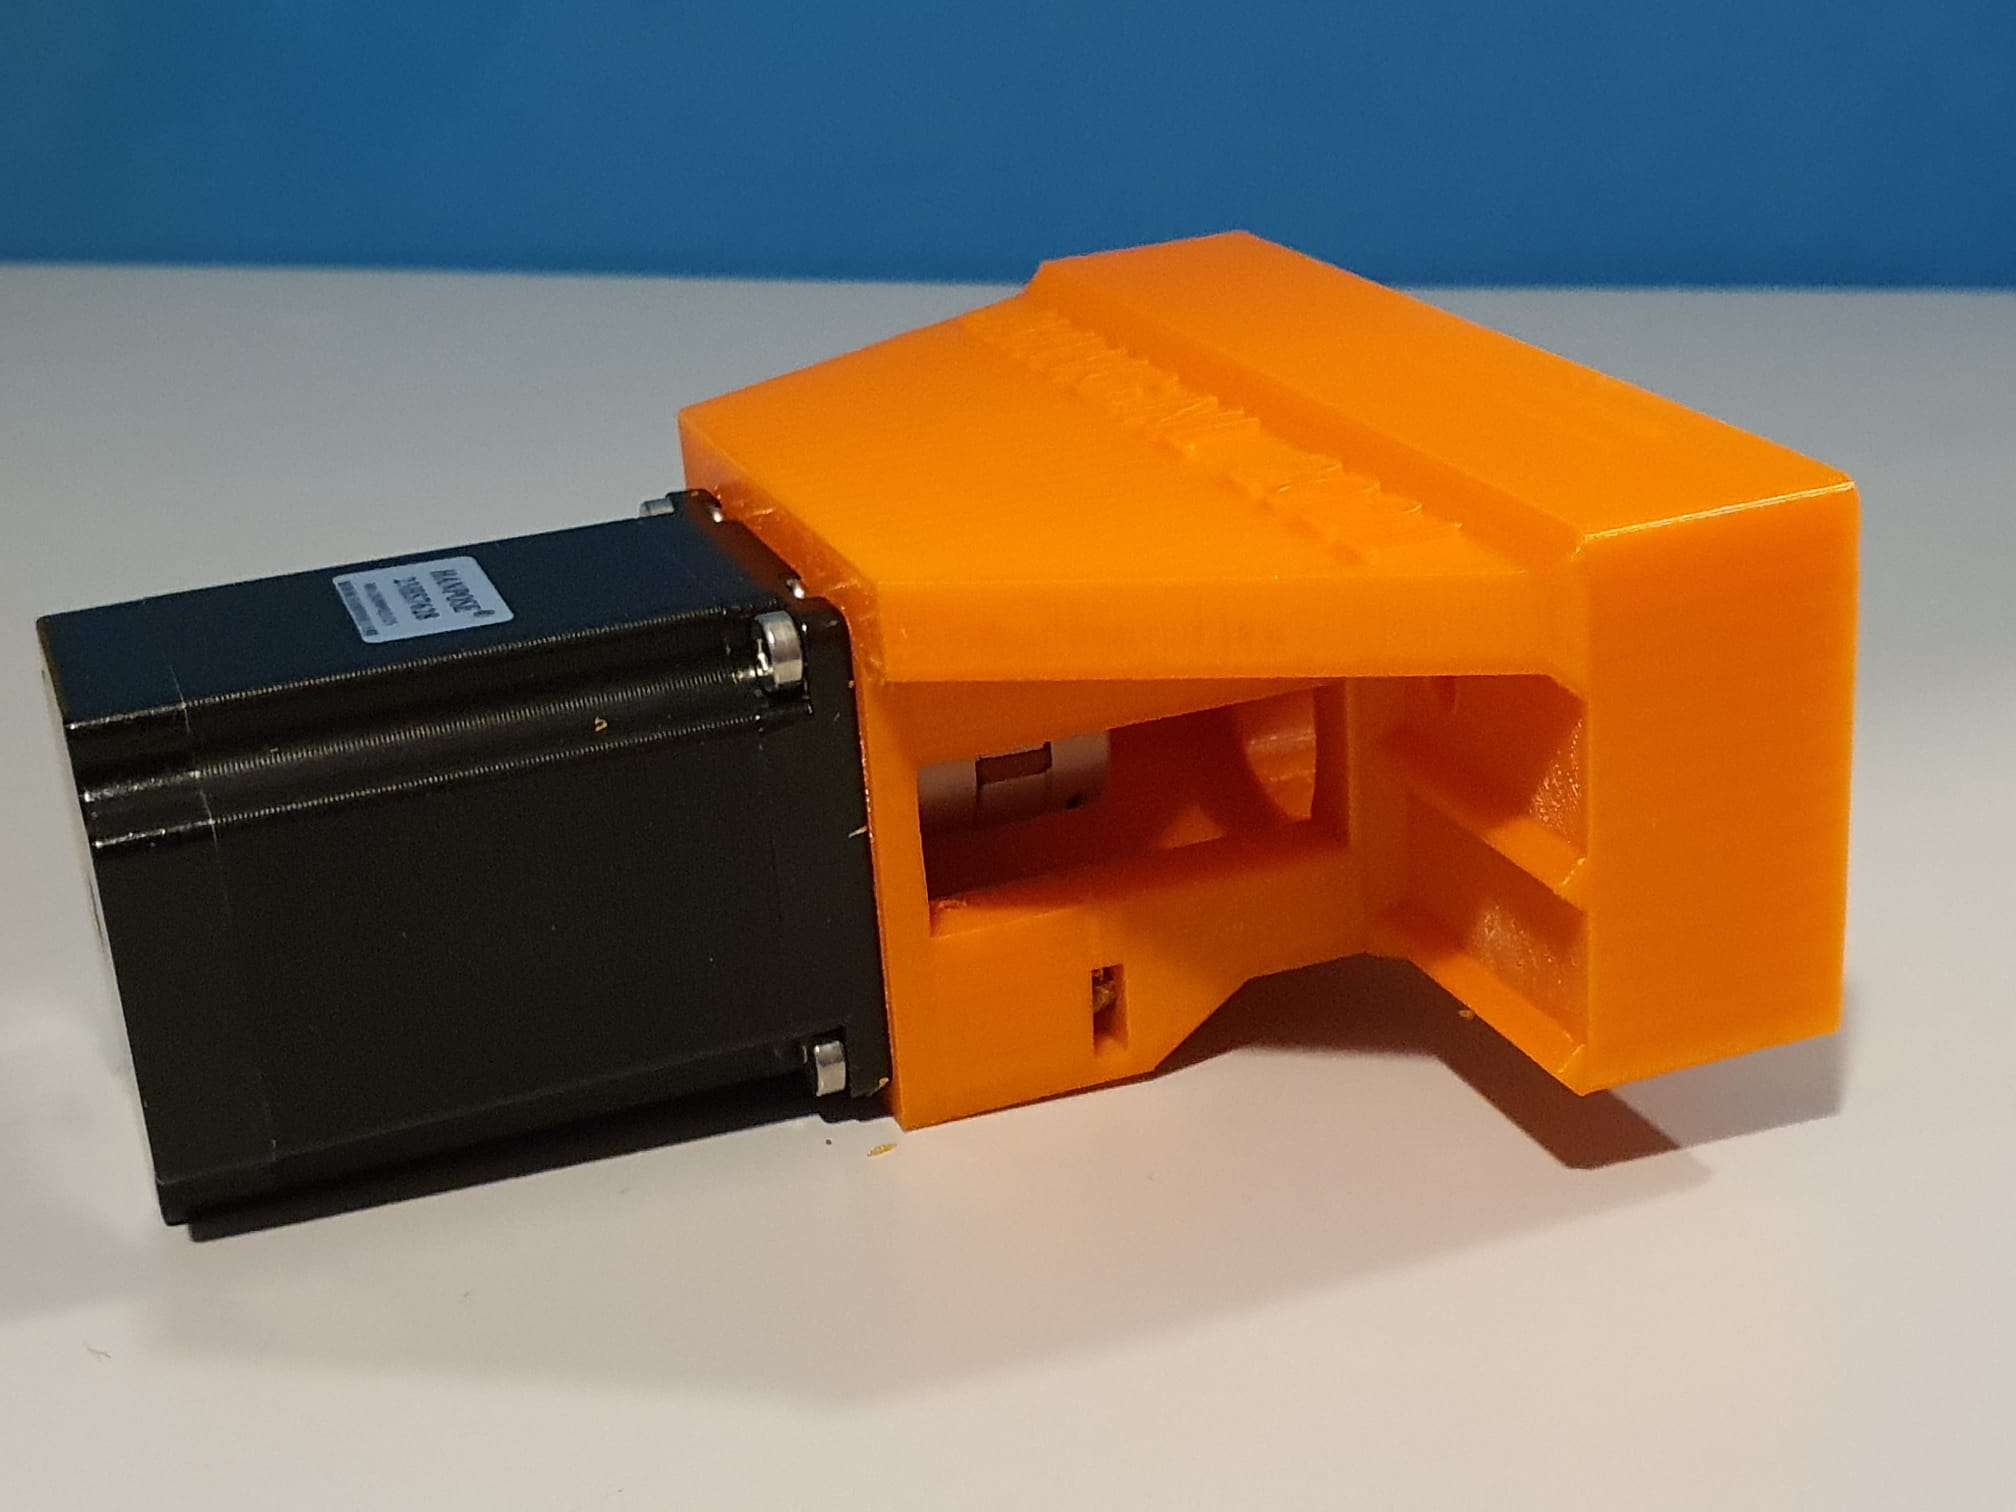
Dit is het derde deel dat ik maak, voor de Z-as.
Dit onderdeel is vrij eenvoudig: Eerst moet de adapter goed passen op de bovenkant van de Z-kolom, en de gaten voor de 4 bouten moeten precies goed zijn. Hetzelfde geldt voor het gat van de geleidingsschroef van de lagerhouder.
Daarbovenop wordt de Nema23 houder/montage geprojecteerd. Inclusief alle benodigde boutgaten, moergaten en een zijgat voor het aandraaien van de koppeling.
De lead schroef heeft een buitendeel voor het handwiel dat we gaan gebruiken voor CNC dat 10mm is, en wat schroefdraad 10mm voor Z. De schroefdraad is nodig om de hoeklagers (niet bedoeld voor zijdelingse torsie) met wat torsie aan de lagerhouder te kunnen vastschroeven.
Als je directe aandrijving doet, heb je een speciaal koppelstuk nodig dat in 2 kan worden gesplitst. Dan monteer je eerst één deel op de loodspil met wat ringen tussen de molen en het koppelstuk zodat de moer in het koppelstuk kan worden geplaatst. Als de schroefdraad te lang is, slijp je er wat af.
Plaats vervolgens het rubber (met middengat) terug in het gemonteerde deel van de koppeling en duw het andere deel in het rubber, zodat de koppeling compleet is.
Monteer vervolgens de geprinte adapter met reeds gemonteerde Nema23 motor op de Y-as en duw de Nema as in de koppeling. Gebruik het rechter werkvenster van de adapter om het koppelstuk op de Nema-as aan te draaien en klaar is kees!
Mocht je ook een handwiel willen hebben dan kan dat, maar dan moet je een stepper kopen met een as die zowel aan de voor- als aan de achterzijde zit (dit heet ‘dubbele as’ maar is eigenlijk een langere as, uiteraard).


 En een verbeterd toplager voor de Z-aandrijvingsas
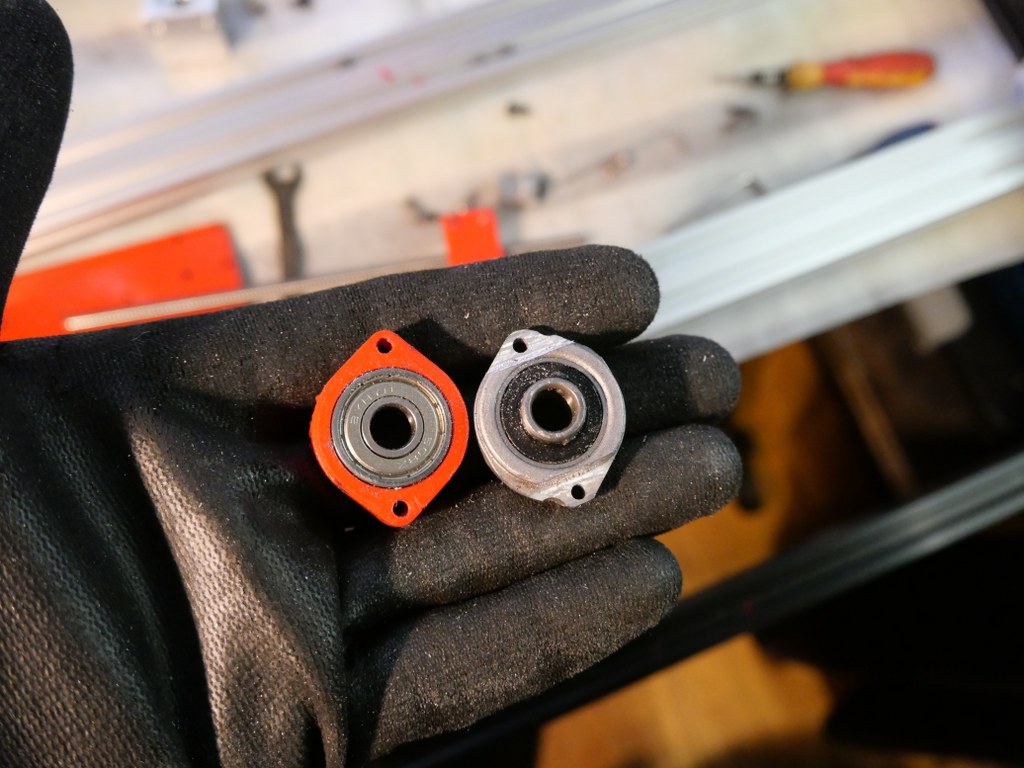


 Dit is in eerste instantie gedaan met slimme dubbele homing van de dubbele Y assen, en geeft me veel meer controle over de machine. Het is ook al mogelijk om gewoon op GRBL gebaseerde Gcode naar de USB poort van de machine te sturen, en het reprap FLY board gewoon als gcode-interpreter te gebruiken om de machine te besturen. Maar voor nu gebruik ik de webinterface. UIteindelijk ben ik overgestapt naar het gebruik van eindstops op alle assen, vanwege de bump in omschakelen van stealthchop naar XX met de Mellow TMC2209 drivers. Dit is een vervelend bij-effect van sensorless homing.