FLY 407 Motherboard RRF3+ wifi + BTT 2.4 inch TFT + multi-extruder

2021-05-11

I got the Mellow Fly 407 board in today, and it now works awesome!

I hooked the Mellow dedicated wifi unit to EXP 1 and EXP2 and to the serial TFT connection, programmed the microSDcard offline on the PC with the files from the proposed Github site and it all went great!  (The little added user manual is very good, just follow the directions and it can’t go wrong!)

Burnt the board’s firmware first, then the firmware of the wifi esp module and after setting up the wifi with YAT via USB, I programmed the wifi settings.  Then, with the Duet’s WDC PC-remote console via wifi, I uploaded the FLY 407 motherboard with all the latest available firmware: RRF3.4 beta and the latest wifi- and DWC versions.

Then, I removed the serial connection between the TFT connection on the motherboard and the wifi module and plugged in the BTT 2.4 inch TFT at the same serial port.  Since there is only 1 tft port available, I use the same serial port as I used for programming the esp wifi module.  I already put the RRF3 firmware on the TFT unit.

Well, the results are awesome! On the TFT after connecting you see the extruder step from 0 to 1-2-3-4 and back to 0 so this all works very nice!

I must be honest here: I also tried the Mellow 7 inch screen but this is not yet really working as well to me as the little BTT screen IMHO.  The Fly screen is a lot bigger, though, and the Fly 7 inch TFT has great potential.  I know that it will also take some getting used to the FLY’s TFT screen layouts.  The access to the macro and gcode directory is nice, but since everything is placed differently than the PanelDue screens, it might just take some time to appreciate it more.

Reprap CNC with Mellow FLY-CDY-V2 – Duet2wifi clone

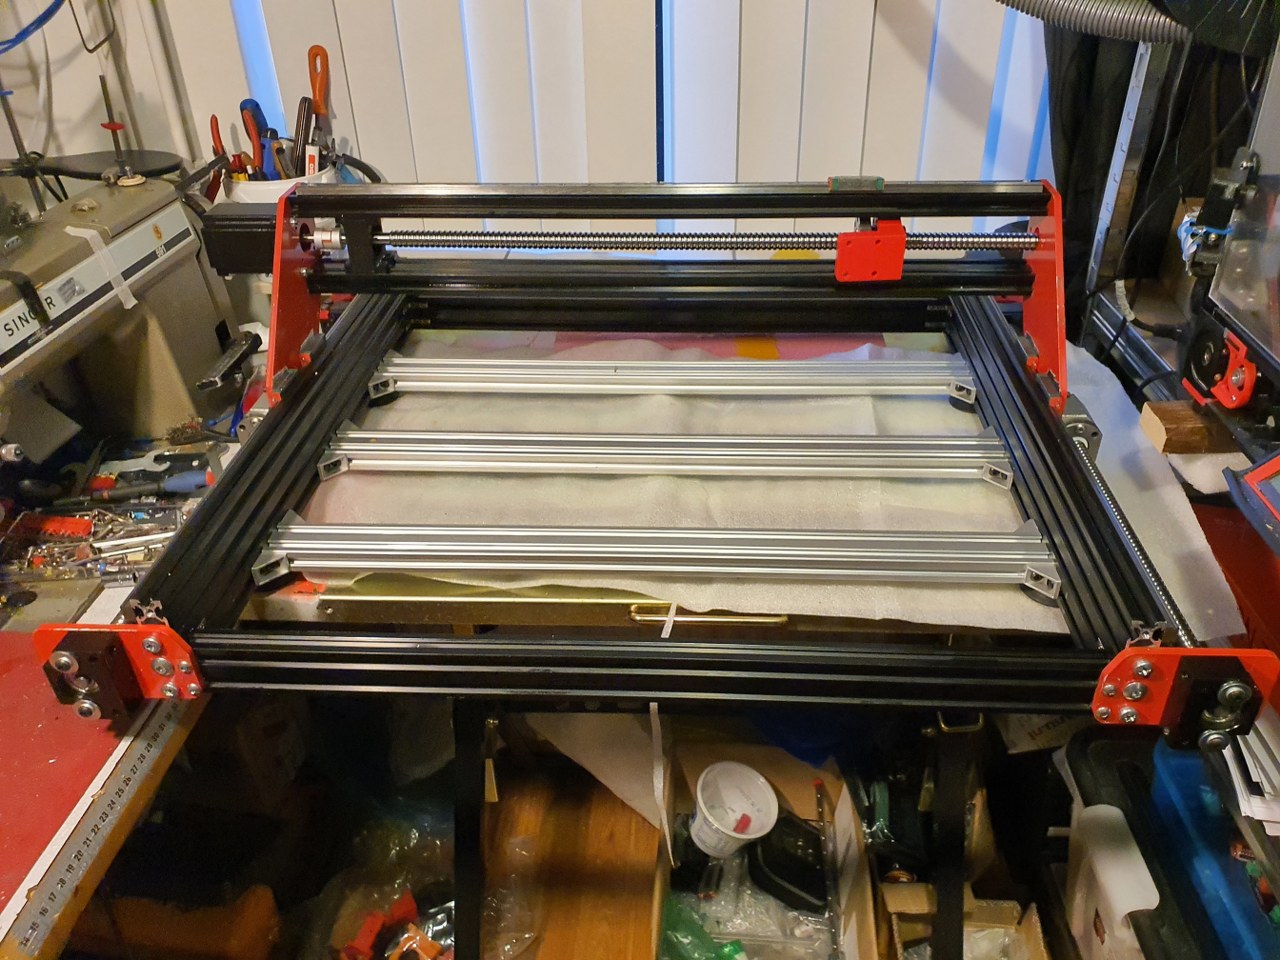
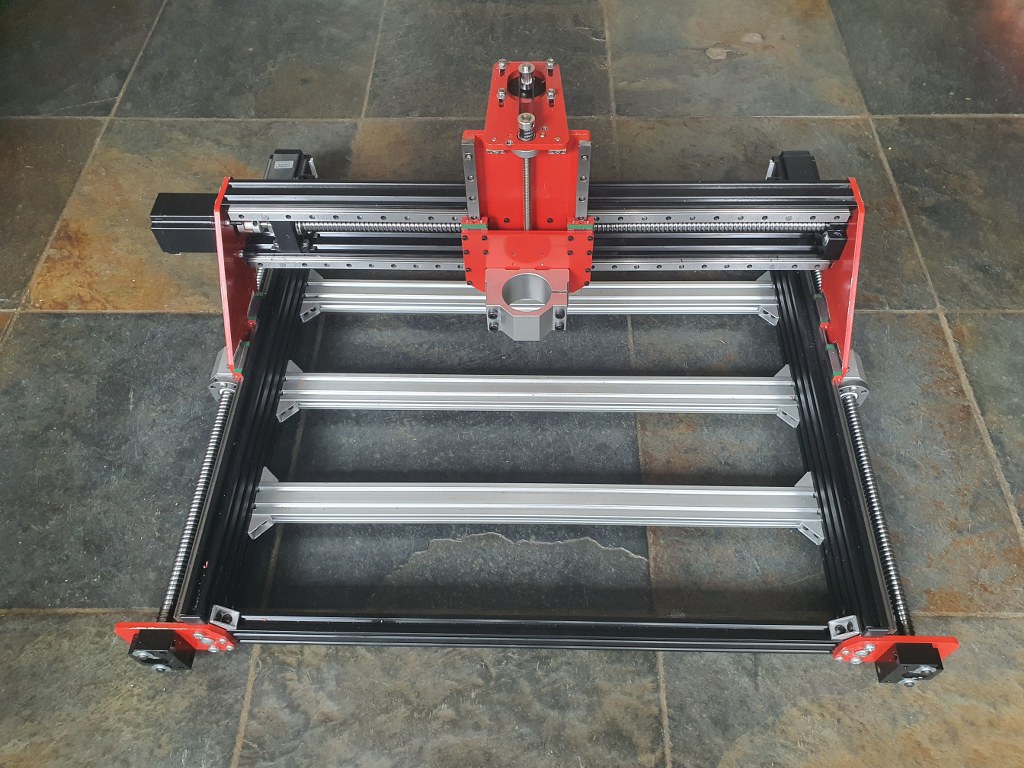
To get the Indymill running, at first I chose to use the Duet2wifi and reprap3 as base. 

Since I am very familiar with Reprap and with the Duet, I want to try this anyway. 

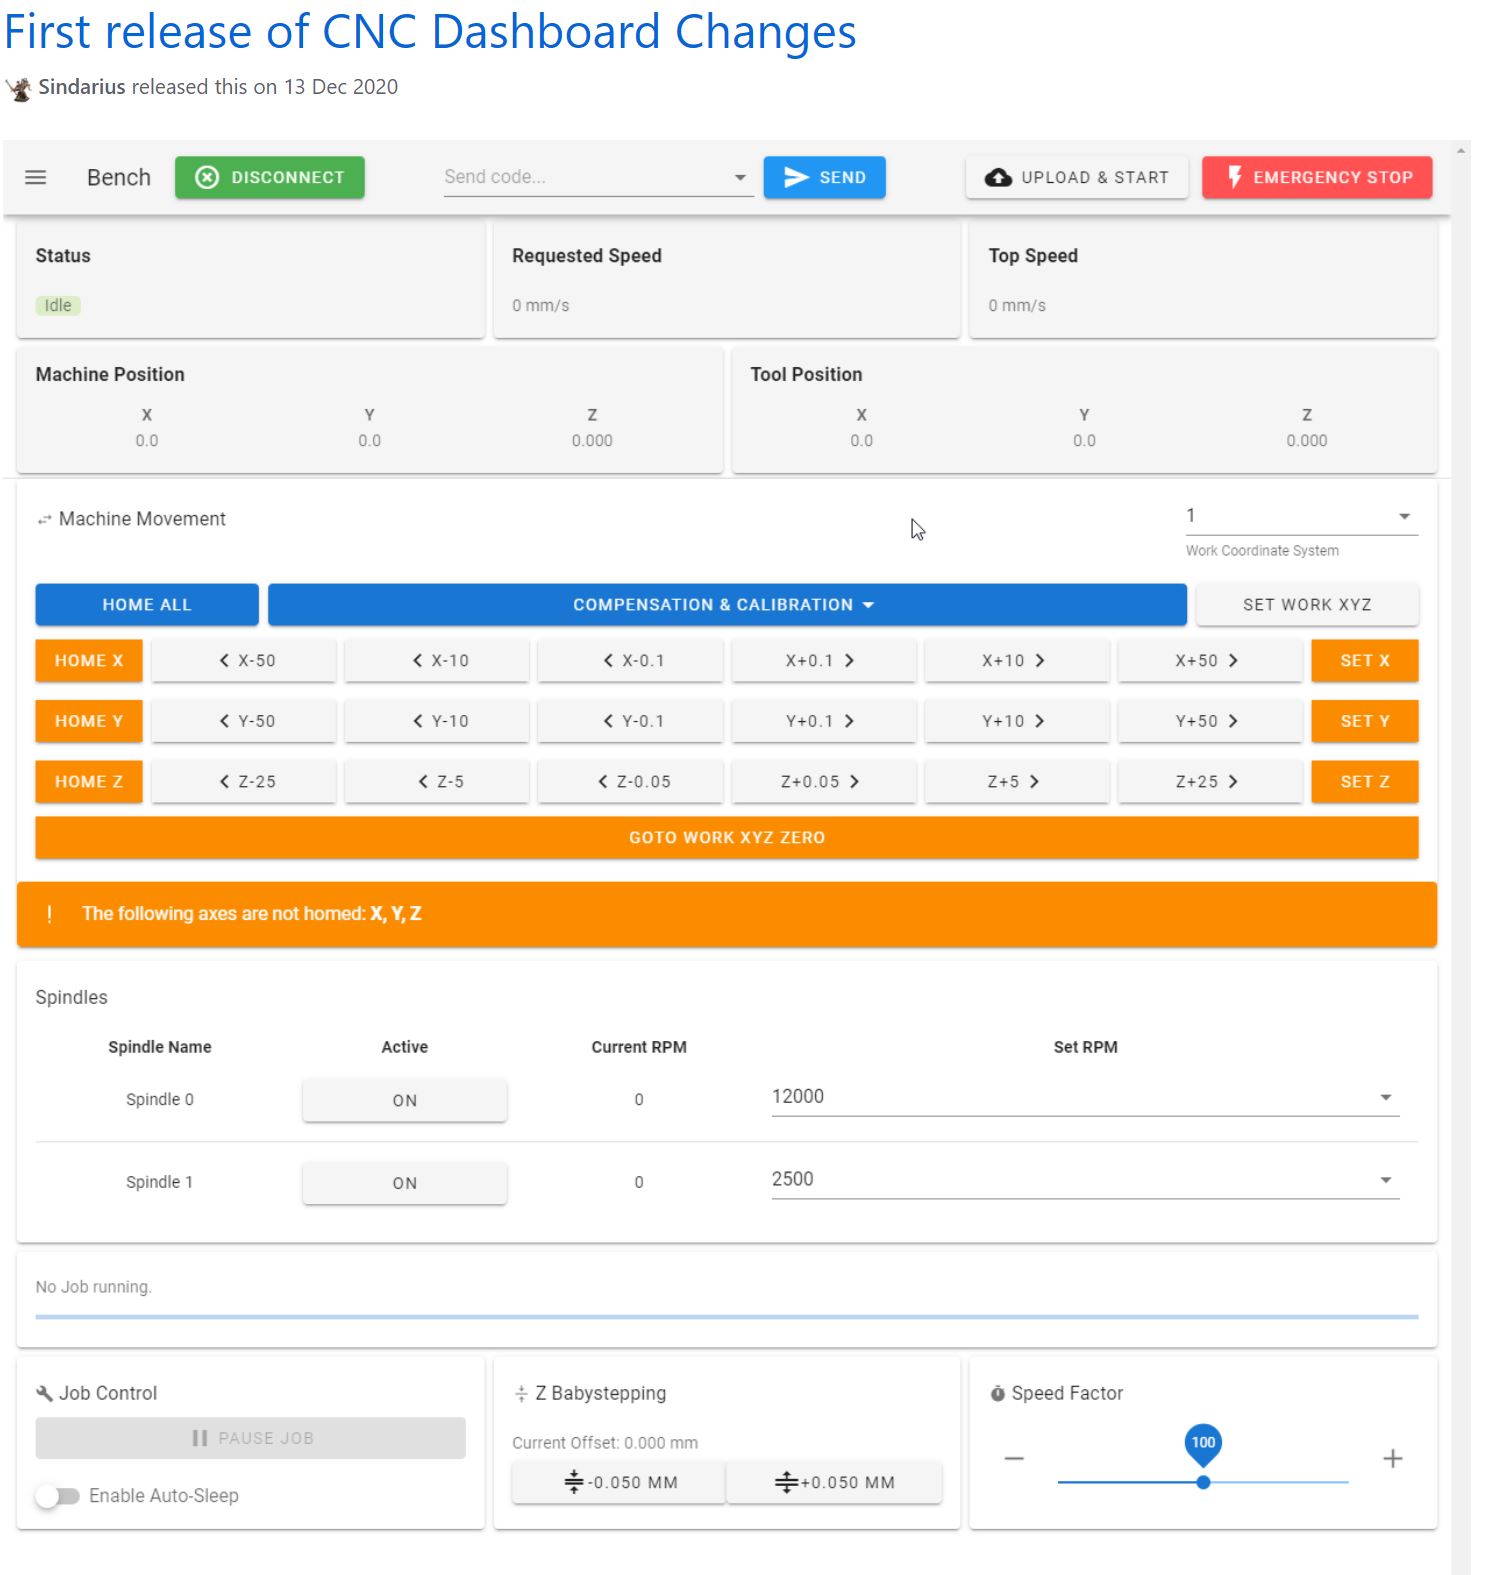
In the end, if it is all installed I need to have software to design and get a file with Gcode and this will be sent to the Duet2wifi controller via wifi, using the Duet’s webinterface that is been developed  for CNC in Beta (DWC for CNC). 

I currently use Openscad for designing, export as .STL and then make a .nc file for the CNC machine from this with Estlcam. 

In Estlcam you can make the machine-specific settings like where the center is, how to set Z=0 et cetera.

The Duet2wifi is my favourite solution because I can if so desired use sensorless homing on any axis.  And- because I need to home 2 independant Y axis and I have a lot of experience in making this work I first went for this solution. For my settings with sensorless homing please see THIS POST 

When you get a good enclosure for the Duet2wifi, use 24 Volt PSU and good driver cooling blocks, you can push the Amps to over 2 Amp continuously.  Works well with my Nema23 steppers.  2.5 Amps is max but we don’t want that,  I found that 1.8 Amps works very well and creates enough torque for the Indymill.  

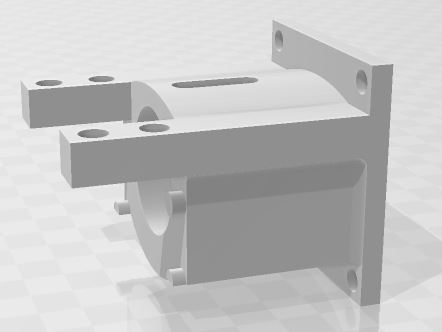
After having the Indymill work with sensorless homing I rebuilt all to be used with endstops instead for better stability and compatibility with my other driver board setups.  I do want to use the Indymill with several driver setups, and for this setup to be exchangeable, I need the endstops anyhow.  


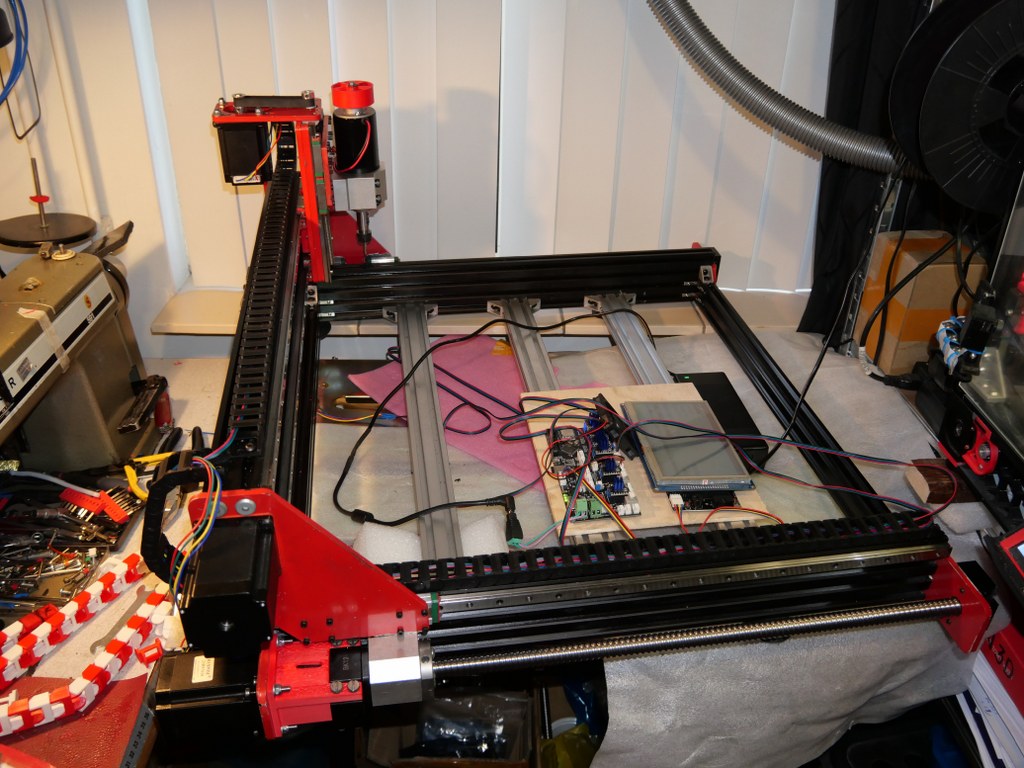
I am currently using reprap boards from Mellow, since they use the raprap firmware that is ported to the STM core that the Mellow boards use.

On top of this, on the esp you can  mount the Duet’s DWC software and thus also the DWC CNC software. 

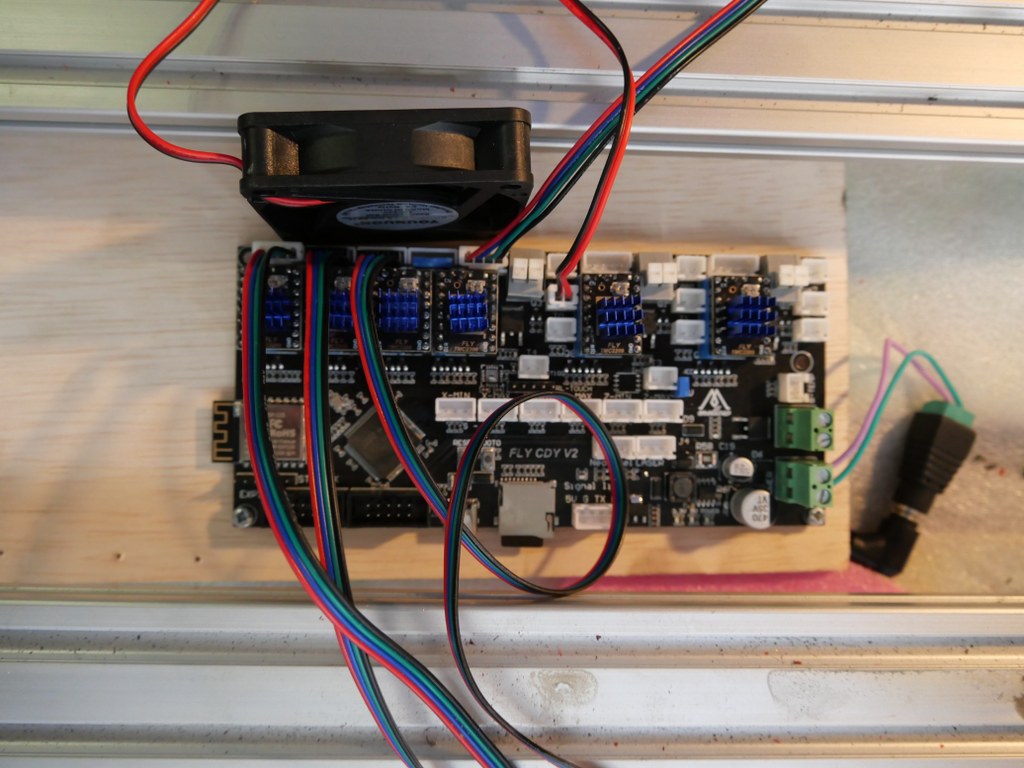
I have this currently running on the Indymill with a FLY-CDY V2 board and TMC2209 drivers. 

The nice thing about these Chinese boards is, that you can mount any driver you like, and this means that external drivers is also possible.

So, also the external add-on drivers that do closed loop control can be used.  < I was thinking to make this my additional project: Try to do sensorless homing on the Y axes with this, use very low power and switch off the Closed loop during homing.. If I can get this to work, you will read all about it!>

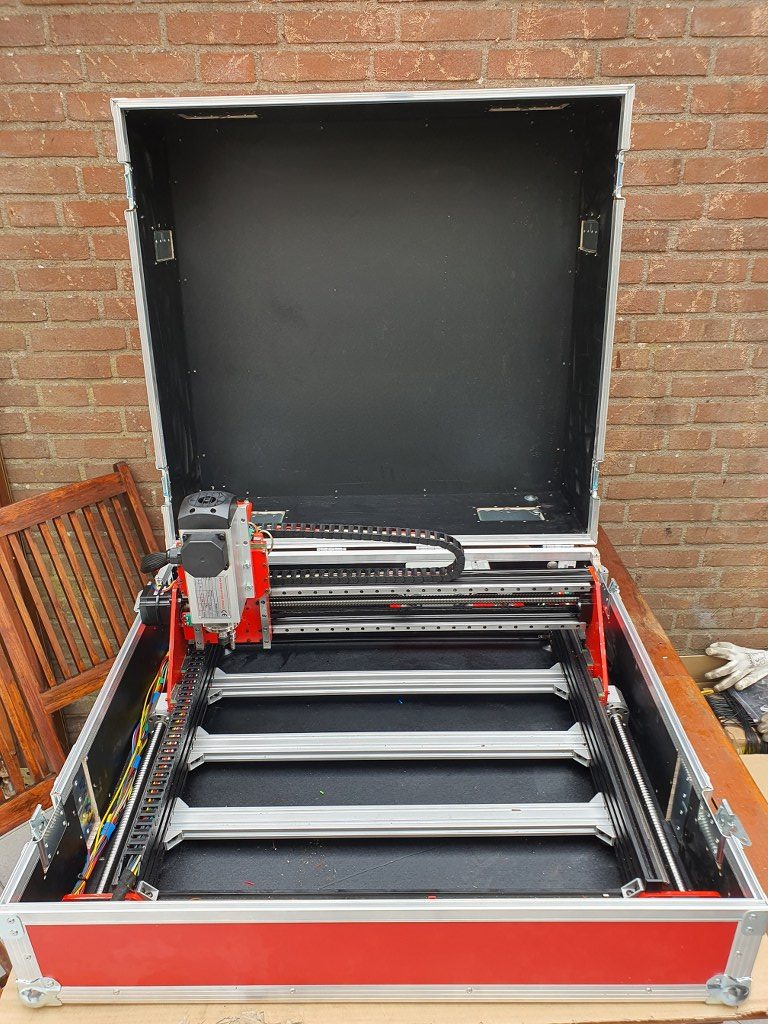
For the Duet, a setup is available on the Duet website to use an original pendant handwheel unit and add an arduino Pro micro to make a serial interface for connecting to the Duet!  That is a very welcome addition.  See this post!

In the next part of this post my current config file with endstops for Duet/reprap/FLY is shown, as this is operaional for the Indymill.

BE AWARE to use the most current DEVELOPMENT firmware versions for a) the board’s initial firmware, b) the DWC firmware and c) the wifi esp program!

; Configuration file for Board: fly_cdyv2 (STMWiFi)
; Firmware: RepRapFirmware for STM32F4 based Boards 3.3beta1_3 (2021-03-08)
; Duet WiFi Server Version: 1.25-01S-D
; DWC from Sidarius, specificlly redesigned for use with CNC 3-axis
; customized by Jan Griffioen sales@jmwg.nl 2021 04 08
; Made for a CNC Cartesian printer with single X,double Y and single Z steppers and a single spindle with external driver.

; General preferences —————————————————————————————————————-
M453 ; CNC Mode
G90 ; send absolute coordinates
M83 ; and relative extruder moves
M550 PDUET_CNC ; set printer name
M551 Preprap ; Machine password
M552 S1 ; WIFI ON

; Network —————————————————————————————————————————-
M586 P0 S1 ; enable HTTP
M586 P1 S0 ; disable FTP
M586 P2 S0 ; disable Telnet
M552 P0.0.0.0 ; IP address (0.0.0.0 = use DHCP)
M554 P192.168.178.1 ; Gateway
M553 P255.255.255.0 ; Netmask
M555 P2 ; Set output to look like Marlin
M575 P1 S1 B57600 ; comms settings S1 for Original PanelDue and Fysetc 7 inch TFT =OK

; Drives —————————————————————————————————————————-
M569 P0 S1 D2 ; physical drive 0 goes forwards using default driver timings
M569 P1 S1 D2 ; physical drive 1 goes forwards using default driver timings
M569 P2 S1 D2 ; physical drive 2 goes forwards using default driver timings
M569 P3 S1 D2 ; physical drive 3 goes forwards using default driver timings
M584 X0 Y1:2 Z3 ; set drive mapping
M350 X16 Y16:16 Z16 I1 ; configure microstepping with interpolation
M92 X640 Y640:640 Z1600 ; set steps per mm
M566 X500 Y500 Z300 ; Set maximum instantaneous speed changes (mm/min)
M203 X2700 Y1400 Z1000 ; Set maximum speeds (mm/min)
M201 X300 Y300 Z150 ; Set accelerations (mm/s^2)
M906 X1800 Y1800 Z1800 I30 ; set motor currents (mA) and motor idle factor in per cent
M84 S100 ; Set idle timeout

; Axis Limits ————————————————————————————————————————-
M208 X0 Y0 Z0 S1 ; set axis minima
M208 X500 Y480 Z100 S0 ; set axis maxima

; Endstops —————————————————————————————————————————-
M574 X1 S1 P”^xmin” ; configure active-high endstop for low end = LEFT on X via pin xmin
M574 Y1 S1 P”^ymin+^ymax” ; configure active-high endstop for low end = REAR on Y1 and Y2 via pin ymin and ymax
M574 Z2 S1 P”^zmax” ; configure active-high endstop for high end = TOP on Z via pin zmax

; Z-Probe ——————————————————————————————————————————
; a probe must be defined here to have a Z=0 DATUM, including the offset (when there is any, If you use the tip of the tool no offset is required. OR, use manual Z-datum setting via a dedicated macro!

; Mesh G29 —————————————————————————————————————-
;M557 X15:215 Y15:195 S20 ; define mesh grid to be called upon by G29 for an authentic Mesh bed levelling IF this is required and possible

; Fans ———————————————————————————————————————————–
M950 F0 C”fan0″ Q500 ; create fan 0 on pin fan0 and set its frequency
M106 P0 S0.5 H-1 ; set fan 0 value. Thermostatic control is turned off

; Tool definition section; —————————————————————————————————————-

M950 R0 C”!e2heat” L25000 ; Create spindle index 0, with PWM pin on heater 2 output and 25000 RPM achieved at full PWM. At this port, add a PWM-> Voltage 1-10V converter!
M563 P1 S”Spindle 1″ R0 ; Create tool 1 with spindle 0 and call it “Spindle 1”

; Miscellaneous —————————————————————————————————————————-
M140 H-1 ; Disable heated bed
M564 S1 H1 ; Disable jog commands when not homed
M98 P”customconfig.g” ; Execute custom config settings

; Epilogue ———————————————————————————————————————————
;M556 S78 X0 Y0 Z0 ; Axis compensation here if needed
;m98 P/sys/leds_show.g ; Neopixels show (max number is 60)
;m98 P/sys/leds_off.g ; Neopixels OFF (max number is 60)
T0 : select first Tool
M501 ; execute config_override.g

Indymill increased working space and stability Y-axis

2021 05 13: Yesterday I received the iron plates for my Indymill from Nikodem Bartnik, and it was all very well packed and quickly delivered!

As I always do on any build, I first check the separated axis for best fit and possible improvements. I started with the Y-axis.  In the below picture, the left side of the macine is shown, being the left Y-axis.  The rest of the machine is not yet attached.

This is how I started with the original design. Ball bearing block (orange) and screw mount (red) are both 3dprinted here.

The Y-axis is somewhat limited in its drive towards the rear of the Indymill CNC machine, due to the bridge plate for the X-axis.  This bridge plate is blocked in its movement towards the rear because it hits the bearing block (orange part) that holds the ballscrew in place. By removing a small and unused part of the bridge plate, the movement can get about 6 cm extended towards the rear.  The pictures are attached to this post, please see how I made this.

Maximum movement towards the rear (top in the picture) due to a removed piece of the bridge plate

I used the plasma cutter to cut the parts out of the 6mm steel plates and after this was done, I used the lamel grinder to make it smooth.  Although I used a guiding rail for cutting, the power was apparantly a bit too much so it is not a very beautiful cut… -)  No worries because all still fits very well.

BK12 original axial bearing (black) for 1605 ballscrew and -nut (red) with Nema23 holder (orange) with an attachment for the original BK12 bearing, both placed on the left Y- axis of the IndyMill CNC

An original nut holder for a 1605 ball screw nut, machined down on my manual mill to fit the Indymill’s Y-axes

The nut holder in place on the left Y axis

Plasma cutter router DIY ‘the simple way’

I am in the process of developing a router for my plasma cutter, since the cutter works very good but it will be way more effective once I can machine my designs with a router for this cutter.

Example of a very big X-Y design for a Plasma Router on Aliexpress

My design differs from others because i will use only existing affordable parts that require no additional machining.

Firstly, you would need a cutting table with a maze where you can put your steel on, when cutting.  This maze will be enclosed with a steel box so no cutting debree will be thrown around.  Around the box a set of aluminium or steel profiles will be mounted on which the wheels for the X or Y axis will be built. From here on, a normal router setup can be made.

The plasma head will need to be adjustable in height but does not neccessarily need to be CNC movable.  Just a manual knob to move it up and down a little will do.

So, only 2 axis are to be made with CNC.

For the Y axis I will use a complete accessory from AliExpress with ball bearing 1604 and an effective way of 600mm, including  a Nema23 stepper motor.

Y-axis 1204 ball bearing screw drive, NEMA23 stepper motor and dual linear rails.  This will move the plasma head left and right.  I might use something a bit simpler that this…

HPV8-2
X-axis on both sides of the box that will move simultaneously forward/backward with steppers mounted in series, the Y axis will be mounted in between.

The plasma cutter ‘head’ will get a fixed (but a bit vertical movable) mount on the mounting plate of the Y-axis.

Magnetic Breakaway CNC Plasma Torch Holder
Magnetic break-away torch mount

And the mount for the head of the plasma cutter

The electronics will be added at the front of the Y-axis in a 3d-printable box. (or you can buy a ready-made box HERE).

Electronics will be an Arduino UNO with standard GRBL shield, or THIS as a better all-in one solution, including local router managing.  At the beginning and end of each axis, a limit switch will be mounted.  Switches, cabling and mounts are available on Aliexpress  HERE and HERE.

Firmware for the Arduino comes from the widely available GitHub and the GRBL community.  GRBL software is available for Windows PC and MAC as well.  Designing can be done in any way, and the most simple way will be the online Cad solutions like Tinkercad .

Kid's Privacy Safe Harbor - BBB CARU

The power supply for the Plasmarouter will be a 24 Vols 8 Amps portable power supply like THIS one.

Indymill iron hardware treatment

The required iron plates were not available in ready- to use state at the time I needed this, fortunately I could buy the plates as a kit with all of the drilled holes already in it, non-painted.  And- all of the thread tapping still needed to be done.   Since I am also making changes to the design of the millling machine,  some holes will be altered and this is best done when the plates are not yet painted.

The raw streel for the Indymill.  I put small colored circles  where the thread needs to be tapped.

Rustpreventing primer spray-painted the Indymill’s iron plates


Milling the Indymill parts

My very basic mill is just an old drill machine with a large X-Y cross table mounted underneath. But- for basic milling it works.

In the process of change: My HBM25 lathe is going to be changed (temporarily) to act as mill. I need some parts milled flat and square, this will do that. Waiting for the MK4 sleeve for my MK3 milling head…

All mounted to the lathe

Indymill adapted frame and -Y-axes build instructions

In this post, you can see how I changed the original Indymill to more rigidity by using the original 1605 aluminium nut holders for the 1605 ball bearing screws of the Y axis, and how I made use of the BK12 and BF12 ball bearing blocks instead of the 3d printed parts like in the original build.

Yesterday 2021 05 22 I cut the aluminium profiles that are required for the frame of the Indymill.  My metalsaw is set at the perfect 90 degrees angle that you need for these aluminium extrusions

Today I put the frame parts together, based on the changes that I made to the ball screw holder block and to the screw bearings and -holders. And- overnight I spraypainted all metal parts red.  Used just what was lying around.

Left side, left is the Nema23 motor, and the BK12 bearing block is now connected to the engine plate with an ABS sideways printed connecting piece. ( I found the PETG printed parts I made earlier to break on the sleeve at the left when applying force, so I went for ABS and I printed it as you see here with supports to give strenghth for the bolts and nuts.) To the right, the aluminium nut holder is placed. This has been milled down and new screw holes were made in the holder and plate to connect it to the plate (see the text later in this post)

same treatment on the right hand side

Overview of the RH side with the end bearing and -block, connected to the front plate bearing holder. I milled additional holes in the bearing blocks (front L&R) to (re-) use the tapped M5 holes that are already in the red connecting plate

When building the frame, make sure that you do not initially screw anything tight.  Follow the steps that apply to any build:

  1. Make the footprint square by measuring either with a good 90 degrees angled measuring hook OR measure the diagonals against each other and make them alike.  Then, tighten all corner screws .
  2. Re-measure the footprint’s left against right length and also front/rear length. If there is any difference here,  a) take everything apart and b) make sure you have equal sizes for your build where this is required.  OR, if you have a non-standard build, make sure you build according to specs sizes. The, do 1. again.
  3. For a lineair rail: use a ruler that is specifically made for your type of rail  You can 3d print one or buy two aluminium ones.  ALWAYS use at least 2 rulers!  With the rulers in place at 20% from left and 20% from the right,  after you have installed the rail loosely with the screw in the nuts, tighten the screw a bit but not too stiff..  We will get back to these screws at a later stage.
  4. Put the connecting piece on the motor’s axle (8mm side) and tighten this well.  Preferably, use some loctite on the axle but don’t overdo it.  Be aware that you need to testfit the BK12 first.  make sure that the connecting piece almost touches the BK12’s nut!
  5. Put the stepper motor and the BK12 connector together, using the 3d printed thin NEMA23 adapter plate between motor and steel plate. Do not yet tighten this too much.
  6. Make an original aluminium 1605 nut holder block shorter to fit exactly.  See the picture.
  7. Fit the aluminium nut holder block including the entire assembly of the 600 mm long 1605 ball bearing screw on the machine, and superglue the block in the correct position.  Let it dry so it won/t come off. Demount verything except the steel sideplate and the glued aluminium nut holder.
  8. clamp the nut holder to the steel plate with a grip vice, just to make sure it all keeps together.
  9. Drill 3 new 4mm holes through the steel plate’s lower part ,  drill through the aluminium block as far as possible.  2 holes on the lower side and 1 just between 2 of the top 3 holes,  NOT where the existing hole of the aluminium nut holder block exists.
  10. Get the nut holder block loose, if it has not already come off.
  11. Tap M5 in the holes of the nut holder block.  You will have come through the big center hole (for the nut) with 2 holes, make sure this gets cleaned up on the inside.
  12. Drill the new holes in the sideplates with 5.5 mm drill (to give you mounting clearance)
  13. Place the sideplate on the 2 bearing blocks of the linear rail with 4 outer M3 x8 (or x10) screws.
  14. Put everything loosely together
  15. Mill an end baring block to fit the 1605 ‘s screw end at the front an mount this at the exact center of the small front plate.
  16. Now, connect your nema 23 engine to a motor steering device so you can test the setup.  First, turn the screw by hand and it should run smooth.
  17. Since you want to have an even height of the side plates, do not alter these unless it needs to be done on both sides equally.
  18. Your fixation point is the only non-movable position, at the rear of the frame.
  19. Move the carriage to the rear and now, see if you have slack on the M3 screws of the slide bearings AND on of the 3x M5 screw the rear of the aluminium nut holder. If so, first tighten the M3 screws.  Then tighten the M5 screws.  If not, loosen ALL of the linear rails screws ans move the rail a little. If this is possible, tighten the M3 screws of the linear rail’s bearing blocks.  Then, try to get as much clearance on the linear rail’s movement up/down as you can and tighten the 3x M5 screws of the nut holder block.
  20. Now, tighten 1 screw only of the linear rail, at the position above the nut holder.
  21. Move the carriage entirely forward position.
  22. Tighten the linear rail’s M3 screw that is exactly in position above the nut holder (of the ball bearing screw)
  23. Now, tighten all screws of the linear rail.
  24. You’re done!
  25. Check the other side and if the linear rail’s height differs from the other side,  the only thing to do is to start over again, where your slack is in the 5.5 mm holes of the steel plate’s screw holes for the  nut block.  If you play with this, and then adjust the linear rail’s height, you can get it all even.  At least’eventually I got mine right but it took some time.  Have fun!

Things to bear in mind: You don’t want anything out of parallel like a linear rail that is uneven to the aluminium profile on which it is mounted or a ball bearing screw that gets under tension.  There is also another way to see what is happening while you are tweaking the hardware/frame: take the front bearing off and see what happens to the end of your ball bearing screw in the hole up front when you move the carriage.  It can tell you much about what is happening…  It should always stay perfectly centered but I’ve seen it up, down and all other directions.. -)

After making the base frame and the Y axes, the rest is more simple. Just get the 2040 pieces in place, I started with only the lower one. The put all in like the rails, the ball bearin screw bearings, the ball bearing screw, coupler between screw an motor, the stepper motor and the X axis is done.

After the X axis, the Z axis is placed in. First put the rear plate on the 4 linear rail sliders and mount the ball crew block of the X axis to the rear. Then, put the vertical short MGN12 rails on the rear Z plate. Then put the bearing for the leadscrew on the top plate’s undernetah.  Put the corner pieces on the top plate and mount it on top of the rear Z plate. Then, feed the threaded rod through the top bearing, mount the angine an d teethed wheels and feed the screw through the nut…  Are you still with me?

Top view to get it more visble: engine and leadscrew connected with teethed belt

I decided to put 3 connecting pieces between the frame’s left and right Y axes to maintain stability and rigidity. After I put these in, the frame was very square and stabele, but also heavier..)


Last time that you see the frame without any wire. Next I will get the endswitches on the farme, the spindle and all other parts that are required to get my Indymill up and running! BTW I mounted 4 heavy purpose rubber feet under the frame, just to prevent having any tordoial stress to the frame when I put the frame anywhere to be used.

And- I must say, this build goes quite well. The materials are OK, and the guideline from the build description was very good. Although I never use it anymore.  The build is quite self-explanatory once you start building the Indymill CNC machine.  I also cahnged quite some parts, and made alterations where I felt this would improve the machine to fit my purpose better.


Indymill adapted X-axis for more rigidity

2021-05-22

On top you see the X-axis, still without mounted linear rails but the 1605 screw is loosely mounted. The red connecting piece for the Z-axis is on the ball bearing nut. the black part on the left between the 2 lengths of 2040 aluminium extrusions is the (anti-) push/pull bearing block that holds an axial (up/down/left/right) and a radial (left/right) bearing but can not withstand any real big lateral force (L-R)

Under construction-still trying to find out how to do this.

I intend to use the same method as with the Y-axes so drop the 3d printed parts as much as possible and re-use the available bearing blocks and nut holder.

For the red nut holder I only need to make a flat extension plate to connect the nut holder to the Z-plate.

For the end bearing block BF12 to the right, this is no problem. I can mount it easily on the sideplate’s outside.

The push/pull bearing block BK12 is more difficult to re-use,  I will try and find a small enough connection block that is 3d printable to shape the BK12 in, and still fits in between the 2 horizontal aluminium profiles that shape the X-axis. It will be very tight so I might have to make something myself, possibly I will just mount the BK12 on a in-between piece of  2040 and first I can mill a hole in the center of the 2040 piece so the end of the 1605 ball bearing screw can gain access to the BK12… Or something like this, will try and report how it goes later!

2021-5-24: Found a possible solution with an adaption of the same  Nema23 to BK12 housing as is used for the Y axis. I am printing this fast with PLA on the Ender pro, will cut off some flesh of the NEMA23 top and bottom flange and will then fit this between the 2 lengths of 2040 extrusions and see how it works!  The screw holes will have to be saved, but 4cm in the center will be removed, some 4 mm wide om both top and bottom.

Today I made the last solution fit the X axis and got all related components to fit the X-axis.  During this I found that the left bottom ball bearing slider cannot move along the BK12 block..  So, I machined some material from this block’s side bottom.  That doesn’t hurt but it does impact my planning a bit.  And- during the process I destroyed a piece of the PETG BK12 holder that connects the BK12 bearing block to the stepper motor and the in-between side plate.  I already directly printed a new ABS part to replace the PETG and wished I had started with ABS like I dit with the Y-axes.  But- look at the bright side: Now all 3d printed parts will be ABS red: like the steel plates!

You must know that I elaborated quite a lot on how to print the Neam to BK12 couplers and fount that it is not good to print these withh the face to the Nema23 motor DOWN.  Instead- I printed them flat, with the side that faces the stepper motor to any side but down or up.  This gives great strength to the 2 pieces that carry the mounting holes for the BK12 bearing so they won’t break during use.

And I found that ABS in my case (both ABS red and PETG vblack are Sunlu products)    works better for this build because the PEG breaks under strain and ABS flexes a little but does nor break..


Indymill CNC Nema23 with sensorless homing on Mellow Fly-CDY2

After configuring the reprap Mellow FLY-CDY-V2 motherboard for CNC including the webinterface and installing Mellow’s TMC2209 driver units I got  sensorless homing setup for the Indymill.

It took a lot of time to get it all tuned, as the 3 axes act entirely different due to their different inertia.  The weight that is carried is obviously higher for the Y- than for the X axis.  And the 4 kilogram weighing spindle engine made it pretty difficult to get the Z axis tuned.

The resulting config file is provided in this post.  Use this with caution, since every machine is different, and the used stepper motors, cabling, steppers and PSU all have influence on the CNC’s behaviour and thus on the config settings.

To have the original Mellow FLY TMC2209 drivers work with sensorless homing, set the underneath dip switch to ON

(Diag pin will then be connected).  It took me some time to find out that this is different than other TMC2209 drivers, where the Diag pin is activated by jumper settings on the motherboard.  No idea what happens when you use non-Fly TMC2209’s on the Fly board, but I expect this will not work for sensorless homing.

What I experience on the Y axis is that if you have real problems with homing or skipping steps, the steel Y carriage plates may bend and cause a non-square Y carriage that will never align any more.  I repaired this but preventing is better.

GO TO THE INDYMILL & Reprap Driver POST 

Since this setup with sensorless homing never gave me good speed ratings, I disassembled this setup and continued with endstop setup.  If you want to know how to setup sensorless homing with reprap, please look at my sensorless homing setup on my dual carriage 3d printer, where this works perfect!

Indymill CNC with GRBL Mega256 RAMPS1.4 shield and LCD

This is my test setup for a 1.4 RAMPS shield on top of an Arduino Mega with TMC2209 drivers, optical endstops and individually homing of dual Yaxes PLUS an LCD that shows the exact XYZ locations anytime.

Firstly, I must admit that this option was initially NOT on my list bacause I felt this was a pure hobby-like option.  BUT- as my requirements list grew and other options got less and less, I ordered a Ramps 1.6 shield and plugged one of my Mega2560 boards under it.  Then- the search began to get a working fork of GRBL for arduino that both accomodated the Mega 2560 and my requirements list.  On this list: GRBL, Squaring my gantry, LCD with useful data, Handwheel connection, Preconfigurable buttons on the handwheel (stop, define as zero, probe here, et cetera).  The fork that does this all is: GRBL-Mega-edge.  The last comment is of April, 2020 and the fork was updated last in 2019.  But- it works straight out of the box and the documentation is very well maintained. 

Since it works under the Arduino IDE and has its own library, I foresee little problems in the future.  Everything is freely configurable and it might even be possible to put an Arduino Due in place of the Mega2560 in this setup, with some tweaking of pins and speeds.    And- tweaking is required for the hardware as well. The Ramps boards were never designed for 24 Volts, so this needs to be taken care of.  One might of course use 12 Volts and use external driver modules, but I intend to keep everything very small and make use of an external PSU, and a small handwheel-like box for the Mega2560, Ramps, drivers, LCD, buttons and handwheel knob.  By the way: For getting my designs I already had from my 3d printer background towards the CNC I bought Estlcam (CAM program). This really does a great job at converting it to Gcode and sending it to my Grbl- Mega 2560/RAMPS setup.

Afterthoughts 2021-06-22:  When connecting Estlcam to the Mega2560 and RAMPS1.6 shield, Estlcam can program the RAMPS / Mega2560 configuration, including dual X and Y axis.  This works straight out of the box including endstops. Actually this is easier than first compiling GRBL on RAMPS with Arduino’s compiler.  BUT- it seems that autosquaring does either not work or I did not install Estlcam’s options correctly since the endstops on the dual axis appear to function in parallel instead of indicvidually per axle.

24 Volts connecting is not possible on a RAMPS shield just like that. I removed D1 and powered the Mega2560 with a 9 Volts PSU, and the shield seperately with 24 Volts.  For the Arduino DUE, dedicated RAMPS boards are already available (Smart ramps that compensates for the 3.3 volts in/out Voltage of the Arduino Due)!.

Another option for Estlcam is to program the Mega2560 without RAMPS shield and connect everything directly to the Mega2560 with jumpers.  If this is done, Estlcam will do the bare programming of the Mega and Estlcam can steer almost everything.  Since I bought a license for Estlcam I will, at a later stage, try this as well.  SEE THIS POST


error: Content is protected !!